We open ports on the router ourselves. How to connect to open ports? Advanced HTTP and TCP proxy configuration
By default in all Windows operating systems to connect using the protocol RDP ( Remote Desktop Protocol / Remote Desktop ) uses the port TCP 3389 .
If your computer is connected directly to the Internet (for example, a VDS server), or you have configured port 3389/RDP on your border router to the local network on a computer or server running Windows, you can change the standard RDP port 3389 to any other. By changing the RDP port number for connection, you can hide your RDP server from port scanners, reduce the likelihood of exploitation of RDP vulnerabilities (the latest critical vulnerability in RDP BlueKeep is described in), reduce the number of attempts to remotely guess passwords via RDP (does not forget periodically), SYN and others types of attacks (especially with ).
Replacing the standard RDP port can be used when behind a router with one white IP address there are several Windows computers to which you need to provide external RDP access. On each computer, you can configure a unique RDP port and configure port forwarding on the router to local computers (depending on the RDP port number, the session is redirected to one of the internal PCs).
When choosing a non-standard port number for RDP, note that it is advisable not to use port numbers in the range 1 to 1023 (known ports) and dynamic ports in the RPC range (49152 to 65535).
Let's try changing the port on which the Remote Desktop service listens for connections to 1350 . For this:
- Open the registry editor and go to the branch HKEY_LOCAL_MACHINE\System\CurrentControlSet\Control\Terminal Server\WinStations\RDP-Tcp;
- Find DWORD registry value named PortNumber. This parameter specifies the port on which the Remote Desktop service listens for connections;
- Change the value of this port. I changed the RDP port to 1350 in decimal value (Deciamal);
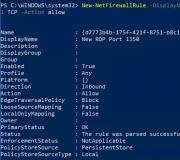
- If Windows Firewall is enabled on your computer, you must create a new rule to allow incoming connections to the new RDP port (if you reconfigure a remote server via RDP without creating a rule in the firewall, you will lose access to the server). You can create an allow incoming rule for a new TCP/UDP RDP port manually from the 'Windows Defender Firewall' console ( firewall.cpl) or using: New-NetFirewallRule -DisplayName "New RDP Port 1350" -Direction Inbound -LocalPort 1350 -Protocol TCP -Action allow AND: New-NetFirewallRule -DisplayName "New RDP Port 1350" -Direction Inbound -LocalPort 1350 -Protocol UDP -Action allow

- Restart your computer or restart the Remote Desktop Service with the command: net stop termservice & net start termservice

- Now, to connect to this Windows computer via RDP, in the mstsc.exe client you need to specify the RDP connection port via a colon as follows: Your_Computer_Name:1350 or by IP address 192.168.1.100:1350 or from the command line: mstsc.exe /v 192.168.1.100 :1350

If you use RDP connection manager to manage multiple RDP connections, the RDP port number you specify for the connection can be specified on the “Connection Settings” tab.

- As a result, you will successfully connect to the desktop of the remote computer using the new RDP port number (using the nenstat –na | Find “LIST” command, make sure that the RDP service is now listening on a different port).

The complete PowerShell script for changing the RDP port, creating a rule in the firewall and restarting the RDP service on the new port might look like this:
New-NetFirewallRule -DisplayName "New RDP Port $RDPPort" -Direction Inbound –LocalPort $RDPPort -Protocol UDP -Action Allow
Write-host "RDP port number changed to $RDPPort " -ForegroundColor Magenta
You can change the RDP number remotely on multiple computers in an AD domain (specific OU) using Invoke-Command and :
Write-host "Specify the new RDP port number: " -ForegroundColor Yellow -NoNewline;$RDPPort = Read-Host
$PCs = Get-ADComputer -Filter * -SearchBase "CN=DMZ,CN=Computers,DC=winitpro,DC=ru"
Foreach ($PC in $PCs) (
Invoke-Command -ComputerName $PC.Name -ScriptBlock (
param ($RDPPort)
Set-ItemProperty -Path "HKLM:\SYSTEM\CurrentControlSet\Control\Terminal Server\WinStations\RDP-TCP\" -Name PortNumber -Value $RDPPort
New-NetFirewallRule -DisplayName "New RDP Port $RDPPort" -Direction Inbound –LocalPort $RDPPort -Protocol TCP -Action Allow
New-NetFirewallRule -DisplayName "New RDP Port $RDPPort" -Direction Inbound –LocalPort $RDPPort -Protocol TCP -Action Allow
Restart-Service termservice -force
}
These instructions for changing the standard RDP port are suitable for any version of Windows, from Windows XP (Windows Server 2003) to Windows 10 (Windows Server 2019).
A common task: setting up remote access to a computer that is connected to the Internet via a router.
Solution: do port forwarding on the router. Port forwarding is also called publication of the port or port forwarding. In English terminology the terms are used Port Forwarding And Port Publishing.
What is port forwarding
Port redirection is the mapping of a specific external port of a gateway (router, modem) to the desired port of a target device on the local network (server, workstation, network storage, camera, recorder, etc.)
But which port to forward depends on how you want to access the computer.
How to set up remote access via RDP (remote desktop, terminal)
RDP connections are made to port 3389 of the target computer. What should be done:
Step 1 Allow incoming RDP connections on the computer
Attention! It is possible to make INCOMING connections via Remote Desktop to the following editions of Windows OS:
Windows XP Professional;
Windows 7/8.1 Professional;
Windows 7/8.1 Ultimate;
Windows 7/8.1 Corporate.In Windows XP Starter, Home Edition, in Windows Vista/7/8/8.1 Starter, Home Basic, Home Premium there is no possibility of incoming connections.
To do this we open Properties of the system(WIN+Break), click on the link Additional system parameters:
Go to the tab Remote access, put the switch in position Allow connections to this computer, uncheck Allow connections only from computers running Remote Desktop with network level authentication (recommended) and click OK to apply the setting:

Step 2 Create an account on your computer under which the remote desktop user will connect.
Requirement No. 1. This the account must have a password. According to the default settings of the local security policy, accounts without a password are prohibited from connecting via RDP. It is not recommended to allow remote access to non-password-protected accounts in security policies. This will create a threat of unauthorized access from intruders.
Requirement No. 2. If the user is NOT an administrator on the local computer, he must be added to the group. This can be done in two ways.
How to allow a user without administrative privileges to connect to a remote desktop
Method one.
Right click on the system shortcut This computer and select Control:

In the window Computer management select Local users and groups => Users:

Find the desired user in the list and double-click to open its properties:

Go to the tab Group Membership and press the button Add:

Click the button Additionally:

Then, button Search:

Select a group from the list Remote Desktop Users and press OK:

In the windows Group selection And Properties:<пользователь> click OK:


Method two.
Open system properties (Win+Break), click Extra options:
Go to the tab Remote access and press the button Select users:

Click the button Add:

Click Additionally:

And Search:

In the list, select the user account to which you want to grant remote access rights and click OK:

Now click OK in the following two windows:


Step 3 Create a forwarding rule on the router, according to which, when a request is made on a given port, the connection will be redirected to port 3389 of the desired computer.
In D-Link routers, the required section may be called Virtual Server, as in D-Link DIR-615:

Also, it may be called Port Forwarding, as, for example, in DIR-300:

The essence is the same:
- We give an arbitrary name to the rule;
- Open a non-standard port on the router that is not occupied (field Public Port);
- We indicate the IP address of the target computer on the network where the remote user should go (field IP Address);
- We indicate the port number through which the application or service runs on the computer. In our case, for the Remote Desktop Server service this is port 3389 (field Private Port).
If your ISP gives your router a dynamic address, you can conveniently use the Dynamic DNS service. D-Link has its own service where you can register an Internet address (i.e. domain) for free and set up access to your router and local network through it.
To configure Dynamic DNS, go to the section MAINTENANCE, select subsection DDNS Settings and click on the link Sign up... to go to the site and register a domain. Then set up synchronization of the domain with the router's IP address in the area DYNAMIC DNS SETTINGS and save the settings with the button Save Settings:

After this, you can connect not by IP address, but by an address like your-adres.dlinkddns.com:port
Checking the connection to the computer via remote desktop
Start the Remote Desktop Server client:

In field Computer Enter the address and port separated by a colon. In field User enter your username and click the button To plug:

Check the box and click the button To plug:

Now enter the user password, check the box Remember credentials, if you don't want to enter your password every time, and press OK:

After this, a message may appear:
The authenticity of the remote computer cannot be verified. Do you want to connect anyway?Here you can check the box Don't ask for connections to this computer again and press Yes:

Instructions
You must know the IP address of the computer you want to connect to. If you know the domain name, you can determine the IP on one of the existing services. For example, here: http://www.all-nettools.com/toolbox/smart-whois.php
Enter the domain name in the format www.name.ru – that is, the site name without “http://”, click the “Submit” button. You will receive an IP address and all additional information about the site.
Now you need to determine which ports are open on the computer you are interested in. This is done by scanning using special programs - scanners. The most famous scanners are Nmap and XSpider. It’s better for a beginner to choose the second one; you can find both a demo version and a full version of the program online.
Open XSpider, enter the IP address, start scanning. After it is completed, you will receive a list of open ports on the scanned machine. Presence does not mean that you have gained access to the remote computer and only indicates that this port is being used by some program. For example, port 21 – ftp, 23 – telnet, 4988 – Radmin, 3389 – Remote Desktop, etc. Type “List of ports and their services” into a search engine and you will receive detailed information.
You have received a list of open ports. The next step is to look for ways to penetrate these ports on . There are many options here, the main ones are guessing a password or finding and using a suitable exploit. An exploit is a program code written for a specific vulnerability.
If you want to learn how to use exploits, download Metasploit. It includes several hundred exploits, their composition is constant. Metasploit also includes an Nmap scanner. Learning the program takes time and patience, but the results are worth it.
If you want quick results, download two programs: VNC scanner with Gui interface (vnc_scanner_gui) and Lamescan. The first is a very good and fast scanner, convenient when scanning a specific port. For example, port 4899, used by the remote control program Radmin.
Launch the VNC scanner, specify port 4899, select the desired country from the list and click the “Get diap list” button. A list of IP address ranges will appear in the window on the left. Select several ranges (preferably 2-3), delete the rest. Click the "Start scan" button. After the scanning process is completed, you will receive a text file IPs.txt with a list of IP addresses of computers that have port 4899 open. Click the “Start parser” button - the list will be cleared of all unnecessary information, only IP addresses will remain.
Launch the Lamescan program. Click on the “Settings – General” menu. Set the port number to 4899. Enter the paths to the password and login dictionaries (find them on the Internet). Click "Done." Now click the green plus sign and enter your scanned IP addresses into the window that appears and click the green arrow. The process of selecting a password for the specified addresses will begin. In most cases, the selection is unsuccessful, but out of hundreds of addresses, a few will end up with simple passwords.
Download and install the Radmin program. Launch it, enter the computer address with the selected password. In the window that appears, enter your password (and login - if you selected data for the program with a login and password). A blue connection icon will appear, and a few seconds later you will see the desktop of the remote computer on your screen.
Port assignment is a method of forwarding packets from any port on a local network interface to a specified host (computer) and port on the Internet, or forwarding packets from any unoccupied port from an external (Internet address) to a specified host (computer) and port on the local network.
The operation of this service is very simple and is usually used if it is impossible or advisable to use NAT or an HTTP proxy, or if it is better not to change the default gateway on client machines. Also, very often this scheme looks more understandable to many users than configuration via NAT.
Let's look at several common examples of configuration through port assignments.
Attention! Port assignments and public mail servers, such as mail.ru, yandex.ru, gmail.com, which require connection via secure communication channels, will not work with The Bat program. The problem lies in The bat program itself, because... There you cannot accept certificates and add them to exceptions so that they work normally and always. Through the assignment of ports, for example, "Mozilla Thunderbird" will work normally.
- Mail settings.
As you know, there are two services for exchanging email messages - POP3 (RUS) And SMTP (RUS). They use TCP ports 110 and 25 respectively. To send client requests using these protocols to the Internet through port assignments, you need to create two assignments.
For example, for a POP3 server we will most likely use an unoccupied local port - 9110, and for SMTP - 9025. We will configure it for the popular free mail - mail.ru.
Open the “Services - Port Assignment” page in the administrator console and click the “Add” button:
We select the IP of the local network card as the listening interface, port 9110. As the destination, enter the address pop.mail.ru and specify port 110:

Click the "Add" button again and specify the parameters for the SMTP server. We select the IP local network card as the listening interface and specify port 9025, and as the destination we register the address smtp.mail.ru and specify port 25.

Now you need to open the properties of the mail client on the client machine and enter the settings for assigning ports there.
For example, for The Bat program the setting will be like this:
- Setting up remote access from the Internet to a local network computer,
for example, for the program R-admin (RUS) or RDP (RUS).
Typically, the ports that are used for these two programs (4899 TCP for R-admin and 3389 TCP for RDP) are already occupied by the server itself on which UserGate is installed, so we recommend that you use any others.
Let's select port 9999 for the RDP service, and port 9998 for the R-admin program.
In our example, the local subnet is the 192.168.2.X subnet and the computer being accessed from the Internet has an IP address of 192.168.2.45.
We create a rule in accordance with our current network configuration. We specify our external interface as the listening address. If you have a connection to a PPPoE, VPN or Dial-Up provider, then specify to listen to any interface, port 9998 for R-admin:


A remote connection from the Internet to a machine on the local network in this case will look something like this:
- for R-admin we specify the external IP address of the machine with UserGate - 172.19.169.7 and port 9998.
- for RDP we specify the external IP address of the machine with UserGate - 172.19.169.7 and port 9999.
The Wi-Fi router is configured in its control panel via the web interface. Therefore, configuration changes can be accessed through any browser. To do this, just open page 192.168.0.1 or 192.168.1.1 (depending on the router model). Next you will need to enter your username and password. By default, both of these parameters are set to admin.
If the default username and password do not work, and you did not change these data, they may have been changed by the wizard when connecting or setting up the Internet. For security reasons, some providers change the default login information. In this case, they can be found in the contract or at the bottom of the router, on a separate sticker.
Advice! Don't forget to change your login information in your router's Wi-Fi settings. You can do this in the “System Tools -> Password” menu.
Changing your password will significantly secure your network and help prevent unauthorized access or resets. The settings will take effect after the device is rebooted.
If authorization in the router control panel is successful, a status page will open, which displays basic information about the router, Wi-Fi wireless broadcast data and the status of the current Internet connection.

Preconfiguration for port forwarding
Before forwarding, you need to change the settings for the distribution of local IP addresses within the network created by the TP-Link router. The device on which the open port will be used in the future must be given a constant internal address. DHCP is responsible for addressing within the local network, so you need to open the menu “DHCP -> List of DHCP Clients”. This window will display a list of devices connected to your network. We look for the desired device by name and copy its MAC address.

In the case shown in the screenshot, finding the required device was not difficult, since only one device was registered on the home network. However, there are situations when a significant number of devices are connected to the network, and the name of the required computer is unknown or not displayed. In this case, you can find out the computer address directly through the operating system. The easiest way is to use a special command on the command line.
Press the Win+R keys to open the Run New Program window. In it, enter cmd and click OK.

After entering the getmac command, you will receive the necessary data that you will later need to forward ports on your TP-Link router.

If an error occurs when executing a command, it is recommended to repeat the operation by running the command prompt as an administrator.
After this, you need to open the menu “DHCP -> DHCP Settings”. This page will display the range of IP addresses within which the computers on your network are addressed. In the case in the screenshot, the starting address is: 192.168.0.100, the ending address: 192.168.0.199. This data will be needed in the next step.

Next, you need to open the “DHCP -> Address Reservation” page and click the “Add new...” button. Without completing this step, port forwarding on a TP-Link router will not bring the desired result, since the computer will be assigned a new local address each time.

In the "MAC Address" field, paste the combination that you copied from the list of DHCP clients or the command line. In the “Reserved IP address” field, enter any address that is within the range specified in the DHCP settings of the TP-Link router. Click the "Save" button.

The added MAC address to IP binding will appear in the list, but for normal operation of address reservation, you will need to restart the Wi-Fi router, which the system will warn you about.

You can reboot your TP-Link router programmatically in the “System Tools -> Reboot” menu.

Opening ports on a TP-Link router
After completing these preparatory steps, you can begin to directly open the ports. In order to open them on the TP-link router, go to the “Forwarding -> Virtual Servers” menu and select adding a new entry

Fill in the fields with port numbers. In the IP address field, enter the value that you have reserved for your computer. If necessary, select a protocol. In the “Status” field, leave the “Enabled” checkbox so that the settings take effect immediately after rebooting the Wi-Fi router. If you want to forward standard ports of one of the services, you can do this by selecting the required service in the last drop-down list. There is no fundamental difference between entering it manually and selecting from a list, but this function can be useful if you do not remember the port number that needs to be opened.
The TP-Link Wi-Fi router offers the following services for which you can forward standard ports:
- GOPHER
- TELNET
The maximum number that can be opened on TP-Link: 65535.

In some cases, it may be necessary not to simply forward, but to dynamically open ports in response to an incoming event. You can configure this function in the adjacent menu: “Forwarding -> Port Triggering”. The most common use for this setting is working with complex applications that receive many incoming connections (online games, Internet telephony, and video conferencing applications). To create a new Port Triggering entry, click Add New.