Open MMS message to. How to open an MMS message on your phone? How to send MMS from Android
Setting up MMS on Android may be required in two cases. The first of them is buying a new smartphone. The second is to reset existing settings to factory settings. In any case, you need to change the configuration so that this service works. This can be done in four ways:
- Automatically.
- With the help of a service center operator.
- By manually entering the required values.
- Using the operator's regional website.
It is all these methods that will be discussed in detail within the framework of this material.
Automatic setup
Automatic setup of MMS on Android occurs with minimal human intervention - this is its main advantage. But the disadvantage is that it can only be done once - during the initial registration of the device in the mobile operator’s network. After this, everything is considered to be set up and there is no need to resend this data. Its order is as follows:
- We install the SIM card into the corresponding slot of the smartphone and assemble it.
- Turn on the device and, if necessary, enter the PIN code.
- As soon as registration is completed, the search for the required values in the operator’s database begins. After they are found, this information is sent to the gadget.
- Next, the subscriber must accept the configuration profile and save it.
This completes the automatic configuration process. But the process of receiving and sending messages itself may be blocked. The activation procedure will be described further in the text.
Operator assistance
Unlike automatic, setting up MMS on Android with the help of a service center operator or by manual entry can be done many times - this is their plus. But on the other hand, in the process of their implementation you need to perform certain manipulations, which slightly complicates the configuration process. Each operator has a toll-free consultation number. For Beeline it is 0611, for MTS - 0890, for Megafon - 0550. Next, following the instructions from the autoinformer, you need to establish a connection with the operator and order the necessary settings, which will then be sent to your smartphone. Then they need to be accepted and saved. After this operation, it is recommended to completely reboot the device, that is, turn it off and on. In some cases, you may need to activate the service. To do this, when calling the operator, please enable this service for this number. This completes the setup of MMS on Android with the help of a service center operator.

Manual input
It is not always possible to reach the service center, but you need to receive an MMS urgently. In this case, the necessary settings can be set manually. To do this, go to the following address: "Applications"\"Settings"\"Networks"\"More"\"Mobile networks"\"APN". Then you need to enter the operator parameters - this is the actual manual setup of MMS on Android. Beeline, for example, requires the following parameters:
- The profile name should be Beeline MMS.
- The home page in this case is http://mms/.
- Data transmission channel - GPRS.
- Access point - mms.beeline.ru.
- IP address - 192.168.094.023.
- and the password are the same - beeline.
The remaining values remain unchanged. For MTS you need to enter the following data:
- Profile name - MTS MMS center.
- APN should be mms.mts.ru.
- The login and password in this case are identical - mts.
- Home page - http://mmsc.
- IP address - 192.168.192.192.
- Port - 8080 (some models may use 9201).
As in the previous case, we leave all other values unchanged. Setting up MMS Megafon on Android requires the following values:
- Profile name - megafon.
- APN depends on the tariff plan. Here you need to look at the documentation that came with the starter package.
- The login and password in this case are identical - gdata.
- Home page - http://mmsc:8002.
- IP address - 10.10.10.10.
- Port - 8080 (some models may use 9201).
We don’t touch everything else and leave it as is.

Another way...
Another way to obtain settings is to order them on the operator’s regional website. To do this, on a computer connected to the Internet, use a search engine to find the page we need. Then select the smartphone model and enter the captcha and mobile number. Then click “Submit”. Within 5 minutes the necessary information will be received. We save and install the necessary profiles. If the requested information has not been received within 5 minutes, it is better to repeat the order on the same regional website of the mobile operator. It is also recommended to completely reboot the phone. After that, we send and receive MMS. There shouldn't be any problems. If something doesn't work, we look for the error. As practice shows, somewhere they did something wrong. You can delete the old profile and do everything again.

Results
This article described step by step what is on Android for various operators. As can be seen from everything previously said, there is nothing complicated about this. The lucky owner of a new smartphone can handle this task without any problems. Just follow all the directions and you shouldn't have any problems with this procedure.
With the development of the era, mms had to lose their former popularity. But this did not happen for various reasons: firstly, not all people have access to the Internet, and secondly, sending MMS messages is much faster than in some messenger.
In contact with
Advantages of MMS

MMS on Android
With the Android operating system, in most cases they support data transfer using MMS. You just need to configure it. You can change configurations on Android using automatic configuration, you can immediately contact your mobile operator, configure it manually, or order settings on the operator’s website.
Automatic MMS setup
This method is very convenient because the technology will do everything itself instead of the user. The likelihood of making a mistake or damaging your mobile device is close to zero. The only negative: you can use the automatic configuration only once (when registering for the first time in the mobile operator’s network). How to set up MMS automatically:
- Install a SIM card.
- Launch your mobile device and enter your PIN if prompted.
- Receive settings in the form of SMS messages from your mobile operator.
- Run the configuration and wait for the installation to complete.
- You can now read sent messages.
SIM card prices
sim cards
Asking an operator for help
Unlike the previous method, you can ask the operator for help an unlimited number of times. But here the user will have to strictly follow the instructions in order to achieve a positive result. Each mobile network operator has its own toll-free technical support number. You need to ask to send MMS settings to mobile phone number:
- MTS – 0890;
- Megafon – 0550;
- Motive – 111;
- Beeline - 0611.
After ordering settings, you must accept them, and then reboot the device to start using and sending messages. It happens that the service does not connect the first time and requires additional activation. In this case, you need to call technical support again and ask to enable the service for this cell phone number. After all manipulations, graphic messages will be activated.
Mobile phone prices
Cell phones
Setting up MMS manually
If it is impossible to get through to the operator, and the MMS service is needed any minute, then you will have to install it on your own. Instructions:

The next steps vary by operator. Only some columns are the same for users of Beeline, Megafon, MTS, Tele 2, Motiv. This is the “access point type” - mms and “MMS port” - 8080 (there is an alternative code 9201 for MTS and Tele 2 subscribers). Example of settings for the mobile operator Beeline.
You can specify any username(use Latin characters). The access point is mms.beeline.ru. The login, or username, will be beeline and the password will match it (also beeline). In the MMSC column you should enter http://mms/. The IP address for this mobile operator is 192.168.094.023.
You only need to enter the specified information and leave the rest of the columns unchanged. Afterwards, you only need to save the entered data and restart your mobile device.
Order settings on the mobile operator website:
- Go to the mobile operator's website.
- Select the model of your cellular device from the list listed and enter your mobile phone number.
- Click "send".
- Over the course of some time, the phone will receive settings that will need to be installed.
- Reboot your device when installation is complete.
 If you are unable to achieve success, then the problem is most likely in the user’s actions or in the settings of the phone itself. If you fix the problem It is impossible to do this on your own, you should contact the service center of your mobile operator.
MMS is an instant multimedia messaging service that allows users of mobile communication services to use the ability to send texts, photos, video and audio recordings to other subscribers. The maximum size of files available for sending is 500 kilobytes, and the number of text characters should not exceed 1000 characters. You can send multimedia messages not only to a phone number, but also to an email address. You can send MMS both within the territory of Russia and abroad. The cost of sending one message depends on the tariff and averages 7.95 rubles.
Sending MMS from Beeline via the Internet has recently been blocked, so in order to be able to communicate with subscribers via multimedia messages, you need to connect and configure this service on your mobile phone.
How to connect MMS to Beeline?
You can check whether the MMS service is activated or not by contacting the Beeline support service at 8-800-700-0611, or by visiting the main page of your personal account where a list of connected options is displayed. If the option is disabled, you can activate it in one of several available ways:
- Dial and send the command *110*181# call from your phone. It includes a package of three services, which includes support for sending and receiving MMS messages.
- Go to yours, open the “Available” list in the “Services” menu, and then select the MMS connection. In the same way, you can connect the service through the Beeline mobile application for Android and other mobile platforms.
- Contact an employee at one of the Beeline offices with a request to connect MMS - they will help you completely free of charge.
Automatic MMS setup
After connecting MMS, you need to configure the option correctly in order to be able to read and send multimedia messages. To do this, follow these steps:
- Follow the link: MMS settings to get to the menu for automatically receiving MMS settings for your phone model.
- Select your phone model in the drop-down list, or enter its name yourself.
- Click on the “MMS” button, then select “Yes, proceed to MMS settings.”
- If automatic setup is possible, enter the phone number in the window and click the “Submit settings” button. If only manual MMS setup is available, carefully read the instructions provided for your phone model and strictly follow its instructions (the steps may differ for different phones).
The MMC configuration files received automatically must be applied, and then the phone must be rebooted. In addition to the above method, you can get automatic settings for your phone for free by calling 060432.
After the reboot, the MMS service should be activated and become available for use.
Manual MMS setup
If for some reason you cannot go to the site and find out the manual settings for your phone, create an MMS profile in the phone settings menu with the following data:
Save the profile with the above MMS parameters and reboot the phone. After this, you will be able to send and receive multimedia messages.
Setting up MMS on Android may be required in two cases. The first of them is buying a new smartphone. The second is to reset existing settings to factory settings. In any case, you need to change the configuration so that this service works. This can be done in four ways:
- Automatically.
- With the help of a service center operator.
- By manually entering the required values.
- Using the operator's regional website.
It is all these methods that will be discussed in detail within the framework of this material.
Automatic setup
Automatic setup of MMS on Android occurs with minimal human intervention - this is its main advantage. But the disadvantage is that it can only be done once - during the initial registration of the device in the mobile operator’s network. After this, everything is considered to be set up and there is no need to resend this data. Its order is as follows:
- We install the SIM card into the corresponding slot of the smartphone and assemble it.
- Turn on the device and, if necessary, enter the PIN code.
- As soon as registration is completed, the search for the required values in the operator’s database begins. After they are found, this information is sent to the gadget.
- Next, the subscriber must accept the configuration profile and save it.
This completes the automatic configuration process. But the process of receiving and sending messages itself may be blocked. The activation procedure will be described further in the text.
Operator assistance
Unlike automatic, setting up MMS on Android with the help of a service center operator or by manual entry can be done many times - this is their plus. But on the other hand, in the process of their implementation you need to perform certain manipulations, which slightly complicates the configuration process. Each operator has a toll-free consultation number. For Beeline it is 0611, for MTS - 0890, for Megafon - 0550. Next, following the instructions of the autoinformer, you need to establish a connection with the operator and order the necessary settings, which will then be sent to your smartphone. Then they need to be accepted and saved. After this operation, it is recommended to completely reboot the device, that is, turn it off and on. In some cases, you may need to activate the service. To do this, when calling the operator, please enable this service for this number. This completes the setup of MMS on Android with the help of a service center operator.
Manual input
It is not always possible to reach the service center, but you need to receive an MMS urgently. In this case, the necessary settings can be set manually. To do this, go to the following address: "Applications"\"Settings"\"Networks"\"More"\"Mobile networks"\"APN". Then you need to enter the operator parameters - this is the actual manual setup of MMS on Android. Beeline, for example, requires the following parameters:
- The profile name should be Beeline MMS.
- The home page in this case is http://mms/.
- Data transmission channel - GPRS.
- Access point - mms.beeline.ru.
- IP address - 192.168.094.023.
- and the password are the same - beeline.
The remaining values remain unchanged. For MTS you need to enter the following data:
- Profile name - MTS MMS center.
- APN should be mms.mts.ru.
- The login and password in this case are identical - mts.
- Home page - http://mmsc.
- IP address - 192.168.192.192.
As in the previous case, we leave all other values unchanged. Setting up MMS Megafon on Android requires the following values:
- Profile name - megafon.
- APN depends on the tariff plan. Here you need to look at the documentation that came with the starter package.
- The login and password in this case are identical - gdata.
- Home page - http://mmsc:8002.
- IP address - 10.10.10.10.
- Port - 8080 (some models may use 9201).
We don’t touch everything else and leave it as is.

Another way...
Another way to obtain settings is to order them on the operator’s regional website. To do this, on a computer connected to the Internet, use a search engine to find the page we need. Then select the smartphone model and enter the captcha and mobile number. Then click “Submit”. Within 5 minutes the necessary information will be received. We save and install the necessary profiles. If the requested information has not been received within 5 minutes, it is better to repeat the order on the same regional website of the mobile operator. It is also recommended to completely reboot the phone. After that, we send and receive MMS. There shouldn't be any problems. If something doesn't work, we look for the error. As practice shows, somewhere they did something wrong. You can delete the old profile and do everything again.

Results
This article described step by step what is on Android for various operators. As can be seen from everything previously said, there is nothing complicated about this. The lucky owner of a new smartphone can handle this task without any problems. Just follow all the directions and you shouldn't have any problems with this procedure.
Nowadays, to send media files, users mostly prefer to choose email or social networks, for example, Odnoklassniki, VKontakte and others. But, in principle, there are still people of the old school who still want to work with MMS rather than with e-mail. Why, you ask? There are hundreds of answers: email can be hacked, it is difficult to register a mailbox for individuals, it is very difficult to remember your address rather than someone else's, you constantly forget your password and much more. In this case, we decided to describe in detail how to set up MMS on your Android and what is needed for this!
In principle, the setup process is no different from previous generation devices, when we specified all the settings manually or automatically. We will describe all the methods for the main mobile operators.
The article will contain the following operators:
- Beeline;
- Megaphone;
- Tele 2.
Initially, you need to check whether the service is activated for your number at all or not, because in some regions, oddly enough, it is disabled for certain numbers. Call your operator's customer support center. All calls are free!
At all, The easiest way is to call the same service center and ask the operator to send you the settings. In this case, all operations will be carried out automatically, and for MMS to work correctly you will only need to restart the device and use this technology to the fullest.
Usually the operator is told the phone model, after which the settings are sent and saved automatically. But it often happens that the user needs to do everything manually.
For Megafon
If you have a SIM card from Megafon, then you will need to use the instructions described in this subtitle!
Automatic setup. Send a free message without text to 5049. In a few minutes, a message will be automatically sent to your number with the necessary parameters specifically for your model. You need to save them and reboot your phone. After that, you can try sending MMS to your friends.
Manual setting. In the Android operating system, go to “Settings”, select the “Wireless networks” tab and then “Mobile network”. Here you will need to click on the “Access Points” tab. Now carefully review what data must be filled in!
Please note that all submitted data must be filled out exactly as described above. Each entry is written in a separate tab. You will see all these fields when you go to the “Access Points” item in the menu. Next, all you have to do is click the “Save” button, restart your phone and check the functionality of the MMS.
For Beeline
If you use a SIM card from Beeline, then you need to set up MMS based on the instructions in this subheading!
Automatic. Call the toll-free number 06741015, after which all MMS parameters will be automatically sent to you. They can be saved directly in the dialog menu after opening the incoming SMS. Beeline also has the option of setting up this technology using your personal account.
Manual. Go to “Settings”, select the “Wireless Networks” tab and go to “Mobile Network”, click on “Access Points”. Here you will need to specify settings specifically for Beeline! They will be as follows:

For MTS
If you use an MTS SIM card, then you need to perform the settings according to the instructions in this subheading.
Automatic. It is necessary to send an SMS message with empty content to service number 1234, after which within a few minutes the subscriber will receive a response SMS from the operator with the settings for their device. You need to save them and restart the phone, after which you can send MMS. Setting up MMS using the “Internet Assistant” is also available, where each user independently manages the options on their phone.
Manual. To manually configure, you need to go to “Settings”, then to “Wireless Networks”. Select “Mobile network” - “Access points” and enter the settings described below:

Save all the specified parameters and reboot your phone.
For Tele 2
Despite the fact that Tele 2 has not been around for very long, you can also configure MMS for it, both on a regular device with support for Java applications, and on modern devices with Android and iOS.
Manual setting. Go to the “Settings” menu item, then select “Wireless networks” and click “Mobile network”. Go to the “Access Points” tab and set the following parameters:
conclusions
In general, we can conclude that setting up MMC on Android is not difficult, regardless of which operator you use. Just keep in mind that sending one MMS costs about 7 rubles, and this is not very profitable, given the capabilities of modern technologies that allow you to send high-quality media files completely free of charge.
In the Android operating system, do not forget to activate the mobile network, because... It may be disabled by default! Attention! If you do not activate the mobile network, sending MMS will not be possible. To do this, go to the main menu “Settings” and select “Wireless Networks”. Click the “Mobile Network” tab and activate it.
Also in Android OS, on the quick tabs panel, you can enable data transfer with one click.
What is setting up mms on android? Today, such a service is no longer something new, but it continues to be one of the most convenient, given that various files can be transferred via MMS, including photographs and images. Many users specifically choose those mobile operators that provide packaged MMS messages. For example, MTS offers its subscribers packages for 10, 20 or 50 messages, the MMS+ service (discounted messages), as well as special tariff plans with unlimited MMS messages. There is even a free MMS Show! And how to set up MMS on Android without the help of specialists.
Preparing MMS settings for Android
The reasons for the incorrect operation of MMS are, as always, trivial (but these are definitely not problems with registering an iPhone, which Apple devices often have). And the first is the absence of such settings on the device at all. This means you must order them from your mobile operator. After they are sent to the phone, they need to be saved.
New generation smartphones, when first launched together with a SIM card, identify the Internet and MMS settings themselves. However, this only applies to SIM cards that already contain such information.
How to set up MMS yourself? For this function to work correctly, after saving the settings, the mobile device must create 2 points, receiving data via the GSM network or from the SIM card - a point for transmitting MMS messages and an Internet access point. If the SIM card is many years old, it is unlikely that the phone will be able to independently identify itself in the cellular operator’s network. How to be in this case?
Instructions for setting up MMS on Android
Where do you start setting up MMS on Android? First, go to the “Settings” of your mobile device, select “More”. In different phone models, the item may be called differently - for example, “Communication settings” or similar phrases. Next, select the “Mobile network” option and click on it, after which the user will see the settings that are associated with his cellular operator.
The next item he needs is “Access points” (“Access points”, “APN”, etc.) Here you will need to create a new access point specifically for MMS. To do this, click on the auxiliary menu and select “New access point” (“Create APN”). Most likely, the access point will be missing, but if it already exists, but MMS messages are still not sent, you will need to delete it and create a new one.
A new access point requires a specific list of parameters, which you can find out from your cellular operator. For example, for Beeline subscribers they look like this: MMSC - http://mms/, Proxy -192.168.094.023:8080, APN - mms.beeline.ru, Username - beeline, Password - beeline. So, all that remains is to enter the correct parameters.
The article tells how to configure MMS on the Android operating system.
Navigation
The ability to send MMS from certain mobile devices is no longer some kind of special technical service provided for a lot of money. MMS can be sent with the same ease as SMS, but for this, of course, your gadget must be configured accordingly. In this review, we will discuss how to configure a mobile device running the operating system “ Android” to send MMS messages.
How to set up a gadget running Android to send MMS?
First, let's figure out what settings we have to send MMS to “ Android”:
- Automatic setup
- Setup by calling a specialist
- Manual setting
- Setup using a computer and the Internet
I would like to add that the very need to configure MMS to “ Android”, as a rule, occurs in the following cases:
- Factory settings have been reset
- A new gadget was purchased
How to configure a gadget running Android to send MMS using automatic settings?
The simplest method for setting MMS to “ Android” is, of course, an automatic setting. That is, in this case we need to perform a minimum of actions, the rest will be done by the system.” Android" on one's own. But this method of settings is valid the first time your gadget is registered in the network of any mobile operator.

How to set up MMS on Android?
The following steps must be taken:
- Install a SIM card in the gadget
- Turn on the gadget (if you need a PIN code, enter it), wait for the registration process to complete, and an SMS with the settings will be sent to your mobile device
- After receiving the settings for your gadget, you will need to accept and save them. After rebooting the gadget, your mobile device is controlled by “ Android” will be ready to work with MMC
How to set up a gadget running Android to send MMS by calling a specialist?
You can turn to a specialist for help setting up MMS on your gadget every time you need it. True, you will already have to take more actions than in the previous method.
To set MMS to “ Android” with the help of a specialist, you need to call your mobile operator:
- « Megaphone» – to the number 0550
- « MTS» – to the number 8900
- « Beeline» - to the number 0611
- « Tele 2» - to the number 611
After the call, we will be taken to the voice menu (applies to all mobile operators) and will follow the instructions from the answering machine. Then we will be contacted by a specialist from the company we have chosen, who will need to read out our passport data to identify us. After this, the specialist will send the tinctures to our phone. Next, you should proceed as in the previous case - accept and save the settings, and also reboot the gadget. In some cases, you will need to call the specialist again and ask him to activate the settings on your SIM card.
How to configure a gadget running Android to send MMS manually?
If you purchased your gadget a long time ago, and also cannot reach a specialist by phone, then you need to set the MMS to “ Android” manually.
For this you need:
- Go to the gadget menu
- Next go to “ Settings»
- Then go to " Networks" or " More» depending on the gadget model
- Next you need to click on “ Mobile networks»
- Go to " Access points" and select " Mobile data»
- Next select “ Internet access points" and click on " New access point»
Then you should enter certain data, which may differ for each mobile operator. The table below shows what data should be entered in each specific case:
| « MTS» | « Megaphone» | « Beeline» | « Tele 2» | |
| Name | - | megafon | - | mms.Tele2.ru |
| Login | mts | - | beeline | - |
| Password | mts | - | beeline | - |
| APN | mms.mts.ru | Depending on the tariff | mms.beeline.ru | - |
| APN type | mms | mms | mms | mms |
| MMSC | http://mmsc | http://mms:8002 | http://mms/ | - |
| MMS port | 8080 | 8080 | 8080 (9201 – for some gadgets) | |
| IP address | 192.168.192.192 | 10.10.10.10 | 192.168.094.023 | 193.12.40.65 |
Enter the specified data, save the settings and reboot the gadget. Your mobile device is now on “ Android” ready to work with MMC.
How to set up a gadget running Android to send MMS using a computer and the Internet?
If you don't want to dig through your phone, then set MMS to “ Android” is possible using a computer connected to the Internet. To do this, we need to go to the website of our mobile operator and select the appropriate section.
In this review, we outlined all the possible ways to configure MMS on your gadget running “ Android" If the above methods do not work, then you did something wrong.
Video: Internet and MMS settings for Android phones
MMS messages have been known to us since the advent of phones with color displays, thanks to which mobile communications have opened up great opportunities for us. But a few years later, technological progress gave us more advanced technologies that pushed MMS messages into the background. Although, we cannot completely forget about this type of information transfer, since such situations happen in life, then it is necessary to use MMS and in this article we will consider the question: how to send mms on android and how to properly configure your device. And those who often use this type of messages specifically choose mobile operators that provide package messages. For example, a very popular operator that works with this message format is MTS.
Preparing the settings
MMS messages may not work for you for quite simple reasons, which at first glance seem funny. You'll need to look at the settings first, as often there aren't any at all. If they are missing, you need to make a request to your operator to receive these settings. As a rule, after the request, the settings will arrive within a few minutes, and all you have to do is save them.
Since modern smartphones have many functions, the first time you start with a SIM card inserted, the settings will be saved themselves. However, it is worth remembering that this function will only work with SIM cards that have already received these settings earlier.

Having received the settings from the operator or read them from the SIM card, your smartphone must provide two access points; it receives these points from the SIM card or GMS network. Many people have old SIM cards on their smartphones, which, due to their growth, do not allow the smartphone to read the necessary information. This case is very complicated, but don't worry because everything can be solved in a few minutes.
Setting up MMS on Android devices
First, you need to go to the “Settings” of your smartphone running Android OS, then find the “More” item. But this item may have a different name, since there are a huge number of Android phone models in the world. After selecting this item, go to the “Mobile network” option, in it you will see all the settings that are associated with your mobile operator.
Next we go to the “Access Points” item, at this point we will need to create a special access point for MMC. To create such an access point, you need to call the “New access point” command. In case a hotspot for sending MMS already exists, but it does not work, you need to delete it.
And now to the most difficult part, to create a new access point you need a list of special parameters, which are different for each operator. You are provided with an example parameter for subscribers Beeline MMSC - http://mms/, Proxy -192.168.094.023:8080, APN - mms.beeline.ru, Username - beeline, Password - beeline.
Why are MMS not sent from Tele2? There may be several reasons. As a general rule, the service is activated automatically and free of charge for Tele2 subscribers; you do not need to take any action to do this - just insert a SIM card into your smartphone. But often users have problems sending such messages. We offer a list of the most popular problems that arise, as well as ways to solve them.
Briefly on the topic
Most often, problems sending messages are associated with a failure in the settings or incorrect Internet settings. To solve these problems, you need to check all the settings or call 679
Problem #1
The service settings have disappeared or are missing altogether:
Perhaps the most common reason why MMS does not work on Tele2. Most relevant for owners of so-called “outdated” phones. What to do in this case?
- Make a call to 679 and request the correct working parameters. They will come to your mobile phone, and you just need to apply them.
- As an alternative, call the operator at 611 . But the first option is preferable.
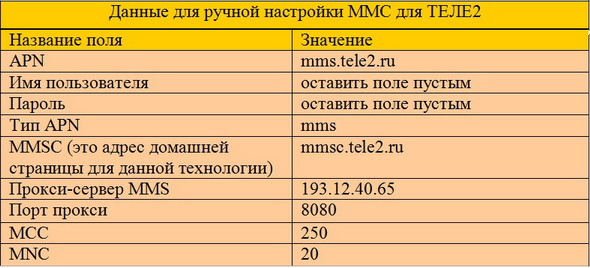
- You can also debug the service for sending and receiving multimedia yourself. Go to the settings of your phone/smartphone and fill in the fields by analogy:
You will find information on how to connect MMS in Tele 2.
Problem #2
Incorrect Internet settings. Another reason why MMS does not load on Tele2. To solve this problem, the operator also offers several methods:
- Order the correct parameters by calling 679 , similar to requesting settings for multimedia messages;
- Through your personal account on the Tele2 website;

- Or manually enter the following data into the settings of your communication device (they are the same for phone owners on any platform, be it Android, IOS, etc.)
In case of failure, we advise you to follow the above instructions. Most problems can be resolved by following these simple steps. We also note that any service received is free. Tariffing is included only if a multimedia message is sent - its cost is 6.5 rubles (the price is indicated for Moscow and the Moscow region).