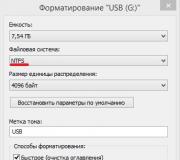
Switches, regular application, managed forms. Programmatically adding and changing elements of managed forms 1c managed set the switch on the element form
I read many forums, and nowhere did I see an intelligible description of working with the “Switch”. So I decided to write it myself.
In MY opinion, the most common mistake is the misconception about the “Switch”. When you place several “Switches”, for example 3, on a form, many people believe that in the program logic these are 3 different objects that influence each other. But, in fact, the program perceives all 3 “Switches” as one object. And choosing one of them changes the state of this object. Let's look at an example.
1. Create three radio buttons on the form. For convenience, we will not change the names.
2. Highlight Switch1. In its properties, in the “BASIC” section, check the first in group box. “VALUE TYPE” select a number. (Next we’ll look at why exactly the number). The length can be set to one, but this does not provide any special functionality.
3. Select “Switch2” in the “SELECTED VALUE” column and put 1.
4. Select “Switch3” in the “SELECTED VALUE” column and put 2.
Essentially, with actions 3 and 4, you set a flag that will change when you select the corresponding “Switch”. In “Switch1” the default “SELECTED VALUE” is zero.
5. Check whether the switches are in the “WALKING ORDER” in order. (for example: 13,14,15)(Fig. 1). a continuous order of traversal by switch is required. The auto-bypass order is enabled (positions are numbered 13, 15, 20) (Fig. 2) in this case, the switches under each other will not work. You should remove the use of auto-order from the form and, if necessary, manually specify the order.
How to set the traversal order for details. While in the form, in the "Dialog" menu, you need to uncheck the "Automatic traversal order" checkbox. After this, you can either use “Dialog” -> “Setting the traversal order”, or “Dialog” -> “Travel order”. The second method seems to me to be the most convenient. With this method, a picture with the prop number appears for each prop. All you have to do is click on the numbers, selecting the details in the order you need.
////////////////////////////////////////////////////////////////////////////////////////////////////////////////////////////////////////////////////////////
6. Select “Switch1” and write the procedure we need for it.
For example:
EF=FormElements; If Switch1=0 Then EF.Payment Status.Value = "Unpaid"; OtherwiseIf Switch1=1 Then EF.Payment Status.Value = "Partially paid"; OtherwiseIf Switch1=2 Then EF.Payment Status.Value = "Paid"; endIf;
7. Press F7. Press F5. Let's see everything is working, we're great. And the big BOSS gives us a bonus.
EXPLANATION FOR THE CODE
Why is there "Switch1" everywhere? Since it has already been said, the program perceives all three elements as one, and since “Switch1” is the first in the group, then the program perceives it as the entire element. If you make “Switch2” the main one in the group, then the correctness check will need to be carried out according to "Switch2".
Well, where does "0", "1", "2" come from? We set those values that the object takes when switching “Switches” in paragraphs 3 and 4.
AFTERWORD:
This code is given as an example of working with switches. In my opinion, this is more clear and understandable. But it’s worth mentioning that in “Value Type” you can immediately select what you need - a predefined value from a directory, an enumeration, for example, or a string value. That is, in the above example, it was possible to immediately assign the switches as values not 0,1,2, but immediately “Unpaid”, “Partially paid”, “Paid”. And then the code will be reduced to one line:
Form Elements.Payment Status.Value = Switch1;
The result will be the same.
//////////////////////////////////////////////////////////////////////////////////////////
Switches in controlled forms (UF) have been made more intuitive.
When creating a Switch, you need to remember the duo Attributes, Form Element.
First of all, you need to create Form Attributes. You set the type of the attribute to what values your switch will accept. I chose the String type. Here you have two options: if you created an Object attribute, then the value accepted by your switch will be saved in the database, if you simply add to the list of form details, then the result accepted by your switch will not be saved.
Next, drag and drop the Attributes we need into Form Elements. When creating a form element, the element in the "View" properties will have the type "Input Field". Select "Field switch" from the list. As a result, you will get a form something like this:

We fill in the title of the Form Element, color, font, location and other beauties to your taste.
There is an item in the properties of the form element. “Selection List” - in it you enter the Values that your switch will take when selecting one or another item. In my example, I added lines with the values “Record”, “Cancel Post”, “Post”.
After this, your switch is ready for use.
Depending on whether your switch is an Object attribute or a Form attribute, you use the following code to get the value stored in it:
SwitchFormElementFormElement // access directly if this is an attribute of the Object form.SwitchInsideDB // access through the Object element. to your details.
Switches (aka RadioButtons) in 1C 7.7 are implemented in a very unique way. The first thing to consider is the fact that they always form a group (there is no point in a single switch). In 1C there is no obvious connection between group elements. The first element in the group is selected, for which an identifier is specified (this can be a numeric attribute of the metadata object). The belonging of other switches to the group is determined by the order of traversal.
When opening the form, the value of the switch must be initialized, because otherwise, none of the group elements will be included, which is not correct.
In a typical 1C configuration, initialization of switches is implemented as follows: Procedure Enter New (Copy) // initialization of other details Currency = 1; EndProcedure //Enter New It seems quite simple, but if you consider that the most popular value is usually placed first in a group of switches, we could do the initialization automatically using the platform’s means.
In my opinion, the main disadvantage of the switch is that at the output we get an impersonal numeric value, unlike, for example, enumerations. Unfortunately, in 1C 7.7 there is no standard way to represent enumerations by switches. But there is an alternative to this - the use of predefined variables (similar to constants in other programming languages).
Let's look at an example of using a switch value: If Currency = 2 Then Cash Account = AccountByCode("50.11"); Otherwise Cash Account = AccountByCode("50.1"); endIf; In order to understand this code, you need to go to the form and determine that the “Currency” attribute is the identifier of the first element in the “Cashier” radio button group. The group itself consists of 2 elements: “ruble (Kt 50.1)” and “currency (Kt 50.11)”. Only after this it becomes clear that, contrary to the usual logic, “Currency = 2” is a sign of a foreign exchange office, and “Currency = 1 or 0” is a sign of a ruble box.
You can make your code easier to understand by defining form module variables with names and values that correspond to the radio button positions. For this example these would be the variables: Variable to CashboxType_Ruble, to CashboxType_Valutnaya;
In the module initialization block we define their values: kCashier_RublevayaType = 1; kCashierType_Currency = 2;
As a result, the source code is converted to the form: If Currency = kCashierType_Currency Then Cash Account = AccountByCode("50.11"); OtherwiseIf Currency = kCashType_Ruble Then Cash Account = AccountByCode("50.1"); Otherwise Warning("The cash register type is not specified."); endIf;
In conclusion, I would like to note that, in my opinion, creating groups of switches makes sense only in the case when there are no more than 4 (maximum 5) elements in the group. Otherwise, it makes sense to use a combo box, because... it will take up significantly less space on the form.
Add a group frame to the form and place switches on it via the menu item Form -> Insert control... and select the switches in the window that opens:
In the right part of the window, add the switch value as much as we need, check the box “Promotions - first in group” so that this switch is selected automatically.
After we add the switches, we select the data type for the first value “Shares”, in our case we assign the value “Type of Securities”:

And the switch value itself is entered into Data -> Selected value. For Shares this is 0, Bonds - 1, Bills - 2 and Units - 3. But before entering this data, you need to check the order.

If the switches are not in order, then the switch will not be carried out, that is, we will not be able to select the value of the bond. In order to enable this feature, you must select the menu Form -> Setting traversal order and place all the switches in order.

Check the selectable value of the switches after correcting the order.
All that remains is to write the program code in the “action” switch event “On change”:
If CB Type = 0 Then
OtherwiseIfCBType = 1 Then
ThisForm.FormElements.Receipt.Columns.NCD.Availability = 1; // only for bonds we allow NKD
OtherwiseIfCBType = 2 Then
ThisForm.FormElements.Receipt.Columns.NCD.Availability = 0;
OtherwiseIfCBType = 3 Then
ThisForm.FormElements.Receipt.Columns.NCD.Availability = 0;
endIf;
Now, when you select the “Bonds” switch, you can edit the value of the asset column.
1. Input field
2. Checkbox
3. Switch
Entry field
As a rule, an input field is associated with an object attribute and reflects its data. This is perhaps one of the most common elements, it has several ways to select a value:
Selecting from a list (List Selection Mode)

Selecting from another form (Select button)

Control buttons
The implementation of the above examples does not require significant effort on the part of the developer. for example, for the list mode it is necessary to fill the list of an element with values; to select from another form, it is enough to simply associate the control element with the directory data. But for the control buttons, you will need to write more code to process clicks on each button, although it will not be large:
Procedure pvSelection of NomenclatureRegulation(Element, Direction, StandardProcessing)
//Select data for the input field
// in this case, the Nomenclature directory
Request = New Request;
Request.Text=
"CHOOSE
| Nomenclature.Link As Product
|FROM
| Directory.Nomenclature AS Nomenclature
|ORDER BY
| Nomenclature.Code";
TZNomenclature = Request.Run().Upload();
//search for the current directory element specified in the input field
CurrentElement = TZNomenclature.Find(Element.value);
If TechElement = Undefined Then
// if the element is not found then set the index number
// outside the value table, because the very first element in
// value table has index 0
TechIndex = -1;
Otherwise
// if the element is found we get its index
TechIndex = TZNomenclature.Index(TechElement);
endIf;
// calculate a new index depending on the button press
// minus in front of the variable The direction is placed so that when
// clicking on the top arrow showed the element above it
// and therefore with a smaller index
NewIndex = TechIndex-Direction;
// get the number of elements in the directory
// subtract one because all collections in 8.1 start at 0
Number ofElements = TZNomenclature.Quantity()-1;
If NovIndex< 0 Или НовИндекс >Number of Elements Then
// if when changing the index is outside the value table
// i.e. its number is greater than the largest index or less than 0 then
// do not change the value and inform the user about it
Notify("You have reached the directory limit");
Otherwise
// assign a new value, "Product" is the name of the column of the value table
Element.value = TZNomenclature.Get(NewIndex).Product;
endIf;
End of Procedure
Checkbox
In most programs, a checkbox serves to display two states: checked, unchecked. In 1c, the checkbox has three states; in the third state, the checkbox is displayed as checked and at the same time shaded. The three states are only available if the checkbox data is a number, and the states have the following meanings:
Switch
The switch is used to select one value from a small number of possible ones (preferably no more than five), and the values cannot be combined. For example: suitable for selecting a person’s gender. Another example: let’s say a company gives one of 3 discounts on a product, and the discounts do not add up:

In this case, the convenience of using radio buttons may lie in the fact that each of them can have some value, which is set in the “Selectable value” property. And then "5% Discount" can store the value 5 or 0.05.
It's important to remember three things when using switches:
The first switch should have the "FirstInGroup" property (in this example, it is the "5% Discount" switch).
Switches that are meaningfully related to one group should go in a row when setting up the traversal order, without interruption by other form elements. The traversal order is set from the menu "Form -> Setting traversal order", for this example it looks like this:

- The type of selected value is set for the switch that has the "FirstInGroup" property.