Formatting a hard drive via BIOS without. Formatting a hard drive via BIOS
When the operating system is running, full formatting of the hard drive is impossible. The fact is that the operating system will not allow you to erase the partition on which it is installed. Therefore, in this article we will tell you about several ways to format a hard drive without using an operating system.
Using Windows bootable media
Method 1 – Using the Command Line
To perform the formatting procedure using this method, you will need a disk with a recorded installation of Windows 7 or 8. A bootable USB flash drive with a recorded OS image is also suitable.Step 1.
To boot from the installation media, you need to restart the computer and open the BIOS shell (depending on the motherboard, these may be the “DEL”, “F2”, “Ctrl+F2”, “F8”, “F12”, “Esc” keys) ).
Step 2.
After this, the BIOS shell will launch, in which you need to go to the “Boot” tab (control the arrows on the keyboard).
Step 3.
Open the "Boot Device Priority" menu.

Step 4.
As the first bootable media, select either a floppy drive or a USB port that will have the name of your flash drive. The disk drive is selected if you have a CD with a recorded image, USB is selected if you have a bootable flash drive.

Step 5.
After this, you need to save the changes and exit the program shell. You can do this by pressing the “F10” key or go to the “Exit” menu and click “save & exit”. After this, the PC will automatically reboot and you will see a message asking you to press an arbitrary key to continue booting from the media (this message does not appear when booting from a flash drive), to continue press an arbitrary key, for example, space or Enter.

Step 6.
Next, the process of copying the Windows installation files will follow and the installation wizard will start. When the wizard starts (the language selection window appears), press the keyboard shortcut “Shift+F10”, which will launch the command line. If you are using an installation disk with Windows 8, then you need to start the command line as follows:
- Select your system language.
- Go to the Diagnostics menu.
- Open the “Additional Features” sub-item.
- Launch Command Prompt.
Formatting the hard drive will completely erase your data, so it is important not to make the wrong choice of disk. The problem is that when running from bootable media, you may not see the actual drive letters. To determine the partition letters of your hard drive, type the following at the command line:
"wmic logicaldisk get deviceid, volumename, size, description."
After entering the command, press Enter. The console will display available information about the partitions (drive letter, size and description).
Step 8
To perform formatting, enter the following format command:
"format /FS: [file system type] [drive letter]: /q"
For example:
"format /FS:NTFS C: /q" - quick formatting in the NTFS file system
Press Enter. The process of formatting the selected partition will begin.

Method 2 - Using Windows Setup
This method involves using the Windows Installer shell.Step 1.
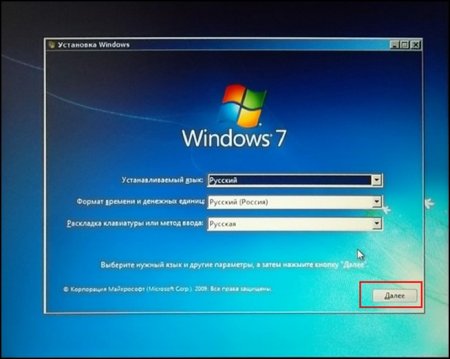
After the language selection window appears, select the Russian language and click “Next”. We start the installation by clicking the corresponding “Install” button.
Step 2.
Then you need to choose which type of installation to use: “Update” or “Full installation”. In our case, the second point is necessary.

Step 3.
In the next window you will be asked to select the partition in which the new OS will be written. Select the partition you want to format and click Disk Setup. The Disk Control Panel will appear, where you can format the partitions, delete them, and re-partition them.

Note: When starting from bootable media, the drive letters will most likely be missing, so make sure you are formatting the correct drive. It is best to remember the sizes of each partition in advance, since you can use them to navigate which disk is which.
Step 4.
To start formatting the partition, click “Format”.

After this, the disk will be formatted.
Using third party boot utilities
Method 3 – Using Third Party Boot Utilities
If for some reason you do not have an installation image of the operating system, you can use third-party boot utilities. One of these is ERD Comader. Based on it, you can create a boot disk or a removable flash drive. After you have created bootable media, select it as the main boot device in the BIOS (we discussed how to do this above). After downloading the program, go to the “MicroSoft Diagnostic and Recovery Toolset” section. In response to numerous requests and pop-up windows, click “Next” all the time until the main working window loads (screenshot below), where you need to select the “Disk Cleanup” item. This will launch the Disk Cleanup Wizard.
Note: In addition to this utility, there is also a third-party software package called “Hiren`s Boot CD”. In its composition you will find many utilities for working with disks and more. It is also accompanied by detailed documentation.
According to available statistics, several hundred people every day are interested in the answer to the question of how to format a hard drive via BIOS. I note that the question is not entirely correct - in fact, formatting using the BIOS alone (at least on regular PCs and laptops) is not provided, but, nevertheless, I think you will find the answer here.
In fact, when asking a similar question, the user is usually interested in the ability to format a disk (for example, drive C) without loading Windows or another operating system - since “from within the OS” the disk is not formatted with a message that this volume cannot be formatted. Therefore, we will talk about formatting without loading the OS - this is quite possible; By the way, you will also have to go into the BIOS along the way.
Note: If you want to format the driveC before installationWindows, then the following text is not quite what you need. It will be much easier to do this in the process. To do this, at the stage of selecting the installation type, select “Full”, and in the window where you need to specify the partition for installation, click “Configure” and format the desired disk. More details: .
In this example, I will use the Windows 7 distribution (boot disk). The steps when using a disk and flash drive with Windows 8 and 8.1, as well as recovery disks created within the system, will be almost the same.
After downloading Windows Setup, on the language selection screen, press Shift + F10, this will open the Command Prompt. When using the Windows 8 recovery disc, select Language - Diagnostics - Advanced Options - Command Prompt. When using a Windows 7 recovery disk, select “Command Prompt”.
Taking into account that when booting from the specified drives, the drive letters may not correspond to those that you are used to in the system, use the command
Wmic logicaldisk get deviceid, volumename, size, description
In order to determine the disk that needs to be formatted. After that, to format, use the command (x - drive letter)
Format /FS:NTFS X: /q - quick formatting in the NTFS file system; format /FS:FAT32 X: /q - quick formatting to FAT32.

After entering the command, you may be prompted to enter a disk label, as well as confirm that the disk is formatted.
That's all, after these simple steps, the disk is formatted. When using a LiveCD, everything is even simpler - set the boot from the desired drive in the BIOS, boot into a graphical environment (usually Windows XP), select the disk in Explorer, right-click on it and select “Format” from the context menu.
Good afternoon, dear readers of my blog! Has your laptop started to behave in a completely incomprehensible way; you can’t find the files you need on it? Is your computer glitching at startup and it has become completely impossible to work? Antivirus diagnostics not helping? All that is visible at startup is a dead blue desert? Then the last radical method remains. Let's try to figure out how to format a hard drive on a laptop via BIOS.
The design of the hard drive is extremely simple. The main disk of a computer is a round plate with a magnetic coating applied to it. Its surface is absolutely smooth and polished to a mirror shine. There are no sector markings on it, and where this or that type of information will be stored is determined by the formatting operation. During this process, the plate is physically marked and any broken or damaged areas are inspected. Such places are excluded as unreliable and information is not recorded on them. Primary disk formatting is performed at the manufacturing plant. All subsequent cases occur every time you reinstall Windows. Each of them checks the disk surface to avoid a conflict between the system and newly recorded programs.
Attention! Formatting will lead to complete loss of data previously saved on the laptop. For example, only an experienced programmer can restore your favorite photos using special utilities. For money, of course.
How to properly format a hard drive via BIOS
To reformat, bring a boot disk or a copy on hard drive with Windows. You can download a Windows OS file of any version on the Internet or use a licensed copy of the Windows distribution. To achieve the final result, it makes absolutely no difference where the new Windows comes from. To revise an HDD disk without access to the main OS, you need to do all the operations at the boot stage. Pre-integrate the media with the new operating system.
What to do in this case:
- We reboot the laptop and during the initial startup period, activate the Del key to enter the basic system. In some models, as an alternative to Del, Insert or function keys F2, F5, F12 are used. Pay close attention to the message at the bottom of the screen when loading. Accurate information is always provided there. If you have saved documents for your device, you can find detailed instructions there.
- Wait for the BIOS text window to appear on the screen. It is impossible to navigate through the mouse, but only by activating the block of buttons on the keyboard: up, down, right, left. Let's go straight to the “Boot” tab.
- We prioritize booting the system from the boot sector we need on a CD or USB drive, and not from the HDD. How does this happen? Use the arrows on the keyboard to get to the “Boot Device Priority” item. Using the F5, F4 functionality, select the value CD-ROM or flash drive to the most important first position.
- Now you need to leave the base system, but save the consequences of the intervention by activating the F10 function key. We are waiting for the laptop to reboot on its own.
- To configure Windows 8, select language - diagnostics - advanced features - command line. To configure Windows 7 OS, activate the “Command Line” item.
- If you come across unfamiliar information while working, use a text editor line
wmic logicaldisk get deviceid — volumename-size-description
- To select the name of the required disc, activate
format /FS:NTFS X: /q - partitioning process in the NTFS system;
format /FS:FAT32 X: /q - accelerated partitioning process in FAT32,
the value “X” is the symbol of the desired disk.
Issue the format confirmation command and reboot.
On the latest versions of Windows 10, you can simultaneously choose to convert MBR to GPT and apply the new partition scheme.
BIOS does not recognize drives of any type
Sometimes when setting up a basic system, all or one available disk is not visible in the Boot section. What should you do in this case? First of all, if the laptop is very old, most likely it simply does not support the format of flash drives. If the input/output system does not see the hard drive, and problems are observed in the operation of the laptop (and they are observed if there is a question about formatting the disk), then the most likely cause of the problem is mechanical damage to the hard drive or the cell where it is installed.
Problems with BIOS
Your favorite Asus, Acer, HP or Lenovo does not turn on at all, but you haven’t dropped it? Most likely, there is a failure of the input/output system itself. Only changing the motherboard can help here, but it is not cheap. However, it has its advantages. You can upgrade your laptop to the maximum permissible parameters.
The second option is that the battery powering the system has failed. You need to unscrew the cover on the back of the laptop and find a small round-shaped coin cell battery. Carefully replace it and try to reboot the device.
Bottom line
Be extremely careful and you will see that the hard drive partitioning process is not that complicated. The most primitive way to do formatting is directly in the operating system by activating the “Format” command.
In addition, periodically the procedure of reinstalling the operating system will benefit any laptop if it begins to freeze and irritate its owner. By the way, information on how to reset the BIOS to factory settings.
Did you like the material? Did you gain new information and were able to “cure” your laptop computer? Or perhaps you see some inaccuracies in the article? Write in the comments and I will be happy to answer any question.
Also, at the bottom of the page you can see icons of the most popular social networks. Share the material with your friends, perhaps some of them will be interested in learning something new.
Visit my pages again, I will be glad to meet regular and newly arrived readers of the blog.
Thank you for your attention! See you again on my blog. Sincerely, Rostislav Kuzmin.
A large number of people face the task of formatting a hard drive through BIOS every day. It is worth noting that it is impossible to format a hard drive using BIOS alone. Therefore, most often, users have in mind the possibility of formatting the hard drive before installing or restoring the operating system.
When the OS is running, it is impossible to completely clean the system partition (most often drive C). An error message will be displayed to you. Therefore, we will discuss in detail the process of formatting a hard drive without starting the OS using your computer's BIOS. There are several main formatting methods via BIOS, we will look at each of them.
To format, you will need a special bootable flash drive or boot disk with a recorded operating system. A disk with a licensed Windows OS is ideal as a boot disk. It is also possible to use a self-created disk with a recorded OS.
First, restart your computer. After starting, you need to press the combination on the keyboard to enter the BIOS (most often it is DEL, F12, F8, Ctrl+F2, Esc - you can read more in this article). The main BIOS window will appear in front of you, in which you need to use the keyboard to click on the " tab Boot".

Now select your drive (if using a boot disk) or USB port (if using a bootable flash drive) as the main boot device.
After that, press F10 to exit the BIOS, saving the changes about boot device priority, and press “OK”. Your computer will reboot and a message about booting from the drive (or flash drive) will appear on the monitor display; to get started, just press any key.
When the language selection screen appears, use the keyboard shortcut Shift+F10 to access the command line. If you use a disk with Windows 8, then you need to open the command line differently by following the steps: " select language" - "diagnostics" - "additional features" - "command line".

When starting a computer from a boot disk or flash drive, the drive letters may not match those you are used to. Formatting a hard drive through the BIOS will completely delete all data, so you need to be careful when choosing a drive. To determine the real letter designation of the hard drive in the command line, you must enter the command wmic logicaldisk get deviceid, volumename, size, description.
To format the selected disk, write the command on the command line (instead of X is the designation of your disk):
- format /FS:NTFS X: /q – fast format in the NTFS system
- format /FS:FAT32 X: /q – fast format in FAT32
Press "Enter" and wait for formatting to complete.
Formatting via Windows Installer GUI
The second way to format a hard drive through the BIOS is using the Windows Installer. To do this, after selecting the language, click “Next”.
After that, select "Full installation".
Select the hard drive that needs to be formatted and click “Configure”.

To format the disk, select "Format".

Formatting via ERD Commander
There is another effective way to quickly format a hard drive without loading the OS. To do this, you need to download the ERD Commander program and create a boot disk based on it. In the BIOS, select the disk drive as the main boot device (you already know how to do this). When the program starts, go to the "MicroSoft Diagnostic and Recovery Toolset" section. In all the requests that appear, click “Next” until a working window appears, in which we select the “Disk Cleanup” item and format the hard drive.

Thus, we have looked at all the main ways to format a hard drive through the BIOS. If there are boot disks with other operating systems, the names of the items may change slightly, but the logic of the procedures will not change.


