Changing the appearance of Windows 7. How to return the standard theme to Windows? Detailed instructions
Customizing the appearance of Windows 7
Some desktop design options you or someone else set when installing the operating system, for example background picture("wallpaper"). But this does not mean that such a background image will torment you with its appearance forever. Everything can be changed. This applies to both the appearance of the windows and the sounds during various actions.
To change Windows 7 appearance settings, click right click mouse over an area of the Desktop free from windows and icons (Fig. 2.33).
Rice. 2.33. Calling the Windows appearance settings window
Attention!
When changing various settings Windows, you will see that some elements of the settings windows are marked with
(for example, buttons that call additional windows with settings). This means that system administrator rights are required to perform the action of the specified item. When installing the operating system, a user with administrator rights must be created. If you are not running as an administrator user, the system will not allow you to use the item marked with the specified icon.

A. N. Lebedev. “Windows 7 and Office 2010. Computer for beginners. Go to work tomorrow"
In the appeared context menu select Personalization. The window shown in Fig. will open. 2.34.
Rice. 2.34. Personalization window
Topics
A design theme is a ready-made set of parameters for the screensaver, desktop wallpaper, windows and sounds for various events. You can configure all of these settings manually individually (we'll look at how to do this later), or you can simply select the theme you like.
The main field of the Personalization window, where you see phrases with the word "theme", shows Windows 7 themes (for example, Windows 7, Architecture, Characters). You can select a theme by clicking on the theme icon or its name. Once you do this, the corresponding theme will be enabled.
Changing the appearance of windows
To change appearance Windows windows 7 You need to click on Window Color.
This will open the Color and appearance window (Fig. 2.35). The rectangular box in the center of the window shows an example of the current design of the window and its elements. Below this field is the Element list.

A. N. Lebedev. “Windows 7 and Office 2010. Computer for beginners. Go to work tomorrow"
Rice. 2.35. Window color and appearance In this list you can select the element of the window or desktop that you want
tune. After that, the parameters of the selected element that can be changed will appear to the right and below this drop-down list.
Desktop Background
To open the Desktop background settings window, select Desktop Background.
The window that appears (Fig. 2.36) shows thumbnails (reduced images) of various background images. Windows Developers 7 did their best and provided you with a wide variety of drawings.

A. N. Lebedev. “Windows 7 and Office 2010. Computer for beginners. Go to work tomorrow"
Rice. 2.36. Setting the desktop wallpaper
All these images are contained in a special folder Windows desktop backgrounds. This can be seen in the Picture Position drop-down list. You can search for pictures in several more folders, a list of which is visible if you click on this drop-down list.
Maybe you drew a picture for the Desktop yourself? Or do you have a good photo on your hard drive that's suitable for the background? You can select any image saved as a file on your computer's hard drive as your Desktop background. To do this, click the Browse button. As a result, a window for selecting a folder will open. You will encounter such windows more than once when working with various Windows applications 7. An example of a folder opening window is shown in Fig. 2.37.

A. N. Lebedev. “Windows 7 and Office 2010. Computer for beginners. Go to work tomorrow"
Rice. 2.37. Folder selection window In the window that opens, click on the triangle to the left of the Computer folder
or by the name of the folder itself. The result will be a list logical drives on the hard drive of your computer, as well as CD and DVD drives and any other connected storage devices (Fig. 2.38).
![]()
A. N. Lebedev. “Windows 7 and Office 2010. Computer for beginners. Go to work tomorrow"
Rice. 2.38. List of logical drives Click on the name of the drive on which you saved the picture file. At
This will display a list of folders contained on the selected disk (Fig. 2.39). If your drawing folder is inside another folder, find that folder's name and click on it. Having found the folder with the picture, click on it and then click OK. As a result, pictures from this folder will be displayed in the window shown in Fig. 2.36 and you can choose any of them.

A. N. Lebedev. “Windows 7 and Office 2010. Computer for beginners. Go to work tomorrow"
Rice. 2.39. Contents of drive C:
You, of course, understand that the size of the picture may not match the screen size. The Picture Position drop-down list determines how to place the background image on the Desktop. Available options: Fill, Fit, Stretch, Tile, Center.
The pictures to the left of the corresponding options for placing the picture show how this will happen. Let's look at each case.
Filling – the image size is adjusted vertically while maintaining the image proportions so as to fill the entire Desktop.
Fit to size – the image size is adjusted horizontally while maintaining the image proportions so as to fill the entire Desktop.
Stretch – the picture is stretched vertically and horizontally so as to fill the entire desktop.
Tile – if the size of the picture smaller size Desktop, it is repeated many times until it fills the entire surface of the Desktop.
Centered – the picture is displayed in the center of the Desktop with its original dimensions.
You can select multiple images at once. They will replace each other after the time you specify. To do this, select the first of the desired images by clicking the mouse, and then press the Ctrl key on the keyboard and, without releasing it, click on the other images. As a result, all the images you have marked will be marked with check marks. In this case, the Change picture every drop-down list will become available, where you can select the duration of display of each picture.
IN latest version Microsoft has done a lot with its operating system to improve the appearance of Windows 7. However, everything, even the best, gradually gets boring and users begin to look for an opportunity to change the usual work environment. A banal change of desktop wallpaper does not count - today we will talk about a deeper change in the “windows”.
Themes and styles
The program does not require installation, but you must run it as an administrator ( Right click - Run as administrator). After this, the utility will automatically patch your system by doing available installation various topics registration Then you need to specify the path to the necessary files from the theme you downloaded and click on the Install Theme button. The topic will appear on the right in the list installed themes. Now just select the desired design option from the list and click Apply Theme to change the appearance of your system.
Start button
To change the appearance of the Start button, use the program Windows 7 Start Button Changer. The utility comes with ten design options for the start button. After selection suitable option Explorer will restart and you will see updated button Start.

Program icons
Change icons installed applications it is possible standard means Windows - by selecting in the file properties the desired picture. But for everyone installed programs this will take quite a long time, so it’s better to use the application 7conifier, which not only allows you to change many icons in one fell swoop, but also comes with several eye-pleasing themes.

You can easily switch between sets of icons in the program interface, and also restore the default set if you followed the program’s advice and did backup copy at first start. With 7conifier you can create your own icon sets.
Well, as a result, after applying all the above listed programs, your system will acquire completely new look. For example, this one.
The design of Windows 10 contains elements of both versions 7 and 8 of the operating system. For example, the Start menu returned again, but in a slightly modified form. On the left side are recently open source software, and on the right side, instead of the list of applications, live tiles appeared.
Despite the fact that the developers listened to users and made the design more familiar, they changed start screen, returned the Start menu and so on, not everyone is satisfied with the existing system design. Therefore, there are several ways to make Windows 10 look like Windows 7.
Appearance
When the user first logs in to the desktop, they will see nothing but the Recycle Bin. In version 7 of the system, in addition to it, there were desktop shortcuts on the screen, network environment and user folders.
IN new version The system's themes and icons have changed. This parameter is the easiest to change. The Internet is full of topics, including Aero 7 - standard design sevens. It changes in the same place as the shortcuts - in the “Personalization” section.
Taskbar Settings
In Windows 10, the taskbar contains some elements that were not there in version 7 - the search bar and task view. These functions are more convenient for tablets than for the desktop version and therefore they can be hidden.
The search bar takes up a significant amount of space on the panel. To save space and so that the worker Windows table 10 was more similar in design to the seven, you can do two things: either remove the search bar completely, or make it in the form of a small icon that will be pinned to the taskbar.
For the first option, you need to right-click on the panel, click on “Search” and check the box next to “Hidden”. If necessary, you can call it with the Win button. To leave the search on the panel as an icon, instead of “Hidden”, select “Show search icon”.
The task view button shows all open processes and allows you to create a virtual desktop. You can remove it by right-clicking on the taskbar and unchecking the box next to “Show task view button”. You can see open programs and windows using the standard Alt+Win command.
Returning the standard Start menu
You can make the Start menu like Windows 7 either using system tools or using third party programs. You can return the Start menu using system tools or using additional utilities. In the first case, you just need to remove all the extra tiles from the right side of Start.
Open Start and right-click on the icons, selecting “Unpin from” home screen" The tiles will disappear and the menu will become more similar to version 7 of the operating system. You can also resize the menu to empty space The tiles didn't take up much space.
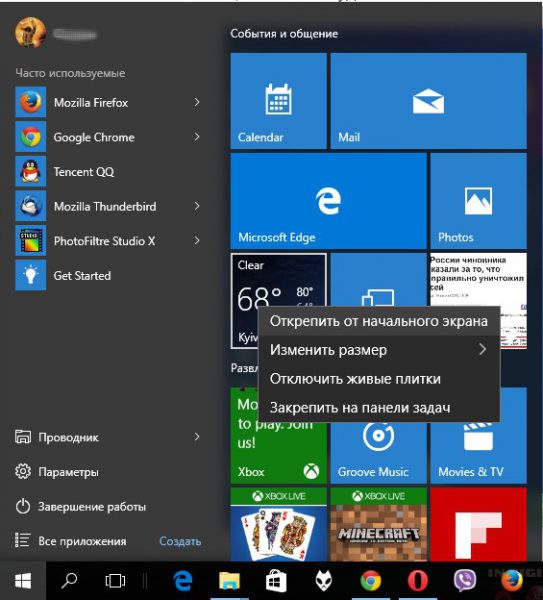
For quick access You can pin them to programs on the left side. Right-click on any empty space in the menu and select Properties. In the window that appears, go to the “Start Menu” and select “Settings”. Next, another window will appear with a list of applications that can be placed in the menu. This could be the Control Panel, Documents, and so on.
If this method does not suit you and you want standard menu Start, then only help here special programs. For example, you can use Classic Shell- This is the most popular utility.
Download any of the above programs, run installation file and follow the program instructions. Many of them have flexible settings Start. 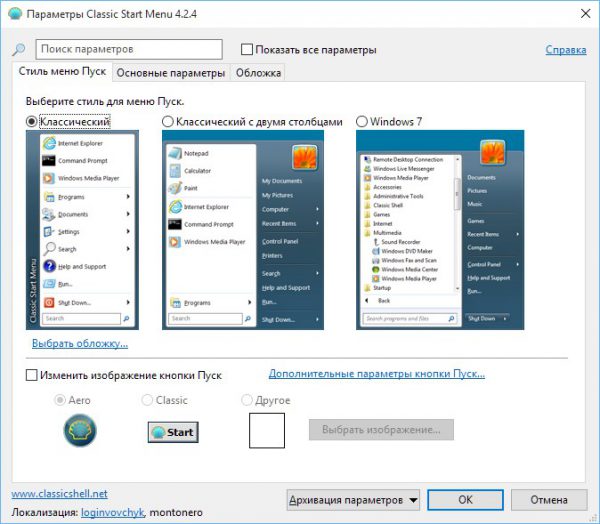
Windows 10 provides more options for returning to familiar look than Windows 8. Users may like some innovations and decide to leave everything as is; some decide to completely redo the appearance.
Video
Hello!
Every computer user (especially the female half :)) tries to give their Windows originality and customize it for themselves. It's no secret that basic settings not everyone likes them, and besides, they can even slow down your PC if it is not particularly powerful (by the way, such effects include the same Aero).
Other users want to disable various graphical bells and whistles, because... we’re simply not used to them (after all, all this didn’t exist in Windows 2000 and XP before. I, for example, am generally quite ascetic about this, but I have to help other users...).
So, let's try to change the appearance of the seven a little...
How to change the theme?
Where can you find a lot of new topics? At the office Microsoft website has a sea of them: https://support.microsoft.com/ru-ru/help/13768/windows-desktop-themes
Theme - in Windows 7, the theme refers to everything that you see. For example, the picture on the desktop, window color, font size, mouse cursor, sounds, etc. In general, the entire display and soundtrack related to the chosen topic. A lot depends on it, which is why we’ll start setting up our OS with it.
In order to change the theme in Windows 7 you need to go to personalization settings. To do this, it is not necessary to go to the control panel; you can simply right-click anywhere on the desktop and select “personalization” from the menu (see Fig. 1).
There are quite a lot of other topics on the Internet, just above under the title of this subsection of the article I provided a link to the office. Microsoft website.
By the way, important point! Some themes may even cause your computer to slow down. For example, themes without the Aero effect (which I talked about here:) run faster (usually) and require lower computer performance.
How to change the background, wallpaper on your desktop?
Large selection of ready-made wallpapers: https://support.microsoft.com/en-us/help/17780/featured-wallpapers
The background (or wallpaper) is what you see on your desktop, i.e. background picture. This picture has a very big influence on the design. For example, even the taskbar bar changes its color depending on what picture was selected for the wallpaper.
To change standard background, go to personalization (note: right click on the desktop, see above), then at the very bottom there will be a link “” - click it (see Fig. 3)!
By the way, the background on the desktop may be displayed differently, for example, there may be black stripes along the edges. This happens because your screen has a resolution (more about this here -). Those. roughly speaking, a certain size in pixels. When it doesn't match, then these black stripes are formed.
But Windows 7 may try to stretch the picture to fit your screen (see Fig. 4 - the lowest red arrow: “Fill”). True, in this case, the picture may lose its entertainment value...
How to change the size of icons on the Desktop?
Change icon size- very simple! To do this, right-click anywhere on the desktop, then select the “view” menu, then select from the list: large, medium, small (see Fig. 5).
How to change the sound design?
To do this you need to open in control panels Personalization tab, and then select Sounds.
Here you can change the usual soundtrack to various others: landscape, festival, heritage, or turn it off altogether.
How to change the screensaver?
We also go to the personalization tab (note: right-click anywhere on the desktop), select the screensaver item below.
How to change screen resolution?
Option #1
Sometimes you need to change screen resolutions, for example, if the game is slow and you need to run it with lower parameters; or check the operation of a program, etc. To do this, right-click on the desktop, and then select screen resolution from the pop-up menu.
Option No. 2
Another way to change the screen resolution is to configure it in video drivers (AMD, Nvidia, IntelHD - all manufacturers support this option). Below, I will show how this is done in ItelHD drivers.
First you need to right-click on the desktop and select “ Graphic characteristics"(see Fig. 12). You can also find the video driver icon and go to its settings in the tray, next to the clock.
Rice. 12. Graphic characteristics
Rice. 13. Resolution, display section
How to change and customize the START menu?
To customize the START menu and taskbar, right-click on the "START" button in the lower left corner of the screen, then select the properties tab. You will be taken to settings: in the first tab you can configure the taskbar, in the second - START.
Describe each checkbox in the settings, probably makes a lot of sense does not have. It’s best to set it up experimentally: if you don’t know what the checkbox means, turn it on and see the result (then change again - look, at random you will find what you need :))..
Setting up showing hidden files and folders
Here, it is best to enable the display of hidden files and folders in Explorer (many beginners get lost and don’t know how to do this), as well as showing file extensions of any file types (this will help avoid some types of viruses that masquerade as other types of files).
This will also allow you to know for sure what kind of file you want to open, and also save time when searching for some folders (some of which are hidden).
To enable display, go to control Panel, then to the tab design and personalization. Next, look for the link “ Show hidden files and folders"(in the Explorer settings section) - open it (Fig. 17).
- uncheck the box next to “ hide extensions for registered file types«;
- move the slider to “show hidden files, folders and disks" (see Fig. 18).
Desktop gadgets
Gadgets are small information windows on the desktop. They can notify you about the weather, about visitors mail messages, show time/date, exchange rates, various puzzles, slides, CPU load indicators, etc.
You can use the gadgets installed in the system: go to control Panel, enter “gadgets” into the search, then you just have to choose the one you like.
By the way, if the presented gadgets are not enough, then you can additionally download them on the Internet - there is even a special link for this under the list of gadgets (see Fig. 19).
Important note! A large number of active gadgets in the system can cause a decrease in computer performance, slowdowns and other delights. Remember that everything is good in moderation and do not clutter your desktop with unnecessary and unnecessary gadgets.
That's all for me. Good luck to everyone and bye!
Have you bought a computer, or just switched to Windows 7 (8, 10), or are you already bored with the standard view?
Let's try to figure out how to configure the OS so that the magnet works with it.
We change the theme from the "Windows 7" set.
When the user is new or wants to change everything at once, then it is better to use a tool such as choosing themes for Windows 7.
The list of topics can be accessed in the Personalization window.
To do this, just use Windows Explorer by right-clicking directly on the desktop.

Attention! Don't fall for any shortcut!
In the window that appears, use the mouse pointer to select “Personalization” and click.
A window will open with established themes for "Windows 7". Now you can try out all the topics one by one.

Clicking on the selected topic will change the appearance of the desktop, folders and the appearance of the mouse cursor will also change.
Having made your choice, do not forget to confirm by clicking the left mouse button on the inscription “Save theme”.
If there is no good theme inside "Windows 7".
At first, the set of themes already installed inside the OS is quite enough for you to study and enjoy working with your computer. What should you do if you’re tired of this or not? interesting topic? Then you can find on the Internet what best suits your taste and install it on your PC. This can be done in the same “Personalization” window.
If you've been paying attention, you'll have noticed "More topics on the web" (or in the Microsoft Store).

This is what is needed now. Click on it.
Next, you will go to the Microsoft website web page; a large arsenal of themes is presented for copying and installing in operating system. The choice is so wide and varied that for better search sorted into topics and genres.
Having decided on your preference and made a selection with the mouse, you find yourself in a gallery of themes with captioned images. You can get acquainted with the topic in more detail by clicking on the inscription “More details”.
If you are satisfied with it, you can copy it to your PC by selecting “Download”.
Installing personal themes for Windows 7.
If the user is sufficiently prepared, you can independently install themes for Windows 7, which are not available either in the OS or on the Microsoft website.
For those who are not familiar with this entry - "SystemRoot/Ressources/Themes", let me explain - this is the path (the route of your movement through the OS folders) where the files with installed themes for the design of the operating system are located.
Attention! This method is only suitable for trained users. The OS does not allow installation of programs without a Microsoft signature, so you must use specialized utilities, "Universal Theme Patcher for Windows".
Using this utility, UAC is disabled (for those who don’t know, find information in search engine), starting with administrator rights, in the program we click on 3 buttons for Patch.
There is no need to worry about unexpected accidents; the utility automatically creates a previous configuration file - Backup.
In case of using 64-bit Windows versions, you need to do this twice, because the OS has libraries for the 32-bit and 4-bit versions of Windows.
Removing the theme for "Windows 7" from the OS.
To remove unused themes, use the learned method of logging into the Personalization folder.
Select the topic you want to delete. Right-click in the window that opens Windows Explorer, click on the inscription “Delete topic”. That's it.
The delete operation is necessary tool from cluttering your OS, especially during training and long searches best topic OS design for Windows.
Having mastered this small course-guide into the world of "Windows 7", there will be no thought that the appearance of the OS will soon get boring.
At any time, you can choose a theme to design inside "Windows 7". Or add third party products.
Setting up the appearance for Windows 8 and Windows 10 is practically no different from what was described above.


