How to change raw file system to fat32. Recovering data from a RAW partition using TestDisk
Imagine inserting a flash drive into your computer and seeing a message: “To use the drive in drive F:, first format it. Do you want to format it? If it's a new flash drive, no questions asked, but what if there was data on it? Then don’t rush to agree to formatting - perhaps there is a chance to save them.
First of all, you can try to take a risk and fix errors using Windows tools. To do this, open the console as administrator and write:
Chkdsk f: /f
Naturally, f: will need to be replaced with the current disk name. The /f option means error correction during scanning.
If the operation was successful, you can try opening files. But it may also be that you see the error “Chkdsk is not valid for RAW disks.” Don't despair, we have a couple more options in stock. Let's use a special program DMDE.
DMDE is a very cool program that is useful for searching, editing and restoring data on disks. The developer reports that it uses clever algorithms, thanks to which it can restore directory structures and files in difficult cases when other programs do not give the desired result.
DMDE has a disk editor, a simple partition manager, the ability to image and clone disks, rebuild RAID arrays, and so on. Paid editions support the recovery of files and directories without restrictions, but the free version is also very good and helps just as well in many situations.
After starting the program, select our media.

A partition window opens, where we double-click to select a full scan.

After a quick scan, you need to go one level higher to the “Found” folder and click “All found + reconstruction”. A dialog will open where we select “Rescan current file system” and wait for the end of the operation.

After scanning, DMDE will show a list of found files. We look through the folders and choose what to restore. Unfortunately, you cannot restore entire folders in the free version. To restore one file at a time, right-click and select “Restore object”, then indicate where to restore and click OK.

It is worth noting that file names are generated automatically and often do not correspond to the original ones. Don't be surprised if some files come out broken or artifacts appear in your photos. By the way, images can sometimes be restored using one of the special utilities. For example, Recuva, R-Studio and “PhotoDOCTOR”. To my great surprise, the latest program restored almost dead photographs in very good quality and with a minimum of artifacts - many of its competitors could not cope with this.
In general, good luck in your recovery! But it’s better, of course, to immediately rewrite all data from temporary media and make backups.
A “healthy” storage device has an NTFS file system (if it is a hard drive or external storage device) or FAT (if it is a flash drive). The corresponding entry can be seen in the properties. When it fails, you can see the RAW mark in this place, which means “raw, raw.” This data format has become generally accepted. It allows you to save files, but does not allow you to work with them normally.
Reasons for the appearance of RAW
Errors leading to loss of data of various formats and types:
- Power surges, improper shutdown of the computer, malfunctions of the uninterruptible power supply unit, other hardware,
- The consequences of a virus infection, which are rare, but can destroy the NTFS file system,
- Failure caused by physical damage. After scanning, in this case it is necessary to identify bad sectors with a special program (MHDD, Victoria).
What to do with a RAW file system
If such a problem became relevant for you when the pre-existing NTFS partitions were destroyed, then the OS denies access, stops displaying information about the equipment: “it doesn’t see”, and also requires you to format the disk. Under no circumstances should you do this, at least until all methods of saving data have been tried.
Methods for restoring a hard drive file system
We recommend that you first try the standard method of resuscitating the hard drive:
(Checkingdisk - disk check). This is a Windows tool for testing and repairing NTFS partition table. Since it's possible that Windows won't start in case of a crash, CHKDSK is activated by typing on the command line:
- Press the key combination Cntrl + R,
- In the Run window that appears, type CMD
- At the command prompt, enter: chkdsk (drive name): /f

- You will receive a message stating that verification cannot be performed. Agree to perform a reboot check (Y) and reboot the PC.

These actions start scanning for errors and correcting them on the hard drive. If you need to overcome RAW on an external drive, then enter “chkdsk (name): /f” in the search bar that appears when you click the “Start” button.
The process of finding and correcting errors will definitely take a lot of time. How much is difficult to say. This depends on the size of the hard drive, the formats used and the extent of the damage. We recommend not to fuss and wait for another PC reboot, which will happen without your participation. If the file system has been successfully restored, then it is now possible to boot the computer in normal mode.
Next you should check the integrity of Windows itself:

Alternative Ways to Deal with RAW
If you have done all of the above, but the result is not marked as NTFS in the properties, then still do not rush to format. There are several programs that, in many cases, will be more effective than the standard CHKDSK.
- Try TestDisk, a free data recovery utility. This program will be able to adjust the partition table and restore “lost” partitions, rebuild the NTFS boot sector. It works with almost any operating system and any format. When working with TestDisk, you will need administrator rights.
- is a powerful recovery program that fixes all commonly used file system types. It searches for and recognizes unreadable hard drive partitions using the advanced IntelliRAW algorithm. R.saver does not require installation on a PC and works with various formats.
- Recuva is a free popular program with a user-friendly interface that will return the file system to its original state. Often used by beginners. It has the function of searching and restoring information of a certain type and format: only photos, or only text files.
Hard disk drives (HDDs), which for various reasons are not detected by the operating system, receive RAW status and access to them is no longer possible. When you try to open such a disk, Windows advises you to format it, but if you follow this recommendation, all recorded information will disappear. It is advisable to restore an acceptable format: NTFS or FAT32.
The sources of problems with the HDD can be different, and before doing anything to restore the format, it is worth identifying them. Here are the most common:
- Connection failures. For example, the user incorrectly disconnected the disk or the power supply stopped and the file system became corrupted.
- The cable that connects the drive to the board is broken.
- Malicious software that violates the data structure.
- Errors that occurred when reinstalling or updating the OS.
- In the case of a flash drive, the reason for changing the format to RAW may also be a malfunction of the USB connectors.
- Malfunctions of the PC motherboard.
- Errors when working with Acronis Disk Director.
Format recovery
To restore NTFS format from RAW, try the following:

Restoring format using special programs
If, when you try to check the HDD using the method described above, a message appears: “CHKDSK is not valid for RAW disks,” you can use programs that allow you to restore the NTFS format from RAW. Let's look at the most popular of them.
DMDE
DMDE is a utility that looks for damaged partitions in the file system and helps restore the disk to NTFS status. After downloading and installing the program, you need to do the following:
- Launch the application.
- On the left, check the box next to the phrases “Physical devices” and “Show partitions”.
- Select the damaged drive and click OK. After this, the utility will find the RAW section and indicate it with a crossed out icon. If this does not happen, perform a full scan (the corresponding button is located at the bottom of the window).
- Now try to open the RAW volume and click “Recover” and then “Apply settings”.
- After this, as a rule, the HDD format changes to NTFS.

DMDE program window
IMPORTANT. If you are trying to return the NTFS status to the system disk and do it from another PC, then after the operation is completed and the HDD is returned to its place, the old computer will still display it in RAW format, so it is advisable to first restore the Windows bootloader.
Recuva
A simple and easy-to-use program that can fix RAW disks and flash drives. The procedure is as follows:
- Launch the application, select “Recover all files”, mark the damaged disk and click “Start”.
- The utility will detect files with a broken structure and correct the format to NTFS.
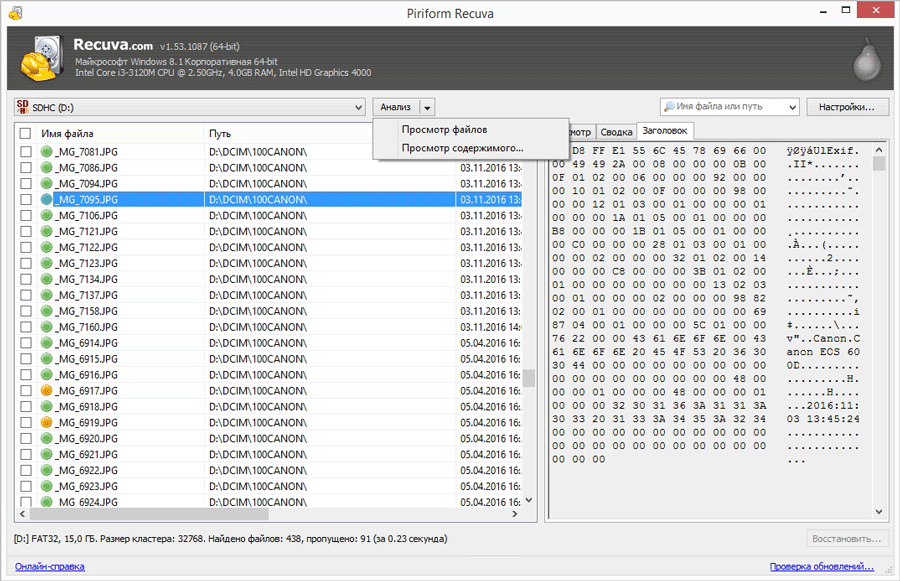
Piriform Recuva program window
TestDisk
The third utility that restores the disk format. Just download and run it, and then:
- Select New, press Enter.
- Then click on the problematic HDD, then Enter again and select Analyze and Quick Search.
- After executing the command, select Write to restore the information structure.

TestDisk window
If all these manipulations lead to nothing, most likely the disk has mechanical damage or its components do not interact correctly and it would be more advisable to show it to a specialist.
There are situations in which a user may lose access to his hard drive (or a separate partition), and the file system of this disk (or its problematic partition) will begin to be defined as “Raw”. Such a hard drive may contain data that the user needs and needs to access (often at any cost). In this material I will try to help the user who finds himself in such a situation, I will explain how to fix it RAW HDD format, and will also tell you about the tools that will help us with this.
To understand what “RAW HDD format” means, you need to refer to the translation of the word “RAW” itself. Translated from English, the word “raw” means "raw, unprocessed". Accordingly, this term refers to disks on which either there is no file system installed at all (the disk is not formatted), or their file system is damaged for some reason (the structure of the MFT file table is broken, incorrect MBR partition table data, etc.).
Initially, the term RAW denoted the default file system when working with CD-ROMs. Blank discs being prepared for recording were identified by the system as using the RAW "file system".

Illustration RAW format - HDD disk
Nowadays, every hard drive that is not formatted in the NT file system format (such as FAT or NTFS) has a “RAW” hard drive status. Check out the most effective ones.
Reasons for the RAW status of a hard drive
To understand how to fix the RAW format of HDD disks, you need to understand the list of reasons that cause it. I would note the following determinants:
- Power surges;
- Problems with the hard drive cable (the cable is damaged, poor contact between the cable and the hard drive, and so on);
- PC problems;
- Bad sectors on the hard drive (especially noticeable when accessing the hard drive, when it responds slowly);
- Damage to the file system structure or damage to the partition table;
- Incorrect reinstallation or ;
- Activities of various virus programs.
So, we have identified a list of reasons that cause the RAW status of a hard drive to appear. Now let's decide how to fix the RAW format of HDD drives.
RAW format of HDD drives - how to fix
So, how to get rid of RAW format HDD drives? I suggest doing the following:
- Use the CHKDSK system utility. If RAW status appears on one of the hard drive partitions, and you have access to the command line (or are using a live build on a CD (DVD) or flash drive), then run the command line as an administrator, in which type:
chkdsk X: /f (where X is the letter of the problematic drive)
After this check, usually the problem with RAW will be resolved, and you will get your working disk back.

If you have a boot disk or flash drive, then boot from it, select the “System Restore” menu option, go to “Advanced options”, then “Command Prompt”, and enter the above command there. When doing this, make sure that you select the correct letter to represent the desired section. To do this, type the following commands one after another:
dispart
list volume- (this allows us to find out the letter of the drive we need)
exit
You can also connect your hard drive to another PC and run the CHKDSK command from it;

Use third party apps
Various auxiliary programs (for example, MiniTool Power Data Recovery or TestDisk) can also help us in eliminating the RAW format on HDD drives.
- The first of the programs mentioned will allow us to recover the necessary data located on the RAW disk.
- Download MiniTool Power Data Recovery (link just above), click on “Lost Partition Recovery” in the main window.
- Select the RAW disk and scan it by clicking on “Full Scan”.
- Then decide on the partition and files that need to be restored, click on “Save”, indicating the path where you want to save the recovered files.

To use the TestDisk utility, download it and run it as an administrator.
- Select “Create” and press enter, then use the arrows to select the problem disk and press enter again.
- Then decide on the desired type of partition table (the utility will do this automatically) and press “Enter”.
- Look for problematic or lost sections by selecting “Analyze” and then “Quick Search”.
- After the utility finds the required volumes, select “Write” to save the resulting partition structure.

Video instructions
Above, I outlined the answer to the question about the RAW format of HDD disks, identified the reasons for the appearance of RAW disks and described the tools for solving this problem. In most cases, the appearance of such a format on your disk can indicate both hardware and software problems on the PC, which I described in the list of reasons for this dysfunction (except for the situation when the disk is new and not formatted). To solve the problem, I recommend following the list of tips I suggested above, this will help to effectively fix the problem of RAW format HDD disks on your computer.
Hello admin, question! RAW flash drive file system, how to fix?
Yesterday I took a flash drive to work, connected it to various computers, copied information back and forth, in short, I worked with the flash drive, and today I connected it to my laptop and this warning popped up: “To use a disk in the F: drive, first format it. Do you want to format it?
As I understand it, if you click on the Format disk button, you can finally say goodbye to your data on the flash drive, which is very important to me. What can you do to recover files on a RAW flash drive?
RAW flash drive file system
Hello friends! If you don’t need the data on the flash drive, you can simply . If you need the data, then read on.
When the file system on your USB flash drive suddenly turned into RAW, then this Means that the file system on the flash drive is seriously damaged. This problem occurs for various reasons: system failures, malware, and so on. In this case, when you connect the flash drive to the computer, a warning will appear stating that the flash drive needs to be formatted into a normal file system: NTFS or FAT32.

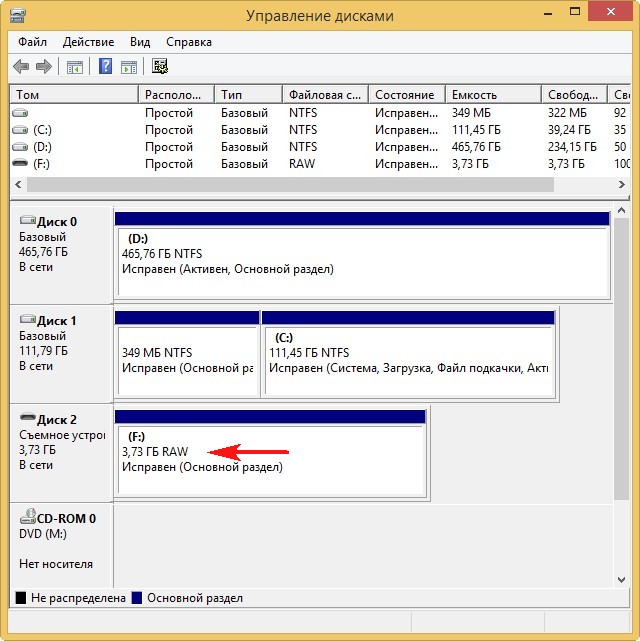
In Explorer flash drive RAW will be displayed like this:

and in Disk Management it's like this
If you format a RAW flash drive, you will lose all your files on it, so to save your data you need to resort to a special recovery program, such as DMDE. After the files have been restored, the flash drive can be formatted and returned to use.
Note: first of all, try to fix file system errors using the chkdsk utility built into Windows (sometimes this helps). Run a command prompt as an administrator and enter the command: chkdsk f: /f, where the first F: is the drive letter of the flash drive (in your case it may be a different letter), and the second /F is a special parameter that corrects file system errors when scanning. If chkdsk fails and will display an error WITHhkdsk is not valid for RAW disks, in this case you can use the DMDE program and similar ones.

Program DMDE is relatively free, that is, it has advanced functions that you need to pay to unlock. I want to say that to restore files on one flash drive, the free capabilities of the program are enough for your eyes and you don’t have to buy anything, but on the other hand, ifIf you like DMDE, it costs only 300 rubles.
So, let's download DMDE on the official website
http://dmde.ru/download.html

Launch the executable file dmde.exe.

The program works without installation, which is very convenient.
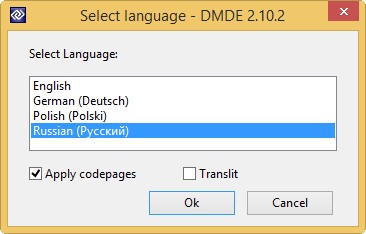
We accept the license agreement.

On the left side of the window, check the box Physical devices, and on the right is our flash drive.
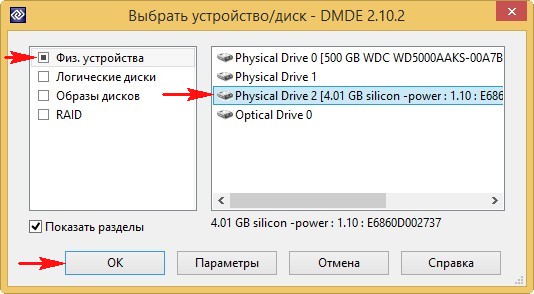
Double-click the left mouse on the flash drive.

The contents of the flash drive are instantly scanned.
Go to the Found folder.

"All found + reconstruction".

"Rescan the entire volume".

A detailed scan of the flash drive begins using the program’s own algorithms for deleted files.

In the next window, DMDE opens the found folders with files.
Do not expect that during recovery the found folders and files will have the names you are familiar with. The names of the found folders and the files contained in them will be generated.
You can enter any folder and restore the files you need.

For example, I found all the photos I needed in these folders.
Double-click the left mouse on the selected folder and go into it.

We mark all found files with checkmarks and right-click.

Select "Recover files".


