How to deep format a hard drive. Low-level formatting of a hard drive? Program for low-level hard drive formatting
Seagate Instant Secure Erase technology protects the data on the drive by instantly restoring it to its original factory settings and changing the encryption key, resulting in any data remaining on the drive being destroyed by cryptographic erasure. This means that, if necessary, all data on the disk can be instantly rendered unreadable. More information about Seagate Instant Secure Erase technology deployment options.
ISE technology requires a self-encrypting drive (with or without FIPS certification). SED drives allow you to secure the active reader through passwords, fingerprints, and other authentication methods, as well as cryptographically erase the drives using ISE technology when they are removed from service or repurposed.
Components needed to instantly securely erase disk data
- Seagate self-encrypting drive, uncertified or FIPS certified.
- A computer with Windows XP, Vista, Windows 7 or Windows 8 installed on it.
- Copy software SeaTools™ for Windows OS (1.2.0.6 or later new version), which can be downloaded here: .
- Go to the tab Downloads.
- On the Utilities tab of the SeaTools Software for Windows window, select Select OS, and then select the desired OS from the drop-down menu.
- Click the button Downloads.
- An adapter cable with a SATA connector and a USB plug for a laptop or a double SATA connector when connecting to motherboard desktop computer.
Performing an instant secure erase
- Disconnect the drive you want to clean from the system and connect it to the computer using an adapter cable with a SATA connector and a USB plug. Note. The SeaTools app cannot perform an instant secure erase on your boot drive.
- Install and launch the application SeaTools for Windows. You may be prompted to install the Microsoft.NET 4.0 package if it is not already installed on your computer. You can download the platform installation package on the official Microsoft website. While downloading it, agree to make changes to your computer and accept the terms of the license agreement.
More information about the SeaTools application, as well as information about preliminary actions To install it, see the SeaTools () page on the “Downloads” tab.
- Once you open SeaTools, you will see the hard drives available for formatting, including serial numbers and model numbers. Select the desired drive.
ATTENTION! Make sure it's selected correct disk, since all data on it will become unreadable and will be permanently deleted. By default, SeaTools does not allow you to erase data on your primary or boot drive. - Go to the tab Basic checks(Basic Tests) and scroll down to Advanced checks(Advanced Tests). A warning message will appear on the screen asking you to confirm your selection by pressing F8.
ATTENTION! Advanced Tests is a mode that removes all data from the disk. Seagate Technology LLC is not responsible for any loss of data. If the drive is selected correctly, press F8. - Go to the Advanced Tests menu and then select SED Crypto Erase. If there is no such item, make sure you have a SED disk. Note. If there is no SED drive, select Overwrite Erase and SeaTools will fill the entire drive with zeroes, thus destroying the data. This procedure may take several hours depending on the size of the disc.
- The SED Crypto Erase dialog box will be displayed. Enter the 32-character PSID found at the top of the disc label. You can enter the number on the keyboard or use a 2D barcode scanner.
- Press F8 to begin the cryptographic erasure process. The dialog box will disappear. If the ID was entered incorrectly, the process will be stopped with a FAIL status. Note. The PSID may contain zeros. It is important not to confuse them with the letters "O". If the ID was entered correctly, within a few seconds the disk status will change to “SED Crypto Erase - Pass”.
If the ID is entered correctly, within a minute the disk status will change to SED Crypto Erase - Pass(Cryptographic erasure of SED data - Passed).
The disk will be restored to its original factory settings, and all data stored on it will become unreadable and will be permanently deleted. The disk can then be taken out of service, reused, or returned for warranty repair or due to the end of the lease term.
Usually, if it is necessary to format a flash drive, we use standard procedure provided in the operating room Windows system. But this method has a number of disadvantages. For example, even after cleaning the storage media special programs can restore deleted information. In addition, the process itself is completely standard and does not include fine adjustments for a flash drive.
Low-level formatting is used to solve this problem. In some cases this is the most ideal option.
The most common reasons for the need low level formatting are as follows:
- The flash drive is planned to be transferred to another person, and personal data was stored on it. In order to protect yourself from information leakage, it is best to perform complete erasure. This procedure is often used by services that work with confidential information.
- I can’t open the contents on the flash drive; it is not detected by the operating system. Therefore, it should be returned to the default state.
- When accessing a USB drive, it freezes and does not respond to actions. Most likely, it contains broken areas. Low-level formatting will help restore information on them or mark them as bad blocks.
- When a flash drive is infected with viruses, sometimes it is not possible to completely remove the infected applications.
- If the flash drive served installation distribution operating room Linux systems, but is planned for future use, it is also better to erase it.
- For preventive purposes, to ensure the reliability and performance of the flash drive.
To perform this process at home, you need special software. Among existing programs 3 copes best with this task.
Method 1: HDD Low Level Format Tool
Method 2: ChipEasy and iFlash
This utility is very helpful when the flash drive fails, for example, it is not detected by the operating system or freezes when accessing it. It’s worth saying right away that it does not format the flash drive, but only helps you find a program for low-level cleansing it. The process of using it is as follows:

You can read more about using the iFlash website in the article on restoring Kingston drives (method 5).
If there is no utility for your flash drive in the list, then you need to choose another method.
Low-level formatting hard drive(HDD) applies to transmission interfaces, including SATA, as well as IDE, which operate at a low access level.
However, it is necessary to immediately make a reservation: when they talk about formatting at a low access level, they mean “new” process"resetting" the hard drive. In this case, data from the surface of the device is erased and replaced with zeros using special software. Previously, low-level formatting meant a completely different process.
Why do you need disk cleanup?
More often complete cleaning hard SATA drive or ATA (IDE) is performed for the following reasons:
In fact, the question arises: why resort to such reformatting methods, what are the reasons for processing the disk at a low access level?
- getting rid of malware, viruses that cannot be eradicated by others are less effective methods: antivirus protection, scanning and destruction of damaged data.
- for a cleaner reinstallation of the system, high-quality installation of applications on a fresh Windows OS, Mac OS or Linux.
- low-level formatting can be used to securely erase private, personal data, which is easily restored using appropriate recovery applications
- one of the most justified reasons is “treatment”, prevention bad sectors hard drive, bad cylinders, which significantly impair the performance of the HDD
- in case you are using a new storage device that does not work without first formatting
- if it was damaged boot sector: that is, the disk does not function as a boot device, but is available for storing information
- when reading errors occur during low-level file operations carried out on HDD
- for prevention, diagnosing hard disk, bringing its structure and surface into proper condition, suitable for correct reading and writing of information
- when reviving the hard drive, this is the most effective way from possible
The design of the hard drive allows you to use unused “reserve” sectors to replace bad blocks. However, on HDD practice may simply not use this backup feature and continues to write and read information to and from bad sectors.
Therefore, low-level formatting of a hard drive allows you to instruct it to discard bad cylinders, replacing them with spare ones. This, in general, significantly improves disk performance, especially when talking about SATA and IDE storage devices that are in use for a long time, while standard methods formatting does not lead to the desired results at an acceptable level.
What program can I use to format a disk at a low level?
Note. If you decide on this procedure, I advise you to first make a backup - that is, both user data and programs - since after formatting the data will be destroyed irrevocably.
A little help will help you free program HDD Low Level Format Tool, which supports a huge list hard drives SATA- and IDE- (with rare exceptions).
Of course there is also regular means. For example, some BIOSes have a low-level formatting option for the hard drive. However, the disadvantage of this method is the low quality and even inadequacy similar methods. Some HDD manufacturers provide their own tools that access the hard drive at a low level, but this is a very narrow niche... Therefore, it is relatively safer to use HDD Low Level Format by downloading the program through my catalog.


Using the SeaTools for DOS utility to format
I present to you an excellent utility program for low level formatting - . You can download it for free from the HDD supplier's website. SeaTools functionality includes three methods for formatting HDDs, which are individually of interest to both home and professional users. The utility will be useful for eliminating numerous problems associated with bad sectors, bad blocks, sudden damage to the structure or systematic losses important information on disk.
One of the important “features” of the program is that it really functions at a low-level, works under DOS, and with its help it is easy to work in the interface command line. The program works quite quickly - try scanning the surface of the disk with it, this operation only takes a couple of minutes.
After scanning and diagnosing the problems, you can proceed to hard low-level formatting of the disk by selecting the required method for deleting information.
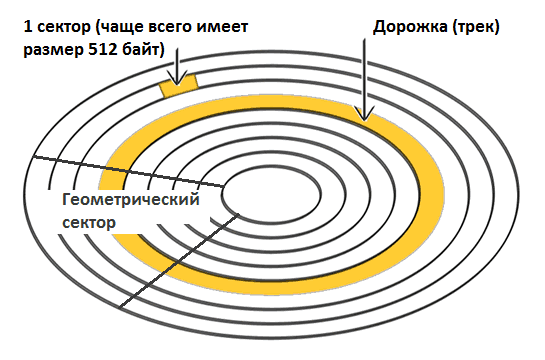
The process of low-level formatting is that sectors and tracks are applied to the surface of the hard drive. Thus, servo marks are applied to the magnetic surface, which are used to position the disk heads as service information. This process is carried out on special servowriter equipment.
At home, it is almost impossible to carry out full low-level formatting of a hard drive. Therefore, it is generally accepted that such a specific event is carried out once at the manufacturing plant. But to imitate this process at home, there are many different ways, for example, to carry out an operation from under DOS, using installation flash drive or process it with a special program.
But before you look for the most acceptable way that low-level formatting can be done at home, you need to determine the main reasons for doing it:
- Prevent leakage of important or classified information. This process completely destroys all information contained on the device, while the usual process deletes data only from the first sector.
- Blocking hard drive sectors that were susceptible to damage. Damage can be caused by impacts, mechanical or temperature effects. Information is not saved for damaged areas.
Working with the helper program
In order to make this operation easier, you can download a program called HDD LOW LEVEL FORMAT TOOL. This utility is used not only for formatting hard drives. It also works with various interfaces and can be used to delete information from a flash drive. This program works according to the following scheme:
- You need to run the program and check Continue for free in the window that appears.
- After this, another window will appear in which there will be a list with all devices.
- When the drive is selected, the window will change and information will appear in it. For low-level formatting, you need to select FORMAT THIS.
- Now the utility will start the process, but before it it will display a message that will remind the user that the data is irrevocable. To continue, you must agree.
- After low-level formatting, you need to do a normal (quick) format through “My Computer” and select the file system type there.
Formatting using the popular Victoria utility
In addition to the narrow specification program, in order to carry out formatting low level you can use a utility with a wider range of actions. One of these utilities is Victoria. Victoria's capabilities are quite extensive and one of its abilities is low-level formatting.
You can work with Victoria in several ways, namely, download from a disk, floppy disk, flash drive, or download and install directly on the computer’s hard drive. In order to use the first three methods, you need to create a boot package of files on the drives, which runs on the computer under DOS.
For Victoria's works in the existing operating system You must first download the program from the official website. To install the program on your device, you need to run the file victoria43.exe as administrator.
In the window that opens, several tabs will appear in which the program analyzes all available hard drives. But in order to permanently delete data Victoria program, on the hard drive, first you need to identify the areas that have been damaged. The “Test” tab can help with this. Scanning will reveal damaged sectors, and to get rid of them you need to run a second scan, but set the Write mode. In the Victoria utility, this mode is responsible for permanent deletion(overwriting) information.
Deleting data via DOS
But in order to format a hard drive at a low level, it is not necessary to use third party program with complex controls. This can also be done through DOS - using the installation disk with the operating system.
- If you have a boot disk with Windows XP, let's start installing it first. During the installation process, you will be offered all hard drives and their partitions that can be formatted in DOS mode.
- When installing a system with boot disk with Vista OS we will wait until the system offers a choice of disk or partition. Then you need to open the “Disk Settings” window.
- If there is no need to change file system and others hdd settings You can click the “Format” button.
When formatting in DOS mode is completed, the system will notify the user and the computer will need to restart.
Low-level formatting must be approached responsibly so as not to harm the system. It does not matter how exactly the operation will be carried out via DOS, from a flash drive or using a program. In addition, you should remember that such a process completely and irrevocably deletes all information accumulated on the hard drive, so before you begin, you should save a disk image for quick recovery.
Hard drives (hard drives, hard drives, HDDs) are unusually pampered devices. Just shake it a little, overheat it, look askance - and the disk is already covered with terrible “bad blocks” that threaten both it and all the information on it with inevitable death.
In the event of disk failures, the most important thing is to save valuable data. But what to do then with their carrier? Can it be used in the future? They say that one medicine helps with all such “sores”: low-level formatting of the hard drive. Let's figure out what this “pill” is and when it becomes necessary to prescribe it.
What is it really?
Low level formatting today is called something completely different from what it really is. In fact, this is one of the stages of manufacturing disk drives, and it is carried out at the factory.As you know, all . Each piece of data has a unique address where it can be found. Creating areas for recording data on a clean magnetic surface and assigning addresses to them is low-level formatting.
More precisely, this is the process of physically dividing the disk surface into tracks(circles or tracks along which the read/write heads move), their sectors(track sections are the smallest areas of information storage on disk drive With own address) And intersectoral intervals. And also - application servo tags– service records between sectors and within them, according to which the head control system ( servo system HDD) will be able to position the latter.
After marking, the disk surface is thoroughly scanned to identify defects in the magnetic layer (physically “broken” sectors), which must be excluded from addressing. Based on the test results, a list of defects and a translator are formed - a table correlating good physical sectors with logical (numbered) ones. This is also part of the factory formatting.
A long time ago, this entire procedure could be performed using the BIOS of a home PC. Today there are practically no such computers and storage devices left. Modern HDDs cannot be physically repartitioned without special equipment and software, and low-level formatting is the operation of “filling” the logical space with zeros (without access to the service areas in which the translator is stored).
As a result of this formatting:
- All information (except for service information) is deleted from the hard drive.
- A custom defect list is created with the addresses of bad sectors that will be hidden - excluded from subsequent read and write operations.
- Defective sectors are replaced with “healthy” ones from the reserve area (remap).
What problems does pseudo-low-level formatting help solve?
The operation is used:
- To prepare a computer for transfer into the wrong hands, so that new owner I could not restore the files from the previous one.
- For corrections that cannot be removed using non-destructive methods.
- For the treatment of certain types of boot viruses.
It is effective:
- If the appearance of “broken” sectors is not associated with a malfunction of the mechanical and electrical components of the hard drive. For example, they formed after a short-term overheating of the disk or sudden shutdown computer power supply, and their number is not growing.
- If there are relatively few defects.
An example of detecting several unstable sectors when scanning a hard drive with the HD Tune utility:

It's useless:
- If the hard drive has suffered from a fall, drowning, or depressurization of the case (hermetic unit).
- If it makes grinding, knocking, grunting and other unnatural sounds when turned on or is poorly detected by the computer (disappears periodically).
The main area of this disk is occupied by unreadable sectors. Treatment with homemade “low-level” formatting will most likely not help him:

What and how to carry out “low-level” formatting at home
Any utility designed for this will be able to fill the surface of the hard drive with zeros and replace the “bad” sectors with normal ones. Even created by a manufacturer of hard drives of a different brand. Rewriting and remapping operations are launched by a standard algorithm that is understood by all disk controllers (the final decision on reassigning bad sectors is made by the controller). These utilities do not have the ability to use highly specific technological commands, so they are not able to cause any harm to the device.Which utility will do the job you need best? It’s not a fact that the native version of your hard drive will work more accurately than the universal one. One didn’t help, try another. There will be no harm from this, but there may be some benefit, since to correct one defective block sometimes you need to make several attempts.
Let's figure out how to conduct a “low-level” HDD formatting using three free utilities.
Universal HDD Low Level Format Tool (HDDLLFT) for Windows
- Let's connect the problem disk to a PC running Windows.
- Download and install the application HDDLLFT. After installation, select “ Continueforfree» (Continue for free).

- In the list of drives, mark the one that we are going to format and click the “ Continue>>>».

- In the next window, go to the section “ LowlevelFormat" and click " Formatthisdevice»

- Let's confirm the operation again and wait for it to finish.
SeaTools for DOS for HDD Seagate
SeaToolsforDOS released in format iso image to sign up for bootable dvds, flash drives and floppy disks. After starting the computer from such media, the main window of the utility immediately opens. For convenience, let’s switch it to Russian, mark the problematic drive in the list, go to the menu “ Additional features » ( Advanced Features) and click " Erase everything"(Erase all).


