How to remove a disk image from a computer. Entries tagged "remove virtual hard disk
Before you start deleting a virtual disk, you must first transfer all the information you need from it to another disk. Then open the Disk Control Panel. To do this, press two keys on the keyboard at once WIN+X and in the context menu that opens, select Disk Management.
How to remove a virtual disk in Windows 10
In the Disk Control Panel, hover over the virtual disk and right-click. A menu will open in which select the item Delete volume.
 How to remove a virtual disk in Windows 10
 When the partition is deleted and an unallocated space appears instead, you will need to move the cursor to the left side of the disk name and press the right mouse button. A menu will open in which select the item Detach virtual hard disk.
 Remember the address where you can find the VHD file in the explorer
 As a result, a window will open in which you need to remember the location of the VHD file, and then click OK and immediately the virtual disk will disappear.
 How to remove a virtual drive in Windows 10
 Now you will need to find the VHD file in the explorer and delete it from the computer. After that, the deletion of the virtual disk can be considered complete.
Very often, PC users ask on the forums the question of how to remove a virtual disk or disable it. Virtual disks do not appear in the system just like that. Therefore, it follows from this that utilities for emulating a DVD drive were installed on the computer or the command “ Subst". From this material, our readers will learn how to get rid of virtual disks in operating systems of the Windows family once and for all.
Disabling virtual drives using DVD drive emulators
You can connect the virtual disk back in exactly the same way. The difference is that in the "Driver" tab, instead of disabling, you need to select "Enable".
There are many images of various programs and games on the Internet that we can download and mount on a virtual drive. Indeed, it is easy and simple than going, for example, to a store and buying discs. Now many will say: “What, now there are still those who buy discs?”. I personally don't care and I don't judge people who buy CDs, it's their right. But now it's different. You mounted everything you need on a virtual drive, installed it, and then this very drive did not disappear, even if you right-click on it and press eject, nothing will change.
To get rid of extra virtual disks, we need a program Daemon Tools, of course, other utilities are also suitable, for example, Alcohol 120%.
Basically, my problem looks like this:

Although it is difficult to call it a problem, but still. Now let's start Daemon Tools and in the window you should see all the virtual and physical drives. If not, then on the left you can go to the drives tab.
We see an empty drive, to delete it, right-click on it.

Thus, you can remove all drives, I had a large number of them, I had to manually remove everything. If you see a button to delete everything nearby, I do not advise you to click on it, as this will cause a critical error in the system and the computer will restart. Most likely this happened due to the fact that, along with the virtual disks, I also allegedly deleted the DVD drive, but it did not delete, well, or the reason is different. Therefore, it is better to delete everything manually.
You can download disk emulators on the Internet without problems, and many, most likely, already use them, so I will not give a link. Good luck to all.
http://website/wp-content/uploads/2015/08/1_5255.jpghttp://website/wp-content/uploads/2015/08/1_5255-150x150.jpg 2017-04-20T12:58:01+00:00 EvilSin225 Windows Daemon Tools, virtual drive, how to remove a virtual disk, virtual drive programThere are many images of various programs and games on the Internet that we can download and mount on a virtual drive. Indeed, it is easy and simple than going, for example, to a store and buying discs. Now many will say: "What, now there are still those who buy discs?". I personally don't care and I... EvilSin225Back in Windows 7, Microsoft developers added the ability to create virtual disks and install various operating systems and programs on them. Windows 10 also has this feature. It is useful in that the user can not install another OS on a blank disk, but create a virtual environment for testing programs and games that is absolutely safe for the main operating system.
Create a virtual hard drive on Windows 10
There is a standard and easiest way to create a virtual disk on Windows 10. Follow the instructions:
- Press "Win + R" and enter "diskmgmt.msc".
- The Disk Management window will open. Select the disk on which the virtual disk will be installed. Often, this is the local disk D. You should not install a virtual disk on the Windows disk.

- Having selected the disk, click "Action", "Create a virtual hard disk".

- The Create and Attach window appears. First, specify the location of the created virtual disk. To do this, click on the "Browse ..." button.

- In the "Explorer" window, you need to specify a name for the file (disk), and then click on the "Save" button.

IMPORTANT! The official Microsoft website states that it is not recommended to set the name "Windows" to the virtual disk and folder in which its files will be saved. The system may replace it by mistake, etc.
- Then you need to select the size of the virtual disk. You can set the desired size in MB or GB. For normal system operation, you can set 32 GB (of course, if the local disk space allows it). It is important to note that if you set the size, then select the "Fixed" value. If you set a "Dynamic value" to a virtual disk, then its size will increase as it is filled with files.

- After that, the process of creating a virtual disk will begin. It will take some time. You will find out that the disk has been created in Disk Management. An unallocated area will appear here. It is not necessary to create a volume. You can immediately start using the virtual disk.

- To do this, just go to Explorer, in which the disk will be placed.
Ways to remove a virtual drive from a PC running Windows 10
The first way to delete a virtual disk in Windows 10 is to use the same Disk Management utility. In it, you will need to right-click on the virtual disk and select "Disconnect virtual hard disk".

If virtual disks were involved in your system using the “Subst” command, then removing them from the system is quite simple.
![]()
When executing the "Subst" command, a mounted hard drive from a specific directory in the system appears, but after rebooting the operating system, it is not displayed. The question arises: where does it come from and where does it go?
The fact is that Windows 10 startup has a batch file installed that executes the “Subst” commands when the system boots. To get into Windows 10 startup, you need to press "Win + R" and enter "shell: startup".

The autoload window will open. Right-click on the virtual machine and select "Delete".

We reboot the system. The remote drive on Windows 10 will no longer show up.
It is important to note that in this topic we have considered an example of creating and deleting a virtual hard disk, not a drive. Creating and deleting a virtual drive is a separate topic.
As you know, in any section of the hard drive, you can create a virtual hard disk using the built-in tools of the operating system or third-party programs. But there may be such a situation that you need to delete this object to free up space for other purposes. Let's figure out how to perform the specified task in various ways on a PC with Windows 7.
As for creating a virtual disk in Windows 7, and for deleting it, you can use two groups of methods:
- operating system tools
- third-party programs for working with disk drives.
Method 1: Using third party software
First, let's explore the possibility of deleting a virtual disk using third-party applications. The algorithm of actions will be described on the example of the most popular program for processing disk drives - DAEMON Tools Ultra.
- Launch DAEMON Tools and click on the item in the main window "Keep".
- If the object you want to delete is not displayed in the window that opens, right-click on it ( PKM) and select from the drop-down list "Add Images..." or just use the keyboard shortcut Ctrl+I.
- The file open shell will start. Move in it to the directory where the virtual disk with the standard VHD extension is located, mark it and click "Open".
- The disk image will appear in the DAEMON Tools interface.
- If you do not even know in which folder the virtual disk is located, you can get out of this situation. Click PKM along the central area of the window interface in the section "Images" and select "Scan…" or use a combination ctrl+f.
- In the block "Image Types" new window click "Select all".
- All names of image types will be marked. Then click "Remove everything".
- All marks will be removed. Now check the box next to the item vhd(this is the virtual disk extension) and click "Scan".
- The image search procedure will start, which can take quite a long time. The progress of the scan is displayed using a graphical indicator.
- After the scan is completed, a list of all virtual disks that are on the PC will be displayed in the DAEMON Tools window. Click PKM by the element from this list that you want to delete, and select the option "Delete" or use a keystroke Del.
- In the dialog box that appears, check the checkbox "Remove from Image Catalog and PC", and then click OK.
- After that, the virtual disk will be deleted not only from the program interface, but also completely from the computer.


Method 2: "Disk Management"
Virtual media can also be deleted without using third-party software, using only the native Windows 7 snap-in called "Disk Management".
- Click "Start" and move to "Control Panel".
- Go to "System and safety".
- Click "Administration".
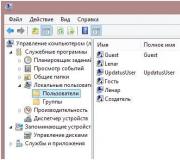
- Find the name of the equipment in the list "Computer Management" and click on it.
- On the left side of the window that opens, click "Disk Management".
- A list of hard disk partitions will open. Find the name of the virtual media you want to demolish. Objects of this type are highlighted in turquoise. Click on it PKM and select the item "Delete Volume...".
- A window will open, where information will be displayed that if the procedure is continued, the data inside the object will be destroyed. To start the uninstall process, confirm your decision by clicking "Yes".
- After that, the name of the virtual media will disappear from the top of the snap-in window. Then drop down to the bottom area of the interface. Find the entry that refers to the remote volume. If you do not know which element you need, you can navigate by size. Also to the right of this object there will be a status: "Unallocated". Click PKM by the name of this medium and select an option "Disconnect...".
- In the window that appears, check the box next to "Delete…" and click OK.
- The virtual media will be completely and permanently deleted.


A previously created virtual drive in Windows 7 can be deleted through the interface of third-party disk media programs or using the built-in system snap-in "Disk Management". The user himself can choose a more convenient deletion option.
Our short review will tell you about virtual BD-ROM drives that often appear in Windows. Despite the fact that they do not play a special role in working with a PC, many users are uncomfortable with their arbitrary appearance. You will find out what these drives are, and we will also tell you whether to remove them.
What it is
BD-ROM are the drives that originally defined Blu-ray discs. However, today these discs are no longer in demand. Their place was taken virtual drives - they simulate the presence of a disk in a Windows system. So it is possible to bypass many license locks.
The BD ROM drive is integrated into the OS at the request of the user or with utilities. Many complain that their virtual drive installed itself. Actually was installed program, which created the DB-ROM. This cannot be considered a virus, because everything happens with the consent of a person. To avoid such cases, you need to read the user agreement when installing software from the Internet.

How to remove the appeared BD-ROM
Do nothing: BD ROM is perfectly safe. It does not load the disk or the processor. You can safely leave everything as it is. Also, in which case this virtual drive will calmly help to simulate a disk, thereby bypassing the license block. But if there are too many such drives, you can remove them.
- There is an option in the PC hardware menu that displays all drives − Device Manager. Run it: in Start - Run - write devmgmt.msc. By opening this window, you can observe many connected devices. Among them, we are looking for something where it is mentioned about DVD-CD-ROM. Here you should remove all unnecessary BD-ROMs: select the one you need, click on the right button to delete.

Utilities
Different programs can make virtual drives themselves. For example, Tools and so it does. Today there are enough similar emulators that do without the consent of a person.
- Uninstall the emulator and all its files. If you do not understand the utilities, then delete all the software installed in the last week. The virtual disk drive is not necessarily integrated right away. This can happen under different conditions. Attention (!) some applications may then require you to insert a disc.
- For those who have not used emulators, but drives still appear, then you should do the opposite - install them. Take UltraISO or DAEMON Tools. In their settings, look for something with the words optical drive. So you can access them and accordingly remove the hated BD-ROM.
VHD (Virtual Hard Disk) is a file format used by virtual machines to emulate a hard disk. You can create a virtual disk for yourself and use it to store virtual operating systems, programs, and other files in a single image file that can be opened by various virtualization programs or virtual machines. Virtual hard disks allow multiple operating systems to reside on the same computer at the same time.
Option 1. Working with virtual disks using a graphical interface.
1) Open the Start menu.
diskmgmt.msc and press Enter.
3) The Disk Management snap-in will open. From the menu bar, select Action and click on Create virtual hard disk
4) In the window that opens, specify:

4.1) File name and location. You can either write it manually or by clicking on the Browse button and using the dialog box
4.2) The size of the virtual disk. Near the text field in which you need to enter the size of the disk, there is a drop-down list where you can select the size of the hard disk. Available values are megabytes, gigabytes, and terabytes. Create a size of at least 20 GB.
4.3) Type of virtual disk. dynamically expandable The disk image provides the amount of space needed to store data.
The size of a VHD file is small when the disc is created, but grows as data is added to the disc. Data distribution is carried out in blocks. Deleting data from a virtual hard disk does not automatically reduce the size of the VHD file. fixed size creates a VHD file, the size of which is specified when the virtual hard disk is created. The size of a VHD file remains constant regardless of the amount of data stored.
5) Click on the "OK" button.
In order for the local disk manager to be able to access the virtual disk you created, you must initialize it and create a simple volume on it. It also uses the Disk Management snap-in.
1) Find your virtual disk and right click on it
2) Click on the item Initialize disk

3) Select the partition style - MBR and click OK

After you have initialized your virtual disk, you need to create a simple volume on it.
1) Find your virtual disk and click on the unallocated area to the right of it
2) Click on the item Create a simple volume

3) In the first dialogue Create Simple Volume Wizards click on the button Further
4) In the dialog for specifying the volume size, specify the size of the future volume in megabytes and click the button Further

5) In the dialog, specify the letter for the future drive and click the button Further

6) In the dialog, specify the required file system, cluster size, disk name and check the box next to the option Quick Format- so that the disk is immediately formatted. Then click on the button Further

7) To accept all configured parameters in the dialog Completing the Create Simple Volume Wizard click on the button Ready.
8) The virtual disk will appear in the disk table. In the Disk Management snap-in, the virtual disk icon is visually different from the physical disk icons. In Windows Explorer, virtual drives look the same as physical drives.

If you already have a virtual hard disk created, you can also attach it in the Disk Management snap-in.
1) Open the Start menu.
2) In the search bar, or in the Run dialog box (you can just press Win+R) type diskmgmt.msc and press Enter.
3) In the menu bar, select the item Action and click on Attach virtual hard disk

4) Specify the location for the virtual hard disk on the computer and click OK. You can specify the location either by entering the value manually or by clicking on the button Overview, and using the dialog box Viewing Virtual Disk Files. If you do not need to write data to disk, then in this dialog you can check the box Only for reading

1) Find the virtual disk you want to detach, right click on it
2) Click on the item Detach virtual hard disk

3) If you wish to disconnect the virtual disk without removing it from the system, then click OK. To completely remove a disk from the system, check Delete virtual disk after removing disk and then click OK.

Option 2. Working with virtual disks using the Diskpart program on the command line.