How to strengthen wifi signal reception on TV. How to strengthen the signal of a Wi-Fi network? Increasing Wi-Fi range
Hi all!
I doubted whether it was worth writing this review at all, because everything was indecently simple, but I still decided to do it. Perhaps the information will be useful for someone. I just decided to show how simple and cheap it is to improve Wi-Fi signal reception. Below the cut is a short overview of two antennas and the result of installing them on a TV box.
from my previous reviews, as planned, we went to our parents. And in their house there is simply a huge number of networks in the 2.4 GHz range. 
The router is located in the corridor, and the box is next to the TV in the far corner of the room. In addition to the polluted air, the signal is also weakened, so the equipment is removed almost to the maximum possible distance in a 3-room apartment, almost diagonally across the entire apartment.
The box's internal film antenna could not boast of outstanding results anyway; at my home the speed was about 35 Mbit/s.
And for parents, in such difficult conditions, their income dropped by 2 times. 
However, even in this case, everything continued to work normally, IPTV and movies online can be watched quite comfortably, without any brakes. And all these experiments with antennas are actually not that necessary. Rather, it’s more my desire to just try what will happen.
Let's look at a cheaper antenna first. It's worth it and the kit already includes an SMA connector.
The stated gain is 3DBI.


Now it's time to pick up a soldering iron. We cut off the unnecessary connector and prepare the cable. 
Next, in a suitable place in the housing you need to make a hole for the connector. Then unsolder the original antenna, and solder the prepared cable tail instead. After this, insert the connector into place, tighten the nut and assemble the housing. 
It looks like this. 
And the result. 
There is already a noticeable increase in speed.

It is collapsible and appears to be of better quality than the first one. 
But I didn’t use it, because... I already soldered the connector from the first antenna, and this one fits perfectly. 
And, as expected, this antenna showed the best result. 
I did not test in the 5 GHz range, because... My parents’ router doesn’t know how to work in it, it only supports 2.4 GHz ((
By the way, the set-top box is really good; after the review, the firmware was updated automatically, and no glitches or problems emerged during use. There is currently a promotion on it in the store,
Strengthened wi-fi is necessary to improve the quality of reception and transmission of various data and watching videos over a wireless network. Since the number of different devices (smartphones, tablets, laptops), the operation of which depends on the availability of Internet access, increases every year, a weak or unstable radio signal worries almost every router owner.
The reasons for the decrease in Internet speed over a wi-fi network may be interior partitions, load-bearing walls, mirrors, household appliances, or other access points to the World Wide Web nearby. There are several ways to solve this problem.
Changing the channel used by the wi-fi router
Anyone who wants to have enhanced Wi-Fi should choose a channel free from the influence of extraneous radio signals. A popular program such as inSSIDer (the official website also provides a free version for Android) will help you determine how busy it is. You can install it yourself on a computer (or laptop) that has an adapter. The utility helps determine the optimal channel for the network by scanning and diagnosing in real time all Wi-Fi connections closest to the computer. After familiarizing yourself with all the presented networks and channels, you must take the following actions:- select the “Wireless mode” section in the router settings (“Wireless network” or “Wireless”);
- click on “Wireless Settings” and change the value of the “Channel” parameter by selecting a free (or least loaded) channel.
Changing the Router Location
Thanks to proper placement, the Wi-Fi router transmits an amplified signal, allowing you to expand the network coverage area. To do this, it should be located in close proximity to the device that is used to access the Internet. When simultaneously connecting to the Internet several devices located in different rooms, it is recommended to install the router as high as possible, choosing for this the central part of the apartment (or house). Such placement, characterized by the absence of remote rooms, will help strengthen wi-fi on a laptop, computer, smartphone or tablet due to the uniform distribution of the signal.
Setting the maximum power value in the router settings
Before using this method of strengthening a Wi-Fi signal, you must study the instructions supplied with the router, since the procedure depends on the model and manufacturer. Most often, to increase the power of a router at home, you should change a parameter such as “signal strength” in the “Settings” (or “Advanced settings”) section by setting the highest value (“100%” or “High”).
Systematic router firmware update
It is possible to strengthen wi-fi on a laptop, computer or tablet after updating the outdated (or defective) router firmware. Usually in such cases, manufacturers offer to download the current version of the firmware posted on the official website for free, since wi-fi can be strengthened only after errors in the firmware have been eliminated. Before starting the update, you should make sure that the new firmware version and router model are compatible, and for this you need to determine the hardware and current firmware versions. Information about the current version can be found through the device interface located in the router settings. The factory settings are indicated on the back of the router.
Replacing the standard router antenna with a more powerful one
An enhanced wi-fi antenna, the coefficient of which has the highest value (5 - 8 dBi), will help increase the coverage area of your home network. This method is only suitable for owners of routers with external (removable) antennas. It is also necessary to remember that if the router model requires the simultaneous presence of two (or three) antennas, then all must be replaced. To ensure a stable signal, antennas should not be placed in different rooms (they should be nearby).If the router has only a built-in antenna, which cannot be replaced, then to improve the signal and increase the Wi-Fi coverage area, manufacturers recommend changing the location of the antennas, moving them in different directions (up and sideways).

Installing a wi-fi repeater
A repeater (or repeater) is a special receiving and transmitting device, the main purpose of which is to increase the coverage area of a wireless router by completely repeating, amplifying and relaying all received signals. This gadget is easy to use. It is usually installed between the signal source (router or modem) and the computer by connecting directly to a regular electrical outlet. To configure the device, you only need to know the name (ssid) and password of the network being used.
Purchasing a router that supports the 5 GHz band
Due to the fact that wireless communications are now installed in almost every apartment, the frequencies of home networks often overlap, leading to overload of the same channel. Household appliances (microwave ovens, cordless phones, video surveillance systems, etc.), which, like most routers, operate at a frequency of 2.4 GHz, can also serve as sources of additional interference. Therefore, purchasing a router capable of transmitting a signal in the 5 GHz range can solve this problem. This range is almost always free from various interference, since it does not overlap with channels using the 2.4 GHz frequency; its coverage extends over a large area, providing channels free from other networks (about 44). But the transition to such a range is only possible when other devices (tablets, radiotelephones) can use it for work.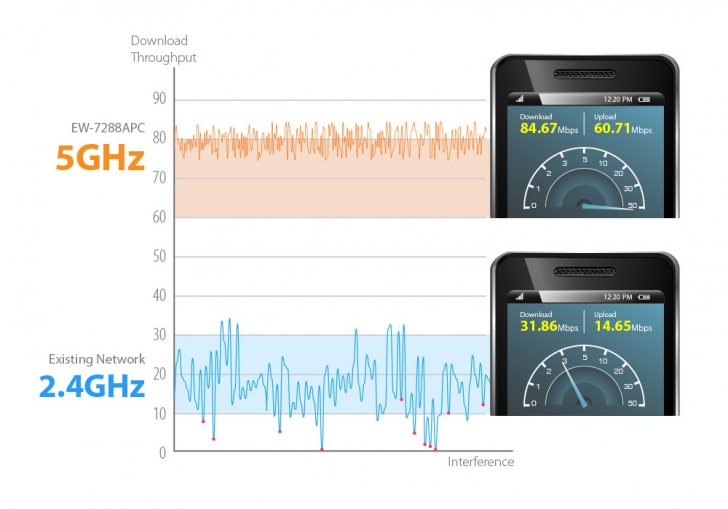
Using the above effective methods, you can significantly increase the speed of your home Internet via Wi-Fi, and you don’t need to purchase expensive gadgets for this. You just need to study the router settings in detail or use additional inexpensive devices.
Every year there are more and more different gadgets that have access to the Internet. Almost every apartment has a laptop, smartphone, tablet or TV, and maybe even a refrigerator with a Wi-Fi module. At the same time, users often face the problem that it is not possible to “catch” a connection to the Internet everywhere. The reason for this may be that the distance from the router to the device is too large. The coverage radius of the router is about 30 meters, and sometimes more. However, there are a number of other factors that can affect the signal level.
Interference can be caused by:

There are software and hardware methods that can help solve this problem. The following recommendations will help strengthen Wi-Fi and make Internet use more comfortable.
Software Gain
The most common mistake when using wireless access points is that the owners pay too little attention to setting up the network. Often, users set a security key and change the SSID. This is where all the shenanigans end. At the same time, there are still a lot of parameters that remain by default. Setting them up will help increase the coverage area. Let's consider the main methods of programmatic signal amplification.
Video: Boost WiFi signal
Correct location
First of all, you need to pay attention to the location of the router in the apartment. It is recommended to place the router closest to the device from which you access the Internet. If it is difficult to figure out such a place, and the connection is made from different rooms in the house, then it would be best to install the router in the central part of the apartment.

Photo: location of the router in the apartment
This way, as much space as possible will fall within the range of action.
If the apartment or house has two levels, then the router must be placed on the ground floor at the highest point, this can be a mezzanine or a closet. You should not litter the area where the router is located with various objects (including metal ones). This will allow the signal to travel unhindered.
Device frequency matching
In apartment buildings, there may be up to 20, or even more, wireless networks in the accessibility zone. This is not very good for the performance of one particular device. All available networks tend to overlap and use the same frequency channel. As a result, the network supply level deteriorates even at a relatively close distance.
In this case, strengthening the Wi-Fi signal is very simple and easy; even the most inexperienced user can figure it out. First, you should install a special program on your laptop, which can be used to determine a free channel. The most commonly used is inSSIDer. After launching the program, the screen will display a list of all available wireless networks and the frequency channels they occupy. You must select a free channel. To do this, perform the following steps:

If all channels are already used by other people’s routers, you should choose the least loaded one. For the settings to take effect, you need to click “Save/Change”.
Modern Wi-Fi protocol – 802.11n
Today, the 802.11n standard is the newest. In addition, it is also the fastest due to its increased coverage radius. If all devices in the apartment from which the Internet is accessed support this standard, then a transition to 802.11n is possible.
In order to switch to the 802.11n operating mode, you must:

Low transmitter power
Many router models are equipped with a function for adjusting the Wi-Fi signal strength. You need to make the appropriate changes in the router settings:

Transition to 5 GHz
Most routers operate in the 2.4 GHz band. However, more expensive router models can output signals in the 5 GHz band. Therefore, it is recommended to switch to this particular range, since it is practically free and not occupied by other devices. In this case, the coverage will spread over a larger area.
The transition to the 5 GHz band is possible if the connected devices can operate in this range.
Hardware Wi-Fi signal booster
If all the above steps have been carried out, but access to the network is interrupted, do not despair. Perhaps all is not lost yet. There are several tricks that can help solve this problem. To do this, you need to upgrade your wireless device. You can increase the coverage radius using a second router. To do this, you need to set up a wireless bridge between the two devices using Wireless Distribution System technology. It will allow you to increase your coverage area by combining several routers into one network.

You can also do some tricks with the antennas. Most routers are equipped with external removable antennas. They are often underpowered by about 2 dBi, sometimes 5 dBi. They can be easily replaced with stronger ones. To do this, it is worth unscrewing the old ones and placing new ones with a higher coefficient in their place. In addition, you can purchase an antenna with a cable and a special stand. It connects to the router. At the same time, it can be moved around the apartment, thus providing coverage without changing the position of the router.

If the device has more than two antennas, then replacing them will be too expensive. It will be cheaper to purchase a repeater. It is also called a repeater. In other words - a repeater.
Using a Repeater
Users often encounter the problem that in large apartments the range of the router signal is not enough to provide coverage in all rooms. To solve this problem, aids will be useful. A repeater can be used as a signal amplification device. This device connects to an existing network as a client. With its help, the coverage area expands. It must be installed between the router and the work computer.

The repeater is compact in size and relatively inexpensive. The repeater looks like a small power supply and operates from the network. There are many options for such devices on the market.
Improving the adapter on your computer
The reception of the distributed signal can also be enhanced on the client device. This advice will be useful to those users whose computers have adapters connected via a USB port. However, this option will be useless for owners of tablets, smartphones and laptops, since the antennas in such devices are built-in. When using a USB adapter to access the Internet, do not connect it directly to the computer. To begin with, you can use an extension cord,

and connect the device through it. A long cord will allow you to move the modem around the house, searching for a network.
You can also purchase a USB adapter booster. It is capable of providing network access in areas with weak signals. A modem is connected to this device and placed in a place with Wi-Fi coverage.
Rebooting the Router
A weak signal and interference may occur due to outdated router firmware or if the installed drivers require updating.
There is no financial cost required to update drivers. They can be downloaded for free on the official website of the router manufacturer. Install them on your computer, the level and quality of the signal will increase.
Antenna upgrade
This method will help you upgrade your device using a reflector. To make it you will need foil and thick paper or cardboard.

A parabola with two holes for the antenna is cut out of paper and attached to a rectangle made of foil. The resulting device must be secured to the antenna. Thus, the signal will become directional. You can also use a drink can as a reflector by cutting it lengthwise, cutting off the bottom, and placing it behind the router. The reflector is directed in the direction where coverage is needed.

By following these simple tips, you can significantly strengthen the Wi-Fi signal on your laptop. To do this, you don’t have to spend a lot of money on buying new devices. You just need to take a little time to study the router settings or use available tools and upgrade the device yourself.
Although, you probably remember, it started with a LAN connector, and then many installed a Wifi adapter via USB.
I have the case when Wifi on the TV is already included. But, I admit, for some reason I first used the LAN connector.
Probably because there (near the TV) there was already a cable installed. But when it was time to renovate the apartment, I started thinking.
Why do I need all the cables and wires?
FOR WHAT?
It’s decided, I’ll switch to Wifi internet connection to the TV. And it seems cool to me, if not like UHD or the more usual 4K.
Of course, there are solutions called Smart TV.
Connecting to the Internet on modern devices is as easy as possible. If we want to watch a movie or receive a service via Wifi, we need a router.
Probably everyone has one, I emphasize the point, a router with Wifi.
I note that not every modern TV has
But if such a module is not installed initially, the issue is easily resolved. It is advisable to purchase and install Wifi via USB!
Of course, first find out which USB modules the manufacturer recommends. This will save you the headache of selecting compatible devices.
Before connecting directly, check the router settings. The main thing is that the DHCP service is enabled in the LAN settings.
The connection itself. Connecting a TV to the Internet is no more difficult than connecting a computer. Of course, each device has its own unique features, but the idea is the same everywhere.
Setting up the connection.
*Turn on the TV and press the Settings button on the remote. Maybe it will be called something else. But the meaning is still the same. You should be in the settings menu. Next, I will explain using the example of an LG TV. As I already noted, I have LG.
*In settings There is a "Network" tab. In it you need to select the “Network connection” item.
*On the screen A list of available wireless networks will appear. Select the one you need.
*Enter the password, if, of course, there is a need for this, and such a need will exist if the router already has a password.
If the password is entered without errors and there are no problems with the network, a message will appear on the screen indicating that the wireless network is working normally. Confirm by clicking ok.
Why clicking?
I'm just kidding, my TV has two remote controls. So in the working (small) one there is a bear function, like on a computer. On the TV screen you can see an arrow, which you point at the desired one and click with the remote control wheel.
I'm distracted, but it doesn't matter - CONTINUE.
Sometimes you may be asked to enter an IP or DNS. Select "Automatic". A network map can be created in the same way. As you can see, there is nothing difficult about starting to watch movies on TV via wifi.
If your router and TV support WPS technology, then you are a happy person!
Just press the WPS button on the router and select the appropriate item in the TV settings - “WPS”. The TV will immediately connect to the network and will not require you to enter additional data.
But if you connect and the signal is bad, even with interference, then it makes sense to dig further.
Wifi channel in the router settings.
Due to the fact that interference appears on the channel, many problems arise in the operation of the Internet via Wi-Fi. We're talking about router channels, yes, they exist there!
Frequent breaks, low connection speed, unstable operation, etc. All this may be due to the fact that other networks start working on the channel on which your network operates and it turns out that the channel is very busy.
This can cause problems with Aunt Shura and, of course, if you watch a movie from a computer on a TV.
This means there is only one conclusion, the signal from your router and the neighbor’s (house, entrance, apartment) intersect, which means they work on the same channel. Because of this, unpleasant problems arise: low Internet speed, connection failure and many, many other problems.
In the end, something needs to be done about this mess.
We think logically, with the factory settings, one channel is allocated to which all of Vasya’s neighbors connect, they also don’t know about the channels in the router. Therefore, it is best to set it to AUTO mode at the beginning.
This means that the device itself will look for a less loaded element and connect using it.
But this does not always give success or, let me say, the best choice.
To select a static value, analyze your network with the inSSIDer utility. It will show the load on all elements. So you can choose the most free one for further connection to it.
Change settings.
The change occurs differently on different devices, so below I will show how to do it on popular models.
TP-Link
First you need to go to the control panel of the device. Once connected to it, enter the address in the address bar,
The login and password are the same everywhere, usually: admin.
Now carefully examine the panel on the left. Find the same menu item highlighted in the photo below. In the “Channel” item, select the required number.
Save your changes.
As you can see, this is very easy to do. Just reboot the router so that it adjusts to the new value.
D-Link
Entering the settings is exactly the same as for the router described above.
With this router things are much simpler. Open the tab called “Wi-Fi” and find the corresponding item.
Just enter your number and save.
By the way, in some models you can see the load on each element, thus eliminating the need for various programs.
Asus
The login is the same, so go to the settings and solve the problem with the knowledge you have gained. Of course, if you have it.
Here, changing the Wi-Fi channel in the router settings is similar to the D-Link device. Only the tab is called “Wireless Network”.
After saving the settings, you don't even need to reboot. He will do it himself.
Zyxel
The login information remains the same as for other routers. Go to the “Wi-Fi network” item and change the data in the appropriate item. Save all changes.
Tenda
It may not be the most popular router, but to some it’s nicer than all the others. The login is the same, but you don’t have to specify a password. Open the highlighted tab. And in the “Channel” item, indicate your value.
Save your changes.
*You should not set the value to 12 or 13. Some devices may simply stop seeing your Wi-Fi, so don't take the risk. Select any unoccupied number.
*When making the necessary changes to your router settings, be sure to check that it has correctly detected your country. This is necessary to correctly display the elements available to you.
*After scanning your network, you find that all elements are busy, then you need a router with a 5 GHz frequency.
Buying a new device with a different frequency will solve your problems. The speed there is much better due to the low congestion. Thus, if you can purchase a new device, then choose this frequency.
*HOWEVER, I think that in auto mode everything should work well. If any problems arise, you can reboot the router and it will select a different channel.
And if you forcefully install, say, a second channel, which will be chosen by several people, then nothing good will come of it.
So we act as stated above!
If nothing good comes from this, or you have a desire, then you can use the inSSIDer program, or WiFiInfoView to search for a free channel.
Good luck, Friends!


