Installing windows from usb. How to install windows from a flash drive? Step by step instructions
You don't need to buy a disk and drive to install Windows 7, as you can install the operating system from a USB flash drive.
Inexperienced users are perplexed by the question of how to install Windows 7 from a flash drive. Not everyone knows how to install from a disk, and even fewer know how to install from USB. In fact, there is nothing complicated; it is important to strictly follow the installation instructions and not break the sequence of steps. Let's immediately decide that you need a USB Flash or an external hard drive with a capacity of at least 4 GB. The file system in which the media is formatted does not matter. In addition, you can even write the image to an SD card or an external device, for example, an MP3 player, which is recognized in the computer as a flash drive.
Installation sequence
If you install the OS on a blank disk, then you don't need to worry about its contents. If you are reinstalling the OS, remember that the disk on which you are installing the system will be completely formatted, which means that all data on the disk will be deleted. Therefore, the very first step you need to think about is what files you need to save. Next, follow the following instructions:
- Download the OS;
- Create installation media;
- Changing BIOS settings;
- We start the computer from an external device;
- Follow the instructions for installing the OS;
- Install drivers and update the installed OS;
These 6 steps are similar for all versions of the operating system; the scheme also works for other versions of the OS, including Windows Vista or Windows 8.
Where to download OS
You need to download not just system files, you need an ISO image suitable for writing to a flash drive. You can download it here. Already at this stage you need to decide which version of the OS you need. The question is not only whether you will use the “Home” or “Professional” version, but also what bit capacity it will have - 32 or 64 bits. After you decide on the OS version, download it to your hard drive.
How to write an OS to a flash drive
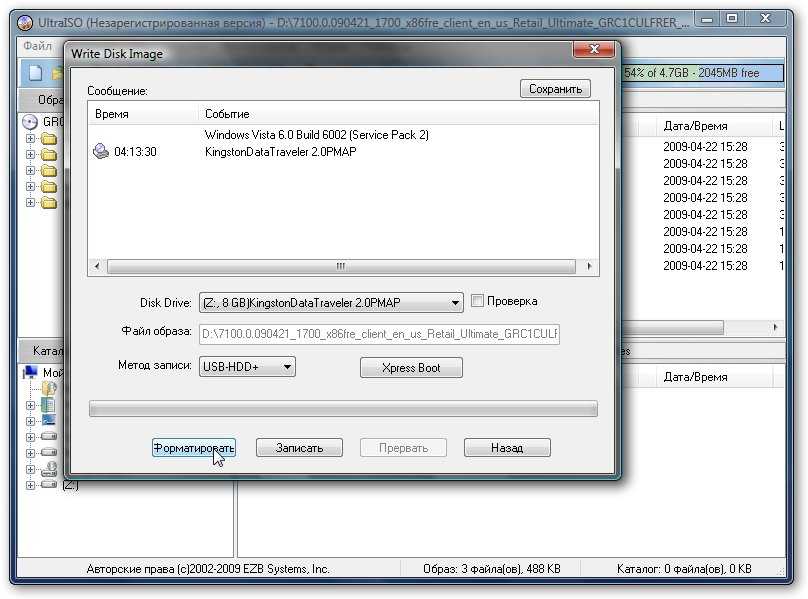
If you simply burn the distribution kit to USB, then you will not be able to run the OS from it, nor can you run the installation from a flash drive. To create bootable media you need to use specialized software. One of the best programs for creating is . Let's look at creating this utility as an example. First of all, open our ISO image of Windows 7 inside UltraISO:


You need to choose not only the drive, but also the recording method. Select USB-HDD+, you don’t need to touch other settings.
How to start installation via BIOS
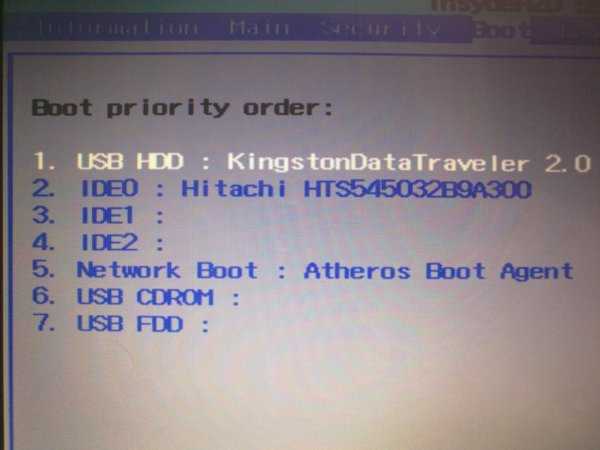
After you have created a flash drive with seven, you need to boot your computer from it. To do this, you need to reboot it and during system startup go into the BIOS and specify the startup sequence. Depending on the BIOS version, entry is available using the F2, Del, Esc keys, but there may be other keys. Inside the BIOS you need to find the BOOT tab, where you can specify the startup order. Your media must already be in the device, otherwise you will not be able to specify it to start when you start your PC. The loading sequence should be something like this:
After making changes to the BIOS, they must be saved and exited. Then the system will automatically reboot and start from USB.
Installation
After the start, the installation of the system itself will begin. If you downloaded the Russian version, then the entire installation will be accompanied by Russian instructions and recommendations. Just follow the instructions that appear on the screen, and within 20-30 minutes the operating system will be installed on your computer. If you have any questions, look at the instructions:
Don't forget that the hard drive where you install the OS will be formatted. This means that all data on the disk on which the new system is installed will be deleted. Therefore, you need to take care of their preservation in advance.
Setup and updates
After installing Windows 7 on your computer, it’s too early to relax. Next you have to configure the system, and then install all the necessary drivers. For settings and drivers you can use the following programs:
- DriverPack Solution;
The first program will optimize the operation of the system. The second program will automatically install all the necessary drivers. During setup, be sure to create a backup of the OS, as well as a first restore point, which will be useful to you in the future if you have any problems, for example, you encounter errors.
Hello friends!
Today I will answer the three most popular questions that arise from users who decide to install Windows 7 or Windows 8, 8.1, 10 from a flash drive for the first time.
How to install Windows from a flash drive?
How to make a bootable USB flash drive?
How to boot from a flash drive?
Recently, the issue of installing Windows from a flash drive has become especially relevant. The share of so-called netbooks in the computer equipment market is rapidly growing. Compact netbooks that are not equipped with an optical drive are mobile and very convenient.
Everything would be fine, but what to do if there is no DVD drive? In fact, the absence or malfunction of the drive does not mean that you will not be able to install Windows or any other operating system. There is a simple solution to this problem: you need to write the installation files onto a USB flash drive and install from it.
The process of installing an operating system from a flash drive is much more convenient and faster. Why waste time and money buying a disc if you have a USB drive at home. In addition, there is no guarantee that you will get Windows on disk the first time, so this is an extra cost. All we need is a USB flash drive of 4 GB or more.
How to install Windows from a USB flash drive
In fact, the process of installing Windows from a flash drive is no different from . The only difference is the media, in this case a USB drive, from which the installation will be performed. Accordingly, before installing Windows from a flash drive, you need to transfer all important data from the partition on which you are going to install the system, usually Drive (C:), to another partition. Also don't forget in advance. Nowadays, when a computer is used for payments, I recommend it right away. And, to completely close the installation issue, (follow the link for a guide on how to do this Right). I also recommend that you pay attention to a good one. In short, there is serious work ahead. I hope you don't look like this after all this. 🙂
How to make a bootable flash drive?
There are plenty of ways to prepare your USB flash drive for subsequent installation of the operating system. I decided to focus on the most reliable and proven method: through command line.
It is suitable both for preparing a flash drive with subsequent installation of Windows 7, and for installing Windows 8 (Windows 8.1). Don't be confused by the abundance of screenshots and the apparent complexity of this method. This is not so, you will soon see for yourself. This method allows you to create a bootable USB flash drive directly from the Windows 7 operating system itself. Let's get started.
Attention: To install Windows from a flash drive, you will need to completely format it; accordingly, all information stored on it will be deleted, so copy important files to another drive in advance.
In this case, we will prepare a bootable USB flash drive with Windows 7, but you can make a flash drive with Windows 8 (8.1) in exactly the same way.
First, insert the USB flash drive into the laptop and launch the command line. To do this, click on the Start menu → Run or the Win + R key combination to display a dialog box where we type the command cmd and click OK.
A dialog box will appear that looks like this.
In this administrator dialog box, you will need to enter a series of commands, which I will list below, and always confirm the action of the commands by pressing the Enter key. Let's get started. For convenience, the commands can be copied here and pasted into your dialog box.
Enter the command diskpart and press Enter:
Now you need to display a list of storage devices; to do this, enter the command list disk and press Enter:
Disk 0 232 GB in size → this is my hard drive, we don’t need it, but Disc 1 29 GB in size → this is my flash drive. By the way, if your flash drive is 4 GB or 8 GB, then do not look for exactly this size; as a rule, the system can show 3822 MB or 7640 MB, respectively.
Be careful!! 1 → this is my disk number. If you have a flash drive number 2 (respectively, Disc 2), then enter the command select disk 2. This is extremely important, otherwise you can easily erase your entire hard drive.
Because I have a flash drive Disc 1(I remind you that you may have a different number), then enter the command select disk 1 and press Enter. Disk 1 is selected.
Enter the command clean, it cleans the selected disk, and press Enter:
The following command create partition primary and click Enter.
You need to format the flash drive in NTFS format. Let's get started. Enter the command format fs=NTFS and press Enter. We're waiting, this will take some time. For the impatient there is a team format fs=NTFS QUICK.
When formatting is complete, enter the assign command and the flash drive is automatically assigned a letter, in my case (J).
All that remains is to complete the work. Enter the command Exit and press Enter.
The most interesting part is over. By the way, this is what our flash drive looks like in the system now: Removable Disk (J:).
Now we copy all the files from the Windows distribution disk to the USB flash drive. If you have an ISO image with a distribution, I recommend using the DAEMON Tools Lite utility.
Install this utility, select iso image with Windows and double-click the left mouse button, the image is mounted, then you need to open the folder to view the files.
Now we simply copy all these files to a previously prepared flash drive.
You can also use the 7-Zip utility. We launch the utility and select the ISO image from Windows, click on the “Eject” button and select the flash drive.
That's it. Our bootable USB flash drive with the Windows 7 operating system is ready for installation. If you did everything correctly, then by running the file setup, located in the directory of the flash drive, the Windows Installer will open.
Let's move on to the next stage. Now we need to boot the computer from the USB flash drive and start installing the Windows 7 operating system.
How to boot a laptop from a flash drive?
In order for us to be able to boot a laptop from a flash drive, disk or other media, so-called ones were invented that allow us to get into the boot menu bypassing the BIOS settings.
I will give an example of how to get to such a boot menu on various laptop models. We reboot the laptop and, depending on your model, at the moment the boot starts, press the corresponding hot key. On my Asus laptop this is the ESC key.

If your computing device doesn't have an optical drive as standard equipment, you'll probably be interested in properly installing Windows from a flash drive at some point. You will have to create an installation USB drive with all the files necessary for installation, and run from this device to begin the procedure for installing Windows 7 from a flash drive. It is important to understand that simply copying files to a flash drive will not be effective. You first need to prepare the USB device by correctly copying the Windows installation files onto it before everything functions exactly as you need it to.
If you don’t know how to install Windows from a flash drive yourself, follow the instructions below.
The following instructions will tell you how to install Windows 10 from a flash drive, as well as Windows 7 and all its versions: Windows 7 Ultimate, Professional, Home Premium. You can find out how to install Windows XP from a flash drive at the end of the instructions.
As you restart your computer, watch for a message during the power-on self test about a specific key, usually Del or F2, that you need to press to enter Setup. Press the key as soon as you see the message while your computer is booting.

Boot order is a BIOS setting, so it is independent of the operating system. In other words, it doesn't matter whether you're running Windows 10, 8, 7, Vista, XP, Linux, or any other system, the instructions for changing the boot order still apply.
Entering the BIOS Setup Utility
After executing the command in the previous step, you will be taken to the BIOS settings.
Each BIOS utility is slightly different, but is basically a set of menus containing many settings for your computer's hardware.
BIOS settings are listed horizontally at the top of the screen, hardware settings are listed in the middle of the screen (gray area), and instructions for making BIOS changes are listed on a page at the bottom of the screen.
Using the instructions to navigate your BIOS utility, find the option to change the boot order. Since each BIOS setup utility is different, the layout of the boot order options varies from computer to computer. The menu item you need to find may be called Boot Options, Boot Menu, or Boot Order. The boot order option may be located in the general menu, for example, in the Advanced Options, Advanced BIOS Features or Other Options tabs.
Boot Order Options
The boot order settings in most BIOS utilities include information about all the hardware connected to the motherboard that can boot from, such as your hard drive, floppy drive, USB ports, or optical drive.
The list that lists devices is the boot sequence in which the computer will look for operating system information.
As it is, the BIOS will first try to boot from any devices it sees, like the hard drive, which means the integrated hard drive built into the computer. If the hard drive from which you are booting is not capable of booting, the BIOS will look for a bootable CD-ROM, and then a bootable connected media, i.e. a flash drive, and finally the last one on the list is the network.
You can change the device from which the computer will boot using the + and – keys. Keep in mind that your BIOS may have different instructions.
Make any necessary changes to the boot order, and then continue to the next step to save your settings.
You will need to save your changes before your boot order changes take effect. Follow the instructions given to you in the utility to go to the Exit or Save and Exit menu. Select the Exit Saving Changes option, confirm it by clicking Yes.
Changes made to the boot order, like any other changes made to the BIOS, are now saved and the computer will automatically restart.
Boot from your USB device and you are ready to install Windows.
Successful installation from a Windows XP flash drive is carried out in a similar way, but you can use the WinToFlash program to create a USB installation media. By switching to wizard mode, you can easily make a bootable USB flash drive yourself.
A netbook is a great thing, as long as it works, as long as Windows 7 runs on it. The real problems with all the ensuing troubles arise when you need to reinstall this very Windows 7.
Where should I put the disk? There is no DVD drive, and you don’t always want to buy an external one, although their cost is not that bad. But OUR man is different from THEIR, because he does not look for easy ways. Give us “cleaner”, “more hemorrhagic” methods, but so as not to pay anything. For those who want to save on buying a drive for a netbook, but reinstalling Windows 7 is painless, this lesson is written.
At least I know 3 ways to install Windows 7 from a flash drive. This article will probably not be entirely for beginners, but rather for those inquisitive minds who want to try everything in the world.
Method 1. Use the command line.
First, let's prepare the appropriate USB flash drive (flash drive) for future download and installation of Windows 7. Please note that some flash drives cannot be put into boot mode:
- Connect a USB flash drive (flash drive) of at least 4 GB to the USB port.
- In the Start menu search bar, enter cmd.exe, right-click on the one found and press Run as administrator
- Launch the disk management utility diskpart, wait for the invitation DISKPART>
- Execute the command list disk(displays a list of all PC drives)
- Look for your USB drive among them, in my example it is Disk 2
- Execute the command select disk #(where # is the number of our USB drive obtained in the previous command). For our case - select disk 2. This command specifies diskpart that all further operations will be carried out with this disk.
- Execute the command clean(erases all data and partitions on the USB drive)
- Execute the command create partition primary(creating a new partition on the disk)
- Execute the command select partition 1(selecting a section as a further object for manipulation)
- Execute the command active– make the selected section active
- Execute the command format fs=NTFS– format the partition to the NTFS file system
- Execute the command assign– activate the process of connecting the device, receiving letters for the created partitions (if the autostart option is enabled, a window pops up as if you had just connected a USB drive)
- exit- get out of diskpart to the command line.
- Let's say that you have it installed in drive H:, then on the command line (not in diskpart !!!) run the command:
- Copy all files from your distribution to your USB flash drive (flash drive). To do this, use either Windows Explorer or the command:
- Download the program Windows 7 USB/DVD Download Tool
- Install and run the program.
- In the first step, specify the path to your ISO file and click the button Next.
- Select the item in the second step USB Device
- Click the button in the third step Begin copying
- The fourth step will begin the process of creating an installation bootable flash drive.
- When the creation process is complete, close the program.
- Insert your flash drive into the USB port.
- Open the Windows ISO image with UltraISO
- On the list Disk Drive:, select your flash drive in the item Recording method: USB-HDD+ and press Write down.
- In the window that appears about the destruction of information Clue, press the button Yes. Wait for the recording to complete (5 to 20 minutes).
- Restart your computer without removing the flash drive from the USB port.
- Immediately after the restart begins, press Delete (Del) on your keyboard to get into the BIOS.
- Set the BIOS to boot from USB-HDD first.
- Save the settings and exit the BIOS. The computer will restart and begin booting from the flash drive.
- The installation itself is not much different from installing from a bootable DVD, but there is one point. When the copying and unpacking of files is completed, and the computer reboots for the first time, you need to go to the BIOS again and set the boot priority back (from the hard drive by default) or remove the flash drive. Otherwise, it is possible that the download will start from the flash drive again.
14) Insert your existing Windows 7 distribution into the drive, or mount the image into a virtual disk.
H:\Boot\bootsect.exe /nt60 I:
H:\Boot\bootsect. exe/nt60I: |
where I: is the letter received by the newly prepared USB drive.
This command replaces the bootloader files on disk I: with those that are necessary to boot Windows 7.
The bit size of the base OS and the Windows distribution must be the same.
xcopy H: I: /s /e /h /
xcopy H : I : / s / e / h / |
That's it, the USB drive is ready. Boot your PC from the resulting USB flash drive.
To speed up the copying process, experienced users can use the program RichCopy, it is a graphical shell for the robocopy command, and includes a large number of settings. Numerous options include sorting files by attributes and folders, error prevention, changing attributes, copy timing, editing the timestamp, setting the number of threads and the size of the cache to use.
Method 2. Using a program from Microsoft - Windows 7 USB/DVD Download Tool.
and finally...
Method 3. Using a third-party program - UltraISO.
Right-click on the ISO file and select Open using UltraISO
In the UltraISO program in the menu File click on the item Open, select the Windows 7 image you need and click Open.
3) After making sure that the image is open, select the item in the menu Burn a Hard Disk Image
I hope you can install Windows 7 on your netbook from a flash drive. If not? Write, ask questions - I will help you in any way I can. Good luck to you.
GD Star Rating
a WordPress rating system
Without an operating system, a personal computer is nothing more than a set of components assembled in a system unit case. To make these components interact with each other, the user must install an operating system on the computer.
An operating system (OS) is software that helps the user interact with a computer through a convenient graphical interface. The OS comes with many programs such as Internet Explorer, Notepad and Paint, Explorer, etc. The same familiar Windows interface is nothing more than a separate application.
When purchasing a personal computer, the buyer must be prepared for the fact that he will have to pay extra for the software separately. Thus, on a computer or laptop, you will have to install both third-party applications (most of them are distributed free of charge) and the operating system itself, which, unfortunately, is paid. However, there are also free alternatives, for example, any edition of Linux.
In the vast majority of cases, users choose Windows, because this system is the most popular among software developers, and is also the most user-friendly and intuitive.
Selecting media for the operating system
When purchasing a computer for private use, a person can easily install a trial version of the system or download an activated OS from any .
Most often, the operating system is distributed in the form of an image. To install Windows on a computer, you must place the image on any supported media. And after that, install Windows from this media onto the computer’s hard drive. The most common media are DVDs and flash drives.
Unfortunately, most builds of Windows are distributed with an integrated set of applications and updates. Thus, the file size increases to several, and therefore the image simply does not fit on the optical disk.
The way out of this situation is to place the Windows installation distribution on a flash drive, or as it is popularly called a flash drive. As a storage medium, you can use either a full-fledged flash drive or a MicroSD memory card installed in a card reader.
If the laptop has a built-in card reader, a person can easily use this device.
Program for placing Windows distribution on a flash drive
There are many applications for installing an operating system from a flash drive. Unfortunately, most of them are too complex for the average user; moreover, some programs work exclusively with a certain version of the system.
One of the best solutions is to use the UltraISO program, because this application allows you to place the distribution kit of both Windows and any other OS on a flash drive. In addition, even a novice user can work with UltraISO; this does not require any special skills.
First, you need to find a flash drive of a suitable size, then connect it to your computer and run UltraISO. If there is any useful information on the media, it must be transferred to other means of storing information, because after the copying process is completed, all data on the device will be lost.
The UltraISO interface may seem quite complicated, because this program is a real universal processor that works with images. If desired, you can even mount images using this application.
To burn Windows to a USB flash drive, you need to go to the “ File», « Open"and select the required image file through Explorer.

After opening the file, its contents will be displayed on the left side of the window.

To write information to a flash drive, you need to go to the "" section and run the " ».

In the section " Disk Drive", the user selects the drive connected to the computer and presses the " Record" It is advisable to leave all other settings unchanged.

At the end of the process, the drive is removed from the computer and can be used to install the OS on any other device.
The process of installing Windows from a flash drive is not that complicated, and yet this topic requires separate consideration. In general terms, the user connects the flash drive to the computer and immediately at the moment of turning it on, calls up the BIOS boot menu, in which a USB drive is selected as the boot source.

Depending on the motherboard manufacturer, the boot menu is called up by pressing the F11, F2, ESC, DEL, F8, F9, F12, F10 buttons. Here you need to check the documentation for the motherboard.
The further installation process is no different from installing Windows using an optical disc. You just need to follow the Windows Setup Wizard instructions on your monitor.
To summarize, it should be noted that flash drives are not just crowding out other drives from the market. These devices can act both as optical disks and permanent memory of mobile gadgets.
The write speed and reusability make flash drives more cost-effective than any other storage medium.
Share.


