How to convert a raster image to vector. Creation of vector graphics. Creating a vector mask for a layer from a vector path
Instructions
The process of converting an image from a raster to a vector is called tracing. Tracing can be performed in a program specially designed for this purpose. Adobe Illustrator. "Illustrator", like Photoshop, is paid program. After installing this program on your computer, run it. Open the image by clicking “File” in the main menu and selecting “Open.”
What is a vector image?
This is, for example, a technique used with digital cameras or scanners. Enlarging the image Raster image. . In other words, to display a string, for example, the software determines the starting point, end point and the subsequent trajectory. It then calculates and positions the set of pixels needed to display that string.
The same applies to more complex shapes and colors. Magnifying image. . This method is often used when working with graphic palettes, such as creating logos or comics. The main formats are those created software, used to design such images.
Use automatic tracing if your drawing has a small color palette and clear contours. Select the image: double-click on it or simply go to the “Object” item. IN top panel The Live Trace button will appear and you will see a small black triangle next to it. Clicking on it will open a menu showing the tracing options available for your image.
Advantages and disadvantages of both types of images
Unfortunately, raster images suffer from the "pixilation phenomenon," which tends to make those famous little squares more visible the lower the quality of the photo. This is especially true when expanding or printing. On the other hand, than better picture, the larger the file.
What is used in the class?
In contrast, vector images are quite lightweight. They also have the famous property of being unbounded and pixel-free, with every line and every shape being recalculated dynamically! Even if nine times out of ten we have to deal with raster images, the most common format, the fact remains that vector image deserves our attention, especially for classroom use.
Click on the “Tracing Options” item if you want to control the result. Click on the Preset setting. Depending on what you want to convert: black and white or color photograph, picture, logo or something else, select the appropriate item.
If you want to trace a logo, choose the Color 6 template. If you're not happy with the results, take a step back and try using the Color 16 template - it's suitable for more complex illustrations. For photos where details are not important, use Photo Low Fidelity, otherwise Photo High Fidelity. The Hand Drawn Sketch template is worth using if convertible image- a drawing made in pencil (sketch or sketch).
Software for processing these images
For vector images, we also have free and free programs. Sending calendar projects. For a specific calendar template, contact your service manager. . We appreciate your confidence in our professional competence We are looking forward to a pleasant and mutually beneficial cooperation.
If you have any sketches prepared with a pencil, come with us and we will find general solution. Files must be prepared without compression. The aspect ratio must match the size you want to print, you must specify the scale. The mask must not contain any visible or invisible objects that exceed the size of the specified image.
In the conversion settings window, pay attention to the “Mode”, “Threshold” and “Minimum area” fields. The first parameter determines the trace type: color, gray or black and white. The second one details the images (the higher the number, the greater the effect), this parameter Suitable for b/w drawings only. The third point determines the area that will be processed: if any area of pixels is smaller than the specified one, the program will turn it into noise and discard it.
Layouts with small elements or thin lines, we recommend making more high resolutions. This program will perform many of the expensive tasks of image processing programs. It allows you to edit photographs and other raster graphics, create animated images and advertisements. Has complete set brush tools: brushes, pencils, spray and clone tools, etc. has powerful system scripts and add-ons. The program has been translated into Lithuanian, Russian and many other languages.
Has various shapes And free tools drawing, as well as text writing, cloning, rotating and other tricks, stuffing and other tools. Convenient operation with screenshots. Many features include: automatic capture, photo collection, etc.
Almost all images in electronic form are in raster format, i.e. broken down into individual pixels. The quality of such a picture will depend on the number of pixels per unit length. Vector images are a picture consisting of individual elements.
You will need
- - program skills Adobe Photoshop.
Instructions
Run Adobe program Photoshop, using the “File” – “Open” command, add to the program desired image, which needs to be changed from raster to vector. Or simply drag it into the application window. Select the tool " Wand» on the Tools palette, highlight white background around the image, click right click mouse and select the “Invert Selection” option.
Select the Lasso or Magnetic Lasso tool. Right-click on the selection and select the Make Work Path option to translate the image from raster to vector. In the window that opens, set the smoothing level to your taste. The Path palette will appear on the screen.
Select the outline of the object using the Path Selection Tool, then select the Layer menu, select the New Fill Layer option and click Color team. Thus, you have created a fill layer, and it was immediately assigned a vector mask in the form of an image outline.
To complicate the drawing, to do this, take the Pencil tool and select the fill layer mask. Set the Subtract option in the pencil settings and complete the elements of the picture. Save the resulting vector image.
Add an image to Adobe Photoshop to translate the image from raster to vector. Double-click on the background layer to make it a working layer. Create a duplicate layer. Select the Eyedropper Tool and click on the darkest color in the image. Next, take the Pen Tool and use it to add anchor points to the image.
In the Pen tool group, select the point conversion tool, select the second layer and trace the outline of the image. Make a copy of the layer and similarly draw the outline of the image with a different color that is dominant in the picture. Similarly, draw the details of the image, each on a new layer. Save the result.
Vector graphics is a way of representing objects using geometric primitives - points, lines, polygons. IN raster graphics, on the contrary, matrices are used fixed size, consisting of dots (pixels). Software converters are used to convert an image into a vector format.
You will need
- Adobe Illustrator
Instructions
Please note
in many editors vector graphics There is a function for converting a raster to a vector. just run some coreldraw or inkscape, import a raster image there and start the conversion.
How to make a vector image from a raster image, Adobe Illustrator, tracing. Typically, tracing is used for images with only solid colors and extremely clear contours, since the presence of gradient or simply complex colors leads to the formation of very large number vector contours.
Sources:
- how to convert a rastovo image into a vector one
Tip 4: How to convert pictures from one format to another
Currently there are quite a few various formats images, but what if you have an image in one format, but for some specific purpose you need a different format?

Instructions
You can change the image format in various ways. This can be done both using programs and online services. Online services, as a rule, do not support too many formats, but also do not require program installation. Plus, they're free. Third-party programs have more features, but are not always free and often require installation on a computer. What to choose - everyone decides for himself.
The most popular and widespread program is graphic editor Photoshop. Open your photo (File - Open) and save it (File - Save As...), selecting the file type that you need. If a menu appears asking you to set the quality of the saved image, select based on your requirements.
The same can be done in ACDSee program. To do this, open your photo in it and select top menu Edit – Convert file format. Next, select new format, click “Next” and save the modified image to disk.
Among the online services, we can recommend the simple and convenient FanStudio, located at http://www.fanstudio.ru/index.html. At the bottom, under the words “Upload a photo,” click “Browse” and select a photo. Then click next to “Save or get link.” Select “Save to disk” and a new photo format. This editor offers a fairly large selection of formats in which you can save the file.
Another service is located at http://pixer.us/. Click the “Browse” button, select a photo and click on “Upload & Edit”. Next, click on the “Save” button and choose from four possible formats: JPG, GIF, PNG and BMP. Then save the photo to disk.
Please note
When working in online editors Please note that older versions of browsers may not display pages correctly.
Sources:
- how to translate jpeg photo
Browsing web pages is not always convenient, given that not all HTML files support portable devices. The problem is solved by converting the file to an image.
You will need
- - Mozilla browser Firefox;
- - Internet connection.
Instructions
Download and install on your computer Mozilla browser Firefox if you haven't had it before. Launch it and in the top menu, go to the plugin settings panel for your browser by clicking on add-ons. Go to search bar V this menu and enter FireShot. When the system finds a plugin with the desired name, stop the search, carefully read the description of the extension being installed, complete the installation and restart the browser.
All graphic files are divided into two global types - raster and vector. Sometimes you need to convert from raster to black and white vector. For example, for tracing black and white icons, QR codes, barcodes, pictures with raster inscriptions, receipts or pictures on a blog.
What is the difference between a raster file and a vector file?
Raster graphics
Raster file represents a sequence of colored squares (pixels). The number of points in a file is determined by its horizontal and vertical dimensions. For example, a 640x480 file contains 307,200 pixels. A raster file can be represented as a mosaic. You cannot stretch a raster image without losing quality.Popular raster formats: JPEG, GIF, PNG, TIFF, WEBP, BPG.
Vector graphics
Vector graphics represent many different geometric shapes described mathematical formulas. The overlay of these shapes on top of each other forms an image. For example, an ordinary square is described by four equal segments, each of which is connected at its ends to the ends of the other two at an angle of 90 degrees.Popular vector formats: SVG, EPS, WMF, PDF.
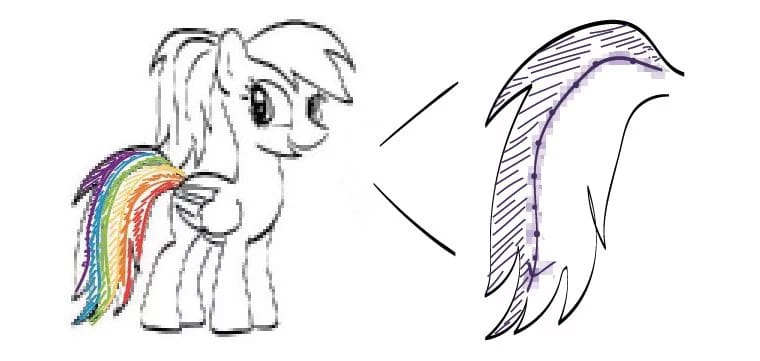
From raster to vector
Vectorization algorithm
Tracing occurs in several stages:- The vectorizer scans the image and finds all areas with pixels colored the same color.
- Borders are approximated by 1 px thick segments.
- A triangulation with a line constraint is constructed.
Potrace based converter
Sometimes you need to automatically convert images that users upload from raster to vector format.There is a very simple and free way implement such a conversion using vector editor Inkscape. Inkscape uses Potrace to vectorize images.
After tracing, the image can only be black and white. On potrace it is written that color support may be implemented in the future.
Example of conversion from PNG to SVG. The potrace function only accepts files with the PNM extension as input, so before tracing PNG you need to convert:
Exec("convert image.png image.pnm"); exec("potrace image.pnm -s -o image.svg");
This method has been implemented and you can look at the quality of tracing of any image. An example of vectorization of a blurry barcode. And this is an example of a traced logo. This is how the converter copes with photographs.
How to make the output picture color
In addition to manual editing, there is another painting option black and white pictures on the way out. But the picture should be low-color. The solution is suitable for tracing colored icons, logos and buttons into vector.You can select individual colors using the ppmcolormask mask (included in the Netpbm package):
Cat img.gif | giftopnm | ppmcolormask #641b1b | potrace
Then trace each part separately and superimpose them on top of each other at the end.
From vector to raster
Rasterize vector drawing much simpler. A grid with cells of a certain size is superimposed on the vector image and the image is discretized, after which it is encoded according to the output format.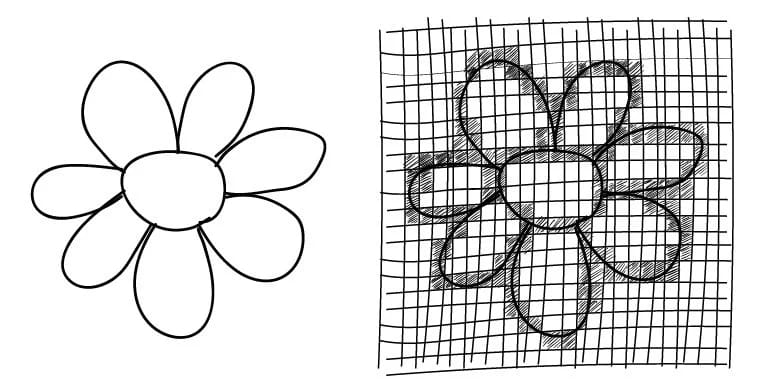
One example of converting SVG to PNG using Imagick.
Using this code you can convert SVG files in PNG24:
$svg = file_get_contents("image.svg"); $image = new Imagick(); $image->setBackgroundColor(new ImagickPixel("transparent")); $image->readImageBlob($svg); $image->setImageFormat("png24"); $image->writeImage("image.png"); $image->clear(); $image->destroy();
Here you can see the results of converting your images from SVG to PNG.
Abstract
- You can convert from raster to vector on your website using potrace.
- Potrace only supports black and white vectorization.
- You can convert from vector to raster using Imagick.


