How to clean your computer of everything unnecessary. Complete cleaning of your computer from debris: detailed instructions
Users of personal computers must ensure that their device is in good working order. This includes cleaning your PC from viruses, Not necessary programs, component testing and much more. In this article you will learn how to clean your computer so it doesn't slow down.
All causes of brakes can be divided into software and hardware. In the first case, the user can fix the problem manually and using special programs. If the hardware malfunctions, it will not be possible to eliminate the cause of the slowdown without special knowledge in this area. We'll sort it out software reasons and ways to eliminate them.
Setting up autoload
If you often install programs and applications on your laptop or PC, they may be added to the default startup folder. Some of them greatly affect the turn-on speed operating system, while others noticeably slow down the operation of the device. You can track the entire list of programs in startup as follows:
- First you need to launch the "Task Manager". The easiest way is to use hot Ctrl keys+Shift + Esc.

- Now you need to open the “Startup” tab. Here is the list we need.

- Pay attention to the columns “Status” and “Impact on startup”. From the first you can find out whether the program is enabled or disabled. The second column displays the degree of influence on turning on the computer.

- It is necessary to select those applications that most affect the PC boot speed. You need to close them yourself. To do this, right-click on the line with the program and click “Disable”.

Now unnecessary applications will not interfere fast loading operating system. The same procedure can be carried out through the CCleaner program, about which we'll talk further.
How to clean your PC using CCleaner
This utility allows you to clean your computer from temporary files, cache and registry errors. It can also be used to delete installed software and configure autoloading. Let's look at all the functions in order. First you need to install CCleaner:
- Open the official website to download the free installer. The program is compatible with Windows XP, Windows 7, Windows 8 and 10.

- Run the downloaded file and click on “Install”.

- After quick installation, click on “Run CCleaner”.

- In the first section, “Cleaning,” the utility allows you to delete temporary files, browsing history, browser cache and other garbage. Before starting, you must close the browser. To start the procedure, click on “Analysis”.

- After scanning the system, information about the files to be deleted will appear. Now click on Cleanup.

- Go to the “Registry” tab. This function allows you to clear registry keys of errors and conflicts. Click on "Search for Problems".

- After collecting information about the problems, click “Fix Selected.”

- You can make backup copies of changed data.

- To start, click on “Fix marked”.

- Next comes the “Service” tab. Here are tools for uninstalling programs, setting up startup, browser extensions, etc. If you are going to clean your PC from unnecessary programs and files manually, then CCleaner will an excellent alternative standard Windows software removal tools.

- The Startup tab provides an alternative to the standard functionality of the Task Manager. Here you can not only completely remove applications from autorun, but also temporarily disable them. You can also configure the launch of tasks and context menus when you turn on the PC.

CCleaner is one of the few programs with such extensive functionality that can be downloaded for free in Russian. In order for the utility to monitor the cleanliness of the system in background, do the following:
- Go to the "Settings" section. Check the box marked.

- Ready! Now the utility will clean your PC every time you turn it on. You don't have to do the operation manually.
Virus cleaning
The next reason for slowdowns is malware infection. For cleaning it is recommended to use third-party antiviruses, and not the standard Windows Defender.
If your antivirus cannot cope with the treatment, then you can use one of the special one-time utilities. It will scan and cure your system once, but will not be a permanent protector. Let's figure out how to properly scan your computer using Dr. Web Cureit:
- Open the link and download the program. The distribution will weigh about 160 MB.

- The utility does not require installation. Launch the downloaded file and click on the “Start scanning” button.

- Wait until Dr. Web Cureit will completely scan your system for threats.

- Now click on the “Disarm” button and close the utility.

Clearing the browser cache
- Launch the browser and hold down the Ctrl + H keys. This tab can also be opened through the side menu.

- Select “Clear history” from the menu.

- Select the “All time” time range and click on the “Delete data” button.

If you don't want to use third party software to clean your PC, then use standard functionality Windows.
Uninstalling programs
If you do not work with CCleaner functionality, then uninstall unnecessary applications You can use the operating system tools:
- IN search bar On the taskbar, enter the query “Uninstall”.

- Find unnecessary software in the list and click “Delete”.

The interface differs slightly depending on Windows versions, but all the names and programs are the same.
Disk cleanup and defragmentation
Let's figure out how to perform disk cleanup using standard OS tools:
- Through Explorer, go to the “Computer” section, click on the desired hard drive RMB and select “Properties”.

- In the “General” tab, click on the marked button.

- Check unnecessary files and click "OK".

- Confirm deletion.

- Now in properties, open the “Tools” tab and select “Optimize”.

- Select the hard drive partition and click “Optimize”.

- After analysis file system the program will determine whether it needs hard section disk in optimization, and will start it if necessary.
Manually deleting temporary files
All temporary files are stored in the Temp folder. You can access it as follows:
- Launch the Run window (Win + R) and enter the command:

- Before manual removal carefully review the list of files and folders. You may need some of them for work or games (saves, configuration files, etc.). The rest can be safely deleted.

Disabling effects
If the brakes appear due to weak iron PC, then turning off the visual effects. This especially applies to modern Windows 8 and 10. With the help of the presented guide you can disable unnecessary effects:
- Open Control Panel and go to System and Security.

- Now click on “System”.

- Open the menu " Additional options systems."

- In the “Advanced” tab, click on the marked button.

- Set the option to "Provide best performance" and save the changes.

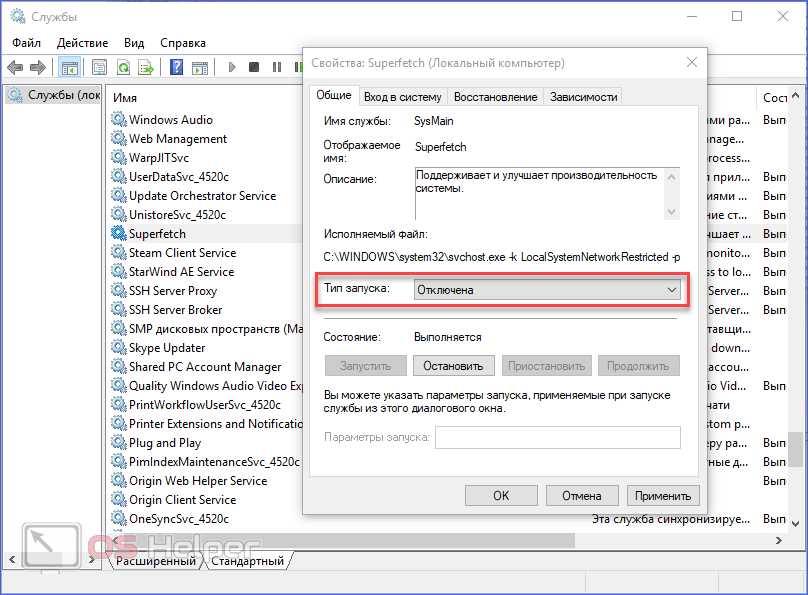
Disabling services
This point concerns the operating room Windows systems 10, which has many services running by default. All of them significantly load the processor and RAM, so some of them need to be disabled. You can do it like this:
- Launch the Services application. To do this, enter the command in the “Run” window:

- The first service is Windows Search, which scans and indexes files for search in the background. Find the line of the same name in the list and double-click on it. In the window that opens, select the startup type “Disabled” and apply the changes.

- The second service is Superfetch. With its help, the OS monitors frequently used applications and preloads them into RAM. To reduce the load on your PC, try disabling this service in the same way.
Prevention
Besides software problems, the reason why the PC slows down is hardware faults. One of these is dust contamination. The user must keep the inside clean system unit. The main sign of contamination is an increase in the temperature of the processor, video card and other components. You can track metrics using special utilities.
One such program is HWMonitor. Through it you can track the temperature of all components. For example, the screenshot shows the temperature of each processor core:

Conclusion
We have reviewed all sorts of ways speed up work personal computer. By using manual cleaning and special utilities you can get rid of most of the causes of brakes.
Video
Check out the video with detailed description all actions from the instructions. You can complete all the steps while watching the video.
Even new computer After some time it starts to freeze a lot during operation. This happens due to the fact that a large number of unnecessary files, programs and cache accumulate in the system. You can fix the problem by clearing your computer of junk.
Free computer cleaning of junk and unnecessary files
Let's consider the most popular methods cleaning.
Cleaning the registry
Start» - « Execute».
Enter " regedit" and click " Enter" or OK.

First of all you need to create backup copy: « File» - «»…


The editor window is divided into 2 parts. The left section displays the sections, and the right displays individual registries.

Now you need to find and delete records of deleted programs.
HKEY_CURRENT_USER - « Software»…
You need to look through all the entries and find those that contain the name of the program or developer company. In the picture below this is the program.

Find the entry and press the button Delete.
If an error occurs after changing the registry, you can restore it from a backup copy.
Cleaning the system disk
Before you clean your computer of junk, you need to save all your data. Usually files user are stored on drive D, A programs are installed on drive C. If hard drive is not divided, then all information is stored on drive C. You need to transfer files, music, photos, videos from one partition to another drive, cloud storage etc.
The "" function is built into OS Windows 7. Click right click mouse (RMB) using the “ My computer", select the item " Properties" and further "".

In the next window you need to select the partitions that should be deleted. Usually this is the “” folder, a cache from the Internet and files in the Recycle Bin.

The disk cleaning process begins.

Cleaning startup
Not all programs that are installed on a computer are garbage. Antivirus and firewall are designed specifically to protect the system. They should not be removed from startup, unlike other programs. Torrent, application for sound card can be launched separately later. You can clean your computer using the built-in program MSConfig.
« Start» - « Execute" or " Win+R» - « msconfig.exe» - OK.

The "" window will open. Go to the tab "" and " Service».
This displays a list of all programs that load when Windows starts. There is a check mark next to each of them. To remove a program from startup, you need to remove the check mark and click.
To avoid accidentally turning off system program, activate the “” checkbox at the bottom.

All changes will take effect after the system is rebooted.
Removing unnecessary programs and files
The next step in cleaning your computer from junk is deleting unused programs. This can be done system means, via the control panel.
Start – Control Panel – .

You need to find the program in the list and click on the “ Delete».
This method has one serious drawback - “tails” of programs may remain on the computer.
You can also clean your computer from viruses through the registry. Viruses create registry entries to download their files when Windows startup. They are located HKEY_LOCAL_MACHINE and HKEY_CURRENT_USER. They need to be found and removed.
- Open the registry: Win + R - Regedit - Enter. Go to the section /Software/Microsoft/Windows/Current Version/Run. Find the file - right-click - Delete.

Next, you need to clear all malicious entries in the registry. To do this, click “ Computer" - tab " Edit» - « Find" Enter the names of all malicious processes and click " Find next" You need to delete all registry branches that contain these files.
Clearing the cache
A cache is a storage for temporary files, but most often unnecessary files accumulate here. It has to be cleaned manually. The cache may contain temporary files and DNS. Consider how to clear your computer of junk cache.
DNS- this is the sequence of determining the correspondence between the IP and the text name of a computer on the network. Every time DNS information domain is cached for later use. This provides quick access to the file and reduces server load. But if the IP changes, the user will not be able to open the site using the link to domain name. To avoid this error, you need to clear the cache by running the command " Start» – « Execute» - ipconfig /flushdns. The system will clear the memory and close the window.
How to delete temporary files from hard drive, has been described previously.
For long time work, duplicate files accumulate on the computer. For example, a user downloaded a movie, forgot about it, and then copied it again. Manually clearing your computer of debris in the form of duplicates is very time-consuming and inconvenient. Therefore, it is better to use third-party programs, for example, AllDup. The search is carried out immediately on all disks, inside archives, filters, etc.
By default, the search is performed by file name. In the settings, you need to change the search options by specifying the file contents as the method.

Based on the search results, files will be sorted by size. You can only view photos. Check the duplicates and click the button in the upper left corner.

Selected files can be deleted or moved to any disk partition, for example, the Recycle Bin.

Here's how to clean your computer of junk for free.
How to clean your computer using special utilities
Built-in programs have limited set functions. Sometimes with the help of one third party application can simultaneously solve several problems.
WITH using CCLEANER You can clear the registry, cache and startup list. A separate menu section is provided for each task. To clean the registry, you need to go to the " Registry integrity» check all the boxes and start the process.

The program will analyze all system errors and display them in separate list. We check that there is a checkmark next to each and them and click “”.

A warning will appear on the screen. Click "" to start the removal process.

Through the "" tab you can delete all temporary files and network cache. First, the program analyzes the information...

Then it displays a list of files that need to be deleted.

Auslogicsboostspeed
Immediately after launching the program, it will offer to perform a “system check”. The first time the process may take 30 minutes. In this case, all cache files, duplicates and other garbage will be displayed in the results. You can select a specific operation in the “” section: clear history, delete files, clean (defragment) hard drive or clear the list of programs from startup.
RevoUninstallerPro
RevoUninstallerFree is designed to remove unnecessary application from a computer. All installed programs are displayed on the "" tab. You just need to select the application and “ Delete» (the button will become active).

The menu "" presents two more useful features:

- ", with which you can edit the list of applications launched when Windows starts.

- ", which searches and deletes residual files from a computer.

The program is used to clean cache, unnecessary files, system errors. In the settings, you can mark which items are best left, for example, passwords for sites in the browser.

Having selected all the necessary items, we start the cleaning process.

Unlocker
You can clean your computer from garbage, viruses and program remnants using the Unlocker program.
You need to download and install the application on your PC. Find the file or folder to be deleted and right-click on it. In the menu that opens, click “ Unlocker».
Often, users turn to technicians with a problem: why the computer slows down if it is only a few months old from the date of purchase. To exclude similar problem, the wizard needs no more than 15 minutes to get your computer working in a new way. How does he do this? How to clean your computer yourself? We will deal with this issue now.
Dust is the first reason for braking
Overheating can cause braking. Overheating can occur due to the fact that the system unit simply does not have enough air. Where do you usually have your system manager? Probably in a special compartment of the computer desk.
When operating, especially under heavy loads, system unit components can consume a lot of watts. In terms of power consumption, they can be compared to a hair dryer or a small electric kettle. Of course, such work generates a large amount of heat. It is driven out of the system unit by constantly running fans. As you understand, if you put it in a “blind” niche of the table, and also cover it with a bunch of necessary papers, your computer will be in constant overheating. The equipment tolerates everything, only the fan begins to work differently, more noisily. Even the slightest load causes them to start working at full capacity.
As the load or ambient temperature increases, electronic components a special protection of the microprocessor is triggered, it is called throttling. Its main task is to artificially reduce the number of operations performed per second. For example, your computer is performing a complex operation, but from time to time it begins to take small breaks. For this reason, games freeze very often.
If your computer’s radiator is “clogged” with dust, then the transition to respite mode begins much earlier and under lower loads.
To keep your computer from overheating and working as quickly as before, you need to clean it periodically. IN in this context This means mechanical cleaning of the computer.
To clean your computer, you need to remove the system unit from the niche, unscrew a couple of screws, and remove one side cover. That's it. For these purposes, it is not necessary to call a specialist; you can do everything yourself. Clean up the dust wherever you can get it. The main thing is not to break anything.
Action plan:
1.Disconnect the system unit from all wires. If it is difficult for you to remember where a particular wire was connected, then draw a plan on paper or make notes on the wires. Do not disable anything inside the system unit.
2.Take soft brush and a vacuum cleaner (having removed all attachments in advance, if there is a “ wet cleaning", then turn it off too);
3.Lay the system unit on its side ( best place for the procedure - this is the floor);
4. Turn on the vacuum cleaner to suction, then take the hose with your left hand and bring it to the places where the most dust has accumulated and to the fans.
5. With your right hand, “ruffle” in places where dust accumulates, while simultaneously sucking it into the vacuum cleaner. By the way, a vacuum cleaner is necessary to prevent dust from scattering throughout the apartment.
That's it, the cleaning procedure is finished, return it back removed cover“system unit”, screwing it with screws.
Now your computer will stop overheating, and perhaps stop slowing down.
If you do not have a desktop PC, but a laptop, then contact a computer technician, since not many laptop models allow you to clean the dusty insides simply by removing the cover. As a rule, you need complete disassembly. Laptops have very delicate parts, so it is better to have your laptops cleaned by professionals. Note that they need to be cleaned much more often than stationary ones, since due to their compactness, dust is better retained in them.
If you don't clean your laptop in time, more serious problems may arise. Therefore, it is recommended to clean your laptop once a year (this is the minimum). Especially if tailed friends live in your house.
Computer cleaning software
If, after cleaning the hardware, your computer still slows down, then you need to perform software cleaning.The main reason why a computer slows down is infection with malware (viruses, worms and other evil spirits). Before you clean your computer, you need to get rid of them. How to clean your computer from viruses? It's simple.
To do this, install powerful antivirus and run full check the entire computer. Choose an antivirus from well-known companies; little-known ones can do harm rather than good. Not a bad option - trial version paid antivirus. As a rule, it is fully functional, but has a usage limit (usually 30 days). As you understand, paid antivirus better than free.
Remember that two antiviruses cannot exist on a computer at the same time, as this can also cause the computer to slow down.
Temporary files slow down your computer
If, after checking your computer for viruses, it is still slow, then you need to clean it of temporary files. To do this, enable the display of hidden files. Further advice will differ depending on the version of the operating system installed on your computer.
Do the following: Start => Control Panel => Folder Options. In the “View” tab, put a dot next to the “Show” column hidden files and folders”, next to “Hide system, protected files (recommended)”, uncheck the box. After which the computer will ask you if you want to apply this change, you click “Yes”. Then click “Apply”. Now you will have new files and folders on your computer (previously invisible), do not delete them under any circumstances!
Now move on to cleaning. Do everything according to the instructions.
Go to Computer => Local disk(C:) => Windows => Prefetch. IN Prefetch folder delete everything you see. Then go to the Windows folder, find the Temp folder there and delete everything too.
If you have Windows 7 or Vista, then the next paragraph is for you.
Go to the Local Disk (C:), go to the Users folder, find the folder with the name under which you are registered in the system. Next find AppData folder, and in it Local folder. Then find the Temp folder in it, enter it and delete all the files that you see. If you have several users, then these steps need to be repeated with the folders of each user.
If you have Windows XP, then do what is described in the paragraph below.
Return to the Local Disk (C:), go to the Documents and Settings folder, then go to the folder of the user under which you are registered in the system. In it, find the Local Settings folder, and in it the Temp folder. In the latter, delete everything.
Then return to Local Settings. In it, find the Temporary Internet Files folder. Delete everything in this folder.
If you have several users, then these steps need to be repeated with the folders of each user.
Next, do a standard cleanup of drive C. Go to Computer, then right-click on the Local Disk (C:) icon, go to Properties and check if the “Shrink this drive to save space” checkbox is unchecked. If the checkbox is checked, uncheck it. Then confirm changing the settings for all files on drive C. This way the computer will slow down half as much. Then click on the Disk Cleanup button. In Windows 7, you also need to activate the Clean option system files. Then click OK and wait.
By the way, in Windows 7 you can put checkmarks next to all items, but in Windows XP not all items can be checked. In particular, do not check the box next to “Compress old files,” otherwise the computer may begin to slow down over time. After clicking the “Ok” button, the system will clear everything itself.
To prevent your computer from slowing down, you can disable some of the visual effects
Right-click on Computer, select Properties, then go to Advanced system settings and activate the Advanced tab. Look where it says Performance - click on Settings.
In Windows 7, you need to uncheck the following items:
1. The menu fades after calling the command.
2. Animation of windows when minimized and expanded.
3. Sliding when opening lists.
4. Smooth scrolling of lists.
5.Fading or sliding effects when prompts appear.
6. Animated controls and elements inside the window.
7. Fading or sliding effects when accessing the menu.
8. Animation in the Start menu and taskbar.
After which you will need to click OK and OK again.
Check autorun. Press Win+R, then type msconfig into the search bar and press Enter. In the startup section, uncheck the boxes for downloaded programs, as well as drivers. Which ones exactly? Decide for yourself.
Advice for advanced users - disable system restore
Inexperienced users believe that system restore cures all “illnesses,” but this is not the case. A rollback usually helps in cases where you have problems with the system, drivers, etc. Therefore, you can turn it off, because it introduces serious braking into the system.
Right-click Computer, select Properties, then System Protection. Opposite the drive (C:) you will see “Enabled”. Select Local disk (C:), click Configure and put a dot
opposite Disable System Protection. If you click the delete button, you can free your computer from all restore points. Then click OK.
If you have a lot RAM(2 GB or more) and you do not use resource-intensive applications (for example, Photoshop or 3d Max) or games, then disable the page file.
Now do the following: click Start, then right-click on Computer. In the window that appears, find “Advanced system settings”. Open another System Properties window. In it, select the Advanced tab, pay attention to the Performance section and click the Settings button.
In the Performance Options window that opens, find the Advanced tab, find the Virtual Memory inscription there and click Change.
In the window that appears Virtual memory see if the checkbox is checked
opposite the column “Automatically select the size of the paging file”. If yes, then remove it.
Opposite the column “Without a paging file, put a circle.” Then click the Set button. Windows may not like it, don't pay attention to it. If you have more than two GB of RAM, then feel free to click “Yes”. Confirm the result with the “Ok” button. After which the system will ask you to reboot, allow it to do so.
After rebooting, it’s as if your computer has been replaced! It works very fast. Now Windows is loaded completely into RAM, so the hard drive will be practically not used during its operation, that is, it will wear out less!
If you launch something resource-intensive in the future, don’t worry. If there is not enough RAM, the computer will warn you about it. Then you just need to check the box next to Automatically select the size of the paging file, and then click OK. Then the system will do everything itself.
When we have already dealt with the issue, how to clean your computer. We have almost finished cleaning it (the dust has been wiped off, the viruses have been “kicked out”). You need to do defragmentation. This is done when the computer is clean.
By the way, if you like to play games, you can buy a flash drive (its volume should be twice as large operating system computer) and use it with Ready Boost technology. You will feel the productivity increase immediately.
Another tip - do not forget to periodically clear your browser caches. They sometimes specifically interfere with the operation of both browsers and the entire computer.
We solved the problem of computer slowdown without various optimizers, registry cleaners and other things. The computer actually started working faster. In addition, we freed up more than one gigabyte free space. It obviously won't be superfluous.
By the way, hide system and hidden files, this will make you much safer.
That's all, now your computer will still work fast!
- To clean your computer from viruses: malwarebytes, trojan remover
- To clean the registry and general speedup: bootspeed
- To eliminate braking from overheating: Everest (will show the temperature)
How to speed up the computer boot/shutdown process.
How to speed up the computer boot/shutdown process. (This method is only relevant for multi-core computers) By default, when loading, the operating system uses only one processor core. The rest are idle at this time. To enable them too, make a small adjustment. Call the "Run" command using the Win + R key combination or by going to Start -> All Programs -> Accessories -> Run. In the "Open" field, enter msconfig command and press Enter. The "System Configuration" window will open, in which go to the "Download" tab. On this tab, click the "Advanced options..." button. A window will open in which, as indicated in the picture, check the box next to “Number of processors” and just below select the number of processors that will be involved in loading Windows. It is advisable to choose maximum quantity, which your computer has and Windows boot it will happen faster on your computer.
Hello friends. In this lesson I will show you how to clean your computer from junk and unnecessary files. It’s no secret that all the junk that is on our computers does not bring any benefit to our system, and in some cases, on the contrary, can be the reason for computer slowdown and various glitches.
Let me show you how you can clean your computer of junk and unnecessary files in a few simple steps.
Cleaning the Registry and deleting unnecessary files
Using free program CCLEANER, we can delete huge amount trash. Download latest version from the official website: https://piriform.com.
Install CCleaner and run it. Go to the Registry tab, make sure all the checkboxes in the section Registry integrity installed and then click Search for problems.

After a few seconds all will be found unnecessary entries. To clear them, click Fix and in the window that opens Correct marked.


Now open the first tab - Cleaning. Here you can see what checkboxes are in the section Windows and Applications. I usually leave everything by default and click Analysis.

Upon completion, we see a list of all files ( trash), which can be deleted. Their size is also indicated (almost 1 gigabyte). Click Cleanup to delete this whole thing.

System disk cleaning: TEMP folders, Disk Cleanup
On the way to the next step we need clear TEMP folders, in which temporary files are stored, and perform Disk Cleanup, which allows you to clean your computer of unnecessary files using standard tools systems. Some functions have already been performed by the CCLEANER program, but I assure you manual check will not be superfluous!
Open the Computer section, then the system drive (C:) and following folders: Windows – TEMP.

The contents of the TEMP folder can be completely deleted. Temporary files are stored here and are of no use. If errors appear, for example, " These files are used", then we just click “Skip all". Usually it’s not possible to delete minimum quantity files!
There is another temporary folder in Windows and it’s the easiest to get to. in the following way. Click Start and type %TEMP% into the search bar. Temp folder will appear in the found.

In Windows 8 and 10, the search can be launched using a keyboard shortcut WIN+Q.
The found folder needs to be opened and the contents cleared!

After cleaning the TEMP folders, do not forget to perform a “disk cleanup” using standard system tools. To do this, right-click on the system disk and select "Properties".

On the "General" tab there is a "Disk Cleanup" button. Click it to analyze unnecessary files.

After a couple of minutes the program will offer to delete a certain amount files. Check all the boxes and click "OK".

If you have recently updated the system, then in this window you will see more additional button "".

Click it to delete temporary files that were downloaded to update Windows.
Important! If you have little space on your system partition, then I advise you to read my lesson: . There I told 10 cool chips, for cleaning system disk
Scan your computer for viruses: Dr.Web CureIt
One of important steps at cleaning your computer from unnecessary files– this is of course the same. To do this, you will not need a utility from Doctor Web! Download the latest version from the official website.

Launch Dr.Web CureIt ( does not require installation) and after accepting the agreement, click “Continue” and “Start verification”.


Within approximately 15 minutes the system will be checked for malware. If viruses are found, the program will offer to neutralize them.
To clean your computer of junk, it is not enough to simply delete old and unnecessary files. You should not forget about autoloading, which can also become clogged with various rubbish!
Returning to the previously installed CCleaner program and go to the "" section. Here we will see all the programs that run with the computer. I advise you to select unnecessary software and click the "Turn off" button.

TO unnecessary software I include all programs that are not used immediately after turning on the computer. They can be started manually when needed.
Removing unnecessary programs. 2 ways
If you decide clean your computer of junk, then many programs  may become unnecessary if you just take it and think about how often we use them? Some users install everything into their system without a second thought. It's time to analyze the software and clean your computer of unnecessary programs.
This can be done, for example, using standard system tools by going to Start – Control Panel – Uninstall a program.
After launch Revo Uninstaller you will also see a list of all programs and clicking on any of them calls the “Uninstall” function.

But here, immediately after deleting the program, we are asked to search for remaining traces. Select "Moderate search" and click "Next".

First, the remaining items in the registry will be found. Select what is indicated in bold and click “Delete”.

And in the next step the program will find the remaining files and folders. They also need to be selected and click “Delete”.

Removing duplicates
From time to time, problems may appear on your hard drive. identical files. Today you downloaded a movie, and six months later you forgot about it and downloaded it again, you download music and then lose it, you download photos from your phone to your computer several times. All this leads to an accumulation of duplicates on the computer.
It is very difficult to manually search for identical files, so let's use special programs.
We return to the CCleaner program we are already familiar with and open the Service section, tab Search for duplicates. There's a lot here various parameters, which can be customized to suit your needs. For example, I don’t configure anything, I just click “Find”.

After a few minutes, the search for duplicate files will be completed. After carefully studying, I see that I have a couple of identical videos on my computer that can be safely deleted.

I don’t go into detail here, because the program found a lot of files and to remove all the junk you need to spend a lot of time on analysis. But I think the essence of this function is clear!
 Up to this point, we have been figuring out how to clean your computer from junk in Windows itself, using standard and third-party programs. But don't forget that Computers and laptops also need to be cleaned from the inside..
Don’t forget to look inside the system unit at least once a year and clean it of dust, and also apply new thermal paste to the processor. Monitoring the temperature of components will also not be superfluous. On this topic, I advise you to read my lesson:. Using the knowledge gained, you will know whether your device is overheating or not!
Now you know how to clean your computer from unnecessary files, junk and programs. That's all, thank you for your attention, I wish you good luck!
Last time we looked at it, but this time I’ll tell you how delete computer junk manually, by using Windows tools and programs.
1. First, let's look at where garbage is stored in operating systems.
In Windows XP
We go in and delete everything in the folders: Windows temporary files:
- C:\Documents and Settings\username\Local Settings\History
- C:\Windows\Temp
- C:\Documents and Settings\username\Local Settings\Temp
- C:\Documents and Settings\Default User\Local Settings\History
For Windows 7 and 8
Windows temporary files:
- C:\Windows\Temp
- C:\Users\Username\AppData\Local\Temp
- C:\Users\All Users\TEMP
- C:\Users\All Users\TEMP
- C:\Users\Default\AppData\Local\Temp
Browser cache
Opera cache:
- C:\users\username\AppData\Local\Opera\Opera\cache\
Mozilla cache:
- C:\Users\username\AppData\Local\Mozilla\Firefox\Profiles\ folder\Cache
Google Chrome cache:
- C:\Users\username\AppData\Local\Bromium\User Data\Default\Cache
- C:\Users\User\AppData\Local\Google\Chrome\User Data\Default\Cache
Or enter it in the address chrome://version/ and see the path to the profile. There will be a folder there Cache
Temporary Internet files:
- C:\Users\username\AppData\Local\Microsoft\Windows\Temporary Internet Files\
Recent documents:
- C:\Users\username\AppData\Roaming\Microsoft\Windows\Recent\
Some folders may be hidden from prying eyes. To show them you need.
2. Cleaning the disk from temporary and unused files using
Standard Disk Cleanup tool
1. Go to “Start” -> “All Programs” -> “Accessories” -> “System Tools” and run the “Disk Cleanup” program.
2. Select the disk to clean:

The disk scanning process will begin...
3. A window will open with information about the amount of space occupied by temporary files:

Check the boxes next to the partitions you want to clear and click OK.
4. But this not all yet. If you did not install Windows 7 on blank disk, and on top of the previously installed operating system, you probably have space-consuming folders such as Windows.old or $WINDOWS.~Q.
Additionally, it may make sense to remove control points system recovery (except the last one). To perform this operation, repeat steps 1-3, but this time click “Clean up system files”:

5. After the procedure described in step 2, the same window will open, but the “Advanced” tab will appear at the top. Go to it.

In the "System Restore and shadow copying» Click "Clear".
3. Files pagefile.sys and hiberfil.sys
The files are located at the root of the system disk and take up quite a lot of space.
1. The pagefile.sys file is system swap file(virtual memory). You cannot delete it (it is not recommended to reduce it either), but you can and even need to move it to another disk.
This is done very simply, open “Control Panel - System and Security - System”, select “Advanced system settings” in the “Performance” section, click “Options”, switch to the “Advanced” tab (or press the win + R key combination, the command “execute” will open and there type SystemPropertiesAdvanced) and in the “Virtual Memory” section click “Change”. There you can select the location of the paging file and its size (I recommend leaving “Size as selected by the system”).

4. Removing unnecessary programs from the disk
A good way to free up disk space (and how additional bonus increase system performance) is to remove unused programs.

Go to Control Panel and select “Uninstall Programs”. A list will appear in which you can select the program you want to remove and click “Delete”.
5. Defragmentation
Defragmentation of a hard disk, carried out by a defragmenter program, allows you to organize the contents of clusters, that is, move them on the disk so that clusters with the same file are placed sequentially, and empty clusters are combined. This leads to increase speed access to files, and therefore to some increase in computer speed, which at high level fragmentation the disk may turn out to be quite noticeable. Standard program Disk Defragmenter is located at: Start>All Programs>Accessories>Utilities>Disk Defragmenter

This is what the program looks like. In which you can analyze disk, where the program will show a diagram of disk fragmentation and tell you whether or not you need to defragment. You can also set a schedule for when the disk will be defragmented. This is a program built into Windows, there is also individual programs disk defragmentation, for example, which you can download here:

Its interface is also quite simple.

Here are its advantages over the standard program:

- Analysis before disk defragmentation Do a disk analysis before defragmenting. After the analysis, a dialog box is displayed with a diagram showing the percentage of fragmented files and folders on the disk and a recommendation for action. It is recommended to carry out analysis regularly, and defragmentation only after appropriate recommendations from a disk defragmentation program. It is recommended to perform disk analysis at least once a week. If the need for defragmentation occurs rarely, the disk analysis interval can be increased to one month.
- Analysis after addition large number files After adding large quantity files or folders, the disks may become excessively fragmented, so in such cases it is recommended to analyze them.
- Availability check of at least 15% free space on disk For complete and proper defragmentation Using the Disk Defragmenter program, the disk must have at least 15% free space. Disk Defragmenter uses this volume as an area to sort file fragments. If the amount is less than 15% of free space, Disk Defragmenter will only perform a partial defragmentation. To free up more disk space, delete unnecessary files or move them to another disk.
- Defragmentation after installing software or Windows installations Defragment drives after installing software or after performing an update or clean install Windows. Drives often become fragmented after installing software, so running Disk Defragmenter can help ensure highest performance file system.
- Save time on disk defragmentation You can save some time required for defragmentation if you remove it from your computer before starting the operation. junk files, and also exclude from consideration the system files pagefile.sys and hiberfil.sys, which are used by the system as temporary, buffer files and are recreated at the beginning of each Windows session.
6. Remove unnecessary things from startup
7. Remove everything unnecessary from
Well, I think you know for yourself what you don’t need on your desktop. And you can read how to use it. , Very important procedure, so don’t forget about it!


