How to set the full screen resolution. The screen resolution is set to an unsupported monitor: how to solve the problem in Windows
Question from a user
Hello.
I had an error with the image... One game was launched, for some reason the error suddenly appeared: "... that the operation of the AMD video driver was stopped due to...", and then I noticed that everything on the monitor screen became large .
Also, if earlier I could place a hundred shortcuts on the desktop, now there are already 10 - and almost half of the space is gone! How so, what needs to be done to return everything to its previous state?
Anatoly.
Good time everyone!
This happens due to the fact that the optimal screen resolution (in your case, the video driver may have crashed, and because of this the resolution has gone down).
In general, if explained in simple words, then screen resolution- this is the number of points along which the picture is built on the monitor. Of course, the more dots, the clearer and more accurate the contours of the image.
Each monitor has its own optimal resolution, which, in most cases, is worth choosing (if you set the resolution higher than the recommended one, then the text and some elements will become too small and difficult to read, if less than the recommended one, everything on the screen will become large, like from the author of the question).
So, let's get down to business...
Ratio to screen diagonal
In general, as I said above, each monitor has its own optimal resolution, which (usually) is what Windows sets by default (at least if you have all the necessary drivers installed). In some cases this doesn't happen...
Permission is related to monitor diagonal . The larger the diagonal, the higher the resolution, as a rule. If anyone doesn’t know, the diagonal is measured in inches (1 inch = 2.53 cm).

What is diagonal and how is it measured (1 inch = 2.53 cm)
Just below I have given a table that relates the diagonal of the monitor and its resolution (please note that the numbers are relative (although this is most often the case), because each manufacturer sets its own parameters).
| Diagonal | Permission | Designation | Format (aspect ratio) |
|---|---|---|---|
| 15.0 | 1024x768 | XGA | 4:3 |
| 15.6 (laptop) | 1366x768 | HD | 16:9 |
| 17.0 | 1280x1024 | SXGA | 5:4 |
| 17.0 | 1440x900 | WXGA+ | 16:10 |
| 17.3
(laptop) |
1600:900 or | Full HD | 16:9 |
| 19.0 | 1280x1024 | SXGA | 5:4 |
| 19.0 | 1440x900 | WXGA+ | 16:10 |
| 20.1 | 1400x1050 | SXGA+ | 4:3 |
| 20.1 | 1680x1050 | WSXGA+ | 16:10 |
| 20.1 | 1600x1200 | UXGA | 4:3 |
| 20.8 | 2048x1536 | QXGA | 4:3 |
| 21.0 | 1680x1050 | WSXGA+ | 16:10 |
| 21.3 | 1600x1200 | UXGA | 4:3 |
| 22.0 | 1680x1050 | WSXGA+ | 16:10 |
| 22.2 | 3840x2400 | WQUXGA | 16:10 |
| 23.0 | 1920x1200 | WUXGA | 16:10 |
| 24.0 | 1920x1200 | WUXGA | 16:10 |
| 26.0 | 1920x1200 | WUXGA | 16:10 |
| 27.0 | 1920x1200 | WUXGA | 16:10 |
| 30.0 | 2560x1600 | WQXGA+ | 16:10 |
Also, monitors can have different aspect ratios (square-shaped, elongated rectangular, etc.). The table below just links the resolution to the aspect ratio.

Setting the optimal resolution
By the way, to find out the current monitor resolution, you can use online services:

Important!
If you do not have video driver icons in the tray, on the desktop, or in the Windows Control Panel, you most likely do not have video drivers.
Also, if they are not there, you will not be able to change the resolution (there will simply not be an optimal option in the list). Until you install new drivers (or update the “old ones”), the problem cannot be fixed.
I have a detailed article on updating video adapter drivers on my blog, I recommend you read it:
In the IntelHD video driver (nVidia, AMD)
This is one of the easiest ways to quickly change many screen parameters: resolution, brightness, contrast, color gamut, refresh rate, etc.
If you have a video driver installed, then you just need to use the tray icon next to the clock (or right-click anywhere on the desktop). In my case it is IntelHD, in yours it may also be AMD (Ati Radeon) or nVidia (GeForce).

In the settings, as a rule, you need to open the main parameters section (in IntelHD this is “Basic Settings”. In general, many parameters and menu variations depend on the version of your video driver: it is unrealistic to provide all possible options in the article ☺).
You need to alternately change the resolution - choose the one that is most convenient and comfortable for work. Focus first on what is recommended. If the elements on the screen are too small, try moving the resolution down 1-2 points, making it a little smaller.

On Windows 7
If you have Windows 7, then you just need to right-click on any free space on the desktop, and select “Screen Resolution” in the menu that appears, see the screenshot below.

Next, in the "Resolution" tab, you can see what you currently have selected and what else you can set. The optimal resolution is usually marked as “Recommended” (see screenshot below). Most often, they choose either the best option or 1-2 points lower (so that the picture and text on the screen are larger, important for monitors with a large diagonal).

Screen customization in Windows 7
On Windows 8/10
Press a combination of buttons Win+R, then enter the command desk.cpl and press Enter. See screenshot below.

Next, the “Screen” section will open and you can change many parameters: brightness, text (font) size, resolution, etc. Open additional settings, see what resolutions you can set (see example below).

By the way, if you don’t have such a list, and the optimal resolution is not indicated at all, most likely (as I said above) you simply don’t have a video driver. Try updating it (I provided the link to the article above).
Important!
If you have an old CRT monitor (these are so thick ☺, there are few of them now, but they are used in some places) - be sure to check sweep frequency (measured in Hz).
This parameter should not be less than 85 Hz (at 60 Hz, the flickering of the monitor is very noticeable, which causes discomfort and). It's even better if you set it to 100 Hz.
Changing the resolution of your computer monitor can make documents and text easier to read. This is especially useful for large, image-rich documents. You also have the option to make items smaller if you want to see more data at once. The required indicators can be changed using standard PC controls.
How to change resolution on systems running Windows 8
Right-click on the desktop and select “Screen Resolution” from the context menu. Depending on the indicators, move the slider to select the desired resolution. The higher the resolution, the more items and text will appear. Select Apply. Your screen readings will now be new.
How to change resolution in Windows 7
By right-clicking on the desktop in the context menu, select the item suitable for our task. Open the menu to the right of Resolution and move the pointer up or down to select the metrics you want. The lower the resolution, the more objects and text will appear; The higher the resolution, the fewer elements and text will appear on the screen. Save your changes.
How to change resolution in Windows Vista
From the Start menu, go to Control Panel. Here, find and open the Appearance and Personalization window, then click Personalization. In Settings, move the pointer left or right to select your desired screen resolution. Save the changes and work in the updated interface.
How to change resolution in Windows XP
Go to the Start menu and open the Computer Control Panel. Click Switch to Classic View in the left control panel. You must have Classic View enabled to change the screen resolution. Click Display, then go to the Settings tab for the Screen Resolution window. Move the slider left or right to select your desired resolution.

How to change resolution in Mac OS X
Open the Apple menu and select System Preferences. The corresponding window will open and display on the screen. Click Displays, then select the Display tab. Click "Scaled" then select your desired resolution from the options provided. If you're using a connected display, press and hold the Option key, then press Scaled to change the resolution for the second display.
Be sure to visit ours, where you will find all the most popular operating systems Windows 7, Windows 8 and Windows 10 at affordable prices.
Video: How to change screen resolution
On Windows XP
Click the Start button, select Control Panel, and search for Display if you have the classic panel view. Or “Designs and Themes” - “Screen”, if you have a category view configured. In the “Options” tab, find the “Resolution” slider and select the view that suits you. Click the "Apply" button to apply the changes. The countdown timer window will flash. If you don't like what you see, click "no" and look for a new option. If you are happy with everything, click “yes”.
Change screen resolution in Windows Vista
Start again from the Start button and Control Panel, click the Appearance and Personalization button, click the Personalization button, and then click Display Settings. Move the slider until you are happy with the result.
Click the Apply button at the bottom of the menu for the changes to take effect. The timer will flash again on the screen. If you are happy with what you see, click OK.
Changing the screen size on a CRT
Due to system failures, it happens that you see surrounded by blacks on the right and left. If you have a CRT, you can easily fix this using the panel. Just press the “Menu” key, enter and use the buttons on the panel to select the option you need.
Useful advice
If your computer is connected to a TV instead of a monitor, and you see the Desktop limited by stripes on the right and left, read the instructions for the TV and try changing the screen resolution to “Widescreen”.
Sources:
- Microsoft: Change screen resolution
- how to change screen resolution
To play video on most mobile devices, you need to reduce size images so that a weaker phone or player processor can correctly process and run the file. There are special video editor programs to resize videos.
Instructions
One of the most common utilities for editing video files is VirtualDub, due to its small size and wide functionality. Download the VirtualDub archive from the official website of the program and unpack it using an archiver program (WinRAR or WinZIP).
Go to the extracted folder and run virtualdub.exe. In the window that opens, select the File – Open video menu. Specify the path to the video file you want to shrink. Wait until it opens and displays in the player window.
Go to the Video – Filters tab in the top panel of the window. In the menu that appears, click the Add button. From the list of available filters, click resize and then Ok.
In the Filter resize menu, specify new parameters for the width (width) and height (height) of the video image. If you want to play the file on your device, please adjust these settings according to your display resolution. For example, if the screen has a resolution of 176x220, then the width is set to 176, and the height is 220. You can find out the width and height of the display in the specification for your device, in the instructions for
To correctly display information packages on a computer monitor screen, it is necessary that the screen resolution matches the parameters of the system or program used.
Screen resolution is the number of color dots used to produce an image.
The monitor screen is a rectangle, along the length and width of which there is a certain number of dots - pixels. The more there are, the higher the resolution and the clearer the image will be.
Of course, the resolution depends on the physical parameters of the monitor, but most modern LCD or plasma screens are designed for ultra-high Full HD image quality, which is 1920 x 1080 pixels.
But some games or other programs are initially designed with a lower resolution value, since they were created back in the days when the resolution quality left much to be desired. When running such a program, situations are possible when the screen resolution changes to a lower one, and after exiting the program it does not restore the usual settings.
Or vice versa - the program you need cannot start, because the screen resolution built into it does not correspond to the actual one. In these cases, you can and should manually change the monitor resolution.
Problems with screen resolution in Windows 7 do not occur often, since the system has an auto-resolution feature. 
However, sometimes it becomes necessary to adjust the resolution. In this case you need:
— right-click on the free space of the screen to bring up the control menu;
- select a line in the menu "Screen resolution";
— in the window that opens, use the slider to set the required resolution and click "Apply" .
You can also use the system registry to change the permission. This method may seem too radical to some, but sometimes it is difficult to secure the desired parameters through a regular menu. To register the desired permission in the registry, you need to:
- open the system registry editor by entering menu in the search bar "Start" word regedit and press enter;
- find in the system folder HKEY_LOCAL_MACHINE\SYSTEM\CurrentControlSet\Control\Video\(number)\0000;
- in a folder 0000 find NV_Modes and enter the required resolution value in it.
Windows 8 offers many options for managing devices, including the ability to personalize screen resolution settings.
This can be done in different ways, for example, in the same way as described above for Windows 7, through the control menu. But you can do it differently:
— move the mouse over the upper right corner of the monitor, after which it will appear on the screen Metro panel;
- select a section on it "Change computer settings" ;
— select a section in the window "Screen" , use the mouse to set the desired resolution.
Windows 10 OS sometimes confuses even experienced users, since many tasks are solved in it completely differently than in previous versions. 
To change your screen resolution you need to:
- go to "System Settings" and click on the gear image to enter the settings menu;
— select submenu "System" ;
- select a tab "Screen" and click the additional options button;
- scroll down the page and select the button "Screen resolution" ;
— set the desired resolution value and save the changes.
However, you can also use the usual method: using the right mouse button, go to the desktop menu, select “screen settings” and make changes as described above.
Some users, despite the emergence of new OS versions, remain faithful to the good old Windows XP. For them, the procedure for changing the screen resolution will be as follows:
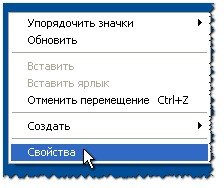
- right-click on an empty space on the desktop;
- select from a small menu "Properties" ;
— in the properties window that opens, select “Options”; 
— set the desired resolution using the usual slider and press the button "OK";
- if the change went well, press "Yes".
Sometimes choosing a different resolution is prohibited by the system. This can be understood by the gray color of the parameter selection. As a rule, this means that the drivers have failed (or were not installed). By updating the drivers, you can change the screen resolution to the desired value.
Good day! Many users understand permission as anything, so before starting to talk about it, I want to write a few words of introduction...
Screen resolution- roughly speaking, this is the number of image pixels per certain area. The more dots, the clearer and better the image. So, each monitor has its own optimal resolution, in most cases, which needs to be set for a high-quality picture on the screen.
In this article I will consider the issue of changing resolution, and typical problems and their solutions to this action. So …
This is perhaps one of the most popular questions when changing resolution. I’ll give you one piece of advice: when setting this parameter, I primarily focus on ease of use.
As a rule, this convenience is achieved by setting the optimal resolution for a specific monitor (each has its own). Usually, the optimal resolution is indicated in the documentation for the monitor (I won’t dwell on this :)).
How to find out the optimal resolution?
2. Next, right-click anywhere on the desktop and select screen settings (screen resolution) in the context menu. Actually, in the screen settings, you will see the option to select a resolution, one of which will be marked as recommended (screenshot below).

You can also use various instructions for selecting the optimal resolution (and tables from them). Here, for example, is a clipping from one such instruction:
- - for 15-inch: 1024x768;
- - for 17-inch: 1280×768;
- - for 21-inch: 1600x1200;
- - for 24-inch: 1920x1200;
- 15.6-inch laptops: 1366x768.
Important! By the way, for older CRT monitors, it is important to choose not only the correct resolution, but also sweep frequency(roughly speaking, how many times the monitor blinks per second). This parameter is measured in Hz; most often monitors support modes of: 60, 75, 85, 100 Hz. To prevent your eyes from getting tired, set it to at least 85 Hz!
Changing the resolution
1) In video drivers (for example Nvidia, Ati Radeon, IntelHD)
One of the easiest ways to change the screen resolution (and in general, adjust brightness, contrast, picture quality and other parameters) is to use the video driver settings. In principle, they are all configured in the same way (I will show a few examples below).
Intel HD
Extremely popular video cards, especially recently. In almost half of budget laptops you can find a similar card.
After installing the drivers for it, simply click on the tray icon (next to the clock) to open the IntelHD settings (see screenshot below).

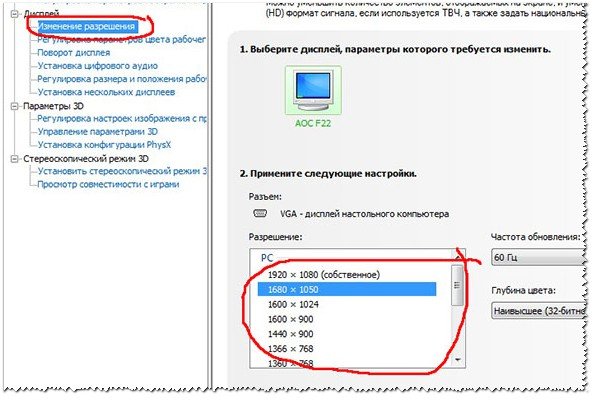
Actually, in this section you can set the required resolution (see screenshot below).

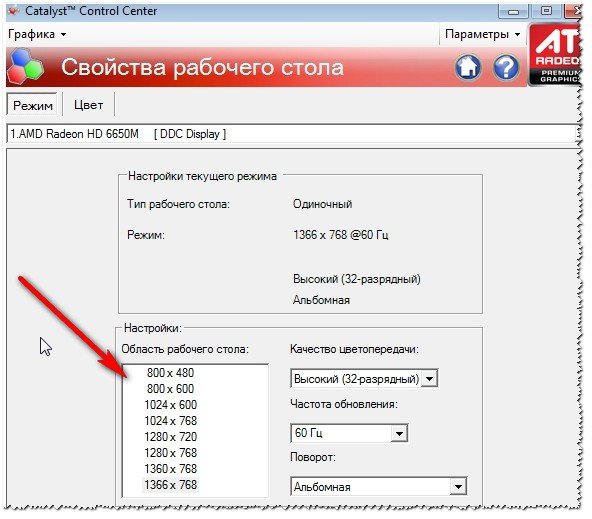
AMD (Ati Radeon)
You can also use the tray icon (but not every driver version has it), or simply right-click anywhere on the desktop. Next, in the pop-up context menu, open the line “Catalyst Control Center" (note: see photo below. By the way, the name of the setup center may vary slightly, depending on the software version).

Nvidia
1. First, right-click anywhere on the desktop.
2. In the pop-up context menu, select “ Nvidia Control Panel"(screenshot below).

2) On Windows 8, 10
It happens that there is no video driver icon. This can happen for several reasons:
- reinstalled Windows, and you have a universal driver installed (which comes with the OS). Those. there is no driver from the manufacturer...;
- There are some versions of video drivers that do not automatically put the icon in the tray. In this case, you can find a link to the driver settings in the Windows Control Panel.
Well, to change the resolution, you can also use control panel. In the search bar, type “Screen” (without quotes) and select the coveted link (screen below).


3) On Windows 7
Right-click on the desktop and select " Screen resolution"(this item can also be found in the control panel).

Next you will see a menu that will display all the possible modes available for your monitor. By the way, the native resolution will be marked as recommended (as I already wrote, in most cases it provides the best picture).
For example, for a 19-inch screen the native resolution is 1280 x 1024 pixels, for a 20-inch: 1600 x 1200 pixels, for a 22-inch: 1680 x 1050 pixels.
Older CRT-based monitors allow you to set the resolution much higher than recommended for them. True, a very important quantity in them is frequency, measured in hertz. If it is below 85 Hz, your eyes begin to ripple, especially in light colors.

After changing the resolution, click "OK". You are given 10-15 seconds. time to confirm settings changes. If you do not confirm within this time, it will be restored to its previous value. This is done so that if your picture becomes distorted so that you cannot recognize anything, the computer will return to its working configuration.
4) On Windows XP
Almost no different from the settings in Windows 7. Right-click anywhere on the desktop and select “properties”.

Here you can select the screen resolution and color quality (16/32 bits).
By the way, the quality of color reproduction is typical for old CRT-based monitors. In modern ones the default is 16 bits. In general, this parameter is responsible for the number of colors displayed on the monitor screen. Only a person is practically unable to distinguish the difference between 32-bit color and 16-bit (perhaps experienced editors or gamers who work a lot and often with graphics). Whether it’s the butterfly’s business...
PS
Thank you in advance for any additions to the topic of the article. I have everything for this, the topic is fully covered (I think :)). Good luck!


