How to enable show hidden files on mac. Show hidden files
You've probably noticed more than once that you can't see hidden files in the Finder on your Mac. It doesn’t matter which operating system is installed on your computer - Mac OS, Windows or Linux, each of them has its own hidden folders and files, and creates new ones in the process.
If in the same Windows it is enough to check the box in the settings to show them, then enable showing hidden files in Mac OS a little more complicated. But after reading our instructions, viewing hidden files and folders on Mac will not be any problem for you. So, how do you enable hidden files on Mac OS? Very simple!
UPDATE: If you have Mac OS Sierra or later, just use the keyboard shortcut "shift+cmd+.".

If this does not work, then you are using the Mac OS El Capitan operating system or an older version of OS X, then the instructions below will help you.
Typically, hidden folders and files are system ones and are necessary for the normal functioning of the computer’s operating system, that is, they should not be changed or deleted. However, there are exceptions everywhere, and sometimes you need to access a file that you don’t even see in the Finder, for example.htaccess for webmasters. All files whose names begin with a dot are hidden by default in Mac OS.
Some hidden files and folders are needed for the operation of the OS, and some are created by the operating system to speed up the processing and delivery of information to the user - they store information about how to display a particular folder and sort the files in it; reduced copies of photos (thumbs) for quick rendering, etc.
If for some reason you need to show hidden files in the Finder, here's an easy way to do it through the Terminal on Mac OS.
1. Open the Terminal program
First you need to open the program "Terminal", which is installed by default on every computer running Mac OS. To do this, in the Dock panel (the panel with programs, which is usually located at the bottom of the screen), open Finder (always the leftmost icon) and select “Programs” from the menu on the left. In the list of installed programs that appears, find the program "Terminal.app" and run it (there are other ways).
By the way, you can open any installed program in a much simpler way - click the buttons Ctrl + space and start typing the program name in the pop-up window. Doing this is much faster than searching for the desired application in the programs folder.

2. Turn on showing hidden files and folders
This item will be the last one if you only need to show hidden files and folders in Mac OS and leave everything like that. To do this, copy the following code
defaults write com.apple.Finder AppleShowAllFiles YES
and paste it into the previously opened Terminal window using the keyboard shortcut cmd+V and press Enter. We recently talked about how to copy and paste text on Mac OS.
If you want to make one specific file/folder hidden, or vice versa, open, it will help you.
Attention! Be careful when changing or deleting hidden files - they are hidden from the average user for a reason. Most of them affect the performance of the Mac OS system, so you should only change them if you are sure of what you are doing and why.
Security is the main reason why certain files and folders are hidden in macOS. Some data must remain invisible to avoid third-party interference. By default, service and system files, caches, logs and settings of installed applications are hidden.
It goes without saying that deleting or changing system files can put your operating system at risk, so why is it necessary to show hidden files? Accessing these files allows you to delete the remaining data of already deleted applications. You can create browser bookmarks and troubleshoot applications.
There are several ways to view hidden files on your Mac device. This guide will help you access hidden Mojave or Sierra files and folders.
Use Finder
This is the easiest and fastest way to view hidden files and folders.Open the application Finder and navigate to the desired directory. While in a specific folder, press on your keyboard Shift + Command + > to make hidden files and folders visible. If you want to hide them again, just press this key combination again and they will disappear.

Display via Terminal
You can use commands in to directly control the system, avoiding navigating through Finder menus and tabs.Click cmd + Space, enter "" and open it. After that, enter the following command line script:
defaults write com.apple.Finder AppleShowAllFiles TRUE
Click Return and enter the following command " killall finder".

To hide files back, use the command:
defaults write com.apple.Finder AppleShowAllFiles FALSE ; killall finder
This is how you can show hidden files and folders on macOS without third-party software. Be very careful to avoid tampering with operating system files. And after completing the actions, do not forget to hide them back.
macOS has the ability to hide folders and files, just like other operating systems. But macOS hides these options and does not allow you to do this as easily as on Windows or Linux. To hide a file or folder, you will have to set the “hidden” attribute for it. Finder and other Mac apps will not show this file or folder by default.
Hide a folder or file
Instead of hiding an individual file (although you can do that), you can create a hidden folder. For the example we'll do this, this trick will also work to hide individual files.
Firstly, open a terminal window – Press Ctrl + Space, write Terminal and press Enter. In a terminal, enter the following command, including the space at the end of it:
Chflags hidden
Drag the folder into the terminal window
The path to the file or folder will appear in the terminal. Press Enter to run the command and the file or folder will disappear. Finder won't show it by default.
Access hidden files or folders
How to access a hidden folder from Finder? The easiest way is to click on the menu Go in Finder and select Go to folder.

Type the folder path in the dialog box and press Go or Enter. ~
Means a custom folder, so if you have a folder named SecretStuff on your desktop, you'll need to enter ~/Desktop/SecretStuff. If this were in the documents, you need to enter ~/Documents/SecretStuff. Don't worry about the fact that the folder is hidden and won't show up normally in Finder, you can quickly access it from this path. Any files you store in this folder are effectively hidden and no one can accidentally see them, but they will appear in the Finder if you navigate to this directory in the manner described.
Show hidden files and folders in Open/Dialog
The enable option is graphical - you must enable it using a Terminal command and restart Finder for the changes to take effect. To view hidden files in Finder, open a Terminal window and run the following commands in it, pressing ENTER after each one:
Defaults write com.apple.finder AppleShowAllFiles TRUE killall Finder
This command tells Finder to show hidden files and then launches it. This will show all hidden files and folders. They appear partially transparent to distinguish hidden files and folders from regular ones - non-hidden ones.
Want Finder to stop showing hidden files and folders? Run the following command to disable this option and restart Finder:
Defaults write com.apple.finder AppleShowAllFiles FALSE killall Finder
Make files or folders visible
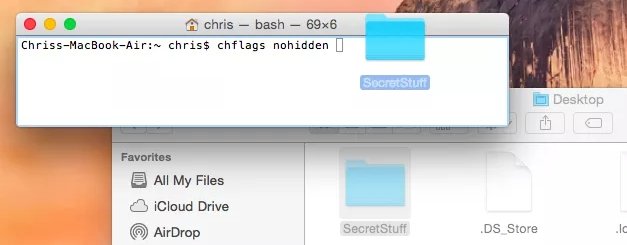
Do you want files or folders to be displayed? Run the same command as before, just change “hidden” to “nohidden.” In other words, enter the following command in the terminal, followed by a space:
Chflags no hidden
If you remember the exact path to the file or folder, you can enter it into the terminal. If you don't remember, you can use the above trick to show hidden files and folders in Finder and drag the hidden file or folder into the Terminal as you did before.
(You can also press the up arrow key in the terminal and get the command you entered earlier. Use the left arrow key to navigate to “hidden” and change it to “nohidden”, then press Enter.)
You can also hide files or folders by renaming them so that the name begins with “.”. However, Mac OS X won't let you rename files and folders from the Finder window, so you'll have to do it from the Terminal.
Don't miss Apple news - subscribe to our Telegram channel, as well as YouTube channel.
By creating MAC OS, Apple tried to protect the average user from unnecessary settings and settings. And everything would be fine, but in the pursuit of minimalism, Apple hid quite popular control “levers” from more experienced users.
As it turns out, MAC OS is not always simpler and more intuitive than Windows, and in some matters even the opposite.
In this article I will show you how to show/hide hidden files in MAC OS. Well, as you like, I give you two different ways to solve the problem for your choice.
As you probably already guessed, you won’t be able to simply go into the Finder settings and activate the mode for showing hidden files in MAC OS, since there is no such switch in principle. But don’t despair, there are plenty of solution options.
Show/Hide hidden files in MAC OS via Terminal
In this method, we will enter UNIX commands in the application window Terminal. At first glance, it may seem that you have delved into a place where an ordinary user should not go at all, but I assure you that all the commands given below have been tested by me personally.
To display hidden files in MAC OS, do this:
STEP 1 - Open the application Terminal from Finder - Applications - Utilities
STEP 2 - Copy and paste into Terminal the following line:
defaults write com.apple.finder AppleShowAllFiles YES
STEP 3 - Press Enter Button
STEP 4 - While holding down the Option/Alt button, right-click on Finder icon in the dock, then click " Restart».

As a result of the executed command, all hidden files and folders will be displayed in MAC OS.
In order to “hide” hidden files in MAC OS, you need to follow the same steps as above, but in the second paragraph you should enter another command:
defaults write com.apple.finder AppleShowAllFiles NO
This method, although not complicated and quick to execute, requires that you keep at hand (or remember by heart) UNIX commands to enter into the Terminal.
This is a little inconvenient if you often need to show/hide hidden files. To automate this process, use the second method.
Show/hide hidden files in two clicks
If you need to show/hide hidden files in MAC OS often and in large quantities, then the miniature FREE Funter application from the Nektony development team will become your indispensable assistant.
After installation, this application settles in the top menu bar, after which working with hidden files is reduced to two clicks.

In my opinion, Funter is a great solution for showing hidden files. At the same time, the application practically does not consume the resources of your computer and does not force you to remember long command lines by heart.
With Funter, you can also install or uninstall directly in the Finder window. attribute "hidden" for files and folders.

I am confident that the methods I have described will solve the problem of showing hidden files in MAC OS for most users. Remember that hidden files were hidden from your eyes by default for a reason.
Option 1
Using the program Terminal You can enable or disable the display of system and hidden files and folders in MAC OS X
Launch the Terminal program (located in Applications/Utilities/ or search for it using spotlight)
enter the command into the terminal window (the defaults write command makes changes to the settings files):
Defaults write com.apple.finder AppleShowAllFiles -bool true
press "enter". This command will change Finder settings. For them to take effect, you need to restart the Finder process with the command:
Killall Finder
press enter.
Hidden files will now show up in Finder.
If after work you need to hide them, this is done with the same command, but with the false parameter
Defaults write com.apple.finder AppleShowAllFiles -bool false
And restart Finder again
Killall Finder
Option 2
If you have to work with hidden files quite regularly, you can use AppleScript to avoid opening the terminal. For this it is necessary to Open the AppleScript program and input the code in the editor window:
Set dialogResult to display dialog "Show hidden files..." buttons ("YES", "NO") copy the dialogResult as list to (buttonpressed) if buttonpressed = "YES" then do shell script "defaults write com.apple.finder AppleShowAllFiles -bool true" else do shell script "defaults write com.apple.finder AppleShowAllFiles -bool false" end if do shell script "killall Finder"
Then click the "Compile" button. And then save as an app or as a script, the app can be inserted into the dock or on the desktop.
If in the “save” mode it is not possible to choose in what form to save this script for displaying hidden files, you can use the “export” command in the file menu.
Option 3
Changing the visibility flag of an individual file. It is especially convenient for managing individual files, for example .htaccess (it does not always work; I will write about this file separately).
In the terminal, go to the folder with the file and execute the command
Chflags nohiddenFileName
Instead of a file name, the folder name can be used, for example the command:
Chflags nohidden ~/Library
Will make the hidden library folder visible, respectively the command
How to make a file or folder invisible (hidden) in OS X
This action is done by the same command chflags, but is used as a flag (sign) hidden , For example:
Chflags hidden ~/Library
Sets the flag for a hidden folder in Mac OS X. In this case, it is the Library located in the user's folder


