How to turn on a router on a Windows 10 laptop. Create a virtual router using third-party applications
There are times when you need to distribute the Internet via Wi-Fi to other laptops, tablets or smartphones using a Windows 10 laptop. For this purpose, the top ten has created a special virtual WiFi technology. Thanks to this technology, a virtual Wi-Fi adapter is created, with which you can set up a personal Wi-Fi network for distributing the Internet.
In this material we will take a detailed look at the work Virtual WiFi in Windows 10, and also get acquainted with the utility MyPublicWiFi, which performs the same actions in the windowed interface.
Despite the fact that all the examples in the article were made in version 10 of the OS, you can use the same methods to distribute WiFi in other Windows.
Checking the compatibility of a wireless network Wi-Fi card with virtual WiFi
First of all, we should check the compatibility of our network adapter with the “Virtual Wi-Fi” development. To do this, open the console with administrator rights. In Windows 10, this can be done by right-clicking on the menu shortcut " Start».
Then select the item “ Command Line (Administrator)" In the open console, type the control line netsh wlan show drivers

If there is a clause “ Hosted network support: yes" in the console, be aware that your wireless network card has support for "Virtual WiFi". Presence " Hosted network support: no" means that it is impossible to create a virtual network for distributing the Internet.
In many cases, if when checking your network adapter does not support “Virtual Wi-Fi”, then the problem can be solved by by updating the driver your network card. You can find the latest versions of drivers on the website of the wireless card manufacturer or on the website of your laptop. In the example considered, the adapter is used Realtek RTL8188CE, who has there is support this technology.
Creating a virtual mesh in Windows 10
First of all, we initiate the wireless network. To do this, in ten, in the console (must be in administrator mode), type the control line netsh wlan set hostednetwork mode=allow ssid=test_grid key=GS6-C3_4zSmtug07uk3Y Here under the value test_grid is understood as the name of our network, and GS6-C3_4zSmtug07uk3Y indicates the set password. As you can see, the password is quite complex and is 116 bits long. This complex password is used to ensure that your network is secure.

Now we just have to put the grid into operation. For this purpose, enter the following command into the console: netsh wlan start hostednetwork This line will make your network active and will allow other Wi-Fi computers to connect to it.

The final step will be enable sharing adapter to which Internet connected.
Pay attention! It is very important to open general access ONLY in the settings of the adapter through which your computer is connected to the Internet. Do not change the access settings on the newly created wireless connection.
To do this, go to Network Connections. This can be quickly done in the program " Execute» command « ncpa.cpl" After that, find the adapter connected to the Internet and go to its properties. Go to the " Access» and check the boxes as shown in the figure below.

If you want disable network, then enter the command netsh wlan stop hostednetwork in the console, after which the network will stop functioning.
You can view the network parameters in order to configure it later using the following commands:
- The command that will output all characteristics your network: netsh wlan show settings
- The command that will display security properties Wi-Fi networks. With its help you can also find out the password you created for it: netsh wlan show hostednetwork setting=security
We share access to the World Wide Web on a laptop using the MyPublicWiFi utility
You can download this utility from its official website www.mypublicwifi.com/publicwifi/en/index.html. According to the developers, it is fully compatible with Windows 10. After downloading MyPublicWiFi run the installer.

The installer will prompt you to click the Next button, which we will click to go to the next window.

In this window you can select the installation location MyPublicWiFi. After selecting the location, also click the Next button.

In the window that appears, check the box “ Create a desktop icon"to create a shortcut on the Desktop and click Next. In the next window, click the Install button, which will start the installation process. In the final window, the installer will ask you to restart your computer. This is necessary for the further launch of our utility.

After reboot let's run the utility using a shortcut on the Desktop to configure it. Now let's enter our settings network name And complex password, and also select the adapter from which the Internet will be distributed.

To start our virtual network, click the button Setup and Start Hotspot. After this action, the program will make settings and launch the virtual network. To disable the virtual network, you must click Stop Hotspot.

On the second tab " Clients» You can view the connected devices to your access point. I would also like to note that thanks to the enabled checkbox “ Enable Internet Sharing"We do not need to manually enable the Internet for a network adapter that has a direct connection to the Internet.
As can be seen from the example, using MyPublicWiFi It is much easier to create a virtual Wi-Fi network, in contrast to the “Virtual WiFi” technology.
Let's sum it up
In this material, we looked at the development of “ Virtual WiFi» in Windows 10, and also got acquainted with the utility in detail MyPublicWiFi. Most of all utility MyPublicWiFi suitable for beginners, as it allows you to set up an access point in a few minutes without using the command line. Essentially MyPublicWiFi is a window add-on for “Virtual WiFi” and is absolutely free.
Our material will be especially useful in situations where you are out of town, and there is only one 3G modem and you need to distribute the Internet through it to several laptops. This information will also be useful if your new office does not have the Internet, and you only have a laptop with a 3G modem and a dozen nettops to which you need to distribute the Internet. We hope our article will help you create your own virtual access point and allow you to solve your Internet problem.
Video on the topic
A laptop, computer or tablet with Windows 10 can be used as a Wi-Fi router that distributes the Internet to other wireless devices. Such a software Wi-Fi access point can be used to organize a local wireless network or share the Internet connection (wired or mobile 3G/4G connection) available on a Windows computer with several devices (phones, tablets and other devices). In the first releases of Windows 10, it was possible to create and manage such an access point only from the command line. Windows 10 1607 introduced a simple graphical interface for creating an access point - “Mobile Hotspot”.
So, today we’ll look at how to create a virtual access point based on Windows 10 without using additional third-party programs. We assume that your computer has two network adapters: a wired Ethernet adapter (connected to the network of the provider through which you access the Internet) and a wireless Wi-Fi adapter. We want a computer with a Wi-Fi network card to be able to be used by other devices as a Wi-Fi hotspot and share its Internet connection.
Advice. Instead of a wired connection, a 3G / 4G connection via a USB modem or phone can be used to access the Internet.
Checking support for Ad-Hoc mode by the Wi-Fi adapter driver
Before you start creating an access point, you need to make sure that the driver of your Wi-FI adapter can operate in virtual access point (Ad-Hoc) mode. To do this, run the command on the command line:
netsh wlan show drivers
The command line will display information about the Wi-Fi adapter driver used and supported technologies (more information about supported Wi-Fi driver standards in the article). Availability of line Hostednetworksupported: Yes ( Hosted Network Support – Yes ) , indicates that this driver supports operation in access point mode. Otherwise, try updating the driver version or installing a different Wi-FI adapter.
Mobile hotspot in Windows 10
Window 10 1607 (Creators Update) and higher introduced a simple graphical tool for distributing the Internet via Wi-Fi. This function is called " Mobile hotspot"(Mobile Hotspot). The function is located in a separate section Options -> Network and Internet -> Mobile hotspot. On this tab, with just a couple of clicks, you can launch an access point on your Windows 10. All you need to do for this is to turn on the switch “ Allow the use of my Internet connection on other devices" The name of the new Wi-Fi network and password will be generated automatically (you can change them) and select the Internet connection to which you will provide access to other devices (list Internet connection sharing). If your computer has only one Internet connection, it will be selected automatically.

Limitation. This way, you may not be able to share all types of connections. For example, a PPPoE connection cannot be distributed this way.
The same window will display a list of devices that are currently connected to your access point. The device name and MAC address are displayed, as well as the IP address assigned to it. As you can see, up to 8 devices can be connected to the access point on Windows 10 at the same time.

Common Windows 10 errors when creating a mobile hotspot
In the event that an error appears when trying to create an access point: Cannot configure mobile hotspot. Turn onWi-Fi‘, try updating the driver of your Wi-Fi adapter and/or removing the Microsoft Wi-Fi Direct Virtual Adapter according to (it is through this virtual adapter that the Internet is distributed). After that, restart your computer and try turning on the mobile hotspot again.

Another common mistake is ‘‘. Try simply restarting your Internet connection.

Another error: ‘ Failed to set up mobile hotspot because the computer is not connectedEthernet,Wi-Fior connection to a cellular network‘. Most likely there are problems with your Internet connection (no network). Check the connection. This error also appears if you are connected to your provider via PPPoE; this type of connection is not supported by the mobile hotspot.

Create a virtual Wi-Fi network from the command line
Let's look at how to create a virtual Wi-Fi access point from the command line.
Let's say we want to create a wireless network called Hotspot(this is the network SSID) and connection password 3 i3iPass. Open a command prompt (with administrator rights) and run the following command:
 If everything is correct, the command will return the following text:
Hosted network mode is enabled in the wireless network service.
The hosted network SSID has been successfully changed.
The hosted network user key passphrase was successfully changed.
This command will create a new virtual Wi-FI adapter in the system, Microsoft Wi-Fi Direct Virtual Adapter, which will be used by other wireless devices as an access point. Now let's enable the created virtual adapter:

Line Thehostednetworkstarted(Holocated network started) indicates that the software Wi-Fi access point has started successfully.
A new wireless connection named Hotspot.
Other Wi-Fi devices can now see and connect to the created access point. Within such a network, devices can use shared documents and peripherals, but access to the Internet through such an access point is not yet possible.
Allow connected devices to use the Internet connection
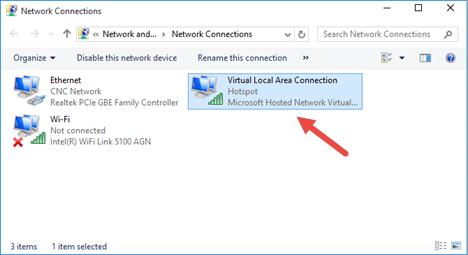
Now let's allow all devices connected to our virtual Wi-FI hotspot to use a wired network connection to access the Internet. To do this, in the Network and Control Center, click on the name of the network adapter through which you can access the Internet. In our example, this is a connection named Ethernet.
 In the network adapter statistics window, click the button Properties.

In the network adapter properties window, you need to allow general Internet access through this connection. To do this, go to the tab Sharing(Access). Check the box next to " Allowothernetworkuserstoconnectthroughthiscomputer'sInternetconnection» (Allow other network users to use this computer’s Internet connection), and in the drop-down list, select the name of the virtual adapter that we created earlier.

Save your changes. In the Network Sharing Center window, the Hotspot network type will change to Internet, which means that this network (and all devices connected to it) now have access to the Internet.

Now all devices connecting to the Windows 10-based access point we created gain access to the Internet through the external network interface of the computer. Try connecting to the created hotspot from your phone, tablet or other laptop.
View current virtual access point settings
You can view the current settings of the access point you created using the command.
Netsh wlan show hostednetwork

The command will display the name (SSID) of the network, supported types of authentication and encryption, the maximum number of devices that can simultaneously use this access point (Max number of clients) and the current number of connected clients (Number of clients).
The following command displays your Wi-Fi hotspot's various security settings and connection keys:
Netsh wlan show hostednetwork setting=security

The access point on Windows 10 cannot work in hidden SSID mode.
Possible errors and solutions with a Wi-Fi access point on Windows 10
Question. After restarting Windows, the Wi-Fi access point does not turn on.
Answer. To restore the wireless network, you need to start the hosted network with the command
netsh wlan start hostednetwork
There is no need to re-enter the network name and password.
Question. When trying to start a hosted network, the error “The Wireless AutoConfig Service (wlansvc) is not running. The hosted network couldn’t be started.”
Answer. Start the service WLANAutoConfig(Wlan AutoConfig Service) from the services.msc console or from the command line:
net start WlanSvc
and restart the virtual access point
Question. When starting a Wi-Fi network, the error “The hosted network could not be started. The group or resource is not in the correct state."
Answer. Check if your Wi-Fi adapter is turned on. Then open device Manager, in the menu View select item Show hidden devices. In the network adapters section, find MicrosoftHostedNetworkVirtualAdapter and turn it on (Engage). If it doesn’t help, run the commands sequentially:
netsh wlan set hostednetwork mode=allow
Then recreate the access point:
netsh wlan set hostednetwork mode=allow ssid=Hotspot key=3i3iPass
netsh wlan start hostednetwork
Question. How can I view the status and settings of the access point?
Answer
netsh wlan show hostednetwork
Answer. You can stop the access point with the command:
netsh wlan stop hostednetwork
The access point is deleted (the SSID and network password are deleted) like this:
netsh wlan set hostednetwork mode=disallow
Question. The device has connected to a Wi-Fi access point, but the Internet does not work on it.
Answer: Check whether your device has received the DNS server settings (try manually specifying the Google public DNS server address - 8.8.8.8 in your client settings. Also try restarting the Internet Sharing Service (ICS), or disabling and re-enabling sharing for the adapter through which your computer / laptop with Windows 10 connected to the Internet.
A few more common problems due to which your access point may not work on Windows 10:
 November 12, 2015
 An access point on Windows 10 is created in the same way as on previous versions. And in this article there are instructions, with illustrations, on how to create a WiFi access point using the Windows 10 operating system.
Similar articles for other operating systems:
Hotspot on Windows 10
In order to create a software WiFi router based on Windows 10, you will need:
- Windows 10
- WiFi adapter. For example, for this article, the built-in WiFi adapter of a laptop (Broadcom) was used.
- Internet connection. For this article, an ADSL connection was used through the Rostelecom operator. But this can be any connection - PPPoE, VPN, GSM Dail-Up, LTE RNDIS, Ethernet, or even WiFi from a second adapter.
Step one
You need to make sure that the WiFi adapter is available, turned on and working. For example, if you have a laptop and it has a built-in WiFi adapter, it can be turned off in the BIOS or with a special hardware button. On modern laptops, instead of a separate button, the Fn+Fx key combination can be used, for example Fn+F3. The easiest way to make sure that the adapter is working is by clicking on the “Network” icon in the tray. You should see a list of available WiFi networks or the message “No available networks.”
Step two
You need to check that your Internet connection is working. Make sure that your computer or laptop has Internet access. This can be done through a browser or in the console (using the ping command).
Step three
After this, you need to check whether the “WLAN AutoConfig Service”, “Routing” and “Internet Connection Sharing (ICS)” services are running. This check is done through "Control Panel - Administration - Services". By default, these services start automatically, but it may be that some smart guy “optimized” your Windows and disabled these services. This happens - a student reads a lot on the Internet and begins to “improve”.
Step four
After this, you need to open the Windows console (cmd.exe) with administrator rights. The easiest way to do this is by opening the WinX menu of Windows 10. In this menu there is a special command, “Command Prompt (Administrator)”:
This menu is opened from the keyboard using the Win + X keys.
Step five
In the console you need to type and execute the command:
netsh wlan set hostednetwork mode=allow ssid=winap key=123456789 keyusage=persistent
Instead of winap And 123456789 you can write a different name for the access point and a different password for it:

Note. Important!
The password must be at least 8 characters long, this is a requirement for the WPA2 security type that is used in Windows when creating an access point.
It is better not to use the Cyrillic alphabet in your password.
The case of letters in a password matters - A And A These are different symbols!
Step six
Now you need to start the access point. There, in the console, type and execute commands
netsh wlan start hostednetwork

The second command shows the current status of the access point.
Step seven
Open Control Panel, then Network Connections and there you should see something like this:

In this example, "Ethernet" is the connection to the Internet. And “Local Area Network 3 winap” is an access point. Immediately rename “Connection via..” so as not to confuse it with others in the future: 
Now you need to share (enable Windows ICS) your Internet connection. Select this connection (in the screenshot it is a connection named “Ethernet”). Then right mouse button, then "Properties", "Access" tab. Enable ICS and specify the connection to which the Internet will be distributed - to the WiFi connection of the access point ("winAP"):

Step eight
Connect the client to this access point and check the Internet. And in the console you can type and execute the command
netsh wlan show hostednetwork
It will show the number of connected clients:

It can be seen that one client is connected.
How to connect a WiFi client to:
- Laptop (or computer) under Windows - Setting up WiFi in Windows 7.
- Laptop (or computer) running Linux - Laptop (or computer) running Ubuntu.
Windows 10 Hotspot Management
Stopping an access point with a command netsh wlan stop hostednetwork
Complete destruction of the access point by command netsh wlan set hostednetwork mode=disallow
If you want the access point to turn on automatically when Windows boots, then the start command needs to be added to autorun. It's about the team netsh wlan start hostednetwork. The command can be written into a cmd script; you must specify “Run as Administrator” in the properties of this script. Then include the script in autorun.
It is necessary that the connection to the Internet is also established when Windows starts. Otherwise, you will have an access point, but there will be no Internet through it.
Of course, this is a very simple access point. But everything is at hand. No third party programs needed. Just Windows 10. And everything can be configured in a couple of minutes.
In this option, there are not many features that an access point should have. That's true. Only this is an option when you need to make a WiFi router very quickly and without problems. And Windows 10 provides just such an opportunity - with a minimum of body movements, what is called “on the knee,” to create an access point.
And if your needs are broader and deeper, if you need an access point for every day, or in complex configurations, then you should not use Windows, but buy a WiFi router. A decent WiFi router now costs less than a thousand rubles.
It’s another matter if you need an access point once a month, for a day or for a couple of days. Or on a business trip. Or on vacation. This is where Windows helps us out. You can quickly distribute the Internet via laptop WiFi to a tablet, smartphone or other laptops.
But if there is a need to make a permanent access point on a computer, then it is better to do it under Linux. This is how this is actually implemented in WiFi routers. For example, as in this article -
Users are often interested in the question of how to distribute a wifi network from a Windows 10 laptop. You may need Internet on your phone or tablet at any time. At the same time, it is not always possible to access a wireless wifi network, or the balance of the SIM card is insufficient, and a number of other reasons prevent you from accessing the “global web”. And here the described mechanism comes to the rescue - the ability to distribute the Internet from gadgets.
Distributing Wi-Fi from a laptop on Windows 10 is a useful function for providing, as a rule, portable equipment with the Internet via a wireless connection. However, the procedure requires a little preparatory work.
Checking the Wi-Fi adapter
First of all, you should make sure that the laptop on which the access point will be created has a working wifi adapter. In addition, for operation, a special driver is required on the wireless adapter, which is usually installed by the system automatically. To check its presence, you need to go to the device manager. Right-click on the Windows logo in the lower left corner and select “Device Manager” from the menu that appears. Then expand “Network adapters”, where there should be no question marks or unidentified equipment. And, of course, the adapter must be turned on.

Check internet
To distribute the Internet from a computer, it must be connected and working normally. You can check the connection visually. This is either a cable inserted into a special connector on the laptop, or a 3/4G modem in a USB connector. You can check its functionality in any browser by going to a well-known page.
Check services
It is also possible to check using the Internet Connection Sharing (ICS) service and the WLAN Auto Configuration Service. To do this, launch the “Task Manager”, go to the desired tab and make sure that the specified “helpers” are in the “Running” state. If this is not the case, just right-click on the name and click “Run” in the drop-down menu.

Standard Windows 10 Wi-Fi Sharing Feature
There are several ways to distribute wifi in Windows 10, for example, through a standard function. This is done through the so-called mobile hotspot in Windows 10. To start, right-click on the Windows icon in the lower left corner and select “Options”. In it, go to the “Network and Internet” sub-item. As a result, a list of available functions will be visible on the left, including a hotspot. But this manipulation is done even faster. Just click on the notification button in the lower right corner of the Windows main screen, where one of the quick access options will be a mobile hotspot.

Next, in the window that opens, indicate which Internet connection will be shared between different devices. Set the required password and create a wifi network name. Don’t forget to move the slider that allows connection to the created connection to the “On” position.
Distributing Wi-Fi in Windows 10 using the command line
Wi-Fi distribution in Windows 10 is also done via the command line. This path is somewhat more complicated than the one described above, and was used when Windows did not yet have a built-in wifi distribution function.
Windows console with administrator rights
Previously, Command Prompt as an administrator was launched by right-clicking on the Windows icon in the lower left corner and selecting the desired item. However, in one of the updates this function was removed, so now you need to left-click on this icon. Then select the “Service” folder in the list, find “Command Prompt”, right-click, select “Advanced” and from there run it with administrator rights.

Setting up an access point
After this, a virtual wifi network is created with the command “Netsh wlan set hostednetwork mode=allow ssid=NameNetwork key=password”. The SSID and key fields contain the network name and password, consisting of eight or more characters.
Access point on/off commands
The created wifi network is launched and disabled using two commands written on the command line. To enable it use netsh wlan start hostednetwork, at the same time to stop it you need to use the netsh wlan stop command.
Setting up routing
At the same time, there will be no Internet yet. You need to go to “Network Connections”, in the “Properties” sub-item you should go to the “Access” tab, where you check the box that allows sharing of the Internet connected to your Windows computer from all other devices.
Network health check
To check whether wifi is working correctly, just use any third-party device, be it a phone or tablet. You should find and connect to a wifi network, try to use the Internet distributed from a Windows laptop.
Create desktop shortcuts for direct distribution control
There is a way to create an analogue of a shortcut for quickly managing wifi in the form of a bat file. To do this, a regular text file requires changing its extension to bat. Then enter a command that starts the wifi distribution mechanism from the laptop and save. As a result, you will not need to re-launch the command line as an administrator each time and enter the required text. In the same way, an analogue of a shortcut is created to quickly turn off the network; you just need to enter in another bat file: the command to stop the network.
Using special programs
In addition, it is recommended to download special programs created exclusively for Internet distribution onto your own personal PC running on the Windows operating system. Their advantage is a greater level of functionality compared to standard methods and, as a rule, practically no questions arise about how to distribute the Internet, because everything is clear on an intuitive level.
 There are many popular programs that distribute wifi from a laptop on Windows. One of them is MyPublicWiFi. You should go to the official website, download the installation file and then install. Interestingly, no third-party programs are offered to be installed in parallel, which is rare for free software. It should be run as administrator. This is done by right-clicking on the shortcut and selecting the desired line. After that, fill in the fields. The first indicates the wifi name, the second contains a password consisting of at least eight characters. And in the third, a connection is selected to be used together. The Enable state is checked. As a result, after clicking on the network start button, you can use it from other devices.
The Virtual Router Plus program is configured using a similar principle. Downloaded from the official resource, installed without third-party software. After this, a shortcut is launched from the desktop, the fields are filled in: network name, password, type of Internet connection used. However, the downside is that it does not have a checkbox that allows you to use the Internet distributed via wifi by third-party devices. To do this, go to properties in the “Network adapters” section and check the box in the “Access” tab. After this, wifi is easily distributed from a laptop on Windows.

Solving problems and fixing errors
In Windows 10, like in any other operating system, errors occur. This also applies to an access point that does not distribute the Internet. Problems appear in the most unexpected places, and it can be quite difficult to diagnose the causes. In any case, you should try to stop and then restart the network; most problems are solved this way.
The laptop does not distribute Wi-Fi, devices cannot be connected, distribution does not start
There are several reasons why you cannot connect to wifi or a Windows laptop does not provide Internet access at all. First of all, the lack of the required wifi adapter driver. It is recommended to download it from the manufacturer's official website.
Antivirus programs can also block distribution. It is advisable to turn them off during the period of wifi distribution. In addition, firewalls built into Windows can block connections.

Error with the title: "The hosted network could not be started...not in the required state..."
Sometimes a message appears informing you that wifi cannot be started or the network is in an incorrect state. In this case, you should turn off and then restart the wifi module. And do this either through the device manager, or using a mechanical button, if there is one on a specific version of the laptop. These include, for example, Vaio and many Asus models. Also, in the Device Manager, enable the display of hidden devices, then in the “Network Adapters” menu, find the virtual adapter and launch it.
It is not difficult to quickly and easily distribute the Internet in Windows 10; even users who are not very technically advanced can cope with the task. The above instructions will help with this, where all possible options are also considered for correctly setting up a wifi access point.
Who needs these additional devices if you can distribute WiFi from your laptop? Naturally, it is better to take the easy route whenever possible. Many people have asked, does this typical setup work for Windows 10? Yes, there are only some subtle points that are better to observe. There is an opinion that such tricks only work on older systems, like XP. Yes, XP is a reliable and proven thing, but with direct hands you can organize the operation of any laptop according to your own rules. So, let's talk about how to distribute WiFi from your laptop to all devices if it has the latest Windows 10 installed.
Is it even possible
First, you should find out whether it is possible to distribute the Internet via WiFi on this device. There are many cases when such a theme works well on XP, but on Windows 10 it is already creaking. We launch the command line in the operating system and enter the command there: netsh wlan show drivers. A message similar to this should appear:
Also, if the interface in Windows 10 does not write messages in Russian, then you can search for Hosted Network in the same way as the highlighted item. If such a possibility exists, then you can continue further with complete peace of mind. What if there is no such feature? There's nothing wrong with that, you can try updating your laptop's WiFi drivers.
Drivers are a typical problem when certain equipment fails to operate.
Do not forget that this is Windows 10, so on the contrary, there may be low-quality new drivers. Therefore, you should try to return their original version. We go to the device manager, right-click on the WiFi adapter and roll back:

Distribute via command line
A great thing is setting up equipment via the command line. There are no usual windows, but the commands are all accurate and clear. Enter the code: netsh wlan set hostednetwork mode=allow ssid=hostname key=password. In this code, as you might guess, hostname is the name of the distribution, and password is the password to it. It’s enough to show your imagination for everything to work out.
- Once the name and password are created, you need to enter the following code: netsh wlan start hostednetwork. As a result, the command line should display a message indicating that the network is running. If such a message does not appear, you can try turning off and then turning on the WiFi adapter.
- For WiFi distribution to start, you need to right-click on Start and open network connections. A list will open in which you need to select exactly the connection that is used for the Internet. Right-click on the connection again and view its properties. Go to the Access tab and allow other users.

Now that's it, you can use WiFi for your pleasure.
Difficulties
If setting up WiFi for a laptop is complicated, then you can try typical solutions to get out of the problem situation:
- You need to try turning off WiFi and the Internet connection itself. After this, you should turn everything on again, as was previously described in the article.
- It happens that the WiFi connection on Windows 10 does not have the necessary settings. In this case, select this connection from the list, right-click and select Details. Next you need to check the settings, if they are not there, you can take them from the picture below.

- Some programs block Internet access. To diagnose this problem, you need to disable the firewall or antivirus. If the distribution has started, then some setting of such a program is interfering.

- It may turn out that setting up WiFi allows access to the wrong Internet connection. It is important to open access from your laptop specifically to the connection that the Internet provides. If it is Rostelecom, then Rostelecom.
- It happens that sharing is not enabled at all in Windows 10. You need to check if the Internet Connection Sharing service is working.
If the setup is done correctly and according to the rules, then WiFi will be distributed from the laptop without any problems. In case of an error, there is no need to panic, just go through the instructions again and see where Windows 10 refuses to work correctly.
(Visited 2,480 times, 1 visits today)


