How to write an active image to a flash drive. How to burn any ISO image to a USB flash drive
Instructions
In order to burn the image to flash media, you need to use the Ultra ISO program. Download the installation Ultra ISO. This program is not distributed, so you should use the trial version, it will be enough. The best option is to download Portable-.
Install the Ultra ISO program. Follow all the installation wizard prompts that will appear in each new window.
Launch the program and insert the flash drive into the USB connector.
In the window that appears, all fields have already been filled out correctly, but it’s still worth checking. In the “Disc Drive” field you must select the flash drive (select the drive letter in Explorer), in the “File” field image» you can see the location of the ISO- image, “Recording method” is a matter of principle; it is better to set the value based on experience. As a rule, the value is set to “USB-HDD+”.
Click the “Write” button - the system will ask you about formatting - agree if the data on the flash drive does not represent value.
Video on the topic
Useful advice
It is worth noting that bootable flash drives created in this way can sometimes fail. Therefore, it is recommended to burn not one, but two such flash drives.
Sources:
- how to burn an iso image to a flash drive
Image represents the entire contents of a disc recorded in a single file. It’s convenient to post the image online; it can be copied to any drive, and then turned back into a disk.

Instructions
To record an image using Alcohol 120%, open the program and select “Create” from the menu on the left. Insert the disk from which you need the image, and it will appear in the Alcohol 120% menu. Click “Start” and the image creation process will begin. At the end of the process, open the “My” folder, where you will find the Alcohol 120% folder. This is where the finished image will lie. Copy it and transfer it to a storage device.
To burn an image using Daemon tools, launch the program and click the “Create image” button. In the dialog box that opens, go to the “Image directory” tab and in the “Output image file” section, specify the folder in which you need to write the image. Now insert the disk that you need to turn into an image and click “Start.” The program will create an image and burn it.
Video on the topic
Please note
In addition to Alcohol 120% or Daemon Tools, you can burn an image to a flash drive using many other programs, for example, Unetbootin or UltraIso.
Useful advice
The Alcohol 120% program after downloading requires a crack, which usually comes in the folder with the program.
Sources:
Now computer technology is actively developing - what was surprising a year ago will be an everyday occurrence tomorrow. Many new products are being released, new software developers are appearing. But the user of a personal computer does not always keep up with the release of new products. For example, flash media have recently decreased in size, but have increased in size and the amount of information they can record. Thus, some media do not want to copy large video files.

You will need
- System change of the flash media file system.
Instructions
It turns out that the problem lies not in the new products of the modern media production industry, but in the users themselves. A competent user understands that the impossibility of large sizes indicates incorrect formatting. However, they are formatted in the FAT 32 system. This file system does not support files larger than 4 GB. It turns out that the solution is quite obvious: it is necessary to accomplish what we need.
Insert the flash drive, give the operating system time to fully determine the presence of the flash drive. Go to “My” - select the flash drive - right-click on the context menu - select “Format”. Select the desired file system – NTFS.
In Windows XP this value is disabled. To do this, you need to right-click on the “My Computer” icon - select “Device Manager” - activate the “Disk devices” item - open the properties window of your flash drive.
Open the “Policy” tab - activate the switch on the “Optimize for execution” item - click the “OK” button.
After completing these steps, relaunch the “My Computer” window to complete, selecting the NTFS file system. After completing the formatting operation, change the value of the “Policy” tab for your flash drive by selecting “Optimize for quick removal.”
Option 2. Blocking USB ports using special programs. These programs do not affect the operation of devices such as mice, printers, speakers. For example, you can use the USB Port Locked program. It is very easy to use. She's blocking. When you try to connect, the computer will not display the drive. When using the program, connecting and working with drives will be impossible. You can also use the ToolsPlus USB KEY program. It locks the removable drive by protecting it with a password. When you try to connect a removable drive, the computer will ask for a password. If the user enters an incorrect code, the drive will turn off. This program is very convenient for use in educational institutions. Using the USB LOCK AP 2.3 program, you can lock not only USB, but also CD-ROM. Protect access to such programs with a password.
Video on the topic
Many users have already abandoned the use of CD and DVD drives in favor of more economical and faster USB drives. Modern programs even allow you to create installation flash drives with different systems.

You will need
- - programs WinSetupFromUSB, Bootice.
Instructions
First, try burning a LiveCD using special programs. Create an image of your LiveCD if you don't already have one.
Download Bootice and run it. Click the Bootice button, select your USB drive and click the Perform Format button. A window will open with four options to continue. Select the third item (Single Partition). In the next window, specify the type of file system into which the flash drive will be formatted. Press the OK button several times. You will no longer need this program.
Copy the files in the disk image to a separate folder. Return to the WinSetupFromUSB program, select the first item in the open window. Click the GO button to start the process of copying the installation files.
If the above method does not work for you, then create a bootable one using the command line. Press the Win+R keys and enter cmd in the window that appears. Press the key combination Ctrl+Shift+Enter to launch Command Prompt as an administrator.
Create a bootable area on your USB drive. To do this, enter the following commands:
SELECT DISK 1 – selection.
CLEAN – cleaning.
CREATE PARTITION PRIMARY – creating a partition.
SELECT PARTITION 1 – select a partition.
ACTIVE
FORMAT FS=NTFS QUICK – quick formatting in NTFS.
ASSIGN
EXIT.
Copy the download files. Type E: at the command line, where E is the letter of the image, and press Enter. Next, enter CD BOOT (go to the folder with boot files). Now run the command BOOTSECT.EXE /NT60 F:. In this case, F is the letter of the USB drive. Copy all image files.
Please note
The option to create a bootable USB flash drive using the command line is suitable for Windows Vista or Windows Seven.
ISO- images are copies of optical discs that are ready for recording. This is a completed project, and add to it files Simply copying won't work. There are special programs to change the iso image and edit its contents. One of them is UltraISO.

You will need
- - computer;
- - Internet;
- - UltraISO program.
Instructions
Download the program from the official website http://ultraiso.info/ and install it into the operating system. The program is paid, and if you do not plan to purchase a key, select a trial period when starting the UltraISO utility. It is also worth noting that such software must be installed in the system directory of the hard drive on a personal computer.
Open in the application you want to change. This can be done from the “File” menu, “Open” item, or by clicking the corresponding icon under the menu. The program window consists of four parts, the upper part serves to display the project you are working on, the lower part is the file manager. The interface of this software is so simple that even a novice user can handle it.
Add and remove files from the image using functional icons above areas of the program window. You can add new ones files inward by simply dragging them from the bottom of the window to the top. Save the edited iso image. If you click the “Save” button, the changes will be written to the original image, if “Save As” - you will have the opportunity to leave the original image untouched, and the working project will be saved as a new image.
The utility also provides the ability to convert images, compress information, and emulate a virtual drive. You can create an iso image from any set of files on your hard drive, as well as copy optical media as an image. You can explore these features through the application's built-in help. At any time, using this program, you can edit or create your own versions of operating systems, record them on various media and then install them on the hard drive of a personal computer.
Sometimes you need to transfer the installation disk image with the operating system to a flash drive. Why is this being done? When installing on compact devices, such as netbooks, there is no other way to install the system. In some cases, this method is used to speed up the installation process on a hard drive.

You will need
- Software:
- - Windows 7 USB/DVD Download Tool;
- - WinToFlash.
Instructions
There are two simple ways to solve the problem. The first method is to use the Windows 7 USB/DVD Download Tool, the distribution package of which can be downloaded from the official website at the following link http://images2.store.microsoft.com/prod/clustera/framework/w7udt/1.0/en-us/ Windows7-USB-DVD-tool.exe.
After installing the program, you need to check for the presence of two packages on your system: Microsoft .NET Framework 2.0 and Microsoft Image Mastering API. If they are missing, download them from the official website of the developer (Microsoft).
Launch the program and click the Browse button next to the Source File line to specify the path to the installation image in iso format. Then click the Next button.
Then, from the list, select the flash media that you will use (if there are several of them). To proceed to the next step, click the Begin copying button."
Not all modern laptops have a DVD drive; we are silent about ultrabooks, whose manufacturers initially abandoned the ability to read/write discs for the sake of an ultra-thin body. Therefore, reinstalling the operating system from a disk, as we are all used to doing, will no longer work and we need to look for another option. That is why we decided to tell you through UltraISO - a program that allows you to work with images. Of course, there is more convenient software, tailored specifically for creating bootable flash drives. In addition, it is paid, but there are a number of analogues distributed free of charge. But if you choose the UltraISO program, we will not challenge your decision and will help you understand its functionality. Well, get your flash drive ready, let's get started!
Create a bootable USB flash drive using UltraISO
So, first of all, we need to acquire the operating system image itself. This could equally be Windows 7 or the newer “Ten”. As a rule, bootable media is created not only for installing the OS, but also for resuscitating the computer. However, this is no longer so important - after all, in this instruction we are considering the creation of a bootable version.It is not for nothing that the name of the program contains the prefix “ISO”, symbolizing the extension of the image file. The image itself can be downloaded on the Internet, on the official website, or borrowed from a friend. This is not so important, the main thing is that it is complete and works flawlessly.
We will need a flash drive with a memory capacity of at least eight gigabytes. This is more than enough. Copy important data from it first, because the media will be formatted.
Creating a bootable USB flash drive using UltraISO
Let's assume that you already have the program installed. Let's get started:
By repeating exactly the steps described above, you will actually write the operating system onto the flash drive and be able to install it.
How to create a bootable USB flash drive from a DVD
At the beginning of the article, we said that the image can be taken from anywhere: download it from the official website, from a third-party resource, or burn it from disk. So let's quickly look at the last option.Let's imagine that you borrowed a boot disk with Windows 10 from a friend, but for some reason you do not want to install the OS from it. It is not at all necessary to create an ISO image through a third-party program, and then make a bootable USB flash drive according to the instructions above - you can take another, shorter route by writing a bootable USB flash drive directly: 
Well, now you know how to make a flash drive bootable. All that's left to do is learn how to restore/install Windows from it. But that's another story...
Many people who use computers in everyday life are often faced with the issue of transferring information to flash drives, which are popular today. Of course, such a step is justified, because, unlike optical disks, they are not particularly susceptible to damage.
However, some users who work with disk images do not pay attention to how to burn an ISO image to a flash drive. But in vain, because you can get a lot of benefits from this.
What is an ISO image
Speaking about what a modern type of file with the .iso extension is, we can say that this is precisely a disk image or, say, a set of drivers that need to be restored. It goes without saying that such images can contain completely different information.
Basically, it is a compressed version of what was on the hard drive or optical media. All archive programs work in the same way. Their only disadvantage is that they do not allow you to create tools that can be launched immediately before the Windows OS (or any other system) starts. But since Windows is the most common operating system in our country, we will start from this.

The simplest recording method
Burning an ISO image to a USB flash drive is quite simple. In the standard version, this will look like a normal copy. To do this, you can use several options for regular copying or cutting using Windows Explorer (or any other file manager), a combination of hot keys, or a command from the drop-down context menu called by a manipulator (computer mouse) with a right click on the file, “Send ...” with indicating the letter of the USB storage device.
In this sense, the solution to the question of how to burn an ISO image to a flash drive is only suitable for using the saved image for further copying or other actions. As they say, this is the most primitive option. Another thing is when the problem arises of how to write an ISO image to a flash drive and make it bootable. You'll have to work hard here.
Using software packages to create a bootable USB flash drive
Modern image creation programs such as Nero Burning ROM, Daemon Tools or the same UltraISO application are the best tools designed to solve the problem of how to burn an ISO image to a flash drive. The fact is that this is associated with system recovery after a so-called crash.
Information is extracted from this image and loaded into the computer system using the type of tool that uses “System Restore”, which is available in the list of standard Windows OS system utilities.
For example, it is very easy to do this in the UltraISO program. It is assumed that the initial image has already been created. Open it, and then go to the line “Burn hard disk image”, located in the “Startup” menu. There we select the desired USB drive, confirm cleaning and start recording.
In the Daemon Tools application, the problem of how to burn an ISO image to a flash drive is solved just as simply.

In this case, you need to use the “Tools” menu and the “Burn bootable disk image” line, then specify the path to the image itself and select the desired USB drive, if there are several of them. After this, only confirmation of the operation is required.
What happens during the recording process
The fact is that ordinary copying is not suitable for restoring the functionality of any system. When creating a boot module, the MBR boot record is copied onto a flash drive, which allows the computer system to see that it is not just a removable device for storing data, but precisely the one from which the entire “OS” should be loaded.
It’s worth saying right away that before using this method, you first need to change the BIOS settings and set the boot priority, specifying a removable USB drive as the first device: when you turn on the computer or laptop, it must (!) be inserted into the appropriate connector, otherwise the system simply will not will see.
In this article, I will tell you how to burn an image to a flash drive (in this case, a Windows image) for subsequent installation of the system on a computer. Nowadays, many people have laptops and netbooks that simply do not have an optical drive, or there is no way to install windows from a disk; this is where creating a bootable Windows 7 flash drive comes to the rescue. This article is primarily aimed at these tasks.
We will write the image to a flash drive in two ways. The first method will be implemented using a very good ultra iso program, and the second using WinSetup From USB. We will start by looking at the steps to work with ultra iso, since this method is less labor-intensive and the process of creating a bootable Windows 7 flash drive will be quite fast. The second method will remain for those who, for some reason, “didn’t work out” with the first option.
Method No. 1
So, let's go. First, download the program Ultra ISO. After the program has been downloaded, installed and launched (click on the trial period if you don’t want to buy), you can begin the fairly simple process of writing Windows to a flash drive:
1. You must specify the path to the image that should be placed on your hard drive:
Click “File” => Open (Fig. 1)
Fig.1

Rice. 2

Rice. 3
Method No. 2
This method will also tell you how to write windows to a flash drive. What you will need for this option:
1. A little free time;
2. Computer (with iron, which supports booting from a flash drive);
3. Program for preparing a flash drive ( download);
4. Actually the flash drive itself (even an SD card will do);
5. An image of the operating system that we want to install.
As an example, I will show how we will write an operating system image to a 4GB SD cardMicrosoft Windows 7Home Premium 64-bit. I would like to immediately draw your attention to the choice of operating system. If your computer has less than 4GB of RAM, then you should install a 32-bit (x86) version of the operating system, since a 64-bit version will simply clutter up the RAM with unnecessary processes.
We insert the flash drive into the USB port and format it to FAT32 or NTFS using Windows. To do this, you need to go to My Computer, find the flash drive there and right-click on its icon. In the context menu, select “Format...”. In the format window, select the file system FAT32 or NTFS (the latter will be better if the flash drive has a capacity of more than 4GB), and also select the cluster size “Standard cluster size” and click the “Start” button. Everything is shown in the picture:

Next, we download a small program in which we will do all the operations we need. There are several programs of this type, but I chose WinSetupFromUSB because it does not require installation and takes up almost no space on disk and easy to use.
Let's launch the program. First, we need to select the device on which we will burn the image. This is done in the drop-down menu at the top (if the flash drive is not displayed in this menu, click on the Refresh button). Next, we need to prepare the flash drive for recording the image, because if we simply copy the image, it will be impossible to enter the system installer, because there is no boot sector. To create it, click on the Bootice button.
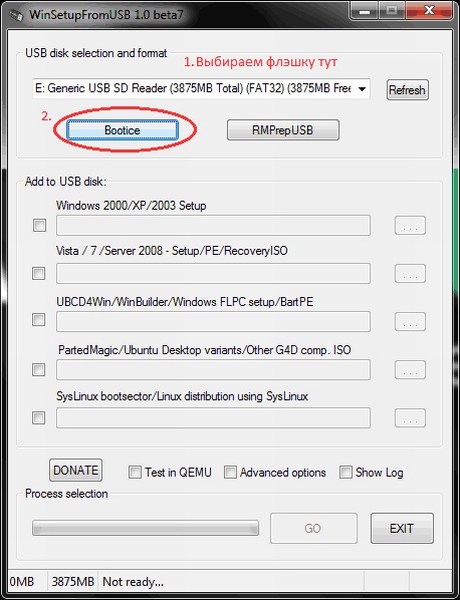
In the Bootice utility window that opens, click the Process MBR button, then see if the Grub4Dos checkbox is checked (if not, check it) and click the Install/Config button. In the Config Grub for DOS window, click on the “Save to disk” button, the program will display a window that the boot record has been successfully written to the drive.

We return again to the Bootice utility window, where we click the “Process PBR” button and do everything the same, without changing anything in the last window, click OK.

That's it, now all we have to do is write the image to a flash drive, this is done in the main program window, which we saw immediately upon launch. You need to check the required box - if you are going to install Windows XP, then this is the first checkbox, but if Vista or Seven - the second. Next, click on the “…” button on the other side of the checkbox and set the path where our unpacked image is stored on the hard drive, or simply mounted in a virtual drive using DaemonTools or Alcohol. Click on the “GO” button and wait until the process finishes.
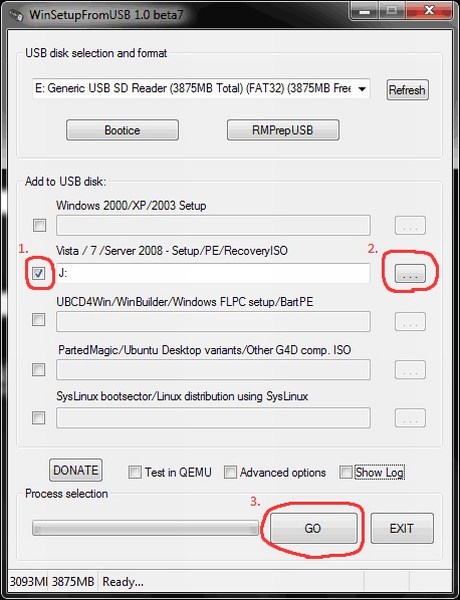
Upon completion, the program will display the message “Job Done!” That's it, dear friends, you can reboot and start installing the operating system.
Also, I advise you to read the article regarding
Almost all modern motherboards support booting from a USB drive (flash drive). Therefore, in order not to bother with CD/DVD drives, you can create a bootable USB flash drive containing the Ubuntu image and install the system directly from it. In addition, it is very convenient to always have a flash drive with you from which you can run (LiveCD) or install Ubuntu. Let's look at how to create a bootable USB flash drive - how to write an ISO image to a USB drive (flash drive).
See also the new article How to create a bootable USB flash drive. It describes the process of creating a bootable USB flash drive using the Etcher and UNetbootin programs.
Further in the text we will assume that the concepts USB drive and flash drive are synonymous. It's easier that way...
Below I describe the case of creating a bootable USB flash drive from Windows, assuming that you already have Windows installed and you want to install Linux.
You will need a flash drive with a capacity of about 1Gb. Next, we need a program that will correctly write an iso image to your flash drive. Let's use the Universal USB Installer (by the way, it is recommended by the Ubuntu developers). Download it from the following page: Universal USB Installer (on the page click the button Download....
Run the downloaded file Universal-USB-Installer-x.x.exe.
On the License Agreement screen, click I agree.
A window for setting recording parameters will open. In the first list you need to select the version of the operating system that you will write to the flash drive (in my case it is Ubuntu 11.04). Then click on the button Browse, a file selection window will open, in it select your iso file containing the disk image with Ubuntu. And finally, indicate which USB flash drive (drive letter) you will burn the iso image to. If the required disk is not in the list, then check the box " Show all Drives" You can also check the box to pre-format the flash drive ( Check this box if you want to format Drive). When all settings are completed, the program window should look like the one shown below. 
Before recording, a window will appear with a list of actions that will be performed. Click the button Yes (Yes).
Click the button Create and the process of writing the iso image to the USB flash drive will begin. 
At the end of the process, the message “ Installation Done, Process Complete!». 
To burn an ISO image to a USB flash drive from Ubuntu, you can use the free UNetbootin program. To install UNetbootin, run the command in the terminal: sudo apt-get install unetbootin


