Creative design of VKontakte group. There is some content that is closed from public access, because
Successful design of a VKontakte group should not only be beautiful, but also functional and convenient. Make design solve your marketing problems so that the group attracts a paying and buying audience to the brand and stays with it forever.
5 steps on how to create a group on VKontakte
Cover
The community cover today is an important tool for designing a brand group in Contact and promoting it. You can download it in the “Community Management” section by going to the “Settings” tab. A high-quality horizontal image in the community header itself plays the role of the company’s main promotional banner on the social network. It sets the mood, informs, enhances the image, calls for targeted actions, and sells at the same time.
1. Use high quality illustrations
The VKontakte community cover should be 1590x400 pixels in size, but it is better to upload a photo 2-3 times larger in .png format. This way you can avoid poor quality display.
2. Adapt the image for different devices
Keep in mind that this image may appear differently on different devices - the edges will be cut off on mobile, so it's best to place all the most important information closer to the center.
3. Place a slogan and USP
Let the client see your philosophy and benefits from the first screen.
4. Display the product/service, process or result of its use
This way, a potential customer will immediately know what you specialize in and will be involved in the product.

5. Help customers contact you immediately
Write your phone number, e-mail, and other company contacts on the banner. If geographical location is important for your business, for example, you are in the catering or horeca industry, the address will also be useful.
6. Announce events
Are you promoting concerts, expecting a new collection or product launch, or holding a festival/conference/client day? Tell everyone who comes to the community about this.
7. Present promotions and discounts
Where else on the main platform can you tell the audience that right now they can place an order from you at 2 times cheaper? Most importantly, do not forget to change the illustration after the offer expires.
8. Offer to take a targeted action

When loading the community cover, two buttons are placed horizontally in the lower right corner - Write a message and Join the group. Point an arrow at them to further attract the audience's attention. So, if the banner shows a product, you can offer to order it immediately in messages. And if it contains a digest of the latest news, subscribe to always receive the latest information.
Upload an avatar and select a thumbnail
Some brands still do not adopt the cover, preferring the old look of the first screen of the group, using a combination of an avatar and a pinned post as the so-called “header”. In this case, one picture is a continuation of the other. It looks most impressive when the photo ends on the same level as the avatar.
When using the maximum avatar size of 200x500 pixels, the size of the image in the pinned post must be made 510x308 pixels. An excellent engaging technique is to attach a video uploaded through a social network player, which stylistically continues the avatar.
If you use a cover as a header, the avatar will then always be displayed as a thumbnail.
Rules for designing a VK community avatar thumbnail
A thumbnail is a small round image that is cropped from a large avatar, and is displayed in the search for groups, in the list of communities for each user and on the left under the cover, if there is one. Here are some design tips.
1. The thumbnail should be understandable to the audience

You shouldn't post a piece of weird illustration. Visualize something that the target audience will subsequently associate with the brand, for example a logo, a product/service icon, or maybe the main marketing character of the brand.
2. Use only high-quality photographs
It’s better to upload the source 2-3 times larger than the required size, so you can forget about the terrible pixel “squares” that do not show you in the best light.
3. Design your own illustrations
Standard stock images will look cheap and unprofessional, and will become synonymous with users' distrust of the brand. Make unique designs in the same concept and colors as the rest of the design.
4. Pictures that contrast with the background of the page are what you need
When designing VK thumbnails so catchily, the “round piece” will stand out in the feed among other groups and will not merge with the background of the page.

5. Place contacts or USP of the company
Depending on the purpose set for the thumbnail, place on it a contact phone number or website address, information about free delivery, an indication of the lowest price in the segment or a promotion.
6. Make the text large and readable
It is better not to use serif or italic fonts - they are too noisy when viewed on PC screens, mobile devices and smartphones, littering the view. Make sure that the text does not extend beyond the borders of the cropped thumbnail. This will allow you to convey the message to the user correctly and effectively.
7. Use custom shapes
For example, in the desired round template, enter a polygon or other geometric shape on a white background. Create an unread notification effect or a graphic “online” icon.
Develop a menu

The menu is an important element of the design of a group in Contact, which makes it easier for users to navigate the group - it will be more convenient for people to find the information they need. Each element and page is created in a special programming language - Wiki markup. Using it, you can make images clickable and create convenient pages within the social network as if it were a website page.
You can use both open and closed menus. In the first case, the user immediately sees the sections that are included in it, in the second, they are preceded by a preview picture with the inscription “Menu”. The menu can also visually become a continuation of the avatar if you use the old community design option.
Develop a product showcase
When placing products in your community showcase, remember that users always see the first 3 items. Place the most popular and most ordered ones in them, uploading a presentation image in the same style. Publish here uniform icons or photos of the products themselves. Services can be placed in products. In the design, show the process of providing the service or its result. The size of such a picture will be square – 400x400 pixels.

Post design
1. Make full use of available image sizes
The maximum width of an image in a feed is 510 pixels. Square images of 510x510 pixels and rectangular images of 510x300 pixels look most impressive.
2. Develop a custom post style
To make your posts look individual, come up with a unified style, font and color scheme.

3. Place short text on the picture
For example, you can divide an image into 2 parts - text and graphic, or write text while darkening the background. To make the text visible without a darkened background, write it on a background (a contrasting graphic block of a uniform color) or add a shadow to the inscription. Photos with a frame look good.
4. Make several templates for different purposes
For example, for quotes use one template for the presentation of visual information, for the announcement of materials from the site - another, and for competitions a third.
Use these absolute techniques, and your company will be presented on VKontakte in the best possible way, and it will be convenient for customers to interact with it. But don’t forget that everything needs moderation! Look at even more fresh ideas for designing a VK community on the services page of the Tesla Target agency.
The same question arises before starting work - how to properly set up a VKontakte group for sales and how to formalize it correctly? There is no clear answer to this question. There are many factors that influence the success of closing a deal between you and a buyer through a social network. Let's look at setting up a VK group in order.
How to register a group in VK? This is the first thing you should pay attention to! Imagine that you are a person who wants to purchase a product or order a service. So you see an advertising post, go to the community to learn more about the proposed offer and... you find yourself in an unknown place.
The description is incomprehensible, there are no contacts, photo albums are chaotically filled with hackneyed photos from the Internet. The desire to buy immediately disappears.
This can be avoided. If you follow simple rules.
- Band cover VK introduces you to clients and should only convey minimal, useful information! This is a contact phone number, website name, brand name. The cover size is 1590x400 for the desktop and 200 pixels smaller for the mobile version.
- Group avatar. It is purely visual in nature and should be remembered by subscribers. There is no need to write mountains of text there, or insert low-quality pictures that are impossible to see. An excellent option for a group avatar would be a brand logo, an icon characterizing the type of activity. The group avatar size is 500x500.
- Album cover. For the cover, sizes 1000x700 are suitable. Place a bright, catchy picture and, most importantly, readable text that will reflect the content of the album. The main thing when creating a cover is not to go beyond the band's style. If the group is made in dark colors, do not create a bright color cover.
- Goods. Complete the block of products in the same style and prepare a high-quality description and photographs of the offered product.
How to name a group on VK? The name of the community reflects the meaning of the project. In my projects I use the following formula: Brand + service, product. Ask why this was done? The answer is simple. To attract free traffic to the group.
More than 97,000,000 people use VKontakte every month. Some of these people use a search engine to find a service or product.
For example, Ivan sells apartments in St. Petersburg. After analyzing the statistics of requests in wordstat.yandex.ru, Ivan found that the most common request is to buy an apartment in St. Petersburg. (172,688 impressions per month).
Based on this, Ivan creates a group: Company name | Buy an apartment in St. Petersburg. Thus, when a person searches to buy an apartment in St. Petersburg, he will see the group in the results.
Status. Here you need to briefly indicate important, relevant information. This could be a feedback number, promotions, website, special offer.
Description of the group. Here describe your advantages over competitors, tell us about the company, type of activity, contacts, delivery information. Show how the business solves a customer problem.
Content. No matter how much you enjoy writing, you can’t live without it now. Share useful materials with your subscribers, organize competitions, congratulate them on the holidays, write with concern for who reads you.
The mistake of most communities is to sell directly. It’s unlikely that you would be interested in seeing a community that everywhere says: “Buy from us, well, buy!”
The best way to sell without selling is to show the client his own problem, reinforce its significance and offer a solution. Tell a story, share a problem with readers and make it clear how the product will help solve the problem.
Discussions. Publish reviews and question-answer sections for feedback from the audience. Reviews are the face of a business, they increase trust and encourage you to make a purchase or sign up for a service.
Bots and applications VKontakte. Assistants for processing applications and supporting audience feedback. Spend enough time setting up applications and sending newsletters. Install the widget in the group, greet the client and encourage a call to action.
Result: A group is a picture assembled from small parts that need to be put together. By following these tips, you can correctly set up a VK group, set up a community and offer services and goods to receive orders through VKontakte.
Prepared the article
1 voteGood day, dear readers of my blog. In the previous article, we learned how to make something charming. Now let's move on to the second part. We will create a beautiful single picture for the avatar and think about an effective transition.

If this is your first time on my blog, then you don’t have to start with the first lesson. You can read this publication first and start designing, starting from this step. Now I’ll tell you how to make a beautiful VKontakte group, and you can decide later whether to use additional features.
By the end of this article, you will have an impressive and unified picture.

Method for the lazy
In order not to distract from important matters those who already know how to do everything, are in a hurry or simply don’t want to bother, I can offer a video tutorial. He will tell you how to do the same thing that I am going to talk about, only without Photoshop through the service www.vkprofi.ru .
I haven't used it and can't say whether it's paid or not. I would be grateful to those who check this information and leave a comment on this article with an answer to this burning question.
For those who want to learn
If you decide to stay and go the long way, then exciting work awaits you. It will be very useful if you are just starting your journey in online business.
You will learn many tricks, for which I will give useful recommendations for working with advertising, and you will also gain useful skills and experience.
You will need...
- Photoshop.
- Basic picture.
The photo must be large and of high quality; if you are searching in search engines, then pay attention to the desktop wallpaper. If you work for a cool community, especially related to business, then I recommend using the service https://ru.depositphotos.com . There you will find advertising images.

Choosing a picture that will promote a product is not so easy. If it is used for the business community, it must meet many requirements. Not everyone understands this. If you are promoting a hotel, inn, bar or club, it is not recommended to take photos of empty rooms.
First of all, we should not sell a place where a person can sit down, but show the emotions that he will receive from visiting the establishment. The beauty of interiors won’t surprise anyone these days. You need to create a unique atmosphere that the buyer will want to plunge into.
Nobody likes worn-out photos. If they are used all the time, then the chance of getting clients decreases. About quality, correctly set light, etc. I won't even talk. I hope you already understand this. Such options as in the photo below have not been rolling for about 5 years.

From personal experience... on one of the projects I worked with a very cool advertising manager. We took each picture apart piece by piece. The object must be at a certain distance from the center, at a specific angle, preferably in the correct optimistic range.
We had to change the color of the frame in which the painting hung in the farthest corner! At first I thought that all this was unnecessary trouble, but then they showed me the conversion after working with similar little things for comparison.
Making a template for a future beautiful group
So, when everything is ready, you need to decide on the dimensions and prepare a template for the future image. By the way, if you learn how to do this, then you can then use this technique for many other tasks and create incredible VKontakte pictures. You'll soon understand what I'm talking about.
So, let's open contact. If you look for standard VKontakte post sizes, you will see 200x500 and 700x500. However, if you use a ruler, you can make sure that the thumbnails do not correspond to these indicators. The service compresses them when loading.

Everything is the same with the picture on Ava, it really is 200x500.
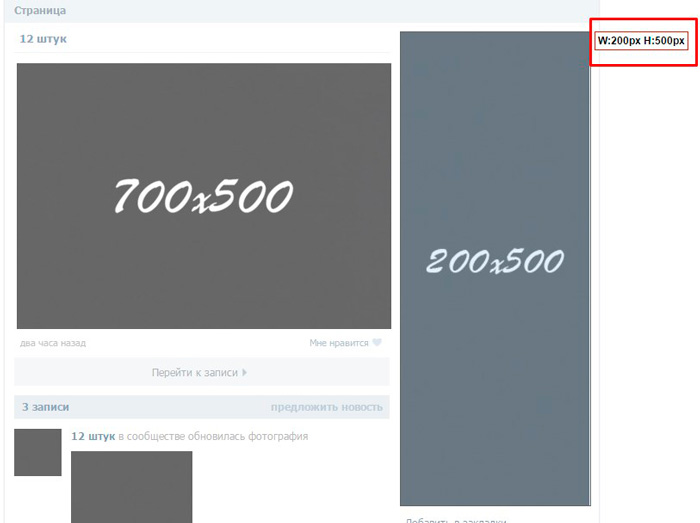
With fasting everything is different.
In any case you need or download the template I prepared, or take your own screenshot. I advise you to choose the second option. Why? This way you can make templates for different tasks yourself. For example, if you have a product gallery or “Latest News” displayed on your main page.
My option is only suitable for pinned posts. The simplest and most popular design method.
Open your group or any other group where a post with a photo is pinned at the top. Like in my drawing. You can also take this photo by right-clicking on it and “Save as...”. True, I’m not sure that everything will turn out right for you in the end. Do you have time for an experiment? Share your results in the comments.

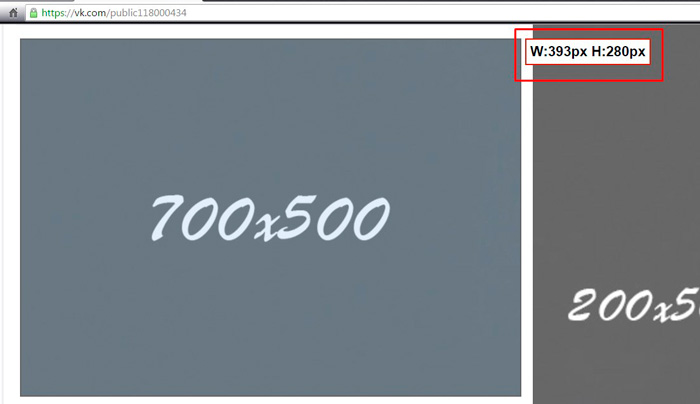
For others, the step-by-step instructions will be different. First of all, enlarge the image in the browser to 100% (press the Ctrl button and move the mouse wheel). Frankly speaking, I don’t particularly understand why this was done, but on my first attempt, precisely because of the scale, it didn’t work out.
Now press the PrtSc button. It's located in the very top row on the keyboard, after the countless "F's". After you click on it, nothing will happen. Everything is fine, you don’t need to click 100 times, open Photoshop.
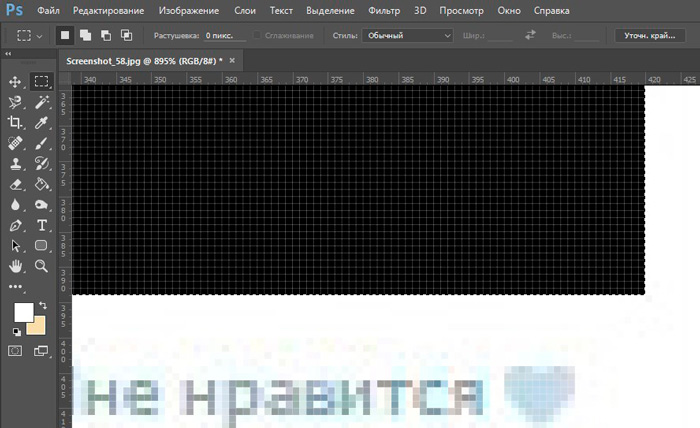
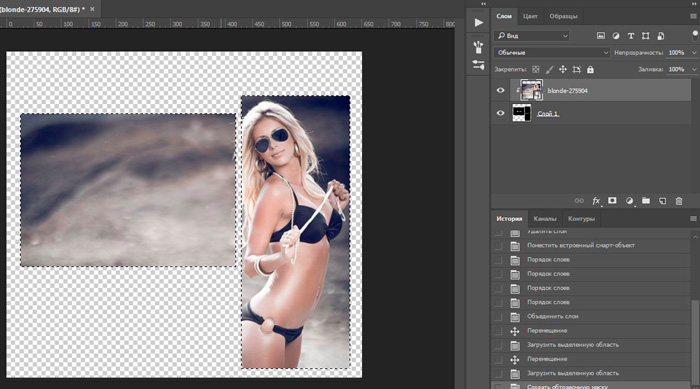
Click on Ctrl+V, thereby you will paste your screen into the working field of the program. Now take the Rectangular Marquee tool and work with the left block.

Guide straight along the edge of the image. You shouldn't get the picture below. This is wrong.

Move strictly along the edge.

Grab the cursor at the upper left corner of the rectangle and move it to the lower right. In order not to fool your head with a magnifying glass, use the magnification using the Alt button and the mouse wheel.
Now press Ctrl+J. This will transfer the selected fragment to a new layer; it will appear above the background.

The same thing needs to be done with the avatar. Select and move to a new layer (Ctrl+J)

When you transfer to a new layer, the background should be active, and not the one you just created. Make sure it is highlighted.
Then you can get rid of the background. Click on the lock next to this layer, this will allow you to manipulate it.

Drag the layer to the trash can, just like a regular file from your desktop.
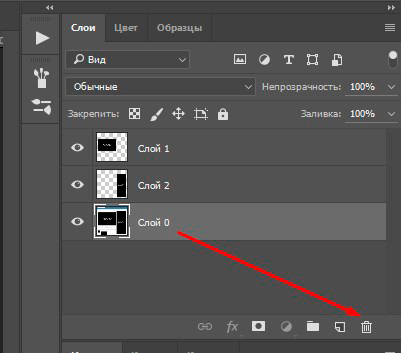
We're done with this. The template has been created.
Unique image for the group
I recently wrote an article about . Incorrect opening and further work with the size can significantly worsen the quality of the coolest picture, if you are interested, you can read an article about this on my blog.
Drag the photo that we will use as the main one.

It doesn't reflect correctly.

If you have the same nonsense, just make it the top one. Then, while holding down the Alt button, click on layer 1 and layer 2 so that both of them are highlighted.

They need to be combined using the right mouse button and the appropriate option. In this case, it will be more convenient for us to continue working. You won’t have to overlay and cut out the photo first for your avatar, and then for the post.

If you press Ctrl and then the thumbnail of the layer you just created. Ants run along the edges of objects from the new layer, which will tell you how to display the bottom picture. You can remove them by pressing Ctrl+D. What is now in the internal part will later be inserted into VK.

If you start moving the photo, then the running ants will “go” with it. I can advise you to set up guides. Don't know how to work with them? Watch this video here.
Once you have everything set up as it should be, you can move on to the next step. I'll show you two options to achieve the same effect. The first one is simple. On the top layer, right-click and select “Create Clipping Mask.”

But I love the second one. He's faster. Press Alt and move the cursor between the two layers, it will visually change. Then left click.

The result is this photo.
Each part can be cut out using the Frame tool and then saved as a jpeg. We add the right photo as an avatar. On the left you can simply add it as a regular post and then pin it.
It's not difficult, but if you have problems, I can recommend that you read the third publication in this series, in which I tell in detail how to make sure that when a reader clicks on your photo, he is sent to a website.

This article will be a detailed manual and I will tell you how to make a menu for a VKontakte group. A beautifully designed VK group menu contributes to a real increase in visitors and sales growth on the site.
Hello my dear readers. Let me tell you today how to make a beautiful menu for a VKontakte group and completely free. By the way, having learned to create such topics, you can earn a little money from this -))). Not a single commercial website operates without creating its own community on social networks, especially VK, which is guaranteed to help bring in new clients, as well as promote your business.

But if your community is not attractive and like everyone else, who will want to stay there? I think no one!!! So let's decorate our groups with high-quality design and learn how to do it very quickly. Before you start creating graphics and our future menu, you need to install the Photoshop program on your computer for further cutting of pictures. Many will ask why you need to cut pictures at all. The point here is that for each menu link we will have to create a separate strip from the general banner.
Today there are several types of created menus:
- Open with active items;
- Closed as a pinned post;
- With individual pictures or a common adjacent picture of the banner and menu.
The essence of creating both options is the same. The only main difference is in the additional elements and record types, and this will be discussed in more detail in this article.
To work with the menu it will help us wiki markup, which is built into the VKontakte text editor today. It differs from the usual one in that it will use standard commands to display a particular image and insert links to the necessary elements. The wiki markup itself allows you to insert code to display images, videos and other elements.
VK group closed menu
In this case, we will see to the left of the main group avatar a hyperlink in the form of the inscription “group menu”, when clicked on, our menu with active items and images will open.
The menu will look like this:

Open group menu (pinned material)
The idea is to create already open menu items that will be displayed in the description of the group itself, where it is usually displayed for all conditions. Our picture will be attached to the description, which we will prepare in advance and link it to the page on which we will have active items. This menu has become very popular recently and is in demand among customers. They look like this:

How to make a beautiful menu for a VKontakte group: step-by-step instructions
So, first of all, we will need to create the main avatar of the group, which we will place on the right, and the stub for our menu in the form of a banner.
- For an avatar 200x332 pixels;
- For the main menu banner, 395x282 pixels.
As you may have noticed, the height of the images is different and this is done so that the images do not move down in height and are at the same level since the height of the community name and status takes up about 50 px and we will need to remove this value from the height of the menu.
To make it clear, if the height of the main avatar of a group is 332, then we subtract 50 from it and get the height of the main menu equal to 282. If the dimensions do not matter, then the height can be set arbitrarily.

The next step after creating a community will be setting up materials, and here we need to prohibit participants from creating additional pages and blocks, but only writing on the wall. To do this, you will need to go to the section under the group avatar called “community management” where we need to make our materials “restricted” as shown below.

Now let's start creating the overall composition. You can, of course, simply insert a picture instead of an avatar and into the description, but let’s not be amateurs and will show you how to do it professionally, so that it is one full-fledged picture, turning into one another.
Let's create a new canvas in Photoshop with dimensions of 600x350 pixels, which we will use as a stencil by cutting out openings in it for our pictures. To work, we need to convert the sizes of all elements and rulers into pixels and this is done along the following path: “Edit-installation-main” and here we set the pixels.
The next step in creating an open menu is to make cutouts for the banner and avatar, which we will then receive for downloading. To do this, go to the section of the left vertical menu and select cutting.

Using the left mouse button, as if you were selecting an area, you need to select blocks of the sizes we need and after each selection, press the “Delete” button and select 50% gray. Such actions will lead to the blocks being of the required size and highlighted in a color different from the main background.
It should look like this:

Now we just select the eraser and use the “magic eraser” function to click on each gray block and get a stencil with cutouts. The next step is to select our main image and place it under the background and get ready-made pictures on which you can write text with the name of the menu or other advertising elements.

Great. After you have placed a picture of our design, we just have to select “save for Web” and as a result we get 2 of our pictures. Now we go back to our group and can fill in the main avatar (vertical). We will use the banner for the menu a little later when working with the wiki markup code.
Let's create the menu itself, with active items that will redirect the user to the necessary sections of a third-party site or to albums and catalogs in the group itself. We will use a new image for variety -))).
So, let's go back to Photoshop and create a new canvas with dimensions of 400x300 pixels. Then select in the section: file-place and select a picture for the menu background.
We place the buttons of our future menu on the picture and cut the picture as we did above by selecting the necessary blocks. After which we also select “save for web” and get a folder with our cuts. In my case, I got 4 pictures in a separate folder.

Now we need to upload the pictures downloaded from Photoshop into a separate album and hide them from prying eyes. After loading, each picture will receive its new name and unique id.
Please note that you must have:
- Materials are opened in “restricted” mode;
- Discussions included;
- The folder with photos is open to everyone.
Now all that remains is to configure our page where the menu will be displayed. To do this, go to the main page of the community and select fresh materials and edit and call “OUR MENU”.
Next, we need to insert the pictures that we received when cutting in Photoshop. Some people use markup codes, but in order not to overthink it, I suggest that you simply select inserting a picture by clicking on the camera icon and upload one after another.

Working in a text editor, if after loading the pictures, we click on the icon in the form of brackets in the upper right corner, we should see this code:
Advice: An important point after loading images is to remove the padding. This can be solved by inserting “nopadding” before the image sizes.
For clarification, it is written below what comes from where, but considering that everything will be inserted automatically and there is no need to be clever, and open as some write each picture and take the id, then we simply download and save.
[]
where xxxxx is the id of your image
yyyyy - width in pixels (maximum 388)
It should end up looking like this:
Now our pictures are collected in a separate banner. And in order to add a link to each item, simply click on the image with markup disabled and in the link section paste the copied url.
And now we come to the most important and final point in creating our VKontakte menu. Now we need to save our page with pictures and copy its address. In my case it looks like this:
http://vk.com/page-116682062_51411604?act=edit&hid=183950676§ion=edit

Remember, at the beginning of the article we made a stub menu, which will be a continuation of our main avatar, and we made a stencil for it. This is exactly what we need now.
Go to the main page and do the following:
Step #1.
We paste the address of the page into the text field for a new post on the wall, after which it will be converted into a link.
Step #2.
We attach an image of our menu placeholder to the post and click send.

Step #3.
Now, after publishing the post, click on the creation time in the lower left part of the post and select “PIN”.


Great!!! Let's finish here. Now you know how to create cool menus and you can earn good money from it. I advise you to do everything in the following order:
- We come up with a structure and order the design of menu images;
- We resize and cut all images;
- Insert pictures into albums;
- We edit all the cuts in the editor and publish them on the main pages of the group.
As a result of our work, we will get this menu.

But the menu itself, when clicked, will pop up with active links. It’s worth playing with the sizes and adjusting them to fit your screen, but don’t forget about display on mobile devices.

IMPORTANT: After changing the VK design in 2016, new changes were made when creating images and requirements for pictures about which.
Download VK group menu template + all lesson sources
I hope the material was useful, and you now easily understand how to make a beautiful menu for a VKontakte group. Subscribe to blog updates and see you soon in new posts. If you have any questions, write them in the comments, and I will definitely help you.
I am attaching a video to reinforce what you read -))).
Administrators of VKontakte communities will find useful tips on how to design a group to attract more subscribers. When registering, do not forget that the administrator has at his disposal not only design elements (an avatar or a banner), but also many functional parameters that together form the appearance of the group.
Important! Try to set aside at least a few hours and explore all the settings available to the community administrator. A thorough knowledge of the functionality will definitely bear fruit, and in the future you will be able to skillfully adapt to new trends.
A few effective tips will help you decorate the group beautifully and harmoniously. Try to use these tips wisely, and strive to make users want to subscribe to the group.
The advice will be useful for those who have not even created a group yet and are coming up with a name. Although, created groups with a small number of subscribers can change their name at any time in the community control panel in the “Basic information” section.


When a community founder is faced with choosing a name, it’s best not to rush. There are cases when the name is obvious (the name of the company, the name of the event, etc.), but for others, the scope of imagination can open up an endless number of options. When creating a name, consider the following important points:

Do not leave out filling out your contact information and, if possible, enter as much data as possible into it. Contact information can be divided into “Contacts” and “Links”.
“Contacts” contains quick links to the group administration. In the description for each contact, a brief description of the administration member is usually written, so do not ignore it - the appearance of “Contacts” also affects the overall design of the group.

Take note! You can create a special work page for the user and add him to your group's contact list. Name him the same as the group, then he will become the branded mascot of the group, which users can write to to find out more information about the group or the products sold in it.

This advice is suitable for those who have created not a group, but a public page selling some goods. On VKontakte, it is possible to create three types of communities: a group, a public page and an event.

Three types of communities - group, public page and event
The public page has an important design feature - there is a large banner on top that replaces the group’s avatar.

Consider creating an updated transforming banner. Place pictures of fresh products on such a banner, then change them in the image editor after each delivery. This is the first thing that will catch the visitors' eyes and potentially increase sales.
Develop a template for your group's posts. Communities look more beautiful in which all posts are designed in the same style, which will be remembered by participants when scrolling through the news feed.

Note! Attach images with your group’s logo to posts and create an ornate grid of tags. You can even create regular columns in the style of “News of the week” or “Minute of humor”.
Don’t deviate from the developed style and don’t be lazy to devote time to designing each post.
This idea permeates the entire article, and to achieve success, you can only remember it! Try to stick to the same design throughout. This may concern the style of writing texts, the design of images, and the creation of a block with products in a group.

Here are some more little tips for creating beauty in the VKontakte group:

Video – VKontakte group design


