Win 7 multiboot flash drive with additional programs. Creating a multiboot flash drive with multiple Windows
In recent years, flash drives have become very popular as a device for installing operating systems. But it would be very nice to have not just one operating system on a flash drive, but several. Let's say several different Linux distributions, or even a flash drive with Windows and Linux. It's possible.
In today's article we will look at how to create a multiboot flash drive with several Linux or Windows operating systems. We will look at both special software and manual partitioning and creation of partitions for a multiboot flash drive. Automatically creating a multiboot Linux flash drive is faster and easier, but manually creating it is much more flexible and you can write, for example, Windows and Linux on one flash drive.
Multisystem is a small open source utility that allows you to create a multiboot Linux flash drive. Using this utility we can write any number of distributions to a USB flash drive. All you need is an Internet connection to install the utility, as well as a flash drive with enough free space.
Multisystem installation
You can install on Ubuntu using a PPA. To do this, simply use the following commands:
sudo apt-add-repository "deb http://liveusb.info/multisystem/depot all main"
$ wget -q -O - http://liveusb.info/multisystem/depot/multisystem.asc | sudo apt-key add -
$ sudo apt-get update
$ sudo apt-get install multisystem
If you have a different distribution, or you do not want to use a PPA, you can download the program, unpack it to any suitable location and run it with the command:
sudo ./install-depot-multisystem.sh
Creating a multiboot flash drive in Multisystem
After the installation is complete, you can begin creating a multiboot Linux flash drive. Connect your USB flash drive and launch MultiSystem from the main menu of the system or through the terminal:
When you first launch the program it will look something like this:

Select the desired USB drive and press the button Confirm. You may receive an error message like this:

This means that the selected flash drive does not have a drive label, just click OK so that the program installs it itself. After this, you will have to disconnect and connect the flash drive, then restart MultiSystem and select the flash drive again.
After that, confirm the installation of the Grub2 bootloader on it:
Now the multiboot Linux flash drive will be configured. In this window you need to select the disks that should be written to the flash drive:

This is done very simply. Just drag the desired ISO image into the program window. If this does not work, you can click on the CD icon and select the desired images in the file system:

Then MultiSystem will extract the files from these images onto the flash drive and make it bootable.

You can add as many distributions as you like, for example this example adds CentOS and Android.
After adding images, you will see them in the program menu:

That's it. Now the multiboot flash drive with multiple Linux operating systems is ready for use. Restart your computer and set your USB flash drive as the first boot device in Bios. Then all you have to do is select the distribution you want to run.

Multisystem also has a number of additional functions:
- Grub Settings
- Updating Grub and Brug boot loaders
- Installing VirtualBox
- Formatting a USB flash drive
- And many others
To access these options, go to the Menus tab:

You can also check what the boot menu will look like using qemu or VirtualBox:

MultiSystem is one of the best utilities for creating multiboot flash drives. But in an even more flexible way, you can create a multiboot flash drive from the terminal, which we will consider later.
Creating a multiboot flash drive manually
In fact, a multiboot flash drive with several Linux operating systems can be created without the help of specialized programs. To do this, a few programs are enough, perhaps already installed on your system, or available from official repositories.
Here's what we need:
- Gparted is an excellent GUI partition editor. You can use any other one, as long as you know how to use it
- Installed Grub2 bootloader.
- qemu emulator to check the functionality of a flash drive
Multiboot flash drive from images
It is not at all necessary to separate a separate partition for each distribution kit on a flash drive. If you only need to write the image files themselves, without modifying them, you can simply drop them into a folder on a flash drive, and then ask Grub to boot from the desired ISO image.
Let's start by formatting the flash drive and making it bootable. It is advisable to format the flash drive in fat32. You can use a file system other than NTFS.
Open Gparted via the main menu or terminal. It is possible that the flash drive is already mounted on the system and to create a multiboot Linux flash drive, you will have to unmount it:

Delete all existing partitions and create one with vfat file system:
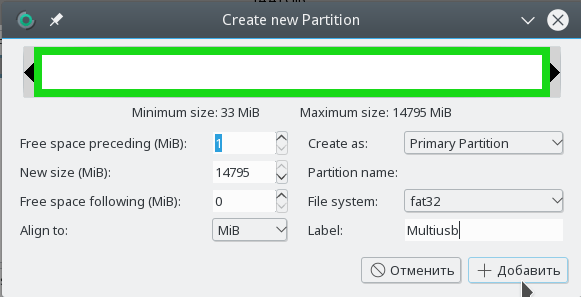
You can create two partitions, one for files and the other hidden for operating systems. Only do the one for files first.
Now in the context menu for the partition on which the images will be written, select Manage flags and check the box next to the item Bootable:

Now all you have to do is press the button Apply:
The operation of writing changes to disk may take some time.
Let's move on to installing the bootloader. First, mount the flash drive in the /mnt/USB folder, here /dev/sdx is your flash drive:
$ mount /dev/sdx1 /mnt/USB
mkdir /mnt/USB/iso/
Copy the required ISO files to the /mnt/USB/iso folder. Now install the Grub2 bootloader with the following command:
grub-install --root-directory=/mnt/USB/ /dev/sdx
Now all that remains is to create the bootloader configuration file. Create a file /mnt/USB/boot/grub2/grub.cfg with the command below and add the necessary items for each iso image:
The item should look like this:
menuentry "Ubuntu" (
loopback loop /iso/ubuntu-15.04-desktop-i386.iso
root=(loop)
linux (loop)/casper/vmlinuz boot=casper iso-scan/filename=/iso /ubuntu-15.04-desktop-i386.iso noeject noprompt splash root=(loop)
initrd (loop)/casper/initrd.lz
}
Let's look at what all these lines mean. The first line of the menuentry, with the word in the claws, is nothing more than a declaration of the item and its name. In the second line, we create a loop variable with the address of our iso image. The next line specifies the root file system, in our case this image. The last two lines must be taken from the file /boot/grub/grub.cfg from the image that needs to be loaded. The latter will, as a rule, remain unchanged; you just need to add the image address (loop) before the inird file address, and in the penultimate one we add the iso-scan/filename parameter, again with the address of our image, and the kernel parameter root=(loop).
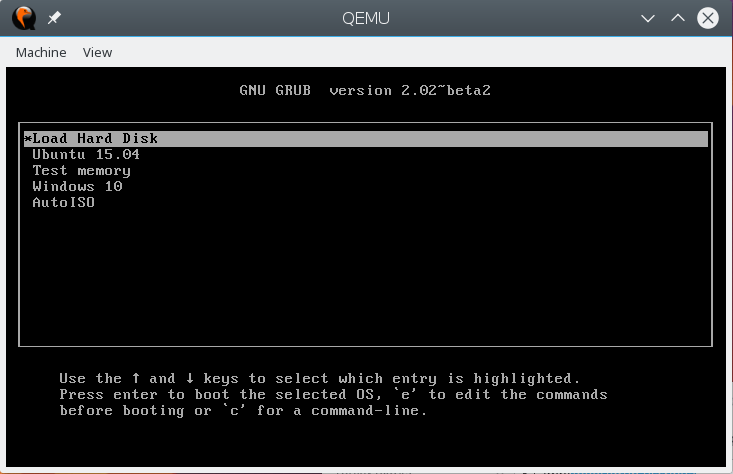
The example shows code for Ubuntu. Create such points for each image. For example, let’s also make a point for memtest:
menuentry "Test memory" (
linux16/iso/mt86plus
}
The mt86plus executable file needs to be downloaded and placed in the iso folder.
Let's make another point for launching from a hard drive if the flash drive accidentally ended up in the slot:
menuentry "Load Hard Disk" (
set root="(hd1)"
chainloader +1
}
hd1 is our first hard drive, after the hd0 flash drive, and the chainloader command transfers control to the bootloader from this hard drive.
For Windows, the menu item will look a little different, like this:
menuentry "Windows 10" (
insmod ntfs
insmod ntldr
loopback loop /iso/windows.iso
root=(loop)
ntldr (loop)/bootmgr
Everything is the same here, only instead of the Linux kernel we load the Windows bootloader using the ntldr command.
When you finish setting up the file, save it and you can check whether everything worked out. First, unmount the flash drive:
sudo umount /dev/sdx1
Then use qemu to boot the system:
qemu-system-x86_64 -hda /dev/sdx
This is what it looks like:
You don’t have to make the menu yourself, but use the autoiso script. Go to the /mnt/USB folder, then run the following commands:
$ mkdir /mnt/boot/grub2/scripts
$ cd /mnt/boot/grub2/srcipts/
$ wget https://raw.githubusercontent.com/coreos/grub/master/docs/autoiso.cfg
Create grub.cfg with the following content:
vi /mnt/USB/boot/grub2/grub.cfg
configfile /boot/grub2/scripts/autoiso.cfg
The script will detect all iso files available on the disk and create a menu from them:

You don’t have to use iso images, but allocate a separate section for each distribution. Then simply unpack the files from the iso image to this partition. Mount the image to any folder, and simply copy the files using cp:
sudo mount ~/ubuntu.iso /mnt/ISO
$ sudo cp -rp /mnt/ISO /mnt/USB1/
Next, the menu item will look a little different. You just need to indicate on which disk the desired distribution and its kernel are located. In Grub, disks are named differently than in Linux. Each disk is called hd and has a number starting from zero, partitions are named starting from one. For example, the /dev/sda1 partition will have the address (hd0,1). As a rule, the disk from which the boot was performed is considered first.
I recently wrote an article on how to create a multiboot flash drive. I think there is no point in writing about this a second time, just follow the link and you will see an effective method, believe me.
Now I’ll tell you how to make a multiboot drive with several systems and completely different programs, most likely the article will turn out to be long, but this doesn’t matter, because all the effective options will be in one place.
How to create a multiboot flash drive using WinToHDD
An interesting program that, in addition to creating bootable flash drives, also has functions for copying the system and installing a new one. So that users understand how to use it, I will try to describe everything in simple and understandable language.
Before the process, you should move important files from the drive to another location, for example, to a hard drive.
You can download WinToHDD from here. Launch the utility and click on the “Multi-Installation USB” section.
A window will open where you need to select the flash drive from the drop-down menu. A message about formatting the flash drive will pop up, be sure to transfer important data. Next, we select the system and boot partitions, although there is only one flash drive, so they will be the same. Click on the “Next” button.

The writing of files related to the bootloader to the flash drive begins, an important operation in which it is better not to touch anything, but just wait.

What do you think needs to be done now? I hope you have already prepared operating system images. They need to be moved to a USB drive. That's it, we made a multiboot flash drive.

What to do with a flash drive made in WinToHDD
We created a bootable USB flash drive with multiple operating systems, which is very exciting. You should now boot from it. This can be done through the BIOS or Boot Menu, whichever is convenient for you.
The boot manager appears, where you select one of the presented items - 64-bit system or 32-bit.

The WinToHDD utility window will appear with the name of the system image. Let's start a new installation and select the desired system from the list. Now click Next.
Next, we are asked to select or create the following partitions - boot and system. Here you must be a more experienced user and not mess anything up. If necessary, convert partitions to MBR or GPT.

If your BIOS is not UEFI, but the Legacy boot type, then you should convert the partitions to MBR and also format them to NTFS.
If you use BIOS UEFI, then convert the partition to GPT. All this is done on the command line.
Once you have specified the required partitions, you can click “Next” and wait for the system to install. You can experiment on a PC with this program if you found these instructions a little complicated, but we managed to create a multiboot flash drive.
Creating a multiboot flash drive using Easy2Boot
First you need to download several files; we will need them during our work:
RMPrepUSB– download from here: http://www.rmprepusb.com/documents/rmprepusb-beta-versions
Easy2Boot– download from here: http://www.easy2boot.com/download/
We launch the RMPrepUSB utility and look at the interface. Lots of functions and nothing is clear. It follows from this that the method will be a little complicated for novice users, but you should not give up this option. Don't forget to connect the flash drive.

Let's first look at those interface items that will be useful to us.
- We mark the option “Do not ask questions” - that is, no notifications with requests will appear;
- In the “Size” fields - enter MAX, “Volume Label” - enter any;
- In the boot sector, select the first option related to Windows;
- In the File system section, check the “NTFS” and “Boot as HDD” items. You can also choose FAT32, but the option is slower and only supports a maximum of 4 GB file sizes.
- In the fifth section you need to select the path to Easy2Boot. Attention! There is no need to unpack the archive; we leave it as is.
- Press the button "Prepare disk". You should have a drive inserted and displayed in the very top field; if there are several disks there, then make no mistake and select the desired flash drive.
- After completing the operation of preparing the flash drive (it was formatting), you need to click "Install Grub4Dos". If a warning window appears, select “NO”.
It is advisable not to close the utility, because it will be useful to us later. When we open the flash drive, we will see several folders there. There is an “ISO” folder, and in it there are supposed folders for operating systems and some utilities.

What do we do next? You need to take the necessary images and transfer them to the WINDOWS directory; you can also move anti-virus utilities, programs for creating backup copies, working with disks, and checking for RAM errors to the appropriate folders.
The images do not have to be placed only in the WINDOWS folder. You can drop them into the root or ISO folder. When loading from a flash drive, they will still be displayed.
Now that you have copied the necessary files to the drive, you need to return to the main RMPrepUSB window. Open the “Drive” tab and click on the option "Make All Files on Drive Contiguous", or press Ctrl+F2.


Create a multiboot flash drive using WinInstall4Grub4DOS
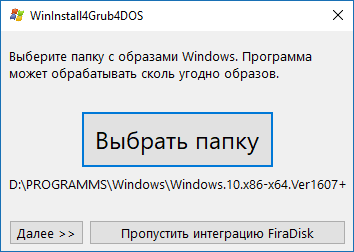
From this link you can download the WinInstall4Grub4DOS tool. Unzip it and run the file. A welcome window will appear, where we click on the “Next” button.

It’s very good if you have prepared the necessary images. You can select them by clicking on the “Select folder” button; the OS images must be located in some folder, the name must not have Russian letters.
Having specified the path to the system images, click “Next”.

After the next click on the “Next” button, you will see operations for copying, driver integration, and other things. The process can be lengthy and we are even offered to go have some tea, thanks for that.

To add data to system images, the FiraDisk script will run. In the window that appears, click OK.


Now let's see what's in the folder with all the images. Copies of them appeared there with the note “FiraDisk”.

Let's go to the WinInstall4Grub4DOS utility and select the “Save files” option. In Explorer, create an additional folder and name it, for example, “Utilities”, since this is where they will be written. You need to create it in the folder where the folder with the images is located.

If you are interested in what these utilities are, then click on the “Why are these files needed?” button.
Finally, we connect the flash drive to the PC, run HPUSBFW, located in the folder with the utilities, as administrator. A window will appear with a choice of flash drive, file system, preferably NTFS, and a checkbox for quick formatting. Start the formatting process. When finished, close the window.

In the utilities folder we find the archive with the GRUB4DOS_GUI tool. Let's run this file.
Move the checkbox to the “Disk” position and select the flash drive next to it. If nothing happens, then run the utility with elevated privileges. Click “Install”.

A command line will open, press the “Enter” button.

In the utilities folder, copy the MENU.LST and GRLDR files to the USB flash drive. If they are not there, then download them from the Internet, they are easy to find. Here's the link so you don't have to search.
Let's create a folder on the flash drive with some name and move the images there with the FiraDisk annotation. We haven't been able to create a multiboot flash drive yet because there are a couple of steps that need to be completed. Let's go!

Using the Wincontig program
One more thing. It is necessary to defragment the copied images. This can be done using WinContig, located in the utilities folder. Launch it and select images using the “Add files” button.

Click on the “Action” section and select “Defragmentation”. We are waiting for the process to finish.
The status should not be fragmented, this means something is wrong with the files, or you need to take a larger flash drive.

In the WinInstall4Grud4DOS window, click “Next”, so we will find ourselves in the section where we will do something.

In the “Menu generator for Grub4DOS” field, you need to specify the path to the disk where you have Windows images. Detailed instructions are written in the file, which is opened by clicking the “What to do?” button.
After that, click “Make”.

After waiting a little, we will see the code that needs to be copied, for which there is a corresponding button.

Open the file menu.lst and copy this code there. Let's save. You should do this for each image.

We have created a multi-boot media with multiple operating systems. This process turned out to be long and hardly anyone will use it, but it will do for general development.
When booting from a flash drive, the GRUB4DOS bootloader will appear, with a black background and a list of operating systems. You can work on the design of the bootloader using ZXBFM__2.1b, but this is optional.

RESULTS
So, friends. I have created such a voluminous article for you. Now you know how to create a multiboot flash drive that has not only operating systems, but also various kinds of utilities. Some methods turned out to be simple, while others were complex or took a long time to implement. In any case, they are all effective if done correctly. Beginners may have problems, as there are a lot of pitfalls here. If you have a problem, be sure to write in the comments, I will try to help.
Previously, new computer programs or applications came on CDs. But recently, most computers are not equipped with drives for reading them. More popular is installing software via the Internet. But what should you do if the operating system fails or you need to reinstall a new version of it on another computer? In this case, a flash drive will help, on which the utility for automatically loading the operating system will be installed. It is possible to make a bootable USB flash drive yourself.
Why do you need a bootable USB flash drive with utilities?
For a computer to function properly, it is not enough to install an operating system on it. For correct operation of all functional units in it, correct display of information, playback of audio and video content, drivers or codecs will be required. There are universal collections of codecs for each operating system that work on computers of different configurations, power, types of processors, video cards, input/output devices, and peripheral equipment. When installing an OS from a bootable USB flash drive, you must install all these utilities.
Creating a multiboot flash drive
The solution to the problem is possible by using a flash memory device that is connected to a USB port. To install Windows and all the necessary utilities for its correct operation, you will need a 16 gigabyte (GB) flash drive. To create a multiboot flash drive for Windows XP/Windows XPE/Vista/7/Windows 7PE/8/10, a flash memory capacity of up to 32 GB is useful. A Windows 10 multiboot flash drive is created using specialized programs: Acronis Disk Director & True Image, RMPrepUSB, Bootice, WinSetupFromUSB, XBoot, FiraDisk_integrator.
What you will need
To create a recovery flash drive, you need a copy (or image) of the OS installation disk. To create it you will need the UltraISO program, administrator rights and a disk with the original OS. After downloading, installing and launching, you need to select the location of the image. The UltraISO Wizard will create an ISO image with the OS. Next, select “Burn hard disk image” and create a bootable flash drive. This multiboot flash drive will need to be filled with the necessary service programs, and a standard set of them will need to be downloaded - antiviruses, codecs, backup tools.
Program for creating a multiboot flash drive
It is difficult to create a separate MultiBoot USB Flash for each operating system. It is possible in Windows 8 to create a multiboot flash drive from the command line, but this can cause errors. Therefore, several utilities have been created that automate these actions, which have the ability to additionally integrate several operating systems, add antivirus programs to the installer, the programs you need, and batch install the entire set on a multiboot flash drive. Among them the most interesting are:
- RMPrepUSB is a universal multi-booter for flash drives, launching them in MS-DOS, FreeDOS, WinPE 1, 2 or 3, BartPE, XP, Win 7, Win 8.x, Win 10, Linux. Works with different file systems - FAT16, FAT32, NFTS. Facilitates checking flash memory, formatting hard and flash drives, creating backup images of a bootable flash drive, and has many auxiliary functions in interactive mode.
- Bootice is a useful program for reinstalling the OS on computers without an optical drive; it has the functions of formatting and splitting the amount of flash memory into several partitions, changing the way the system boots, and you can rename the bootloader.
- WinSetupFromUSB is a free software product for creating bootable Flash USB for Windows and Linux systems with a simple graphical interface. It has the functions of formatting and marking flash memory, copying installation files from distributions, and final testing of the created bootloader.
- XBoot is a free program for transferring images of operating systems, codecs, and programs to a flash drive. Its advantages are the ability to create a boot disk simultaneously for Windows and Linux OS, and choose the type of boot loader ISO Emulation or Grub4DOS. The downside is the menu is in English.
- YUMI – Multiboot USB Creator – a small utility for creating a bootable USB flash, has a simple English interface with descriptions of distributions and recommendations for different computer configurations, offers links for downloading antiviruses, codecs, and drivers.
- FiraDisk_integrator is a multifunctional boot loader, has the ability to integrate all versions of Windows of different assemblies, there is a choice of localization of installed software according to the interface language, simple creation of an image from all distribution sources loaded into the SSD folder.
How to make a flash drive multiboot with MultiBoot USB - step-by-step instructions
When installing a multiboot program, some antiviruses may block this action. It is worth disabling them temporarily or adding this program to exceptions. To create an emergency flash drive, you must complete the following steps:
- Formatting a USB drive for the bootloader format.
- Installing the bootloader.
- Adding operating system images (files with the .iso extension).
- Copying files.
- Testing the resulting tool.
Formatting a USB drive
Preparing a multiboot flash drive to turn it into a bootable tool starts with formatting it. Move all the information you need from its memory to other media - formatting will completely clear it. To format, you need to do the following:
- Launch HP USB Disk Storage Format Tool.
- Select your drive from the list.
- Specify File system – NTFS if files larger than 4 GB will be installed. FAT32 markup must be left if you intend to work with computers based on BIOS UEFI.
- In Format Options, you should check Quick Format - quick formatting.
- Click Start.
Installing the bootloader
Above are several options for utilities that will download all OS distributions and service files. To use them you need:
- Copy the installation module of your chosen bootloader to a formatted USB drive.
- Then run this installer.
- Choose a name for your flash drive.
- Click Install.
After successful installation of the program, a message will appear on the screen confirming the installation of the boot utility on the computer. A message will be displayed on the screen asking you to start it. If up to this point you have created a database with all the necessary distributions and programs on your hard drive, you can check the Start program box and click the Finish button.
Adding operating system images
To add images of different operating systems to a multiboot flash drive, you need to prepare them in the root folder on your computer’s hard drive. This will be several files with an iso extension. Using a bootloader like WinSetupFromUSB, you can make a multiboot flash drive for Windows XP, 7, 8, 10 and Linux. To do this you need:
- Select the name of the flash drive from the list.
- Check the boxes next to the required operating systems in the list, for example – Windows 2000/Xp/2003 Setup.
- Specify the location of the mounted images.
- Click Go.
Copying utilities and files
After transferring operating system images, you should copy the installation files of all the utilities and programs from our list necessary for the system to work on a flash drive. To do this, in the WinSetupFromUSB program:
- Uncheck the Auto format it with FBinst checkbox.
- Select the item Linux ISO/Other Grub4dos compatible ISO by clicking the button on the right.
- In Explorer we find the folder with program images, select all the programs in turn and click “Open”.
- We make sure that they are named correctly in the Boot menu name.
- Click Go and see the process of adding the selected utility to the bootable flash drive.
To create a recovery-reanimation multiboot flash drive, the following basic utilities can be included in the installation package, which can always be changed, removed or replaced with new versions:
- Windows distributions versions 8.1, 10 and XP;
- Paragon Hard Disk Manager – disk space allocation manager ;
- AOMEI Backupper Standard – free backup;
- K-Lite Codec Pack – universal codec package;
- Kaspersky Rescue 10 – Kaspersky antivirus;
- DrWeb LiveCD – Doctor Web antivirus;
- 7-Zip – archiver of files and folders;
- Recuva – file recovery utility;
- RegeditPE – registry editing utility;
- Symantec Ghost v11.0 – for archiving and restoring personal computer data;
- Elcomsoft System Recovery Pro v3.0 Build 466 – the purpose of the utility is to restore user access to Windows accounts and Microsoft applications;
- Universal Boot Disk v3.7 – servicing NTFS drives in MS-DOS;
- NT Password & Registry Editor – change the password and the ability to edit the Windows XP registry;
- Active@ Boot Disk Professional v2.1 – will help you recover and edit deleted files;
- QuickTech Pro v5.8 – setup, diagnostics of the computer and its components;
- MemTest86+ v4.20 – testing RAM;
- MHDD v4.6 – checking hard drives;
- Victoria v3.52 – IDE and Serial HDD maintenance;
- HDD Regenerator v2011 – eliminating physical damage to hard drives;
- Reanimator – fast liveCD for data recovery and work environment repair;
- Alkid LiveUSB – universal system recovery utility;
- Acronis Disk Director & True Image – check hard drives;
- Elcomsoft System Recovery – viewing, changing, deleting passwords for accounts in Windows OS of all editions;
- Daemon Tools is a popular virtual CD-ROM;
- DOS-Navigator – console file manager for OS/2 and DOS;
- Alcohol 120% is a program for copying and virtualizing disks.
Testing
After creating a multiboot flash drive, you need to check its functionality. To do this, you can use the Test in QEMU utility in WinSetupFromUSB. To do this, do the following:
- check the box next to Test in QEMU;
- press GO;
- the program itself will check for the presence of all elements and finally display a list on the computer screen under the heading “Set of boot images and utilities for working with hard drive partitions”;
- Below is a list of all operating systems, programs and utilities;
- If some utilities are not installed, you must repeat the installation process.

Burning a bootable USB flash drive using the RMPrepUSB program
The first step is to run RMPrepUSB. Then you need to go to the dialog box, check in the top window whether the multiboot flash drive is defined. Then we do the following steps:
- Size – enter MAX.
- Volume label – the name of the flash drive in the OS.
- On the right, check “No questions asked.”
- In the “Boot sector” section, select WinPEv2/WinPEv3/Vista/Win7 bootable (CC4).
- File system and options – NTFS.
- To the right you need to select the option Boot as HDD (C: 2PTNS).
- Check the “Copy system files from the following folder...” checkbox.
- An explorer will open in “Browse”, in which you need to select the Easy2Boot archive and click OK.
- If you click “Prepare disk”, formatting of the flash drive starts, which must be prepared for this.
- Click “Install Grub4DOS”.
- We answer “No” to the MBR request.
- In the GRLDR ALREADY EXISTS window, press the OK button.
- After that, we manually transfer the boot programs to the USB flash drive into the MAIN MENU and UTILITIES Menu folders.
- To complete the creation, open the menu item Drive->Make All Files on Drive Contiguous.
- By launching the RMPrepUSB emulator and pressing the F11 key, you can check its functionality.
If you copied all your OS distributions to the MAINMENU folder on a flash drive, then they will be reflected directly in this menu. The UTILITIES Menu item will display service utilities and computer maintenance programs. This completes the process of creating a multiboot flash drive using this program. To select the OS and programs to install, you need to navigate through the menu and select the utilities needed for installation.
Multi-flash drive in Bootice - creation procedure
It is known that Bootice is a utility for creating a multiboot flash memory card. You can download Bootice from the official website of the developer. The utility must be unpacked, and after launching the program:
- In the Destination Disk item, select the flash drive that must first be prepared.
- You should click Process MBR (master boot record).
- Select GRUB4DOS 0.4.5c/0.4.6a (grldr.mbr).
- Click Install/Config.
- Click Save to disk to write all the information to the flash drive.
- For Linux systems, SUSLINUX 4.06/5.01 (FAT/FAT32/NTFS) should be installed.
- Click Install/Config.
- Select SYSLINUX 5.01.
- Click confirmation - OK.
- After completing these steps, the multiboot flash drive will be ready.
Creating a bootable USB flash drive with multiple operating systems in WinSetupFromUsb
After launching the WinSetupFromUSB utility, the SFX archive will be unpacked, the program will start and a menu will open, at the top of which we find our flash drive in the drop-down list. Your steps will be:
- Format the media – check Auto format it with FBinst, then – NTFS.
- Check the box for Linux ISO/Other Grub4dos compatible ISO.
- Press the GO button.
- The flash drive is being formatted.
- In the next step, we sequentially select items from the Add to USB disk list and press the GO button - the OS distribution kits are transferred to a multiboot flash drive.
To randomly select downloadable programs, select Linux ISO/Other Grub4dos compatible ISO and click on the button with the image of three dots on the right, an explorer opens in which we select the utilities and programs we need. Then we add all the ISO images in exactly the same way. The Test in QEMU item will help you check the recorded images. To control, we boot from this multiboot flash drive and check its boot menu.
Utility for creating a multiboot USB drive Xboot
The Xboot interface is simple - to create a multi-boot device for installing and restoring the OS, you need to do the following:
- To add images, you need to drag iso files into the program window. At the same time, in a green window with the question “How to perceive this image?” when adding Windows images, you must specify Add using Grub4dos ISO image Emulation.
- If you are installing a Unix system, then use Utility-Ubuntu.
- In addition to OS images, you can add utility images. The program has links, to access which click File->Download. Select utilities and download.
- After clicking Create ISO, the program will ask for the path to save the image file and offer to check it in the virtual machine.
FiraDisk_integrator script for resuscitation flash drive with multiple OS
To start creating a multiboot flash drive using the FiraDisk_integrator utility:
Video
Perhaps many people have their own collection of images with different versions of Windows. Some even store it on bootable DVDs, which become more and more numerous over time as the number of versions of Windows increases. And now a stack of boot disks is beginning to take up space on the shelves of your desk. But why not make one single flash drive from all these disks, which will contain installations of all the versions of Windows you need. Today I will show you how to do this.
There is one important note. The utility works with only one version of Windows in the image at a time. Therefore, if you have a dual ISO that includes both 32-bit and 64-bit versions of Windows, you will not be able to use it. Download single Windows images, for example from this source, and use them.
I will show how to use the utility to upload several installation images from Windows 7/8/10. You can upload other images in the same way.
Take an empty USB large enough to hold all the ISOs you want to install, plus leave a small amount of extra space. For example, a 16 GB flash drive can hold up to three versions of Windows and one Rescue Disk. If you have a 32 GB USB, then all versions of Windows can be placed on that USB size. And if you also want to add several images with recovery images and rescue disks, you will need a larger flash drive with at least 64 GB.
WinSetupFromUSB is a portable tool that does not need to be installed. After you have downloaded it, extract the archive to a new folder. If you are using a 64-bit version of Windows, then run the executable file with the suffix "64" in the name. If you are using a 32-bit version of Windows, run the file without "x64".
Unpacking WinSetupFromUSB-1-6
If the USB drive was already inserted when the utility was launched, its name will appear at the top of the window. If the USB has not been inserted, plug it in and press the button Refresh.
 Run WinSetupFromUSB 1.6
Then check the box Advanced options. At the same time, we will open an additional window in which check the box.
 Installing additional options
This option allows you to use custom names for the folders in which Windows ISO images are stored, and custom names in the boot menu that you see when you start your computer from a USB drive. Window Advanced options do not close, otherwise the changes will not be saved.
Now comes the difficult part of the instructions. You need to add all versions of Windows one at a time. When adding an image for the first time, make sure that the Auto format it with FBinst installed. This allows WinSetupFromUSB to format the drive appropriately, suitable for booting all systems. If you know for sure that you will be installing from USB on a computer with UEFI mode, select the option FAT32. Otherwise, you can use the option NTFS.
 Auto format it with FBinst
Then select the first Windows ISO image. Check the box next to Windows Vista / 7 / 8 / 10 /Server 2008/2012 based ISO and then click the browse button ... right. Find in Explorer and open the ISO image you want to add.
 Selecting an image with Windows 7
However, if you select a large enough ISO and you are using the FAT32 file system, you may receive a notification that the ISO file is too large and will be split into two parts. It's okay, so press the button OK.

Double check that you have the correct USB selected at the top of the window, and that the correct ISO image is selected. Then click the button GO.
If you are using a large USB drive, you may receive a warning asking if you are sure you want to use this particular drive. Press the button Yes.
If the Auto format it with FBinst option was enabled (It should be enabled since we are uploading the first image), you will receive a warning that all data on the disk will be erased. Click the button Yes to continue.

WinSetupFromUSB will begin formatting the USB, and after a while will show a pop-up window asking you to enter a custom folder name for the ISO, with a limit of 1 to 7 characters. If you do not enter anything within 30 seconds, the folder name will be given by default.

Next, a similar window will open in which you need to set a custom string to display in the boot menu. This time, the name can be from 5 to 35 characters. Again, you have 30 seconds to start entering a name, otherwise the system will set it as default.

WinSetupFromUSB will then begin creating folders, adding ISOs to the USB drive, and configuring boot menu options. This may take a few minutes. The progress of work can be assessed in the status bar of the window.
 Work progress
After the process of preparing the USB drive is completed, WinSetupFromUSB will display a message about the work being completed. Click the button OK.

At this point, the process of recording the first Windows image can be considered complete. Next, without leaving the program, we continue adding the following ISOs to the bootable USB. The adding process is no different from the original one described above, with the exception of some points:
- When adding the following ISOs to an existing boot drive, make sure the Auto format it with FBinst not installed. Otherwise, you will have to repeat all the steps from the beginning for the first image.
- Every next time you add images you need to check the box Advanced options to enable the option Custom menu names for Vista/7/8/10/Server Source. Otherwise, all items in the boot menu will look the same.
But this is where I end this instruction. The principle of adding images containing rescue and recovery disks is completely similar. Follow the same steps every time you add a new ISO to your bootable USB drive. You can return to the utility at any time and add something new to the same flash drive. The resulting boot menu does not stand out with its virtuosic design, but has a classic black and white appearance:
 The resulting boot menu
To have access to files on the disk when the system does not start, it is better to take care in advance of a universal bootable media with various useful programs. CHIP will tell you how to make a “rescue flash drive.”
Sometimes unexpected problems with your computer ruin all your plans and prevent you from completing urgent tasks. The hassle of reinstalling the operating system, drivers, programs and data recovery can take many hours, not to mention the fact that it requires the appropriate knowledge and experience. Another possible danger is virus infection, which will require system disinfection and, probably, data recovery. In most of these cases, a pre-prepared bootable flash drive could help, containing a set of useful utilities and even an operating system, with which you could both work with familiar and favorite applications and easily restore the functionality of your PC.An equally important component is the autonomy and ease of use of such a medium. For example, if you urgently need to process information when you are visiting or on a business trip, then the guest PC may simply not have the necessary or familiar applications. And with our “rescuer”, if you are sure that you will have access to the guest PC, then you won’t have to take your laptop on the road, which is very important, for example, on trips abroad with air travel. To some extent, this also increases the security of working with personal data and websites. Of course, to save information and access the Internet, you can also use Live CDs created using popular utilities such as Dr.Web LiveCD and LiveUSB, Kaspersky Rescue Disc, or bootable media with Acronis products, memtest86, etc. However, these tools have a narrow focus. CHIP will tell you how to create a universal emergency flash drive to restore the operation of a personal computer and lost data, carry out preventive and test work, suitable for use on someone else’s PC.
We create flash drives with Windows OS
Today, the most common operating system is Windows 7, and we will create media with this OS.
Almost any flash drive, memory card or portable hard drive can be used as a storage device. The main requirements here are speed and capacity, which should be sufficient to install the OS and store useful programs and data. Flash media is convenient because it is light and compact and is not afraid of shocks and shaking. However, if you plan to work with it constantly, then it is worth remembering that its read/write resource is limited and at some point it will be better to replace it with a new one. To get an acceptable speed, it is desirable that the flash drive supports the USB 3.0 standard. For large amounts of data, it is better to use a portable HDD, but do not forget that it is sensitive to shock. To create a bootable flash drive, you will need a drive with a capacity of at least 8 GB, a Windows 7 installation (licensed) disk (or its image) and the free PWBoot program.
How to do it
1. Insert the drive on which you want to install the OS into your PC. Remember that all data previously recorded on it will be destroyed during the installation process. Open the Windows 7 installation disk or extract its image - for example, using the 7-Zip archiver - and extract the install.wim file from the sources folder to any directory.
3. Specify the location of the Install.wim file. In the drop-down list, specify the OS version that will be installed on the disk. PWBoot does not display the Cyrillic alphabet correctly, so the list of versions will most likely be unreadable. The order of OS versions in the list from top to bottom goes from the youngest to the oldest: Starter, Home, Home Premium, Professional, Ultimate, Enterprise. Having selected the desired version, check the “Enable boot from USB interface capability” checkbox and click the “Next” button.
5. In the “System boot volume” drop-down list, select the drive on which you plan to install Windows and tick all the checkboxes. After completing all the manipulations, click on the “Next” button. After this, PWBoot will automatically format the drive, install the OS on it and make it bootable. This process can take up to two hours, depending on the writing speed of the USB drive. After completing the installation, run the system for the first time and configure basic settings. To speed things up, disable decorative graphic enhancements. You can do this from the Start | Control Panel | System and Security | System | Advanced system settings" on the "Advanced | Parameters". Once you boot from such a drive, you will be able to freely use Windows and install programs as if you were working in normal mode.
 |
Booting from removable media
In order for your PC to start from a CD, DVD, flash drive or external USB drive when rebooted or turned on, you need to change the BIOS settings.
The vast majority of modern motherboards provide the ability to boot from a USB flash drive, but on older models you can sometimes only enable boot from optical drives. The problem in some cases is solved by installing the latest BIOS version, but for older motherboards such updates may not be released.
When you turn on your PC, enter the BIOS by pressing the “Del” or “F2” key. Next, you need to find the corresponding menu items, indicating the boot order and devices used for this. Depending on the manufacturer and BIOS version, this can be done in the “Boot” or “Advanced BIOS features” sections. In addition, modern motherboards allow you to specify the device from which the system will boot without reconfiguring the BIOS. To do this, when starting the PC, you need to call the “boot menu”. As a rule, this can be done using the “F12” key.
Portable programs
If you have full access to guest software, but you want to work with familiar applications and save the results on a flash drive without leaving traces, it makes sense to simply prepare a set of portable versions of the necessary programs and write them to removable media. Portable editions of utilities can work without integration into the system, without leaving traces on someone else's PC and without changing its settings. Many different options can be found at portableapps.com. A convenient solution is the PortableApps.com Platform application, which allows you to download and update a set of portable programs from the resource of the same name.
The application also simplifies the work when launched from a flash drive on someone else's PC. Its menu is similar to the Start menu in Windows and allows you to comfortably work with portable utilities. For those who have not yet decided on a portable set of programs, we have prepared a list of the most commonly used ones.
|
Thunderbird Portable |
Mail client |
|
Dr.Web CureIt, Kaspersky Virus Removal Tool, McAfee Stinger portable |
Antiviruses |
|
Recovering Deleted Data |
|
|
Secure Data Deletion Tool |
|
|
Notepad++, Portable AbiWord, Libre Office Portable |
Text editors |
|
AIMP (you can select the portable version during installation) |
Audio player |
|
VLC Media Player Portable |
Video player |
|
CDBurnerXP (portable version) |
Burning discs, creating images |
|
Graphic editor |
|
|
SIW, System Spec |
PC testing, component reports |
|
Archiver |
|
|
Portable KeepPass |
Manager of passwords and other authentication data |
|
TrueCrypt (you can select the portable version during installation) |
Encrypt disks, files and folders |
|
Google Chrome Portable, Opera Portable Edition, Mozilla Firefox Portable Edition |
Browsers |
|
Messenger, IP telephony |
PortableApps.com Platform provides quick access to any of the applications located on a flash drive, as well as their additional installation.
The PortableApps.com Platform application allows you to install dozens of ready-made portable programs onto a flash drive.
 |
The SIW portable application will provide information about the system, hardware, network environment and offer a series of tests.
Creating a simple installation flash drive
Many manufacturers have already stopped equipping their computers, such as netbooks and ultrabooks, with optical drives.
If there is no disk drive, you can reinstall the system only by booting from the installation flash drive. To create such media, the easiest way is to use a special utility - for example, YUMI. You will also need an ISO image of the bootable Windows installation disk or other operating system that you want to run from the flash drive.
You can create such an image from a finished DVD using the CDBurnerXP program. Just launch the application and select “Copy disc” in the main menu. In this case, specify the disk inserted into the drive as the source, and the folder on the hard drive into which the ISO image should be saved as the destination. Click on the "Copy Disc" button. Using the same program, you can burn previously saved images to optical discs. Having received the image, you can proceed to transfer it to a flash drive or memory card. Insert the drive into the USB port. If it contains the necessary files, copy them to another medium.
How to do it
1. Launch the YUMI program and in the drop-down list of the “Step 1” field, specify the location of the flash drive.
3. Specify the location of your existing ISO image in the “Step 3” field using the “Browse” button. Click the "Create" button and wait for the boot drive creation process to complete. After that, perform a test run from it, remembering to change the BIOS settings.
 |
Using Slax Linux
In cases where you do not have a licensed copy of Windows OS (ISO or bootable DVD) at hand, we recommend using free Linux-based software. After downloading the archive, you need to place the slax folder on the drive, go to the slax\boot folder and run the bootinst.bat file. Now the created flash drive can be used to boot and work in Slax Linux. In addition to the system itself, you will probably need additional tools. They can be downloaded from the “Modules” section (slax.org/ru/modules.php). The developers offer a very wide range of different programs and add-ons, including games, graphic and text editors and other useful utilities. You can simply copy the downloaded applications to a flash drive in the slax\modules folder.


