Several options on how to disable the digital signature. Driver digital signature as a means of improving system security
Many of the drivers that have ever been released are digitally signed. This serves as a kind of confirmation that the software does not contain malicious files and is absolutely safe for you to use. Despite all the good intentions of this procedure, sometimes signature verification can cause some inconvenience. The fact is that not all drivers have the appropriate signature. And the operating system will simply refuse to install software without an appropriate signature. In such cases, it is necessary to disable the mentioned check. It is about how to disable mandatory driver signature verification that we will tell in our today's lesson.
While installing the driver for the device you need, you may see a Windows Security message on your screen. 
Despite the fact that you can select the item in the window that appears "Install this driver anyway", the software will not be installed correctly. Therefore, simply selecting this item in the message will not solve the problem. Such a device will be marked with an exclamation point in "Device Manager" indicating a problem with the equipment. 
As a rule, error 52 will appear in the description of such a device. 
In addition, during the installation of software without an appropriate signature, a notification may appear in the tray. If you see something like the one shown in the screenshot below, it means that you may have encountered a driver signature verification problem. 
How to disable software signature verification
There are two main types of disabling checks - permanent (permanent) and temporary. We bring to your attention several different ways that will allow you to disable the check and install any drivers on your computer or laptop.
Method 1: DSEO
In order not to delve into the system settings, there is a special program that assigns an identifier for the desired driver. Driver Signature Enforcement Overrider allows you to change digital signatures in any software and drivers.

This method is a temporary solution to the problem. It will allow you to disable the check only until the next reboot of the computer or laptop. However, it can be quite useful in some situations. We will divide this method into two parts, since depending on the installed version of the OS, your actions will be slightly different.
For owners of Windows 7 and below

Owners of Windows 8 and above
Despite the fact that the problem of verifying a digital signature is mainly faced by owners of Windows 7, similar difficulties occur when using subsequent versions of the OS. These steps must be performed after logging in.

This method has one drawback, which manifests itself in some cases. It lies in the fact that after the next inclusion of verification, previously installed drivers without a proper signature may stop working, which will lead to certain difficulties. If you have such a situation, you should use the following method, which allows you to disable the check for good.
Method 3: Configuring Group Policy
Using this method, you can disable mandatory verification completely or until you turn it back on yourself. One of the advantages of this method is that it is applicable to absolutely any operating system. Here is what you need to do for this:

Method 4: "Command Prompt" Windows

Using one of the above methods, you can easily get rid of the problems associated with installing software without a digital signature. Do not think that disabling the scan function will lead to the appearance of any system vulnerabilities. These actions are completely safe and will not infect your computer with malware on their own. However, we recommend that you always use an antivirus in order to protect yourself completely from any problems when surfing the Internet. For example, you can use a free solution.
Sometimes it is vital for us to install an unsigned device driver - for example, our favorite printer or scanner. But we cannot do this, because the operating system on the computer is too smart and does not allow us to do such a stupid thing as installing ancient “firewood” from an unknown source. Is there really no way to defeat a too smart OS? Nothing like this! There are at least two ways to do this.
Disable driver signature verification in UEFI
To begin with, it should be noted that this guide will only work if your computer is using UEFI and not an earlier BIOS. UEFI is usually installed if you purchased your PC with Windows 8 or 10, or if the PC itself was released after 2012.
So, start UEFI first. To do this is quite simple. Having entered the operating system, you need to click on the notification icon and select "All settings". After that, in the settings, open the item "Update and security"> "Recovery".
If UEFI opened in a blue design, select Troubleshoot. In the "Advanced Options" section, you will find "Download Options". This button will display all available launch options.
 Under "Advanced Options" you will find "Download Options"
 Use the key to select the option "Disable Driver Signature Enforcement". After that, you can install the unsigned driver.
Disable Driver Signature Verification from OS
For those who are afraid to go into the motherboard settings, there is another way to disable driver signature verification from the system itself. To do this, simultaneously press the keys and [X] - a small menu will open in the lower right corner of the screen.
Select the "Run (administrator)" option and confirm the request by clicking "Yes".
In a new command prompt window, enter the command "BCDEDIT -Set LoadOptions DDISABLE_INTEGRITY_CHECKS" without quotes and confirm with .
Then enter the command "BCDEDIT -SET TESTSIGNING ON" and confirm again with .
 In a new command prompt window, enter the command "BCDEDIT -Set LoadOptions DDISABLE_INTEGRITY_CHECKS" without quotes and confirm with Now you can install unsigned drivers under Windows 10. However, it should be noted that if the instructions do not work, add two slashes to the "-", or two slashes, -"/".
Disabling this option is possible through the command “BCDEDIT –Set LoadOptions EENABLE_INTEGRITY_CHECKS” > “BCDEDIT –Set TESTSIGNING OFF”.
The absence of a signature indicates that the driver package has been changed or is simply not ready for release and has problems if it refers to the official driver. Now we will tell you why you need a driver digital signature in Windows 7 and how to disable it.
What is a driver digital signature
Driver signature - correspondence of the digital signature (signature) with the corresponding driver package. The system verifies the signature to ensure that the data matches the declared signature and does not pose a threat to the computer. But there are often situations when signature verification is a big hindrance. For example, flashing some Android phones requires the installation of software and a special driver that is not digitally signed.
The signature itself is necessary for the protection and security of your computer as well as your information. We remind you that installing unknown drivers without a corresponding digital signature is dangerous!
In Windows 7, there are several ways to disable driver signature verification. Starting from system boot options, ending with special applications. Next, we will consider each of these options in more detail, as part of detailed instructions with examples and images.
Disabling Driver Verification via Boot Options
Using this option, you can disable signature verification only until the device is rebooted. After a shutdown and reboot, an unsigned driver will not work. So, in order to disable digital signature verification through the advanced boot options of Windows 7, you need to follow these steps:
- Turn off the PC (or restart it) and when turning it on, press the F8 key at intervals of 1 second;
- The system will boot to the "Advanced Boot Options" page;
- Select download option " Disabling Mandatory Driver Signature Verification » and press Enter;
- The system will boot with the necessary parameters;
This option is quite simple, but as mentioned above, this will disable the check only until the next PC restart. Using the following options, signature verification will be disabled until you enable it yourself.
Disabling Driver Verification via Command Line
The command line opens up great opportunities for changing Windows 7 settings, the main thing is to know which commands to use. This method is quite simple, but you must follow the following instructions exactly:
- Click on the "Start" button, enter "" or "cmd" in the search and run the application as Administrator;

- Enter the following commands in turn:
- bcdedit.exe -set loadoptions DDISABLE_INTEGRITY_CHECKS
- bcdedit.exe -set TESTSIGNING ON

- Restart your computer;
At some point, you will need to enable driver verification back, for this, run the commands:
- bcdedit.exe -set loadoptions ENABLE_INTEGRITY_CHECKS
- bcdedit.exe -set TESTSIGNING OFF

Alternative way. You can also use the Windows registry to set the desired settings, enter the following command at the command prompt as Administrator:
- reg add "HKCU\Software\Policies\Microsoft\Windows NT\Driver Signing" /v BehaviorOnFailedVerify /t reg_dword /d 00000000 /f
Disabling validation through the Group Policy Editor
You can use another alternative, through the Group Policy Editor. It is worth noting that the editor is only available for versions Windows 7 Pro and Ultimate(Maximum). If your version of the system is Home or Starter, the previous options may help you.
In order to disable driver signature verification using this method, you need to do the following:
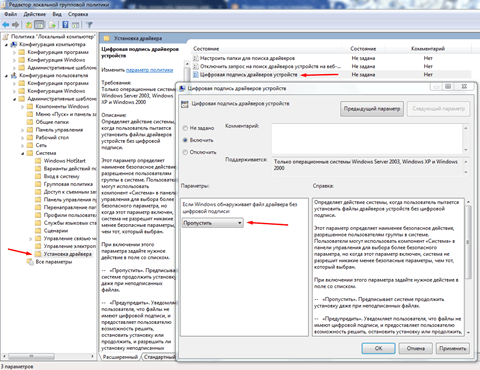
- Press the combination Win + R and enter gpedit.msc;
- Follow the following path "User Configuration" - "Administrative Templates" - "System" - "";
- Open "Digital Signature of Device Drivers" and set the value to "Enable" and set the value to "Skip";
- Restart your computer;
Bypass Verification with Driver Signature Enforcement Overrider
The Driver Signature Enforcement Overrider (DSEO) application is used to bypass Microsoft's security system that prevents unsigned drivers from being installed. Unfortunately, the application cannot forcibly sign the driver, but it is able to change the signature so that the system can consider it signed and correct. You can download the application on the page -.
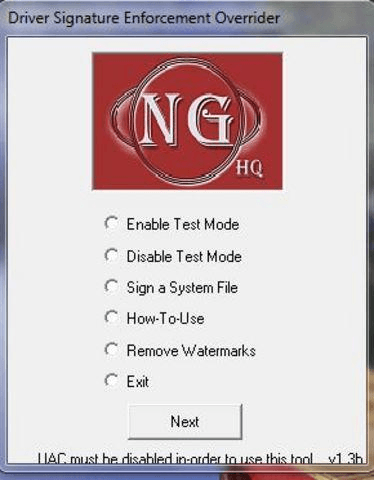
Bypass Driver Verification with Driver Signature Enforcement Overrider
For the application to work correctly, UAC must be disabled. To do this, open the Run window (press the key combination Win + R), enter the command "UserAccountControlSettings.exe" and set the slider to the minimum position and click OK.
How to use Driver Signature Enforcement Overrider:
- Once downloaded, run the dse013b.exe application;
- Accept the terms of the license agreement;
- Enable test mode by selecting "Enable Test Mode" and clicking Next;
- Then "sign" the driver by selecting it using the "Sign a system File" option;
- Restart your computer for the changes to take effect;
You can roll back all changes by disabling the test mode with the "Disable Test Mode" function.
All of these methods should help you solve the problem with checking the digital signature of drivers on Windows 7. But we want to reiterate that you should not install drivers if you are not completely sure that it is safe for your device.
Anyone who has been involved in installing any programs or drivers has come across a security message in which the user is offered two options: do not install or install at your own peril and risk. Today we will consider the question "How to disable digital signature verification in Windows 7".
Windows requires a digitally signed driver. Because it is trying to protect you, and reports that the computer may be harmed, since these programs are possibly malicious. A digital signature means that the software can be trusted because it has been verified and can be used.
Microsoft does not provide these checks for free. Therefore, most small programs do not use a certificate. You can determine which devices on your computer use unsigned drivers. To do this, first open the computer properties.
In the window that appears, click on [k]Device Manager.
As a result, you will see a list like this.
In the above screenshot, all devices have passed driver authentication. If Windows cannot verify the publisher of the software, an exclamation mark will appear next to the hardware in Device Manager.
In order to prevent such a security message from appearing, you need to:
- disable digital signature verification;
- subscribe.
Of course, the first option is much more effective, since you will get rid of such red notifications forever. But we will analyze both methods.
How to disable mandatory signature verification
There are several methods by which you can disable this security message:
- use of the console;
- group policy setting.
As you can see, there are plenty of options. Let's consider each of them in detail.
Console
You can do anything with the command line in Windows 7. To launch it, press the [k] Start button and enter the word [k] cmd there. Then press the Enter button.
As a result of the search, the desired application will appear at the top of the list.
Click on this line. The next window will open.
Enter the command below and press the Enter key on the keyboard.
bcdedit.exe /set nointegritychecks on
In the future, if you want to return the security settings, then enter exactly the same command, only at the end instead of [k]ON, you need to write [k]OFF.
You must restart your computer for the changes to take effect.
After that, you can install any programs.
If control is important to you, and working with the program without a signature will be short-term, then it is recommended to boot in a special mode. To do this, press the F8 button during Windows startup. As a result of this, you will see a large list of different download options.
Select the option highlighted in red and press Enter. In this case, any application will work. As soon as you boot into normal mode, the security will work in full force.
Group Policy
In any version of Windows 7, except for Home Edition, there is a special group policy editor. To launch it on the keyboard, press the key combination Win + R. The following window will appear.
Enter there:
The editor will launch. The folder tree is collapsed by default. You need to go to the driver installation item.
After you click on this item, you will have the following.
Press the right mouse button and select [k]Edit.
In the window that opens, select [k]Disable.
Of course, after that you need to restart your computer.
The methods described above will permanently disable checking for unsigned drivers. If you need to temporarily bypass the security system, you can manually sign the desired file without changing the settings of the entire operating system.
Using the Driver Signature Enforcement Overrider
After the release of the Windows Vista operating system, a new level of protection was added for x64 systems. Now you can use only the software that has been tested by Microsoft. Of course, verification is carried out for a fee. There are a huge number of examples that work on Windows x32 but won't run on x64.
- Download the program from the link. You must have administrator rights to use this utility. If you are sitting as a normal user, then log in as an administrator or anyone else who has such access. Next, go to the "Control Panel" and select the specified item there.
- Select [k] User Accounts.
- After that, at the very bottom, select the desired item.
- You will need to lower the slider all the way down.
- Press the [k]OK button and restart your computer.
- We launch the console in the same way as described at the very beginning of the article. Enter the following text there.
bcdedit /set loadoptions DDISABLE_ENTEGRITY_CHECKS

Owners of great PCs and laptops with the new ten are already faced with the fact that a Windows 10 digitally signed driver is required. Microsoft has greatly tightened the system in terms of protection - now you can’t deliver anything without a digital signature. Sometimes there is a need to disable the digital signature verification of Windows 10 drivers. We are not looking for easy ways. Most often, we need exactly the program or device that does not have any signs of a license. And how often do we download from the Internet what kind people have posted?
Attention! Remove protection carefully, as the Internet is a source of danger. You may inadvertently accept a download from the site, or it will be done covertly. Then your PC will be attacked by a virus. So changing the security settings can lead to disastrous consequences.
How to disable digital signature of drivers in windows 10
There are three ways. There are actually four, but the last one is not for everyone.
Option 1 - temporary shutdown
Valid until the first reboot. This means that as soon as you turn off the computer, all settings will be removed and the operating system will return to its original state. In principle, this is enough to install in the current session. But when you turn on the computer again, the system will be protected. So, we act according to the instructions:
- We press the button in the lower left corner of the screen and look for the gear icon. This is a call to the "Computer Settings" window.

- Next, we need to ensure that the OS is loaded not in the usual way, but in a special version. Windows gives you many control options. Now we need the item "Update and Security", which is responsible for protecting the system.
- We will find in the new window "Recovery".
- Here we will be offered, among other things, Special download options.
- See the Reload button? Click and you will see 9 ways to boot your OS.

- The list will appear at the beginning of the download. We need to select the "Troubleshooting" item from the proposed list. Here you can roll back the system to its original state if something went wrong.
- But now we need "Upload Options". It is in them that the option to turn off is located.
- You will see a long list of different options. Here and , and debugging - everything your heart desires to command your system. What we need is at number 7.

- The choice can be made using the keyboard - 7 or F7.
- And now the download begins in the correct mode for us - the prohibition of digital signatures.
When the computer boots up, digital signatures will no longer be checked. Of course, until the next shutdown.
Option 2 - permanent
You can also disable the mandatory verification of the digital signature of drivers in Windows 10 so that there are no checks at all until you roll back. This is very handy if you are constantly installing something. This method is simpler, although it does not look like it at first glance:
- First you need to find out what BIOS mode you have on your computer: WIN + X and then Control Panel> System and Security> Administrative Tools> System Information.

- If you have UEFI, disable the Secure Boot OS legitimacy check utility. It prohibits booting a system that has not confirmed its legitimacy. You need to go into the BIOS. Do a computer reload and on the first screen (it will be black) you will see which button allows you to enter the settings on your PC. Press it. In the Security tab, find the Secure Boot option and mark disabled in front of it. Save and exit.
- Do you remember what to do?

- Go to the system32 folder, where this program is located. See where you are first. If on the command line you have some path like C:\USERS\HOME, then you need to change the path:
- We type c: and press Enter. Moved to C drive.
- Now we type Cd . twice. This is the command to go up a level.
- We need to go to the Windows folder. We type Cd Windows.
- Then everything is simple: Cd system32
- There is a simpler option: open the system32 folder on drive C in the Windows folder. And in it find the cmd.exe file. This is the command line. Then you will immediately get the right path.
- Now we start editing the OS boot configuration. The Windows system folder contains the BCDEDIT.exe - Boot Configuration Data file. Disable digital signature verification by specifying the following parameters:
bcdedit.exe -set loadoptions DISABLE_INTEGRITY_CHECKS\
- Then press ENTER and charge the test boot mode.
bcdedit.exe -set TESTSIGNING ON

After the reboot, you will see a warning. It will hang in front of your eyes, reminding you that the protection is not working. Windows 10 driver digital signature verification will be permanently disabled.
How else can you allow windows 10 to install unsigned drivers through the command line:
- Go into safe mode. To do this, again go to the special download and press 4 (see screenshot 3).
- Now type: exe /set nointegritychecks on. Pay attention - the space should be after the file name and it should not be between the slash and the command! And do not forget that the command line is loaded as an administrator, otherwise you may not have enough rights to execute the code.
- And reboot again.
You should now be able to install an unsigned driver in Windows 10.
Option 4 - Another way to boot without verifying the digital signature of Windows 10 drivers
True, the HOME (home) version does not support it, only PRO.
- Press WIN+R and type gpedit.msc in the Run window. The Local Group Policy Editor window opens. Here you can manage your system and users.
- Sequentially select "User Configuration", then "Administrative Templates", "System", "Driver Installation".
- Double click on the "Digital Sign Device Drivers" option.

- Set to "Disabled" or in the "If Windows detects a driver file without a digital signature" section, select "Ignore".

- Reboot.
Now you can use any device, even if it has a driver without a windows 10 digital signature. For example, a tuner. And if you have any problems with the image, then on our website you can read how .
If you are interested in how you can save computer resources, we suggest reading about.
How to enable the digital signature of drivers back?
Use the command:
bcdedit.exe -set TESTSIGNING OFF
You will exit test mode. Then we turn on the check with the command
bcdedit.exe /set loadoptions ENABLE_INTEGRITY_CHECKS