Gmail mail login to your page. Gmail – email with the ability to collect mail from other servers into the gmail com mailbox
If when you try to log into Gmail (whether from a computer or mobile device) you have problems or see the message “Add Gmail to your Google account” and “Name is already taken. Try something else,” this article should help you solve this problem.
The reasons that you cannot log into your email from Google may be different, and therefore I will give several possible solutions, and I hope to help all those who are here and reading these instructions.
Logging into Gmail.com - first steps
After this, the very first thing you should try is to clear all the history (cookies) of your browser. From the reviews of several users on the Internet, this is what helped them.
If it worked, great, if not, read on:
- Click on the following link: Sign in to Gmail
- A Gmail login form will appear, where one of your addresses will already be entered. And below there will be a link “Login to another account” or "Sing in with a different account"(if yours is in English) - click on it.
- After this, all your addresses will be displayed, including the one you need. Select an address, enter a password and log in to your mailbox. If an empty login form appears instead of addresses, enter the required address, password and log in.
This option is also possible if, when you try to log into your mail, a window appears Add Gmail to your Google Account and the message “This name is already taken. Try something else."
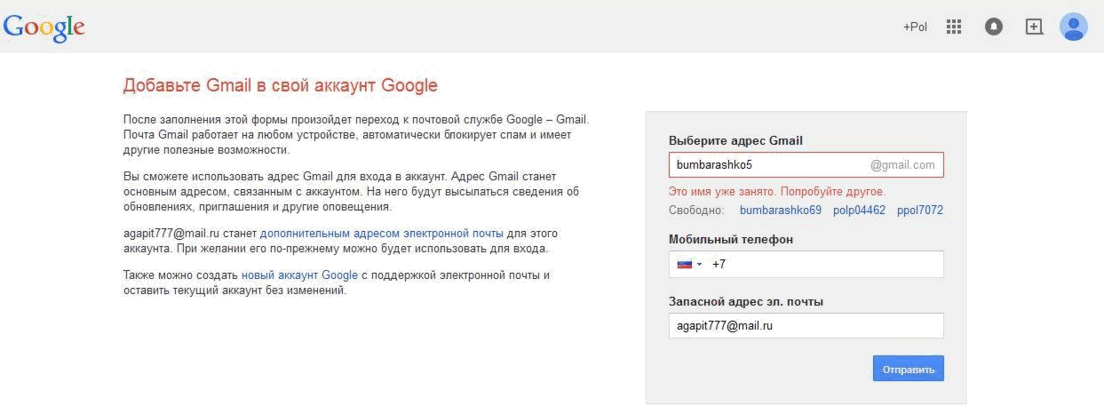
On the same page, where you get the answer “Name is already taken,” there is a circle with a person in the upper right corner (or with your avatar). Click on it and select Add an account. Next, enter your address, password and click Login.

Account information
I think it would be a good idea to once again make sure that you enter all the data necessary to log into your mail correctly. Passwords are very case sensitive, so make sure you don't have the Caps Lock key enabled. Also check that the username is correct i.e. email address, which is written down to @gmail.com.
Let me know in the comments how it turned out for you.
The Google search engine is very popular and every day a large number of users are interested in logging into Gmail.com and registering a mailbox. Many services are integrated into the mail options. It is a convenient, reliable and secure email service.
By creating your own account in Gmail, integration into the social network Google+, YouTube, Play Market (Android applications), Disk (10 GB of storage space for personal information), Documents, etc. automatically occurs. After registering and logging into your email, data synchronization occurs.
- enter your email name and password;

- The email login link will appear at the top of the Google page.

- You can also log in to Gmail from the Google search engine page, using the button on the right “ Login".

If you were unable to log in due to an incorrect password, you need to check the layout language, uppercase or caps mode ( CapsLock), whether the optional keyboard is enabled ( NumLock). If all else fails, click the " Need help" and follow the instructions to recover your password (more details below in the article).
Registration in Gmail.com mail
If you have not yet registered with Gmail, you should first go to the Google search engine. After this:

- a page for entering the data required for registration will open;

- fill out all the lines, enter the verification number from the picture and click " Next";

Automatic login to Gmail.com
On the Gmail login page (registration must already be completed), select the “ Stay logged in". After launching the browser by clicking the " Login" The mailbox opens. Now the gmail will open automatically. 
Notifications about letters without logging into Gmail mail
For more convenient work with mail, special applications have been created that are integrated into the Google Chrome browser (download) and will automatically notify you of sent correspondence, without logging into the mail page. Such add-ons include Checker Plus for Gmail. After installing it, a mail icon and a notification about sent letters will be displayed on the right side of the browser (Google Chrome) (more detailed information after clicking on it). 
Also, this add-on simplifies working simultaneously with several personal mailboxes, has voice notification and control, makes it possible to use mail even when the browser is closed, etc.
Login to Gmail.com without password - password recovery
This service is very attentive to the difficulties of users and all steps to restore mail have already been carefully worked out. The technical service has developed a clarification method that can be used to determine the real owner with a high probability. This instruction will cover the most difficult method - without access to a mobile phone number and without having an attached second mailbox:
- On the email password entry page, you need to click the link “ Need help";

- A page will open with a selection of possible problems, where you need to select “ I don't remember the password" and indicate your email address (if it does not appear automatically). After that, press the button " Continue";

- on the next page you need to specify the password in the form in which it was remembered and select “ Continue" or " I find it difficult to answer”;

- You will be prompted to use a phone number. Because In this manual, the method without access to a phone number is considered, then the item “ I can't use the phone";
If the mobile is available, the " Continue", The SMS code is entered and a new password is set. This concludes the restoration of access for those who have a phone number linked to their account at hand.

- the dates of the last login to gmail.com and registration are entered;

- the next step is to answer the secret question entered during registration. Here you can enter the correct answer and select " Continue" or click on the button " Skip this question" if the question itself is forgotten;

- all subsequent steps are aimed at proving your belonging to this box. Each omission of a question will only prolong the procedure for restoring gmail mail (gmail.com). Upon completion, the system will process all these responses and provide access to the mailbox.
In the future, it is better to play it safe from such cases and write down the data in a safe place. It wouldn't hurt to attach a valid phone number or a second mailbox to your email. You can do this in your account profile settings.
History of mailbox creation
Google's first email account was launched in 2004. After three years spent on its creation, the news published a revolutionary announcement. The public initially perceived the email service, accessible to everyone, promising free gigabyte storage as a joke.
Subsequently, thanks to gmail, great leaps forward took place in this area and almost all Internet mail services began to use these technologies.
Hi all. Today I’ll tell you what Gmail.com mail login is. If authorization on Google mail is unsuccessful, it would be a good idea to try to recover your password. To get started, go to the website – accounts.google.com (do this preferably from the device from which you last successfully logged into your account). Login pages offer their users the opportunity to change the language, choose the one that is most comfortable for you and get started!
Then you need to find the link: “Can’t access your own account?”, and, following it, enter exactly the email address that caused problems with authorization. Here you will need to confirm that you are not a robot by entering a verification code.
Very often the solution to the problem is a simple password recovery. How to do this, read the next article.
The resulting page offers a list of various options for restoring access. If you have another email address in the settings, or a phone number, the recovery procedure is greatly simplified.
Check if cookies are enabled for this site
Cookies are files that help a web browser remember client settings on a specific resource, while saving its configuration and collecting statistics. Now virtually all sites require these files. For this reason, to check their availability for Google Mail, you need to open your browser settings and enable them. We invite you to consider the process of enabling them in three popular browsers, such as: IE, Firefox, Google Chrome.
- Enabling cookies in Internet Explorer. First you need to go to the “Control Panel” and find “Internet Options” there. Click on the “Privacy” tab, then “Advanced”. In the resulting window, you will need to check the “Override auto-processing of cookies” checkbox and set the “Accept” markers on both primary and third-party files.
- Enabling Cookies in Mozilla Firefox. First of all, open your browser and go to settings. There you will find the “Privacy” tab. Find the block with history, where you will need to click on the last item from the drop-down list “will apply settings for saving history.” On top of that, check the “Accept cookies from sites” checkbox. Close the settings window by clicking the “OK” button.
- Enable cookies in Google Chrome. Open the browser, then go to “Settings” (in the upper right corner there is an icon with three stripes; after clicking on it, a window appears in which you can find those same settings).
At the bottom of this window there is a subsection “Additional settings”, go into them and click on “Personal data”, and then “Content settings”. In the resulting window, check the box under “Allow saving local data.” Finally, confirm the configuration by clicking on the “OK” button.
Once you've finished clearing your Cookies, you can also clear your browser history and cache. As a rule, the browsing history becomes so large that performance is significantly reduced, and certain functions stop working altogether. We invite you to take a closer look at deleting history in popular browsers.
Clearing your browsing history in IE.
First you need to go to “Service”, and then hold down the “Alt” button. As a result of this, a menu will appear; in the list of suggested items, select “Delete browsing history”. In the resulting window you will need to mark those items that you need to delete. All that remains is to confirm your actions by clicking on the appropriate button. Made!
Clearing your browsing history in Mozilla Firefox.
With this browser it will be somewhat simpler: you just need to hold down the key combination “Ctrl+Shift+Delete”, in the resulting window, select the items that you need to delete. It is important to systematically clear your browser cache and history. By the way, upon completion of the deletion procedure, you will need to log into your profiles on the sites again.
Clearing your browsing history in Google Chrome.
The deletion process is generally the same as with other browsers, but there is one caveat: upon completion of this procedure on one of the devices, the history is deleted on absolutely all devices from which the Chrome account was logged in. So, open the web browser menu, go to the “Tools” tab. On the resulting page, select Clear Browsing Data. In the window that appears, select the items that need to be deleted.
Along with this, it would be a good idea to look at what extensions are installed in the browser. If you find unfamiliar and unnecessary extensions, it is better to remove them, as they (to some extent) reduce the performance of the browser.
By following our advice, you can easily solve the problem with authorization on any website.
Gmail.com mail login to mail
If you were not registered in Gmail, you can fix this on the website - mail.google.com. On the right side, click on the “Create account” button.
You can create your own profile in this system in 3 steps.
The first stage involves filling out a questionnaire.
- Write your first and last name. An email account is usually created for a long period of time. Moreover, it can be used to activate mobile devices running the Android operating system. If you need an additional email address, it is better to use the services of mail.ru.
- Select a username. This stage is not the easiest, since choosing a name takes a lot of time from users. For example, names such as artem, andrey, etc. are already in the database. It’s good that the system is fully automated, so you only need to enter your option, and it will tell you whether you can use it or not.
- . Its length must not be less than eight characters. Try to make it different from those you have installed on other portals.
- Confirm your password. The site needs to make sure that you actually remember the password you set. Important: the password must include Latin characters. Errors often occur due to incorrect keyboard layout, so be careful.
- Please enter your date of birth.
- Select gender.
- You can write your phone number to protect your account. If it will store important confidential message history, then you can set up two-step authorization by entering an SMS message. Along with this, if you forget your password, you can easily recover it using your mobile phone.
- The reliability of the protection system will increase significantly if. Suppose your main mailbox is hacked and commits their nefarious deeds, and corresponding notifications are sent to your secondary email address.
- You can check the box next to “Make Google my home page” if you want this search engine to be displayed on the main page when you open your browser.
- After this, you need to pass a verification that distinguishes spam robots from real users. This is an absolutely simple task, and it is completed quickly.
- “Country” item: select your place of residence.
- Check the box to indicate your agreement with the rules for using this system.
- If in the future you intend to actively use Google+, then it would be a good idea to check the box “I want to see what they recommend...”. Thanks to this, you can watch what your friends recommend to you.
This is all that is needed for the survey. Click on the “Next” button and proceed to the next registration stage.
At the second stage, if you wish, you can choose an avatar.
That's all for me!
Today, email is an integral part of any communication. It is very convenient to use, because you can instantly send a file of almost any format to your interlocutor or receive an incoming one. It is very important to create an email address and that it is easy to use and reliable. Therefore, this article will help you to know about gmail.com mail.
Using this mailbox couldn't be easier. In order to log into the server, you must register your own Google account. In this article we will describe how to log into your mailbox. In addition, we will tell you how to set it up and edit it in the future, as well as how to secure your gmail mail.
If you have not yet created your own account on the Google server, proceed to register it. Then return to this page to be aware of how to properly log in and set up your gmail email address.
Reasons for experiencing difficulties when logging into mail
After creating your own account, the server will automatically authorize you. That is, you will immediately log into your saved gmail mailbox. However, to use it successfully, you will be forced to log in and out of your own mailbox each time in order to secure your correspondence. It is especially important to log in and out of the “mail” if you did not log into it from your computer (from your work computer, for example).
Since there are people who are faced with the problem of logging into their Google mailbox, we were interested in what exactly this is connected with. We tried a variety of computer equipment and also worked with completely different software. But we didn’t have any difficulties: we logged into mail from any device in the standard way. Based on this experience, we came to the conclusion that perhaps some steps were not being reproduced correctly.
Sometimes incoming users do not separate gmail.com and gmail.ru emails. The first is from Google, the second is from a completely different server. Therefore, you need to make sure that you are trying to enter exactly the saved mailbox from Google. In addition, sometimes the mailbox interface changes, which also causes some difficulties when trying to log in. But in fact, you need to abstract from the appearance of the service, since everything happens in a standard way, despite the updated interface.
Gmail mailbox: how to log in and out?
If you want to use mail and log into your gmail mailbox, do the following:


If you need to sign out of gmail, look at the top right corner of the page. You will see your own photo there. Click on it and click “Log out” in the menu that appears.

Google Email Settings
Today there are very convenient functions in mail (interface, way of working), which you will definitely want to change at your discretion. For example, you have the opportunity to create a permanent signature, change the appearance of labels, or choose a different theme for the appearance of your mail.
In order to change gmail settings, you need to do the following: pay attention to the upper right corner of the page. There you will see a gear icon. Click on it and click “Settings”. This is where you have the opportunity to transform and change the category you want.


Attaching contacts
Mail from Google server contains a very convenient function. It makes it possible to create, save and access the necessary contacts in an address book specially created for this purpose. This feature gives you the opportunity not to clutter your head with all the email addresses of your interlocutors. In addition, there is an opportunity to come in and add additional information to the contact. For example, mobile number, date of birth, residential address.
If you decide to add a contact:


To log in and change contact information:
- On the left settings menu line, click “My Contacts”.
- Select the contact you want to make changes to.
- After this, you have the opportunity to create any changes to the contact information.

It is also worth noting that in the case when you send a letter to an email address unknown to the system, the gmail.com server can automatically put the corresponding address in your contacts. By selecting “Contacts” from the menu, you can easily add changes to the information about this contact.
Transfer email and contacts
Maybe you have a ready list of contacts in another email box? But does mechanically importing every single pin take too long? Then this setting is for you. Mail from Google server includes a function that allows you to transfer your contact list from almost any other mailbox. In addition, it gives you the ability to import all your correspondence.
It is convenient to transfer letters and contacts from Yandex and Mail.ru services. But this can also be done from other emails. To do this:
- Click the gear icon located at the top right corner of the gmail page. You need to go in and click “Settings”.
- Select the "Accounts" category. Check mail from other accounts (using POP3). By following the instructions that appear on the setup screen, you can easily transfer contacts or emails.

gmail email security
If you think that you are an ordinary person, a simple user, and no one will want to enter your email, no one will encroach, then you are very mistaken. Today there are a huge number of attackers hacking mail for personal gain. Undoubtedly, if your mail is used exclusively for everyday correspondence with friends, then there is nothing to worry about. But in the case when the mailbox is linked to other important accounts, especially financial ones (for example, WebMoney), you must secure your own mailbox and funds so that no one can enter it. Many servers make it possible to link important personal pages with a mobile phone number. However, most of them continue to sync with the email address.
If you value outgoing information that is synchronized with your email, and want to prevent gmail from being hacked, you must configure your gmail.com mailbox correctly. Enter “Settings” (top right corner after clicking the gear):
- First, make sure that "Use http only" is selected in the General panel. If there is no outgoing checkbox, then you need to check it. This is necessary to ensure that the data comes out in encrypted form. If the checkbox is not checked, and you use mail in a public place with free access to a Wi-Fi network, there is a risk that attackers will intercept information in unencrypted form and be able to log into your email;
- those who use email clients will be forced to change their connection type settings from simple to secure (TLS). In the connection settings panel, you need to click on the secure connection type, and also change the mail receiving port (POP) from 110 to 995, the sending port (SMTP) from 25 to 465. Typically, the ports change independently after clicking on the TLS connection;
- for those who do not use email programs, it is worth disabling this function: go to the “Forwarding and POP/IMAP” panel to check the “Disable POP” and “Disable IMAP” checkbox;
- Double authentication must be enabled. Its presence serves as the difference between mail from Google and mailboxes from other servers. After establishing dual authorization, to log into your mailbox, you will need to enter a password sent as an SMS message to your mobile phone number. This greatly enhances the security of your email.
How do I enable two-step email verification?
To do this:
- you need to go to the “Accounts and Import” panel, click “Change password recovery settings”.
- On the outgoing page, enter your personal mobile number. In addition, there is the opportunity to specify another email, through which you can recover a forgotten password (linking another email is also not entirely safe, so I recommend not linking it);
- click on “Other Google account settings”;
- On the page that appears, in the “Security” branch, click “Change” two-step authentication. In the new window, select the “Proceed with setup” option;
- In the initial field, please indicate your current mobile number personally. It will receive SMS messages from Google with confirmation codes. If the phone number is already synchronized with the account, skip this field, since the number will already be there;
- Select the Trusted Computer option. It allows you to enter a verification code from a selected computer only once every 30 days.
Thus, you have enabled two-step verification!
Application passwords
Following the establishment of two-step authorization, any applications that used the username and password of your Google page will stop working. An error message will appear: “Invalid username or password.” For them to work as before, you need to generate and change application passwords. To do this and ensure that passwords are saved, do the following (after two-step authentication):
- click “Create passwords” or click on the link: https://accounts.google.com/IssuedAuthSubTokens ;
- on the page, enter the password name you like;
- Click “Create a password.” The creation wizard will give you a password. It must be saved by you, as it will no longer be possible to find it. It is issued only once. Naturally, it can later be changed to something invented personally. His name has no meaning. It will work with any application;
- then enter this password into applications, replacing it with the name of the password of your Google page.
Enjoy!
In order to get into your account and see the list of letters, you need to go to gmail com and enter your personal login and password. Unlike most email services, here you need to enter your entire address, including @gmail com. This is because Google provides the ability to create a gmail com email for a domain for free.
Anyone can use gmail as mail on their domain for corporate employees or for your website, creating mailboxes for users. In such a situation, the dog symbol will be followed by the user's domain.
By filling out your login and password, click the "Login" button. These steps open the folder that you set to be your default display. By default, the Inbox folder will open.
Besides this you can configure your email collectors, such as Outlook or The bat. Google specialists did their best. IMAP settings take no more than 5 minutes. And most importantly, you don’t have to enter your login and password every time. They will be stored in a program designed to enter them for you yourself.
Gmail is a product from the world famous company Google. It was officially released to the public back in 2004, and from that moment on, anyone could create an email on gmail com.
Few believed that the mail would be as it was presented in the press release. Doubts were fueled by the date of the announcement of the start of the first, after the search engine, large project from Google. The first of April after all. The fact that the global giant is going to provide a free mail service became known the day before the start. The New York Times wrote about this on March 31, 2004. It said that it would be possible to create mail absolutely free.
A distinctive feature of the innovative postal service was mailbox size. 1 gigabyte at that time seemed simply a fantastic figure. This was 500 times more than Hotmail's then existing competitor from another American giant, Microsoft. This is what made the news an April Fool's joke.
However, on April 1, Google presented a press release. But even this did not convince all journalists and users of the veracity of the news. The news was so revolutionary. But everything turned out to be true. Product instantly supplanted its competitors(Yahoo mail, Hotmail) from the market. It’s not surprising, because almost every active Internet user wanted to create an email on gmail com. With this product, Google created the Internet development trend for the coming years.
In addition, everyone who decided to create an email on gmail was provided with an innovative feature - search by mail. At that time, Google was the first to introduce such a function that was already familiar to us. But some ten years ago this was a real breakthrough. Gmail com, registration for which remains absolutely free, is developing dynamically to this day.
How to create an email on gmail com?
The process of creating a Gmail account simplified as much as possible. The gmail mailbox, which is registered by visiting the gmail com website and clicking the “Create account” button, is your window to the world around you.
Second option: you can go to the google ru website and select “Mail” in the upper part of the menu and then click on the button “ Create an account».
The registration form that opens contains only the most necessary questions, which will not be difficult to answer. The corporation's specialists took care of new users and provided as clear tips as possible. The key thing to fill out is: unique login and personal password.

Since the email service has existed for more than ten years, coming up with a unique login will not be so easy. If the desired username is already taken, the system will offer you derivatives of the desired login, which are currently free. You can choose from the proposed options, or come up with a new variation.
Also, when registering, you will need indicate your mobile phone and backup email. Don't be afraid to provide this personal information. This is necessary, first of all, for the security of your mailbox. If you forget your password, you can easily restore it either to your phone or to an alternative mailbox.
In addition, if attackers try to hack your mailbox, it will be much more difficult for them to do so. However, the telephone number may not be specified. Instead it will be enough specify a security question and the answer to it. For security reasons, choose a question and answer that only you know. After filling out all the fields, click the “Next” button to create your first Google mail.

Basic Google Mail settings
To customize your mailbox, personalize it, and create comfortable conditions For further operation, follow the steps described in the mail-google login section.

Here you can create your own contact address book for quickly writing letters, set the language of the mail itself, choose a design theme, set the text style and much, much more.

Interesting and unique features:
- Chains– correspondence between the same recipients with the same topic are grouped into a conversation list. This makes it possible not to miss a single letter from correspondence and always be aware of events.
- Notifications– translucent notifications will pop up on top of all windows indicating that a new e-mail has arrived. This is very important if you don’t want to miss an e-mail while doing other work on your PC.
- Significance Markers– the system will display a special icon next to letters whose sender has marked them as important.
- Categories– sorting letters into specific categories. This makes it possible to separate the most important letters, mark them according to certain parameters and distribute them into folders.
And, of course, standard, but very useful features that Google Mail users can find in their mail settings: autoresponder, signature and filters.
Of course, all these additional settings will help you make your use of Google's email service as comfortable as possible.
It is also worth describing the service that is integrated into the mail – “ Tasks". This seemingly ordinary electronic organizer is not as simple as it seems at first glance. It can remind you by email or SMS that you have a meeting scheduled, for example, after a certain time. Having set a task even a year in advance, be sure that the service will not forget about it. If your plans have changed, you can delete the task. And there will be no trace of her.
By the way, about contacts. They can export and import. This is very convenient if you have several email accounts and want to use the same contacts for correspondence.
How to send an email from gmail?
- In order to send an email, you need open google mail website, log into your account and click on the “Write” button.
- A window will open in which you must fill in the recipient, subject and text of the letter. You can select the recipient from your personal address book.
- If you have a desire send a document, picture or any other file– click on the icon in the form of a paper clip.
- In the dialog box select file on PC, which you need to send, or insert a link if the file is already posted on the Internet.
- Click the "Open" button. The file download process will begin.
- Download speed will depend on size file and Internet access speed. You will be notified of the download progress by a filling blue bar.
In case you need send a large file– then it does not need to be attached to the letter. Upload it to the Google Drive service, and send only a link to it to the recipient. This will significantly speed up both your sending and the process of receiving the letter.


