Preparing layouts for printing in Corel Draw and Adobe Illustrator - SkillsUp - a convenient catalog of lessons in design, computer graphics, Photoshop lessons, Photoshop lessons. Corel Draw Tutorials: Layout for making a Round Stamp.
In this video, I show you how to prepare files for digital printing and offset printing. Useful for those who are engaged in printing and printing business cards, leaflets, booklets.
1. Convert all rgb colors to cmyk
- This action very necessary for printers and layout designers on Korela. To prepare a layout for printing, you need to translate all rgb colors in cmyk. EDIT - SEARCH AND REPLACE - REPLACE OBJECTS. Replace color model or palette. Fills first, then outlines.
2. All pictures in rgb must be converted to cmyk
- To do this, find the picture that is in RGB and click Raster Image - CONVERT TO Raster Image. Choose a resolution of 300 dots per inch (DPI), CMYK color mode (32-bit), put a check mark on the Smoothing and TRANSPARENT BACKGROUND. If you do not check the box on the TRANSPARENT BACKGROUND, then it will lose the effect of transparency and shadows and will overlap the objects underneath. Also, after transforming the image, you should not increase it in size on the layout.
3. Convert fonts to curves
- We go to the File - document properties, firstly we look at the availability of fonts, all fonts must be converted to curves, or provided with the layout to the printing house, fonts can be converted to curves by pressing (CTRL + Q), or by right-clicking on lettering and choose to convert to curves.
4. Rasterizing effects
- All printing effects can either be removed during translation into a .pdf or .postscript file, or they can be distorted, so all effects must be rasterized. For example, if there is a shadow effect, it must be separated from the object by right-clicking on the shadow and selecting DISCONNECT SHADOW GROUP (or by pressing CTRL + K). That. the shadow is separated from the object and it can be rasterized separately, and not together with the object on the cat. She was. The shadow is rasterized by clicking the Raster Image - Convert to Bitmap menu at the top. (DPI), color mode CMYK (32-bit), put check marks on the ANTIFICATION and TRANSPARENT BACKGROUND. If you do not check the box on the TRANSPARENT BACKGROUND, then it will lose the effect of transparency and shadows and will overlap the objects underneath.
It is also necessary to rasterize other effects (transparencies, blends, outlines ...)
The only exceptions are the power clip effect, you can not rasterize it, but just for greater persuasiveness, in principle, you can also rasterize it
5. Departures over the bleed
- The cutter needs overshoots (this is the person who will cut the printed circulation into separate units of production - business cards, leaflets, etc.)
Business cards, leaflets and other printed matter are printed not as a single thing (although there are exceptions if the size of this very thing fits into a printed sheet), but immediately in circulation, i.e. along with your order for 100 business cards, leaflets of another customer or business cards of a third customer can be printed at the same time.
This is 1 example of how to prepare a file for offset printing of business cards. As you can see, there are 16 thousand business cards. Business cards for offset circulation can fit a different number. From 10 to 40 thousand. Depending on the size of the business cards and the size of the printed sheet. But back to the bleed. Bleeds are an increase in the size of your layout by 2-5 mm. from each side. Different overshoots are made for each machine and printing house, each works according to its own convenience. Basically we need to increase our layout by 2mm. on each side from the top by 2 mm, from the bottom by 2 mm., on the right by 2 mm, on the left by 2 mm. By stretching the background.
6. Indent important information from the edges of the layout
- Depending on the type of product, the indentation may be different. Let's look at an example on a business card. Standard business card in Russia 90x50 mm. Important information for us in this layout this is the text and contacts of the owner, the edge of the picture in in this case is not so important to us. So, increase the size of the background of the business card to 92 x 52 mm. Those. 1 mm each. on each side, we also retreat 5 mm. from the edges of our business card so that the text is not written on the edge of the business card and the cutter does not cut important contacts our customer.
7. Second side of the layout
- place the second side of the layout (business cards, leaflets, leaflet) on the second page of the document, and not in another file
8. Folds, creases
- do not place text and others important elements the layout is too close to the places of folding, creasing (places of folding). Only place elements close to the fold if they are part of the decoration.
9. High% CMYK ink
- the sum of four CMYK colors at any point should not exceed 300%. Those. look at the colors in your document. By clicking on any sum it up% CMYK, i.e. let's say C = 100 M = 100 Y = 30 K = 0 add up these numbers and get 230% it is permissible we leave it. But if C \ u003d 100 M \ u003d 100 Y \ u003d 100 K \ u003d 50, then in total this is 350% this is too much, reduce the value to 300 or lower.
10. Low% CMYK ink
- it also does not eat well, for example C = 1 M = 2 Y = 0 K = 0, this is too little for printing, you can see the color, but printing machines are of different quality and color range and such a low ink content may not be seen and instead of color in this case it will be White color, i.e. lack of color.
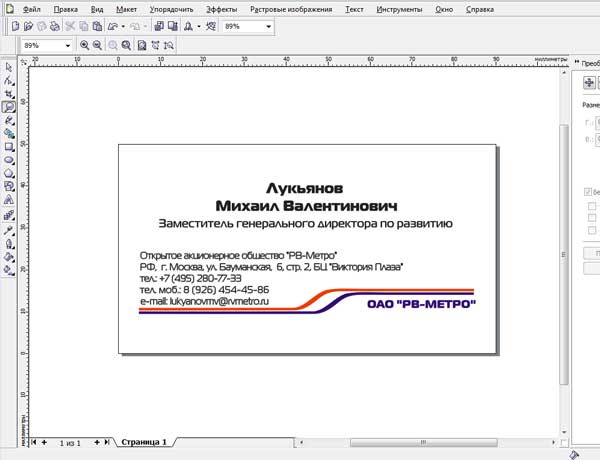
Let's say we have prepared a business card layout in CorelDraw, agreed with the client, approved, everything is ready for printing. Naturally, vector graphics, along with fonts, must be converted to curves and all this must be grouped. The size of a business card should not exceed 80x40 mm, + 2-3 mm. It is about a standard business card on a white background, without full-color fills and graphics cropping.
We will talk about these cases a little later.
Let's clarify right away that we are working in CorelDraw X3 (the thirteenth version of the product).
 Copy and paste the grouped, curved business card into new document... Set the size of the worksheet 90x60 mm (manually, on top panel tools).
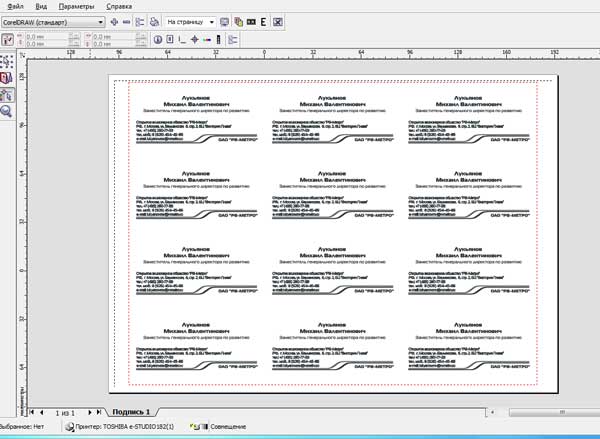
Press the letter "P" (English) on the keyboard (the business card must be highlighted), and the business card is aligned exactly in the middle. Next, go to the "File" "Preview" menu. When asked about choosing a printer, we answer "yes". Now our business card is located in the center of the window preview... Select the second key in the left menu "Layout Layout". In the top menu that appears, where are
horizontal and vertical lines, set the number of pages (business cards). The default is the landscape version of the page, set 3 pages horizontally and 4 vertically. True, in this case, the top marks for cutting will disappear when printing, but we do not need them (I already wrote about this in the article "How to cut business cards"). Of course, you can also print 10 business cards with all the tags, but we'd better save on paper and paint! Next, click the third key from the left and assign crop marks. The architectural part is finished.
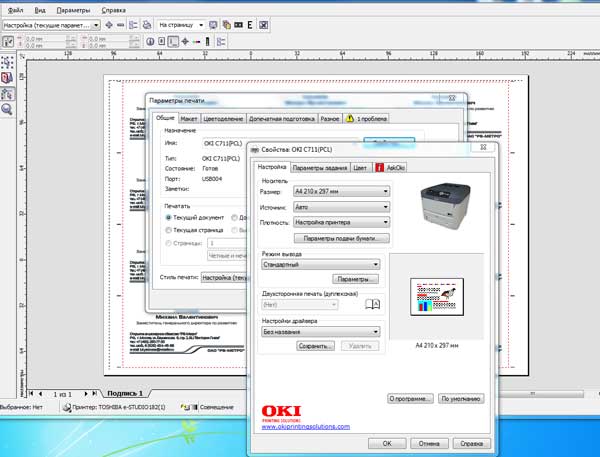
We turn to the choice of the printer and the number of pages. Click "Options" top menu, select "Pre-press". Further, in the "General" submenu, where we select the printer, we again answer "Yes" to the question about the paper orientation. In the properties of the printer, we set the density and quality of the paper, return to the "General", where I recommend that you first print 1 copy to check for errors, if any.
Now let's go back to a non-standard business card, where, say, on the right there is a picture that should
cut off, that is, placed right through. The picture should protrude from the business card (90x50 mm) by 2-3 mm. By the way, it is no longer necessary to align the business card in the center of the sheet; it is necessary to manually position it so that the picture protrudes 2-3 mm beyond the edge. We return to the "Preview" window to the "Layout layout" sub-item. Please note that if we click on the vertical crop line with the small scissors icon, both vertical lines will be highlighted in red, and a window will appear on the top control panel where you can manually set the distance between business cards. In our case, when the right picture goes 2-3 mm beyond the cropped area, then a distance of 5 mm will be optimal. We will act similarly in the case of the left-sided picture. 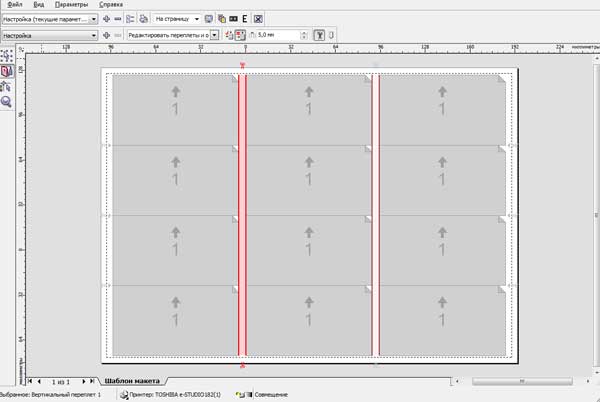 If you need to crop the graphics from the top or bottom, and also when the business card is cropped from all sides, then you will have to go back to 10 business cards per sheet, 12 will no longer fit. You just need to select 2 business cards horizontally and 5 vertically in the Layout Layout window, the page will change from the “landscape” view to the “portrait” one and you will have a place to expand business cards both vertically and horizontally.
Thus, you can print any business card with any parameters and prepare for cutting.
Using the Print dialog box, which is invoked by the command of the same name from the File menu. This window has several tabs. The first of them contains the basic print settings.
Destination - Select and configure the printer.
Print range - you can select individual pages and even only selected objects for printing
Copies - the number and method of collating copies.
Print Preview - Clicking the double arrow button will open a preview area next to the main window. This will allow you to quickly track the changes made in the print settings.
The Layout tab specifies options for positioning the image on the printed page. A document page can be positioned on a printer page in several ways:
As in document - the image is printed at 1: 1 scale in the center of the page;
Fit to page - The image is centered and enlarged or reduced to fill the printer page as much as possible
Reposition images to - You can precisely set the position of the image on the printed page and its dimensions.
The Print tiled pages checkbox is very useful if your document is larger than the printer's page. You can print such a file across multiple pages.
The Separations tab determines the order in which the separations are output. To images containing different colors CMYK or various spot colors, rendered on separate forms (film or paper), check the Print separations checkbox.
Below are the options for customizing color separations. In the Trapping section, you can set options for manual or automatic trapping.
The Prepress tab allows you to set the print type and print special marks. The print type is set in the Paper / film settings: Invert or Mirror.
You will need the PostScript tab if you are printing to a PostScript device. The choice of PostScript language from the Compatibility list must match your device. If the type is not known in advance, it is better to use Level 1. The Use JPEG compression checkbox is undesirable: usually a deficiency disk space not like that a big problem compared with possible loss quality. It is better to leave the Default value in the Screen frequency drop-down list, and if you change it, then only after agreement with the repro center or the printing house.
The Misc tab contains options that are not included in the other tabs.
See the Issues tab for warnings about possible printing problems. Messages can be very different: from exceeding the image over the edge of the printed page to coincidence of screening angles different colors for color separation.
Print Preview
Returning to the Print Preview window, note that all of the above print settings can be accessed from the Settings menu item.
On the left there are four tools that determine the mode of operation in the window.
Pick - change the position on the page and the size of the image.
Imposition Layout — Controls the placement of document pages on the printed page.
Marks Placement - Places alignment, crop, fold, and more marks on the printed page.
Zoom - change the viewing scale in the window.
Some of the most common operations (for example, mirror printing) are carried out in upper part windows in the form of buttons.
Prepare For Service Bureau
This command is useful to you if the document will be printed strangers... In the Prepare For Service Bureau dialog box, you have two options for preparing the file.
Gather all files associated with this document - saves in a separate folder not only the document itself, but also the bitmap images inserted into it (if they were imported with the Link bitmap externally checked) external file)) and files of used fonts.
Choose a profile provided by your service bureau - generates a document in accordance with the requirements of the service bureau in the form special file with CSP extension. We are not aware of any cases of the practice of using CSP profiles in the CIS.
First of all, you should open the Document Information window from the File menu, where you need to pay attention to the following points:
Document
Layers - It is advisable to use a single layer in the document
· Resolution - in accordance with the output line, recommended 300 dpi.
· Graphic objects(Graphic objects) - information about vector objects document, you should pay attention to the Max. the number of curve points (Max # of curve point), this value should not be more than 10000, otherwise you should simplify vector objects.
· Text statistics - statistics about the use of text objects, this field should be: "This document does not text objects"(" There are no text objects in this document "). Otherwise, you should convert the text to curves.
· Bitmap objects. If the file uses raster graphics, then pay attention to its color model, it must be CMYK, otherwise convert all used images to bitmap object, in the CMYK color model, with the resolution of the entire document (recommended 300 dpi).
· Effects (Effect). There should be no effects in the document, all objects with effects applied to them should be rasterized using the CMYK color model and the resolution used for document output (recommended 300 dpi), immediately before printing, or saving PDF... If so, then this field will read - "There are no effect used in this document".
· The Fills and Outlines fields display information about the color models used. Only the CMYK color space and additional spot colors should be used, usually the Pantone palette (attention this will lead to additional costs in industrial printing). Other color models(eg RGB or Lab) must not be present.
View a summary of the problems for a print job.
When preparing a file for printing, check the status of the file before printing it.
conclusion. View a summary of potential and existing problems, as well as suggestions for their solution as follows:
Select the File-> Print menu. Click the Problems tab.
Here you can view possible problems when printing of this file, as well as options for their solution.
You can use the Prep Wizard for a prepress office to get step by step instructions when sending the file to the prepress office. The wizard simplifies operations such as creating PostScript and PDF files, gathering all the information needed to print an image, and copying the original, embedded image files, and fonts to a user-defined folder.
You can print a drawing to a file, which allows the prepress office to send the file directly to an output device. Please contact the prepress office for information on choosing options.
You can include job details that will contain all set parameters prepress preparation.
To call the master of preparation for the prepress office.
Select the menu File-> Prepare for prepress office.
Choose one of following parameters:
Collect all files related to this document
Select a profile provided by the bureau
Options PDF file prepress bureau and prepress PDF parameters are identical (compression of bitmaps using the ZIP algorithm, the ability to embed fonts and save spot color settings to achieve High Quality print).
To create a prepress profile, you need the prepress profile utility, which is installed by default in CorelDRAW.
After completing all the steps, the wizard will create a folder with all the necessary files.
Assigning Properties to Document Layout
When creating a pattern on blank page it is based on the default CorelDRAW template (CorelDRAW.cdt).
CorelDRAW lets you specify the size, orientation, scale unit, and background of the drawing page. You can customize and display grids and guides on the page to help you organize objects and place them precisely where you want them. For example, when creating a newsletter, you can set page sizes and create guides for positioning column text and headings. When creating ad layouts, you can align graphics and text with guides and position graphic elements on the grid. Rulers allow you to position grids, guides, and objects on a scale with selected units. You can also add and remove pages.
Page layout options and tools are fully customizable. They can be used as default settings for other pictures.
You need to start working on your document by specifying options for size, orientation, and page layout style. The options that you select when you set the page layout can be used as the default options for all newly created pictures. You can also adjust the page size and orientation settings to match the standard print paper settings.
Page size. You can specify the page size in two ways: choose a predefined page size or create your own. You can choose from a variety of ready-made page sizes, from legal paper and envelopes to posters and web pages. If the final page size does not meet your needs, you can create a custom page size by specifying the document dimensions. It is necessary to indicate the format of the finished document, after cropping.
Choose Layout-> Page Setup and from the Paper list select the paper type or enter values in the Width and Height boxes.
Page orientation. The page can be in landscape or portrait orientation. At landscape orientation the width of the document is greater than its height, and when portrait orientation the height of the document is greater than its width. All pages added to a document project are set to the current orientation, but a different orientation can be set for individual pages in a document project.
Choose Layout-> Page Setup and choose Landscape or Portrait.
Layout styles. With the default layout style (whole page), each page in your document counts as one and prints on one sheet. You can choose layout styles for multi-page publications such as booklets and brochures. Multi-page layout styles — book, brochure, house, vertical booklet, and horizontal booklet — divide a page into two or more equal parts. Each part is taken as separate page... The advantage of working with individual chunks is that each page can be edited vertically and sequentially in the drawing window, regardless of the layout required to print the document. When you print a document, the application automatically arranges the pages in the order required for printing and binding.
Choose Layout-> Page Setup, in the list of categories, select Page, then Layout. Each layout style is accompanied by brief description and illustration.
Bleed. The bleed area ensures that objects on the outside of the specified page size are printed correctly. If the object is located at the edge of the page with given dimensions, due to a slight shift when printing, at the border of the printable area, white stripe... Therefore, when placing the object, you should slightly extend the edge of the page with the specified dimensions, and after printing, crop the page.
The bleed size depends on the purpose of printing. The pre-trimmed size (that is, the image printed on the sheet of paper) must be larger than the trimmed size. at least 3 millimeters on EACH side.
Security fields. Any significant design elements should be located no closer than 3 mm from the cutting lines, punching lines, and drilling sites.
Working with color
By using of this application you can select and create colors using a wide range of standard palettes, mixers and color models. You can create and edit special color palettes to save frequently used colors for future reference.
An accurate method is required to identify colors. Color models provide different methods color definitions, in each model, colors are defined by using specific color components. To create graphics there is whole line color models.
The final files prepared for commercial printing should use only the CMYK color space and additional spot colors, usually the Pantone palette (attention this will lead to additional costs for industrial printing). All other color models (eg RGB or Lab) must not be present.
Change the color mode of bitmaps.
The colors in images used in CorelDRAW are based on color modes. Color modes define the color characteristics of images and are characterized by component colors. Color mode CMYK is defined in terms of cyan, magenta, yellow, and black; RGB color mode is determined by the values of red, green, and blue.
Although the difference between a CMYK image and an RGB image may not be visible on the screen, the images are still different. At the same size image file RGB images smaller than a CMYK image file, and can be displayed in RGB color space (or gamut) more flowers. Therefore, when used on the Internet or when printing to a printer where accurate color reproduction is required, RGB images are usually created. When required increased accuracy printing, for example, on industrial printing presses, images are usually created in CMYK mode. By reducing the file size of images that use gamut color, accurate color reproduction is maintained, making them ideal for on-screen use.
There is a risk of loss of color information during every image conversion. Therefore, before changing the color mode, you must save the edited image.
To change the color mode bitmap:
Click the bitmap
Select Bitmaps-> Mode
Choose CMYK color mode
Transformation vector graphics to bitmaps.
When converting vector graphics to a bitmap, you can apply special effects provided by CorelDRAW that are not available with vector graphics or objects. When converting vector graphics, you can select the color mode of the bitmap. The color mode determines the number and type of colors that make up the bitmap, and therefore the file size.
When converting vector graphics to a bitmap, you can set options such as blending, anti-aliasing, black overprinting, background transparency, and color profile.
To convert vector graphics to a bitmap suitable for industrial printing:
Select object (s)
Select Bitmaps-> Convert to Bitmap
· Select the resolution "300 dpi" in the Resolution list
· Select the color mode " CMYK color(32-bit) "in the Color Mode list
Check (or do not check) any of the following checkboxes depending on your goals
o Always Overprint Black - printing black elements over elements of a different color prevents gaps between those elements
o Apply ICC Profile - Apply color profiles ICCs that translate device colors and colors color spaces in accordance with the standard
o Anti-aliasing - smoothes the edges of the bitmap
o Transparent background - the effect is achieved transparent background Images
Bitmap background transparency effect lets you see images or backgrounds that are otherwise obscured by the bitmap
Converting fonts to curves.
For correct preparation file for printing, you need to convert all the fonts used in the document to curves, for this:
Select the font objects you are using, then choose Arrange-> Convert to Curve from the menu, or press right button mouse and, in the opened context menu, choose "Convert to Curve".
Reducing the number of nodes in a curve object
o Open the Reshape menu, and select the Shape tool.
o Click a curve object, and do one of the following
o To reduce the number of nodes in the entire object, click the Select all nodes button on the property bar.
o To reduce the number of nodes in a part of the object, select with a frame the part that you want to change.
o Do one of the following.
§ Click the Decrease number of nodes button on the property bar to automatically remove overlapping and redundant nodes.
§ Move the Curve smoothing slider to control the number of nodes to remove. When deleting too a large number nodes can change the shape of the curve object.