Installation and work with ACDSee Photo Studio. ACDSee – full-fledged work with photographs
First, we need to decide what the ACDSee program is and what it is used for. By the type of its functioning, the program belongs to the file managers, which helps to work with photographs of all existing formats. It helps you easily manage your images, organize them on your hard drive, and perform basic photo editing.
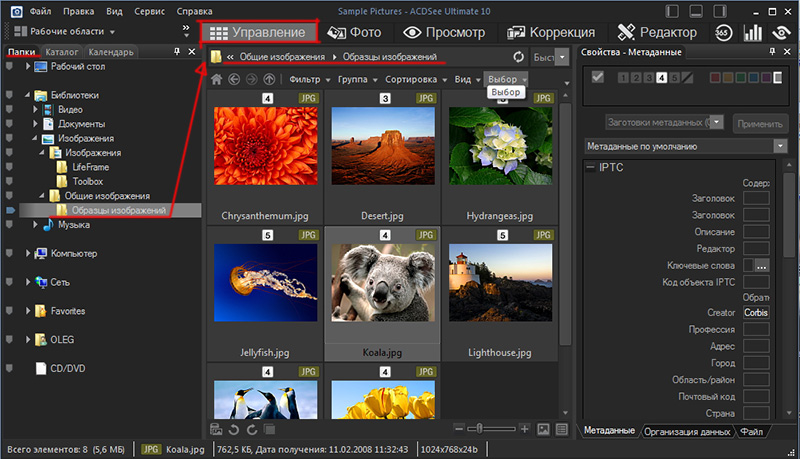
If you have already installed this program, we will look at the basic principles of its operation. If not, download it to your PC and follow the same steps. As soon as the program opens, an image of a folder with already created photographs that are located on the user’s computer will appear on the screen. By default, the program directs the user to the “My Pictures” folder.
In the file settings, you can change this folder by selecting the one you need. To do this, go to the settings menu and select the control mode there, then specify required address. This folder will be displayed when loading the program.

On the left panel you can find a explorer in which you can select any photos. Their icons will immediately appear in the central window of the program.

To view the photo in full size, you can simply double-click on it.

To view the following photo in full size, just scroll the mouse wheel or use the arrow buttons on the keyboard.

If you need to rotate the photo, use the left or right rotation buttons.

On the right side of the screen there is a window in which you need to view data about the image. The name of the camera on which the image was taken, its date, exposure data, etc. will be displayed.

The program consists of four working segments:


MANAGEMENT (we wrote about it above). VIEW – an option where you can view the photo. PROCESSING – dividing an area into several categories.


CORRECTION, which was distributed to TONES. This includes exposure correction, contrast and color settings.
DETAIL – menu for editing sharpness and noise. GEOMETRY - here you can set lens distortion, rotate photographs and straighten the image, crop it and similar operations.
EDITOR – in this menu the operations are identical to those in the correction. In addition, here you can eliminate red-eye effects, make reflections, develop original special effects, photo frames, vignetting, etc.

The INTERNET workspace is an area where you can develop your account and save your photos on the server. You can also view photos of other users here.

EDIT is a menu where the user can crop, adjust and rotate the photo

CREATE – in this menu you can develop a presentation, create an archive, or burn a photo to disk.

SLIDESHOW – from this menu you can launch and configure a slideshow.

SEND – from this menu you can send a photo by mail, etc.

Photo editing can easily be considered an incredibly fun and exciting creative process, which has already become a real hobby for millions of people around the world. But if you decide to use for these purposes ACDSee program, That this work will become extremely simple and fast, because in a matter of moments you will be able to change the size of the photo, both by scaling and by cropping, adjust color scheme, contrast and clarity of the image, as well as other parameters. That is, we can say with confidence that the application is a multi-purpose software that allows you to view and edit pictures, and post them on social networks or on own internet resources.
Features of the ACDSee program interface
ACDSee interface includes only four tabs. This is management, viewing, editing, as well as posting on the network. You will be able to navigate them within a few minutes after you start working. So, using the “Management” tab, you can select the images that you will need for subsequent work. There are also tools that will allow you to rename pictures or sort them by placing them in separate folders. Basics working window application displays file system your hard drive in the form of a standard tree directory. If desired, the user can configure his mode preview, allowing you to control all stages of editing.

In this program you can process graphic files stored on your computer, external drives, and also removable drives. These may be photographs taken from digital cameras, mobile phones and even scanners. As you work, you will be able to view them, convert them to various formats, change the size by scaling or cropping edges, compare several images with each other, create extraordinary slide shows, and so on.
The “Edit” tab contains all the tools that will be useful to users for editing pictures. With them you can fully unleash your own creative fantasies. With just one click of the mouse, various photo defects, including the red-eye effect, are removed. You can also give the photo the desired color tone or even out the tone of the face, apply original artistic filters, add captions, designate photos to be deleted or edited, and so on.
Features and main capabilities of the ACDSee program
The application is extremely endowed wide possibilities who will be able to appreciate not only regular users, but also professionals, after all ICD:
is an advanced photo editor of our time, equipped with a huge amount tools and functions; in comparison with other software, it has an enviable response speed; endowed with a customizable search that allows you to quickly find the required SIM card by key phrases that were previously specified by you; has a rich color palette, a wide range of tools and built-in artistic filters; will allow you to simply remove the red-eye effect, as well as edit the entire image or a separate part of it; will provide tools for adjusting the lighting and contrast of the image; instantly highlight shadows and focus on a certain part of the picture; allows you to convert a photo into most modern formats and upload work to web resources; integrated to work with Twitter and Facebook.

You can download ACDSee for yourself completely free by following the link http://acdseee.ru/. As a result, you will receive the most current Russified version this application and you can start an exciting workflow in just a few minutes.
Rate the post!
(1
votes, average: 1,00
out of 5)
Few users personal computer pays special attention to such everyday tasks as viewing graphic files.
For most people, a regular one is usually enough Windows tools or other operating system. However, most people use an OS from Microsoft, which means that it is not very useful as a standard graphic file viewer. functional program, which cannot edit the image and, most importantly, does not open them in full screen.
Another, no less important drawback pre-installed applications for viewing photos, is the lack of support for animated images. It would seem simple function, which may be simpler, but for some reason Microsoft has been ignoring the GIF format for many years now.
The best photo viewer
Despite the fact that a standard image viewer can launch a slide show, in which the user sees images changing from each other, a person cannot view them in random order, stop and enlarge a certain area. In other words, Windows operating system users are forced to look for a third-party application for such a simple task.
And here again disappointment awaits, because after just a few minutes of searching, a person understands that among the available alternatives, few programs can serve as a full-fledged replacement for the standard program.
At the moment the most popular programs from this category are: XnView, IrfanView, Honeyview, JPEGView, Google Picasa and, perhaps, the highest quality among all available analogs is ACDSee Photo Studio. This program not only works with all possible graphic files, but also edits them efficiently. ACDSee is actively used by many professional photographers for RAW processing files.
ACDSee installation
The installation of the program takes place according to standard mode, the user indicates language settings and the destination directory.
After installation, the application is integrated into the operating system explorer and when you right-click any image, a preview of the selected photo is displayed in the context menu. Unfortunately, this is not always convenient.
High-definition images put a lot of strain on your computer, causing context menu may open in a few seconds. To remove the preview, you need to select the ACDSee PicaView option in the context menu, go to the “Options” subsection and uncheck the “show image” and “Show EXIF” checkboxes. However, if a person actively works with graphic files, the informative EXIF window will be quite useful, in which the user can view ISO parameters, shutter speed, focal length and many other data about the photograph.
In earlier applications, there was no option to hide the preview window; in addition, the window appeared even when working with video files, which is why the computer could freeze for up to several minutes, depending on the size of the selected file.
I had to remove the preview window using third party applications, now the user should simply download latest version ACDSee.
Viewing images using ACDSee
As mentioned above, the main goal is to find a worthy replacement for the Windows image viewer. In other words, ACDSee must fully satisfy the user's needs.
After installing ACDSee Photo Studio, when you open any graphic file, Windows will prompt you with which application to open this type files, where a person must indicate Photo Studio.
One of the main features of this program is its speed. Images of any size open in seconds.
After opening the file, the image opens in windowed mode; in order to expand the graphic file to full screen, you should move the cursor over it and press the mouse wheel. When you press the wheel again, the image returns to windowed mode.
The function of closing the application is very conveniently implemented. To quickly exit viewing a graphic file, simply press the Esc key.
To enlarge or reduce the image, use the plus and minus keys. In addition, for the same purposes, the user can press Ctrl key and use mouse scroll.
When you open any graphic file, the image opens in the so-called " Quick view". For flexible management image archives, you need to launch ACDSee using a shortcut on your desktop. By default, the application scans the "Images" directory in the user's files. If desired, using the built-in file manager, you can move to other directories.
Editing Images
ACDSee Photo Studio is not just convenient application to view photos, but also powerful tool to edit them. ACDSee has extensive capabilities that are almost as good as those of such giants as Photoshop.
This program has two editing modes, which, by the way, can be launched from the context menu when selecting a file.
Correction with ACDSee - Allows the user to change brightness, contrast, exposure and color tone. For informational purposes, a histogram is presented on the left side of the menu. In fact, color correction in ACDSee can give odds to many professional photo editors.
Edit using ACDSee - when opening the editing mode, the user can see a number of familiar tools, including an eraser, blur, lightening and darkening a selected area of a photo, and much more, which is so familiar thanks to the toolbar in Photoshop.
One of the most useful functions for the average user there will be cropping. In just a couple of seconds, a person can delete extra objects from the photo.
To summarize, it should be noted that, unlike other applications, ACDSee is paid, but given all the available functionality, the cost of the program is quite justified.
Photos today widely fill the Internet and social networks, and many people have a desire to edit them. The sphere is actively developing graphic design and photo industry. In order to correct lighting deficiencies, adjust colors, give interesting effects and adding decor or inscriptions, special graphic managers are well suited.
The program is recognized as the leader among them ACDSee Ultimate. The commercial package of the ACDSee program has earned recognition from professional artists, photographers and designers, and receives a lot of positive feedback from ordinary users.
Viewing Images
ACDSee photo manager is very convenient for viewing, organizing and editing photos and other images. The program supports over one hundred image formats. The built-in synchronization module allows you to import files from most models of cameras and smartphones; it is compatible with scanners, printers and MFPs. The important advantages inherent in this program also include a customizable panel for the most popular functions.

ACDSee in Russian with a very convenient intuitive interface allows the user to quickly get used to it. Almost all manipulations with the image are carried out by pressing the mouse button, moving the cursor and do not require special skills or specific knowledge.
Setting up the program interface
Working with the program is especially convenient thanks to extensive settings and flexible interface. Options are available through the context menu and are duplicated as needed on the customizable main taskbar. You can display the necessary tabs in the program work area using the “View” menu item.

Tool windows can be enlarged and reduced, placed in arbitrary areas of the workspace, which maximally optimizes the interface for the needs of each user.
File manager

As you can see, on the left there is a file manager panel, the functionality of which is very similar to a regular Explorer windows systems. The panel makes it very easy to search required images and folders. It is also possible to copy, move, rename and delete files.
The presence of a multifunctional manager allows you to simultaneously work with a large number of files, located not only on the hard drive, but also on removable media.
Will please high speed indexing of images, when opening them you can not only immediately view them, but also assign them keywords, sort, leave notes and comments.
Photo catalog
The program will help collect information about all graphic files on media and catalog them. The sorting type can be changed to the most relevant in each case. This is convenient for tidying up home photo archive and is especially important for those whose professional activity requires storage and use large quantity images.
By launching this cataloging function, the program scans the contents of the computer, finds photographs and compiles its own catalog from them.
To start cataloging you need to do the following:
Select the “File Directory” item in the “Tools” menu

In the window that opens, select the folder with the images that need to be added to the catalog and start cataloging.

Photos in the catalog will be sorted by creation date by default. You can open the catalog on a separate tab: “Catalogue”

Editing Images
Recent updates have expanded the ability to work with layers. You can freely move, connect and edit them: apply a variety of filters and effects, add watermarks, inscriptions, and decorative elements.

Independent settings for any selected area of the image are ideal for correcting them and eliminating artifacts. This breadth of manipulation will allow you to create a collage of any complexity, prepare a graphic layout, adjust photographs and fully realize any artistic concept.
Additional features of the ACDSee Ultimate package
In addition to viewing and editing images, ACDSee photo manager provides:
- conversion of image formats, without loss of quality,
- archiving and restoring graphic files,
- creating libraries of pictures and photographs,
- slideshow display
The bonus of the package is the ability to view video and audio files in the player, however, it has a very modest arsenal of settings compared to most viewers.
You can play audio and video files through the context menu Windows Explorer, selecting ACDSee as the player.

In addition to the main version of the program, a professional package is available: ACDSee pro program. Unlike many common editors, this is a full-fledged image editing manager with a variety of functions.
ACDSee Ultimate is suitable for viewing images, editing and correcting photographs, and eliminating their defects. A wide arsenal of functions is useful for artistic processing of photographs and creating collages. This manager is primarily aimed at a professional audience with a variety of tools and capabilities, however, user-friendly interface and will allow even novice users to work with images.
For many years, Adobe Photoshop has been the most powerful, popular and quite expensive editor. raster images, one might say, is a de facto standard, and all these years, manufacturers of other programs have tried their best so that users no longer need this very Photoshop, sometimes successfully, sometimes not so much. While they are trying, the word “Photoshop” has become a household word - often on forums you can come across the question “Please advise good photoshop for processing photos,” not to mention such concepts as “photoshop the ballot box,” “this is all photoshop,” “it’s better to overshop than undershop,” and others.
Indeed, for daily work With photographs, any advanced RAW converter has numerous tonal editing tools, often providing more convenient and subtle work than those in Photoshop. For example, the same Color Editor tool can be called one of the best, if not the best in the industry. However, in practice, you still have to use Photoshop for complex retouching with the stamp tool, as well as for working with layers - it is working with layers here that is incredibly convenient and, one might say, brought to perfection. And if the stamp in one form or another is still present in many RAW converters, then full-fledged work with layers for a long time was the exclusive domain of Photoshop.
But everything is changing. ACD Systems International Inc. announced a new comprehensive program for management and editing digital photos. First time for this company's products this program Allows you to work with layers for advanced image editing. Now users do not have to use expensive programs from other manufacturers (read Adobe Photoshop) to achieve excellent results - both amateur photographers and advanced users will be able to solve all their creative problems using ACDSee Ultimate 8.

ACDSee Ultimate 8 provides the same image management features as the programs ACDSee Pro 8 and ACDSee 18, released in the fall of 2014. However, ACDSee Ultimate 8 now supports layers, GPU acceleration for graphics, as well as 32-bit and 64-bit transparency. New tools give users more flexible options for editing images, creating collages, adding text or watermarks, applying various filters and effects, all individually for each layer. ACDSee Ultimate 8 is separate application, and not an update to ACDSee Pro 8, as you might think, so these two programs can run in parallel on the same computer.
“The photo industry is developing dynamically, and we noticed that the market needed an easy-to-use photo editor with advanced capabilities,” says Doug Vanderkerhove(Doug Vanderkerkhove), founder and CEO of ACD Systems. “It is for this purpose that we created ACDSee Ultimate 8. For the first time, our users have the opportunity to have an advanced, yet intuitive clear editing images using layers. Our users have always trusted the quality of ACD Systems products, and now both amateur and advanced photographers graphic designers will be able to achieve amazing results in their work.”
As always, ACD Systems, in its press releases, includes the opinions of various well-known professional photographers who work in ACDSee programs to talk about the benefits of such work and their approach to the matter:
“I switched to ACDSee Pro a few years ago and it is now my main tool for RAW and JPEG photos", speaks Glen Barrington(Glen Barrington), photographer and ACDSee user. “Before this, I worked in a competitor's program, and now I use ACDSee Ultimate, as the new layer tools significantly expand my editing capabilities. I no longer need an additional raster editor for complex tasks editing, I can combine various images, apply special effects, and so on, and all this with a familiar interface that I like to work with.”
In Glen's words about the fact that he worked in a competitor's program, you can read Adobe Photoshop between the lines, but he cannot directly express himself like that in his interview. But we can: Glen, it was Photoshop, wasn't it?
Key features of ACDSee Ultimate 8:
- The program allows you to create, rearrange, connect layers, manipulate each individual layer
- Edit a specific area of an image without affecting other areas for more accurate editing
- Applying filters and effects to layers
- Applying Pixel Targeting to Layers
- Adding new images to separate layers to create collages
- Adding text and watermark to separate layer
- Transparency support (for 32-bit and 64-bit images)
Price
ACDSee Ultimate 8 will cost $150. Additional information: www.acdsee.com.
* * *
Practice in ACDSee Ultimate 8
In connection with the release of ACDSee Ultimate 8, the question arises - why was the functionality for working with layers not included in the ACDSee Pro 8 program? For what purpose was it necessary to release a crude program, and then immediately create a clone program, but with expanded capabilities? And what should users do who still managed to buy version 8? Recently, ACDSee Pro 8 of all 11 innovations professional users only one will be somehow useful (!), but for amateurs 7 may be of interest. With the release of Ultimate 8, our postulate is confirmed that, apparently, the company’s goal is to release as many of the same type of products as possible: now users are offered two almost identical programs.
Layers should be found in the Edit tab
ACDSee Ultimate 8, like ACDSee Pro 8, offers photographers either non-destructive processing (Develop) or editing (Edit), but it is the latter that adds support for layers. The fact that working with layers is a priori non-destructive (that is, the original photo files remain untouched) is quite obvious, because in Photoshop, when editing a document that contains layers, the user is forced to save his work as a *.PSD file, although at the very beginning he was created from RAW files or JPEG, which remain in their places untouched.
The same scheme of work applies to ACDSee Ultimate 8: if layers have been added to an image, then, of course, this image can no longer be saved as JPEG file or TIFF. Ultimate 8 uses its own file format *.acdc, which, after saving, will be shown among other photos in the feed as a regular photo. However, you can reopen this file in the Edit tab and continue working with the layers.

If you want to save finished work as a JPEG for publication on a website or sending by mail, then you need to do a regular export. You can, of course, combine all the layers and save the work as a JPEG, but in this case the idea of working with layers collapses, since later you won’t be able to return to editing the layers.
Transparency as a stumbling block
How to display transparency on a computer screen, and what is transparency? It is clear that we can talk about any transparency only if we can place one object behind the other in order to observe parts of the lower one through the transparent areas of the upper one. If there is no bottom layer, and we are working with a single object, then transparency on the screen is traditionally displayed in the form of white and gray checkerboard squares, this was first used in Photoshop, the same principle is used in ACDSee Ultimate 8 (it is not clear whether this method display technology patented by Adobe).
Experienced webmasters, when they hear the word “transparency,” immediately recall the once popular browser IE6, which did not display transparency in PNG images, and I really wanted to use them when creating websites. One way or another, architects and designers who work in 3D modeling programs, video editing operators, when separating a human figure from green background or work on special effects, graphic designers when developing labels, packaging and other printed products, as well as photo artists when editing their photographs.
As soon as we create an object with transparency, we immediately add a “headache” to our computer - many times more computational operations are required, and both the processor and the video card will be loaded at the same time. New hardware, new drivers, new programs... Perhaps the secret of Adobe programmers is also that they somehow managed to make their program work quite quickly with transparent layers on 486 computers. The layers first appeared in the fall of 1994 in Adobe versions Photoshop 3, and it can be argued that it is layers, along with support color model CMYK was done at that moment Photoshop is the best professional graphic editor.
It's the last days of 2014, and here we go - da-da-da-daaam! - in ACDSee Ultimate 8, 20 years later, layers with transparency appeared. Look at the technical requirements for software and hardware - it seems that the program is going to launch a spaceship to Mars, or at least to the Moon - the technical requirements are the most stringent.
However, enough words - let's open the photo in the Edit tab, erase some information, for example, the background, with an eraser, and save our work as an *.acdc file. In the Photo Browser, transparent areas are displayed in black, although it would make more sense to show them in white.
If we work with layers, use transparency in some layers, turn on some layers, turn off some, the program will create a thumbnail based on information about the visibility of the layers.
Photoshop Compatible
Prepare files in Photoshop, open in Ultimate 8
ACDSee Ultimate 8 is compatible with *.PSD format partial. Layered files created in Photoshop can be opened in ACDSee Ultimate 8, but they will be opened as a single-layer image, meaning all layer information will be lost, although some of the layer's transparency will be retained. Pay attention to the white border around the object - this is why the transparency is partially preserved.

Prepare files in Ultimate 8, open in Photoshop
If you open any photo in ACDSee Ultimate 8 and add transparency to only one layer (for example, erase part of the background in the photo), the work can be saved as a *.PSD file, and later edited in the same way in the Edit tab. When viewing the Photo Browser, transparency will appear black, but semi-transparent areas at the edges of the selection will appear rough. If you edit again in the Edit tab, everything will be fine.
 |
 |
| Edit *.acdc, save as *.psd | Displaying *.psd in the photo browser |
|---|
But when adding a new layer to the same image, the program will no longer allow you to save the work as *.PSD; saving a file with layers is only possible in the *.acdc format. In general, we can conclude that compatibility with *.PSD is conditional, and if you work in ACDSee Ultimate 8, you should use exclusively the proprietary file format of this program.
If you open such a *.PSD in Photoshop, the picture will be sad... one layer, and flattened:
 |
 |
| Editing *.psd Ultimate 8 | Open *.psd in Photoshop |
|---|
Applying filters and effects to a layer
Duplicate the base layer and apply an effect to it (for example, in the screenshot below two effects are applied - sepia and vignetting). Here we must immediately say that the layer in ACDSee Ultimate 8 is not a “smart layer”, which is in Photoshop. In other words, you won’t be able to edit the applied effect; you can only use the effect to process something that was previously processed by another effect, and so on in a circle. If you want to experiment, for each experiment we duplicate the bottom layer with the original photo, process it, then turn the layers on and off one by one and select the best option.


The developers present the function of adding watermarks to a separate layer as one of the main features when working with layers. Let's be honest - does a professional need this? It is possible that this is what is needed, but it is necessary as a last resort, when he has already worked on the photograph for several days, done a lot of work, created several options, started all over again, and finally agreed with the customer on all his work, after which he has completed like a berry on a cake, I added my signature or logo on a separate layer. In principle, the logo can be added the old-fashioned way, without using layers, nothing bad would happen.

Working with text
Along with adding watermarks, you can add custom text. This feature is unlikely to be suitable for poster design or greeting cards- the font size of the text can be a maximum of 256 (apparently points). All fonts installed in the system are available, you can apply an effect in the form of a shadow, the volume of some special effects to the inscription. It should be noted that this is not a text layer that can be edited if you suddenly make a mistake in a word, but just adding a raster inscription to the layer, once and for all.

The situation is partially saved by the “Place text on a separate layer” checkbox - in this case, the inscription can be moved to another place and enlarged/reduced, but, again, it will be narrower not text, and a raster text image in the form of an inscription on a new layer. Adding a shadow to this inscription will no longer work. In a word, working with text in layers in ACDSee Ultimate 8 is organized at the level Paint editor V part of Windows 3.1. This tool is good for creating a small signature in the corner of a photo, but nothing more. After amazing comfortable work Working with text in Photoshop is unbearably difficult here.
Performance
We will consider the pros and cons of ACDSee Ultimate 8 solely from the point of view of working with layers, since the program inherited all other functions from ACDSee Pro 8, including all its positive and negative aspects.
+ Pros
- The ability to work with layers for $150 instead of $119/year subscription for a special offer for photographers (Photoshop CC and Lightroom) from Adobe.
- Finally, after a long silence, a step towards serious work has been taken - with layers, the Edit tab begins to make sense for professional use.
- Cons
- Saving the results of working with layers in its own *.acdc format, which can only be opened in ACDSee Ultimate 8. The disadvantage is controversial, since any work with layers must still be saved in some form.
- Working with text in layers leaves much to be desired.
- No adjustment layers.
- The program is only available for Windows, which is a serious disadvantage. Mac owners can only wait for similar functionality to appear in the version for MacOS.
- Serious technical requirements.

Appendix 1. Comparison of Adobe Photoshop and ACDSee Ultimate 8
With the advent of the function of working with layers in ACDSee Ultimate 8, we can compare it with Photoshop, especially since marketers are positioning the program as an alternative to this world-favorite raster editor. Of course, we consider the pros and cons solely from the point of view of the photographer’s work.
Pros of Photoshop
- Smart layers, the so-called Smart layers, and the huge benefits they provide, most notably the re-editing of a previously applied effect
- Adjustment layers - again, re-editing previously made tonal adjustments
- Groups of layers for ease of working with a large number objects
- Advanced text processing capabilities
- Built-in tools for merging HDR and panoramas
- Availability of a huge number of plugins for photo processing: Portreture, Topaz Labs, NIK Software and many others
- Support for ready-made brushes, create your own brushes
- Full integration with other programs in the package Creative Cloud from Adobe: you can easily insert *.psd into any application, you can insert an Illustrator raster document into a *.psd file on new layer, you can insert *.psd with transparency into the layout of a Premiere video clip, etc.
- All kinds of selection tools, such as vector paths, smart edge selection, magnetic lasso, magnetic pen, etc.
- Smart transformation taking into account content (Content-Aware Scale)
- Tight integration with Lightroom, a comprehensive offer for photographers - a subscription to Photoshop+Lightroom.
Pros of ACDSee Ultimate 8
- Relatively low price
- Low barrier to entry, in other words, the program is easier for beginners
- One program for both cataloging/viewing and editing photos using layers
Appendix 2. Technical requirements for ACDSee Ultimate 8
Iron
- Intel® Pentium® 4 processor or AMD Athlon® 64 (2 GHz or faster)
- 2 GB memory (6 GB recommended)
- Video RAM (VRAM) - 512mb
- DirectX 10 compatible video card
- Monitor resolution 1024 x 768 (1280 x 1024 recommended)
- 2GB disk space
Software
- Microsoft® Windows® 7 (SP1) or Windows® 8 (64-bit only). In the case of Windows 7, it is not enough to have SP1 installed; you will also need Platform Update for SP1, as well as all the latest .NET updates
- Microsoft® Internet Explorer® 9+
- Microsoft® DirectX® 10.0 or higher
- Ghostscript 8.0 - for PDF support
- Windows Media® Player 9.0
Final conclusion
New ACDSee version Ultimate 8 is equipped to work with layers, this is good, necessary, useful, and everything really works. However, it is unlikely that professionals will give up their familiar and convenient tools in favor of ACDSee Ultimate 8. The Photoshop + Lightroom combination offers too many advantages, while ACDSee Ultimate 8 does not have a single unique property for which one could drop everything and switch to work with her. On the other hand, for beginners, ACDSee Ultimate 8 is a good option to get acquainted with the basic principles of photo processing, working with layers, and then move on to more serious programs.

© Konstantin Birzhakov, December 31, 2014 Google+
Model: Lena Guard
Based on materials from the official website of ACD Systems International Inc.
The author used a demo version of ACDSee Ultimate 8 to work on the review.
The article uses photographs of the author.
Any reprint in any media only with the written permission of the review author.
The review text is protected using the Yandex. Original texts": Text from 12/31/2014, 13:35


