Explorer compatibility view mode options. For end users
Hello friends! Today's article is about Mail.Ru cloud storage. Let's look at how to use the cloud via the web interface:
How to upload files there and share links to them;
How to create folders and configure access to them;
How to move, rename and delete files.
How to create documents, spreadsheets and presentations directly in the cloud.
And other subtleties of use.
The beauty of any cloud storage is that it gives you additional space to store your files online.
No need to clutter up your computer again.
It’s convenient to share files with other people (just open access via a link).
And since I have a mailbox on Mile, I decided to use this storage as well. Moreover, 25 GB of memory is available for free here. Insert from 2018 - now they give 8 GB for free.
In general, this is all theory. And we will move on to practice.
Watch my video instructions for working with the Mail.Ru cloud below:
So, as you already understand, to gain access to the cloud on Mail.Ru you need to register a mailbox here. Thus, you create your account through which you can use other Mail services, including cloud storage.
Although it is not necessary to register a mailbox, you can use Mail to log into your mail located on another service. I showed this in the video (watch from the 11th minute 46th second). Thus, your mailbox, for example on Yandex, will open in the Mail.ru interface and you will also be able to use the cloud.
To go to the cloud, being on home page Mail.Ru, you need to click on the “All projects” tab and select “Cloud”.

Initially, pictures and a video file are already loaded there, which you can delete. Delete files possibly in several ways. If you need to delete several files at once, mark them with a checkmark and click on the “Delete” button at the top.

Or right-click on the file and select “Delete”. Again, if you have marked several files, they will all be deleted.

And one nuance - in the Mail.ru cloud there is no basket into which deleted files, as on the same Yandex disk. From there we can restore them. We delete it from the cloud immediately!
To add files from your computer to the cloud, use the “Download” button in the upper left corner.

You can upload using the “Select files on your computer” button, or drag them into the upload window with the mouse. There is a limitation - the uploaded file size is up to 2 GB.

Next to the “Download” button we see the “Create” button. We use it for creating folders, documents (Word), tables (Excel) or presentations ( power point) directly in the cloud.

If you want to organize your files in the cloud, then create a special folders. To move file to folder, select it with a checkmark, right-click, select “Move”.

A window will open in which you can select a folder to move or immediately create a new one.

Generally, right button mice we can use for different actions above files– delete, move, copy, download, generate a link for other people or send by mail. It's very convenient.

By the way, if you need download several files from the cloud at once. You select them with checkmarks and they will be automatically packed into one archive for downloading.
![]()


If you share a file temporarily and then want to remove this link, select required file mouse, right-click and select “Delete link”.

All your files to which you have shared access can also be found in the " Sharing».

If a link to a file from the Mail.Ru cloud was shared with you, then you can download it immediately or save it to your cloud. You will have the option to specify a folder (where you want to save this file) or you can create a new folder for it.

Now a few words about setting up access to folders. You can share any folder with the ability to edit. That is, other users will also be able to add files to this folder.
To set up access to a folder, check the box and click on the “Set up access” tab.

Editing access can only be made available to individual members you invite via email.

If you are going to send an invitation to a user with a mailbox other than Mail.ru, then he will receive the invitation only if he logs into his mail via Mail. More about this Here.
At home mailbox this user will see a prompt like this:

Having accepted it, in his cloud, in the “Sharing” section, he will find the folder that you opened for him and will be able to add his files to it. You, in turn, will see all the changes he made in your folder.
And also, you can change the display of files in the cloud. And instead of large icons, you will have this compact list:

Friends, if this is your first time getting acquainted with Mail.Ru cloud storage, I hope that the instructions were clear to you. In any case, I'm always happy to answer your questions in the comments.
I wish you success!
Best regards, Victoria
Sometimes there are situations when Internet explorer 11 or 10 does not display web pages correctly.
This happens because the appearance of pages may change slightly in new browsers. As a result, the site may look unusual.
To fix the appearance, the developers introduced a feature in IE 11 and 10 called “compatibility mode”.
If you enable compatibility mode in IE 11 or 10, the website display settings change - they acquire the functionality of Internet explorer 9 or 8.
Compatibility mode can be enabled not only for the IE 11 and 10 browser, but also for games and programs, just in a slightly different way.
Configuring Internet Explorer 11 or 10 to enable compatibility mode
Before you proceed to enable compatibility mode in IE 11 or 10 browsers, you will need to complete one small step, or rather, enable the display of the “menu”.
To do this, click anywhere at the very top of the browser with the right mouse button and check the box next to the line: “menu bar”.
Now it will appear new line, in which you will have access to many customization options.
Please also note that if the page is not compatible with internet browser explorer 11, then in address bar(With right side) a button appears, clicking on which the browser will automatically switch to displaying sites as it was in older versions.
Enabling Compatibility Mode in IE 11 and 10
Now that you have a menu bar, click on the “service” option and in the tab that appears, select: “Compatibility mode viewing options” or “Viewing...”.

After this, the address of the web page you are on will be written in the window that appears (if you select the first option), where you will be asked to add a site for viewing in compatibility mode.
Click on the “add” button and your Internet Explorer browser will be rebuilt and begin to correctly display the added site.
For those who want to turn off compatibility mode in internet explorer 11, in an open browser, press the “Alt” key to display the menu bar or call it as described above.
Next, go to “service” and click on the line “delete browser history”. A window will appear in which you can clear the compatibility mode list both completely and for individual sites (log option).
It should be noted that this function in Internet Explorer is quite useful and is updated automatically.
The addresses of sites that are designed for older versions of IE are entered there, although updates can be disabled if desired.
However, do not rush to disable it - many sites are displayed much better when the function is enabled. Good luck.
Category: UncategorizedWhen you develop a website, you need to check it for compatibility with different versions Internet Explorer. On the other hand, you may simply end up on a page that is not compatible with the latest version Microsoft browser. In such cases, Internet Explorer 9 Compatibility Mode will help you.
If you come to a page that is not displayed correctly, then first try turning on compatibility mode (most often this helps, example in Figure 1).
Figure 1 - Site not compatible with Internet Explorer 9 (left standard view, on the right - in compatibility mode)
When you visit a site that does not clearly indicate that it is compatible with Internet Explorer 9, a button appears in the address bar. Click this button to enable compatibility mode (the page will refresh after clicking this button). To turn off compatibility mode, click this button again. After this, the site will always be displayed in compatibility mode, and the button will look like this.
If the site developers update the site and explicitly indicate that the site is compatible with Internet Explorer 9, the compatibility mode will automatically turn off. To view compatibility mode options, click

Figure 2 - Compatibility View Options
To add a site to the list, enter the site URL in the line Add this website and press Add. If you want to always work in compatibility mode (for example, you only work in local network, where web sites were developed with the eighth or seventh version of IE in mind), then check the box Show all websites in Compatibility View. In the parameter Show intranet sites in Compatibility View By default there is a checkbox, it tells the browser to open enterprise sites in IE7 compatibility mode.
If you want to enable compatibility mode not for the eighth version of the browser, then click
Figure 3 - Developer panel
Select Document mode and from the drop down list select the required version browser. In order for the browser to be recognized on sites as a different version, click Browser mode and select the desired version.
The Internet Explorer 9 development team promised that IE users would be able to browse the entire Internet. I think they succeeded.
Internet Explorer is perhaps the only browser that absolutely everyone has had to deal with at least once in their life. Windows users: no wonder Microsoft company Stuffs them with every version completely free of charge operating system. At the same time, of course, this software product is far from ideal in its characteristics, but there is still hope for the best. Taking a closer look at the updated IE 11, it’s easy to see that the latest development looks much better than early versions: here you have a brand new interface and improved web page loading speed.
But some sites are still displayed incorrectly: either the images are stretched, or the text is scattered chaotically across the entire field, or the control menu moves from the usual point A to point B. In principle, the way out of this situation is simple - just reconfigure the mode in Internet Explorer 11 compatibility so that the problem resolves itself. But what configuration options can be offered?
How to set up your browser?
In principle, there are not many ways to configure compatibility mode in Internet Explorer 11: just enable or disable the corresponding parameter for the site. Another question is when and how does each of these options apply to Windows?
With the first part of it, everything seems to be clear - we enable / disable it in the event that the site elements are not displayed at all or loaded incorrectly. Accordingly, if compatibility mode was enabled for the site, you need to disable it for the problem to disappear and vice versa. As for the second part of the question, everything is somewhat more complicated here.
How to connect parameters?
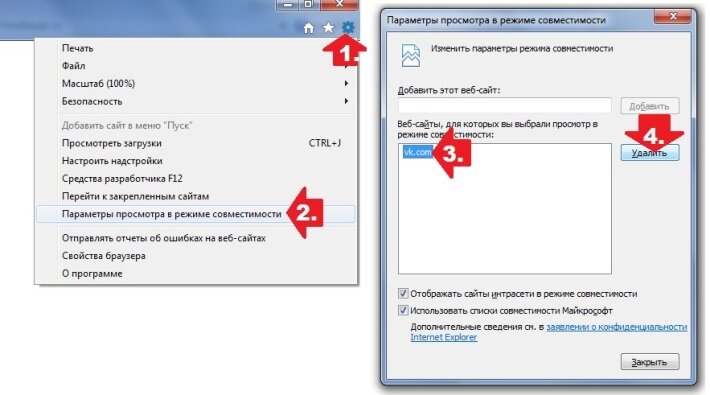
Based on experience previous versions standard Windows browser, it’s easy to guess that you can enable compatibility mode in Internet Explorer 11 by setting viewing options in the “Tools” section. The only catch is that finding it the first time is not so easy, because in the 11th version the standard file menu is hidden and, in order to “reanimate” it, you will have to use one of the available tricks, namely:

One way or another, after the “Viewing Options” window appears to enable compatibility mode in standard browser Windows, first check the boxes next to two parameters - “Display sites...” and “Use compatibility lists...”, and then indicate the address of the web portal with which problems are encountered when loading, and click the “Add” button:

What's the result? Less than 2 minutes - and the compatibility mode in the 11th version of IE is turned on!
How to disable the option?
If the site stops functioning normally due to the compatibility mode enabled in IE 11, you will have to resort to one of the methods to cancel this parameter. First of all, you can arm yourself with the reverse method, i.e., turn it on and turn it off. In this case, to configure the combined mode, open the “Tools” menu, select the “Viewing Options...” item in it, and then find in the list of sites added to the exception the one with which problems are encountered when viewing, click on it with the mouse and click the “Delete” button ":
If the problematic site is not on the list, it is very likely that it is included in the standard Windows lists. In this case, to solve the problem with loading it, you will need to uncheck the “Use lists...” item in the “Viewing options...” box.

In addition, clearing the browser history for Windows, that is, deleting the history of sites viewed in it, will help solve the problem of disabling the parameter. To do this, when open Internet Explorer in version 11, press Alt, then click the “Service” tab in the menu that appears and select the appropriate task from the proposed list. Next, check the box next to “Journal” and click the “Delete” button.
It is not displayed very correctly. This is due to the fact that in each new version browser, the appearance of the pages changed slightly. As a result, the web page began to look, to put it mildly, unusual. To correct the situation, the developers integrated into the Internet browser additional function, called Compatibility Mode.
Enabling Compatibility Mode
If the site is incompatible with internet explorer 11, then a special button appears in the address bar. For some web pages this function is necessary, for others it is unnecessary. For example, if you enable Compatibility View on google.com, updated Google Maps will most likely not work correctly. Other sites, on the contrary, will not be displayed correctly if this function is disabled.
So, first, let's look at how to activate it. We go from the browser to desired page on the network and click Service. There is an item here that allows you to change compatibility mode settings. We click on it. The web page address will be written in the line where it is proposed to add the site to the list viewed in compatibility mode. Click on the Add button, after which the browser will correctly display the resource.
It is not always possible to find the Service section right away. Therefore, I will describe several options for opening this menu. Right clicking at the top open browser, you activate context menu. In it we celebrate command line. After this, a menu with sections will appear at the top, where you will find Service. Another way is to do the same thing, however, click on Menu Bar. In both cases, the browser settings will change, and the panel with these tools will remain at the top of internet explorer.
If you want the menu to appear temporarily, you can press Alt on your keyboard. In addition, you can open the window you need by clicking on the Alt, e, p buttons. In this case, the Russian language must be turned on, since e and p are not Latin, but Russian letters. If you were unable to do this for some reason, you can always install another browser.
Turning off compatibility mode
Those who want to turn off the compatibility mode feature in internet explorer 11 should first go to the desktop. After this, launch the browser. In an open Internet browser, press Alt to open the menu bar or use the other methods above.
Go to Tools, where we select Delete browser history. Check the box next to Journal and click Delete. Can be selected from the list individual pages, for which you do not want to use this function.
Disabling list updates
It should be noted that the list of compatibility sites is automatically updated. This function can be quite useful, since the addresses of resources that were developed for older versions of the browser using Adobe Flash Player, etc. But you can always disable updates.
To do this, you need to go to the Service section of the Internet browser. In it we select Function parameters. Next, uncheck the box next to the line that says download updated lists from the Microsoft website. Close the browser.
It can be noted that compatibility mode is quite useful feature. Therefore, there is no need to rush to turn it off. This should only be done if, due to its activation, the page does not load correctly. However, such a situation is extremely rare. Much more often, everything happens the other way around, and the site is displayed better when the mode is turned on.


