How to change cell width in Excel. Expanding Cells in Microsoft Excel
Changing cell size in VBA Excel: setting row height, column width, auto-selecting cell width depending on the size of the content.
Cell size
The height and width of a cell is determined by the row height and column width at the intersection of which it is located. If, in your case, you do not want to resize an entire row or an entire column, use merged cells of the desired size.
Note that the row height is in points and the column width is in characters, so their numeric values do not correspond to each other in actual size.
Row height and column width in Excel
Programmatically, without additional macros, you can change the row height only in points, and the column width only in characters.
On the support site office applications Microsoft writes about these values this way:
- line height can range from 0 to 409 points, with 1 point approximately equal to 1/72 of an inch or 0.035 cm;
- The column width can range from 0 to 255, with this value representing the number of characters that can be displayed in the cell.
Line height
To change the height of a row, use the RowHeight property of the Range object. And it doesn’t matter whether the Range object is a selected arbitrary range, separate cell, an entire row or an entire column - the height of all rows intersecting with the Range object will be changed after assigning the RowHeight property of this object a new value.
Examples of changing line height:
Example 1
Changing the height of an individual cell:
ActiveCell.RowHeight = 10
as a result, the line containing active cell, acquires a height equal to 10 points.
Example 2
Changing line height:
Rows(3).RowHeight = 30
As a result, the third line of the worksheet acquires a height of 30 points.
Example 3
Changing the height of cells of a given range:
Range("A1:D6").RowHeight = 20
As a result, each of the first six rows of the worksheet will be given a height of 20 points.
Example 4
Changing the cell height of an entire column:
Columns(5).RowHeight = 15
As a result, all rows of the worksheet will be assigned a height of 15 points.
Column width
To change the width of a column, use the ColumnWidth property of the Range object. As with row height, it doesn't matter whether the Range object is a selected arbitrary range, a single cell, an entire row, or an entire column - the width of all columns intersecting with the Range object will be changed after setting the ColumnWidth property of this object to a new value.
Examples of changing column widths:
Example 1
Changing the width of a single cell:
ActiveCell.ColumnWidth = 15
As a result, the column in which the active cell is located becomes 15 characters wide.
Example 2
Changing column width:
Columns(3).ColumnWidth = 50
As a result, the third column of the worksheet (column “C”) becomes 50 characters wide.
Example 3
Changing the width of cells of a given range:
Range("A1:D6").ColumnWidth = 25
As a result, each of the first four columns of the worksheet will be given a width of 25 characters.
Example 4
Changing the cell width of an entire row:
Rows(4).ColumnWidth = 35
As a result, all worksheet columns will be assigned a width of 35 characters.
Auto width selection
To automatically adjust the width of a cell to match the size of its contents, use the following code:
"For example, let's write some text in any cell of the worksheet, for example, this: Cells(5, 5) = "Auto-select cell width" "now let's adjust the width of the cell, or rather, the column in which this cell is located: Cells( 5, 5).EntireColumn.AutoFit
Keep in mind that the column width will be adjusted to fit the cell with the longest content in that column. For example, if the length of the contents of the cell Cells(7, 5) exceeds the length of the contents of the cell Cells(5, 5), then the width of the fifth column will be automatically adjusted to the contents of the cell Cells(7, 5), despite the fact that a different one is specified in the line of code cell.
Quite often, the contents of a cell in a table do not fit within the default boundaries. In this case, the issue of expanding them becomes relevant so that all the information fits in and is visible to the user. Let's find out how you can perform this procedure in Excel.
There are several options for cell expansion. Some of them involve the user manually pushing the boundaries, while others can be configured to automatically perform this procedure depending on the length of the content.
Method 1: Simple Drag and Drop Borders
The simplest and most intuitive clear option To increase the cell size is to drag the borders manually. This can be done on the vertical and horizontal coordinate scale of rows and columns.


Attention! If on the horizontal coordinate scale you place the cursor on the left border of the expandable column, and on the vertical scale - on the top border of the row by performing the drag-and-drop procedure, then the size of the target cells will not increase. They will simply move to the side due to changes in the size of other elements of the sheet.
Method 2: Expanding Multiple Columns and Rows
There is also an option to expand multiple columns or rows at once.


Method 3: Manually entering the size via the context menu
You can also manually enter the cell size, measured in numerical values. By default, the height is 12.75 units and the width is 8.43 units. You can increase the height to a maximum of 409 points, and the width to 255.


The row height can be changed in a similar way.

The above manipulations allow you to increase the width and height of cells in units of measurement.
Method 4: Entering cell size using a button on the ribbon
In addition, it is possible to install specified size cells through a button on the ribbon.

Method 5: Increase the size of all cells in a worksheet or workbook
There are situations when you need to enlarge absolutely all the cells of a sheet or even a book. Let's figure out how to do this.


We perform similar actions to increase the size of the cells of the entire book. Only to select all sheets we use a different technique.

Method 6: Automatic width selection
This method cannot be called a full increase in the size of the cells, but, nevertheless, it also helps to completely fit the text within the existing boundaries. With its help, text characters are automatically reduced so that it fits in the cell. Thus, we can say that its size relative to the text increases.


Same as in Word program, in Excel it is possible to format tables - that is, to bring them into a decent, well-designed form.
You can change the height and width of the cell, the size and type of font, the position of the text in the cell, the borders and fill of the cell. Cells can also be merged (that is, combined). In this article I will talk about changing cell sizes.
Method one.
Change line height can be done manually.
Step 1.
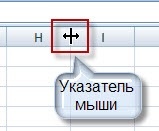
Move the mouse pointer to the line that separates the lines in the very first column - the column with line numbering. Pointer with regular arrow will change to a double black arrow with a separator. This is what it will look like:
Step 2.
Clamp left button mice and without letting go it, drag this pointer up (or down). As soon as you drag the line to the desired height, release the left button. The line height will change.
And it can be made even simpler. Execute step 1. But instead of dragging the changed pointer, do double click left button mouse by bottom line boundary. The line height will automatically adjust to the size of your text in the cell.
Change column width can be done in the same way as height. Move your mouse pointer to the line that separates the columns in the very first line - the line with the names of the columns. He will change again.
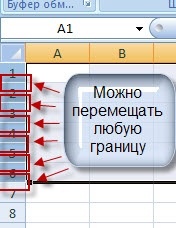
Can change height and width several rows and columns.
Step 1.
Highlight required lines or columns. ATTENTION! They need to be highlighted entirely!
Step 2.
Just as when changing one row (or column), move the cursor to any border of the selected rows (columns), wait for it to change and drag it to the desired width or height. The width (height) of all selected columns or rows will change.

Method two.
You can also change the height and width using the program itself.
Step 1.
Select the cells whose sizes you want to resize.
Step 2.
Go to the menu tab "Home" and find the command block on it "Cells".

Step 3.
Left click on the button "Format". A menu will appear.

Step 4.
To change the cell size, we need the commands that are collected in the block "Cell size".
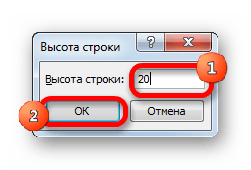
If you left click on the commands "Line height..." or "Column width...", then the following windows will open:


Here you can enter the size (height or width) from the keyboard and press the button OK. Experiment and see how the cell sizes change.
To generally have an idea of the size of a column (row), move your mouse pointer to the border of the desired column (row) (as you did at the very beginning when manual change size), pinch left mouse button and don't move the pointer anywhere. A tooltip with dimensions will appear near the pointer.

If you select teams "Auto-fit row height" or "Auto-fit column width" then the program itself will set the dimensions so that All the data fits in the cell. That is, the height (and width) will be selected according to the longest (widest) data (word, number) in the column (row).


