Creating a local ftp server in total commander. Setting up an FTP connection in Total Commander
Every blogger, not to mention a webmaster, simply needs to be able to set up an FTP connection and it is also advisable to know how to download, edit and upload files back to the server.
All this can be done through file managers with a built-in ftp client. There are many programs that allow you to work via an FTP connection with the server on which the site is located.
The article will talk about how to set up ftp via Total Commander is a very popular file manager at the moment.
One of the first things a blogger faces is confirming the rights to the site in Google and Yandex accounts. The easiest way to upload a rights confirmation file via ftp is through Total Commander (in our case). Or through any other ftp client.
You can still download Total Commander for free on the Internet, most likely on torrent sites.
Editing via Total Commander
There are many settings in Total Commander, but I will only consider the possibility of FTP connection and file editing.
First you need to configure and add an editor to Total Commander, which will open files for viewing and editing.
In addition to Total Commander, you will need an HTML editor.
Download and install an editor on your computer, the simplest and most convenient one is Notepad ++ and remember in which directory it is installed. A lot has been written about it, there is a video on the settings.
So, open Total and assign an editor:

On the screenshot is the Total Commander interface, go to the configuration tab.
Next, we assign an editor for viewing and editing files via ftp via Total Commander:

Do you remember in which directory you have the HTML editor exe file? It must be specified, thereby assigning it for viewing and editing via Total.
At the top we install a program for viewing files.
Below we install a program for editing files via ftp via Total Commander.
Arrows >> - browse folders and files on your computer to make it easier to find and assign a program, for example Notepad ++, as an editor. I have Sublime Text Editor installed as my editor.
This completes the first stage.
Setting up FTP via Total Commander
So, to connect to the server, you need to know the login and password for your ftp account.
Login and password for ftp account
The login and password for your ftp account can be found in the hosting control panel; ftp keys are usually provided by hosters when registering for hosting, or you can check with the support service.
Open Total Commander and go to the FTP tab and then Connect to FTP service...:

Let's go to the Add tab, where we will directly make an FTP connection.

For ftp connection, specify account information

Connection name - can be any arbitrary name, you can name it as you wish. The names of FTP connections can be seen in the previous screenshot.
Server, Port - indicate the server on which the site is located, it is provided by the hoster during registration, and it is also indicated in the hosting control panel.
You can also simply specify the domain name of the site as the server for the ftp connection. It will look something like this: ftp://domain_name Instead of http://, simply replace it with ftp://
An account is nothing more than a login from an ftp account.
Password—specify the password for the ftp account.
Well, click the OK button.
View and edit files via FTP via Total Commander
So the final stage remains - viewing and editing server files via an FTP connection.
By the way
In order to upload a file to the server, or vice versa, download a file from the server to your computer via ftp via Total Commander, you just need to drag this file to any desired directory or folder.

This is what the root directory of a WordPress site looks like. For example, we will edit the robots.txt file.
Right-click on the desired file and select the desired operation in the window that appears. In this case, I selected the Edit tab
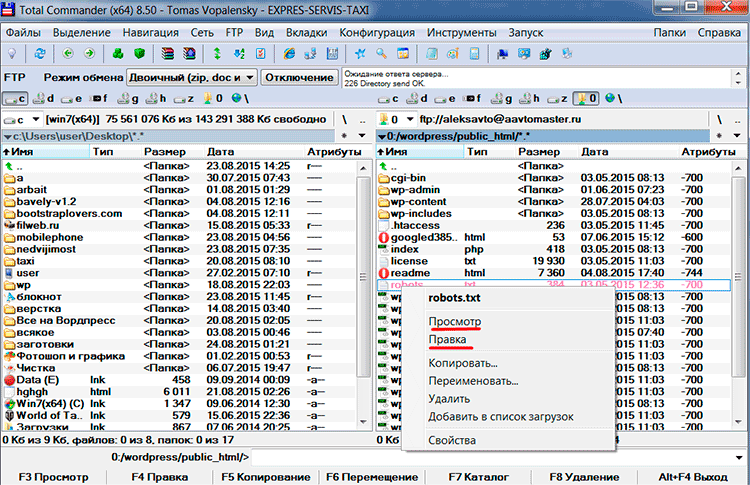
Well, we edit files via FTP via Total Commander
This is what the robots.txt file looks like in my HTML editor. I make the necessary changes and save the file. That's it, the edited file is automatically downloaded to the server.
In some cases, it is convenient to use the file transfer protocol - FTP - to download files from or to the server. You can download files through this protocol using a regular browser, but for uploading files to the server it is better configure FTP in file manager.
The abbreviation FTP stands for File Transfer Protocol(File Transfer Protocol). It is designed for transferring files over computer networks. Using this protocol, you can connect to an FTP server, view the contents of directories (folders) on the server, download files from or to the server. To connect to the server, you need to set up an FTP client.
Majority popular file managers have a function like FTP client. Its setup is almost the same in different file managers, so describing the client setup in each manager is a waste of time. We will tell you how to set up FTP in Total Commander.
Total Commander– one of the most popular file managers. This is a shareware program. You can use it for an unlimited time without paying a penny, but each time you start the program, three buttons will be displayed and instructions on which button to press. If you get tired of it, you can buy the program for little money.
So, how to set up an FTP client in Total Commander? To get started, launch the program. It consists of two panels. In one panel we need to open the folder into which we will upload files from the server (or vice versa, from which we are going to upload files to the server). In the second window we must configure FTP, and after connecting to the server we will see there the folders and files located on the server.

We click the mouse in the address bar of the panel in which we are going to configure FTP, and begin the setup. On the menu Net select an item Connect to FTP server(or click on the FTP button on the program panel). A dialog box appears with several buttons on the right. You need to press a button Add. If the window already has configured FTP connections, do not touch them - they do not interfere with us. A window for setting up a new connection appears.

In the window that opens we see several fields. What information do you need to enter in them?
Connection name. Here you need to enter the name of the connection. It can be anything, because it is only necessary so that you yourself can remember by name what kind of connection it is.
Server [:Port]: In this field we enter the address of the server with which we need to connect.
Account. In this field you need to enter the login required to access the server. It is provided by the server administrator. It also happens that access to the server is open to everyone, then you do not need to enter a login.
Password. The password provided by the server administrator along with the login is entered here. If you are not the only one using the computer, it is better to leave this field empty - then the client will ask for a password every time you connect, which means that no one except you will be able to connect to the server.
Remote directory. In this field we enter the address of the directory on the server that we want to go to. This address is relative and reports from the root directory. For example, in the root folder on the server there is a Docs folder, and in it there is a Reports folder, which is where we need to go. In this case, the relative address of the remote directory will look like this: docs/reports. If you leave this field blank, the root directory will be opened when connecting to the server.
The remaining fields/checkboxes are not required to be filled in. After filling out all the fields of the form, click OK. Now the connection we created should appear in the FTP server connection window. Click on it with the left mouse button (the line with the connection should be highlighted in color) and click on the button Connect. If you are connecting not to a local server, but to an FTP server on the Internet, do not forget to check whether you are connected to the Internet.
As you can see, setting up FTP in Total Commander is quite simple. There is only one caveat: The settings window may differ slightly in different versions of the file manager, but the basic fields remain the same.

In this instruction, we will install the Total Commander FTP client and configure a connection to the FTP server using the ftp protocol (not secure) and sftp (secure).
We will perform the installation on the Windows 7 operating system; for other versions of Windows, the installation of the Total Commander program is identical.
Total Commander- the best of the file managers, it has a built-in simple FTP client, it is quite suitable for uploading, downloading and editing files, but if you need to change the rights to folders or files, then you need to use a full-fledged FTP manager, for example such as.
Download Total Commander
Download the Total Commander program on ]]> official website ]]> . When you open the link above, a page will open with links to the installation file of the Total Commander program for 32bit and 64bit architecture, select depending on your architecture:

In the window that appears, to save the Total Commander installation file, you need to select a folder to save, in our case I select the same folder tmp on disk D:, and save it there:

After saving the program installer Total Commander we need to launch and install it, for this we will run the installation file tcm801x32.exe which is in the folder tmp on disk D:
We launch the Total Commander program installer, a window for selecting the program language opens, we naturally select Russian and press the button Further:

When asked whether it is necessary to install all languages, I chose no, because if the interface is already understandable there is nowhere else why install unnecessary things and press the button again to continue the installation Further:

At this stage of installing the Total Commander file manager, we need to select a folder for installation and since by default the installer tries to install the program in the folder totalcmd at the root of the disk WITH:, we need to click on the installation folder selection button and open the folder Program Files on disk WITH: and select it. So the installation path should be C:\Program Files\totalcmd as in the screenshot below, to continue the installation click the button Further:

In this window, we mark which shortcuts to install to launch Total Commander, mark, following the logic or example in the screenshot, select to create shortcuts in the Start menu and on the Desktop, and also create shortcuts for all users of the system. To continue the installation, click the button Further:

In the screenshot below you can see the process of installing Total Commander:

The installation of Total Commander is completed, click on the OK button to close the Total Commander installer.

The installation of the Total Commander file manager in Windows 7 is complete, let's start connecting to the FTP server.
Let's relax for a few minutes by watching this video, it will relieve work tension and recharge you to continue further full-fledged work:
Choosing an FTP client is a big decision. After all, if you install a program that is not suitable for this, it can damage the files that you will upload to the server via an FTP connection. That’s why many people choose popular programs that have already been trusted by tens of thousands of Russian-speaking users. One of these is Total Commander.
However, judging by the discussions on the forums, Total Commander is not as suitable for working with FTP as the well-known FileZilla application. The trouble is that the reason for such negative reviews is the inability to correctly configure an FTP connection through Total Commander. Therefore, this article will discuss setting up this program, and also touch upon the topic of working via SFTP in Total.
How to set up FTP in Total Commander file manager
The developers of the Total program are confident that working through an FTP connection and a file manager are inseparable concepts. This would be completely inconvenient if you could connect to the server, but could not manage the computer's file system. Total Commander copes with such tasks with a bang, so it will definitely complete all the tasks that you assign to it, of course, if you configure the program correctly.
As you know, Total Commander is a very unique program with a unique interface. You will not be able to use in this file manager the combinations that you usually use when working with a computer. Because to enable FTP settings, you need to hold down the key combination Ctrl + F. In normal mode, this key combination would bring up the search bar. Or you can find the FTP icon on the toolbar at the top - it's your choice. The menu that you will open is the section of the program in which FTP is configured, and in which many users get confused, which is why they are unable to work with the server through Total Commander.
If you do not want to change anything in the settings, but only want to quickly connect to the server to transfer data, then you need to create a new connection - to do this, click “New URL”. Next, you enter the server address in the line and click OK - a connection to the host will occur. And if you have an account on the server, then you can log into it without any problems. Please note that if you use FTP constantly and want to transfer data through this protocol, then it is better not to save your host account login information.
The thing is that Total Commander stores this information insecurely in a place that many people know about. And it stores it in the settings file - wcx_ftp.ini, and there is a possibility that data can be extracted from the file, so it is better not to risk it and use an anonymous connection. But this only applies to those who do not have a personal computer, but a shared one, for example, if you work with FTP somewhere in the office. Otherwise, you can safely save passwords on your PC. The fact that Total stores them in the file system is no big deal, since in extreme cases your computer will be protected from hacking by the Firewall.
It is also recommended to create links to server folders with which you constantly work in the “Frequently Used Directories” menu. If you are familiar with using Total, this will not be difficult to do. However, the best option that Total Commander has for working with FTP is synchronizing data between different directories. You need to open a folder on your computer in one panel, and on the server in the second, and thanks to synchronization you will quickly find data that is missing on the PC or host. Thus, with just a few steps you can instantly upload the necessary files to the server.
Total Commander is also suitable for those who want to use all the capabilities of the server, including editing various files and folders. To do this, you need to change your permissions on the host.
In Total, this is very easy to do - hover over the file and press Ctrl + Enter, after which the command line will appear. In the terminal, enter the command chmod 777 file1.php, only with your permissions and file name. This method is not always convenient, especially if you plan to edit a large number of files. Then you can copy all the files that you are going to edit and click the “Change Attributes” button, after which the menu for editing user rights will appear.
Plugin for secure SFTP connection in Total
If you are afraid to use Total because you think about the possibility of your account being hacked, then work through SFTP. Essentially, it is a combination of an encrypted SSH connection and the FTP data transfer protocol. Using SFTP will protect your data from interception, unlike the unprotected FTP protocol, through which even passwords are transmitted in clear text.
There is no SFTP setting in the standard options of the Total Commander program, so you will need a third-party plugin for this. There are a lot of sites on the Internet that are ready to provide you with a similar plugin for free, since Total itself is distributed free of charge. To install the plugin, you need to go to the “Configuration” section in Total and find the “Plugins” tab. First you need to unpack the archive that contains the plugin and place it in the directory with Total. Next, define the path to the add-on in the settings and click OK.
After the plugin is installed and you go to the FTP settings menu, you will see a new settings item - SSH, in which you can adjust SFTP. In general, working with SFTP is no different from using FTP. The only difference is the method of transmitting information to the server, that is, the standards by which this protocol operates. As for the user side, SFTP is not much different from FTP. So, to connect, you first need to enter your domain name, user and password. And to activate data encryption via a protocol, in the “Connection type” section, select SSH.
It is not necessary to use SFTP to work with the server - it is your personal decision. But keep in mind that FTP still has some limitations. Since this is an open protocol, almost all servers do not allow clients to access personal files and folders via FTP. That is, you will not be able to access the root folder of the site if you use FTP. And SFTP opens these doors for you. In addition, you can safely save the session on your computer, because it will be possible to steal your password and login only if a Trojan penetrates your system. Using SFTP in combination with a normal antivirus and Firewall will prevent this possibility, and your server will be safe. So it’s much wiser to install the plugin right away if you plan to use a remote server via one computer for a long time.
Hello everyone, in this article I will show you and teach you how to set up an FTP connection in Total Commander. Let me remind you that FTP is a data transfer protocol, and is mainly needed for transferring files over a network, or the Internet. Today we will set up file transfer in Total Commander. All you need for this is Total Commander itself, and the access details for the connected node (Login or password, as well as the node itself where we will connect). Let's open our Total Commander and select the tab in the top menu, as shown in the picture. Either a new FTP connection, or simply select “Connect to FTP server”
After this, we will have such a window, it shows a list of our FTP connections, etc. it is empty, we are adding a new one.

We click on the “Add” button, and a window appears with the settings for our FTP connection, or rather, it is necessary to fill in the fields with the settings to configure the FTP connection.

Connection name field: in this field you can specify any name for your connection, for example “Free FTP movie server”. Next, we configure the server and port of our FTP connection. This is a very important parameter; there should be no errors, because If you fill out this field incorrectly, you will not be able to connect to your FTP server. The server and port can be specified as the IP address of the server, or the site, ru address, and so on. After you have entered your server address, fill in the “Account and Password” fields. These fields are also required; without them, connecting via FTP will generate an error. We fill them out and click “Ok”, after that our connection is created. Here is an example of my FTP connection.


By clicking on the “Connect” button, I will connect to the remote directory via an FTP connection. After that, I can download the information I need. I would also like to say that you may have a different version of Total Commander, or the interface may be slightly changed, it all depends on the build and version you are using, but the principle of creating an FTP connection through Total Commander is the same. That's all for now, if there is anything you don't understand or have any questions, write to me, I will try to answer.