Ubuntu installation mysql phpmyadmin. Installing and configuring phpMyAdmin in Ubuntu environment
This article will describe in great detail how to properly install and configure phpmyadmin, which will help us manage our website databases more efficiently and visually than through the terminal.
We will install on Ubuntu 14.10. But the article will also be relevant for others deb-base d distributions, in some cases with minor amendments. First, let's look at the installation and configuration phpmyadmin to the apache2 web server.
Installation via GUI
Open the Application Center of our distribution and enter phpmyadmin in the search bar. The application we need will immediately be displayed below. Select it with the mouse and click “Install”

Ubuntu Application Center
Before starting the installation, we will be asked to enter the administrator (superuser) password to continue the installation. Enter the password and press Enter

During installation we will need to answer some questions. In the first window, select the web server for automatic reconfiguration. Place a check mark next to it apache2 and press the button "Forward"

Next we are asked whether to configure the database for phpmyadmin using package dbconfig-common. The default is checked. We don't need to reconfigure the databases. Uncheck the box and click "Forward"

and wait for the installation to complete.
Installation via terminal/console
Installation through the terminal/console is similar to installation through the application manager.
Open the terminal with the combination CTRL+ALT+T and enter the command
sudo apt-get install phpmyadmin -y
sudo apt - get install phpmyadmin - y |
The installer will ask for a superuser password. Enter it and click Enter. The password will not be displayed when entered.
Next, as with the GUI installation, we need to select a web server for automatic reconfiguration. The mouse does not work in the pseudo-graphical interface. To select a checkbox, press the Spacebar. Celebrating apache2 and click Enter.

In the next window we answer in the same way as when installing in graphical mode. Select with the cursor " <Нет> " and press Enter.

We are waiting for the installation to complete.
Checking the operation of phpmyadmin
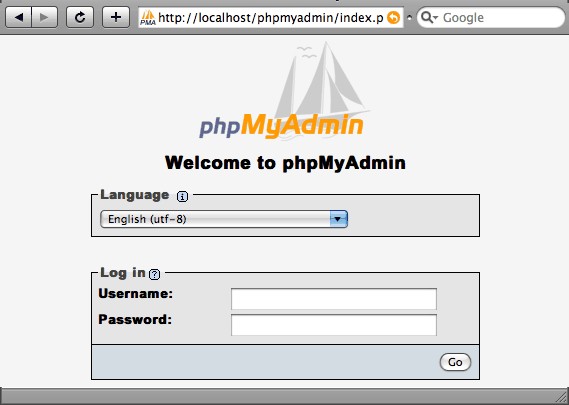
Check functionality phpmyadmin possible at the address http://localhost/phpmyadmin/ in a web browser. If we see the login form, then phpmyadmin installed successfully

Select the language, enter the login and password for the MySQL databases and confirm with the “OK” button. As a result, we should get to the interface phpmyadmin

Setting up phpmyadmin on a web server with nginx without apache2
For some server configurations that do not include a web server apache2, there may be a problem with phpmyadmin. We won't be able to get into the interface phpmyadmin. An example of a configuration would be the bundle nginx + php5-fpm. This problem can be solved quite simply.
Open the site’s configuration file in your favorite text editor (configurations are usually located in the directory /etc/nginx/sites-available/) and to the section server add the following:
Location /phpmyadmin ( root /usr/share/; index index.htm index.html index.php; location ~ ^/phpmyadmin/(.+.php)$ ( try_files $uri = 404; root /usr/share/; # fastcgi_pass 127.0.0.1:9000; # uncomment when using php5-cgi # fastcgi_pass unix:/var/run/php5-fpm.sock; # uncomment when using php5-fpm fastcgi_index.php; fastcgi_param SCRIPT_FILENAME $request_filename; nginx/fastcgi_params; ) location ~* ^/phpmyadmin/(.+.(html|ico|xml|css|jpg|png|js|txt|gif|jpeg))$ ( root /usr/share/; ) ) location /phpMyAdmin ( rewrite ^/* /phpmyadmin last; )
location/phpmyadmin( Root/usr/share/; Index index . htm index. html index . php; Location ~^/phpmyadmin/(.+.php)$( Try _ files $ uri = 404 ; Root/usr/share/; #fastcgi_pass 127.0.0.1:9000; # uncomment when using php5-cgi # fastcgi_pass unix:/var/run/php5-fpm.sock; # uncomment when using php5-fpm Fastcgi_index index . php; Fastcgi_param SCRIPT _ FILENAME$ request_filename ; Include /etc/nginx/fastcgi_params; Location ~ * ^ / phpmyadmin / (. + . (html | ico | xml | css | jpg | png | js | txt | gif | jpeg ) ) $ ( |
This article explains how to install Apache web server, PHP, MySQL DBMS and phpMyAdmin on Ubuntu Linux.
Installing Apache
Install Apache 2 from the repositories. To do this, run the command:
Sudo apt-get install apache2
After installation, the Apache server usually starts immediately (the message “Starting web server apache2” is displayed).
To manage the Apache server, we can use the apache2ctl utility. For example, you can view the current status of the Apache server by running the command:
Apache2ctl status
The commands to stop, start and restart the Apache server are as follows:
Sudo apache2ctl stop sudo apache2ctl start sudo apache2ctl restart
Checking Apache Server Health
You can check if Apache is working by typing http://localhost in your browser. If everything is in order, a blank page will open with the text: “It works!” .
Installing PHP
To install PHP (version 5), run the command in the terminal:
Sudo apt-get install php5 libapache2-mod-php5
After this, you need to restart the Apache web server. Ubuntu did this automatically for me. If this does not happen, run the command:
Sudo apache2ctl restart
Installing MySQL
To install MySQL, run the following command:
Sudo apt-get install mysql-server libapache2-mod-auth-mysql php5-mysql
After MySQL is installed, the following window should appear in which you need to enter a password. By default, MySQL creates an administrative user named root. In this window you need to enter the password for this user and press Enter, then re-enter the password. 
Installing phpMyAdmin
phpMyAdmin is a special web application for administering MySQL. It allows you to manage MySQL databases, run SQL queries, view data, and much more directly from your browser. To install phpMyAdmin, run the command:
Sudo apt-get install phpmyadmin
The installation of phpMyAdmin will begin. At the end of the installation, a window will appear in which you need to select the apache2 server (using the Space key; an asterisk should appear opposite the line apache2) and press Enter. 
Next you will be asked to create a database for phpMyAdmin. Select Yes and press Enter. 
Then enter the password to register phpMyAdmin on the database server and confirm the password in the next window. 
Checking the functionality of phpMyAdmin
In your browser, enter the address http://localhost/phpmyadmin. A form will open to enter your MySQL username and password to log into phpMyAdmin. For the username, enter root and the password is the one you specified for the root user when you installed MySQL.
Conclusion
We installed the Apache web server, PHP language support, MySQL DBMS and the phpMyAdmin application. The next step is to create virtual hosts (sites). Now (after installation) one virtual host has already been created, available at http://localhost. The files for the localhost virtual host are located in the /var/www directory. In one of the following posts I will tell you how to create virtual hosts for the Apache web server.
phpMyAdmin is a LAMP application created specifically for administration MySQL servers. Written in PHP and accessible via a web browser, phpMyAdmin provides a graphical interface for database administration tasks.
Installation
Before installing phpMyAdmin, you will need access to the MySQL database on the same computer where you are installing phpMyAdmin, or on a remote computer accessible over the network. See the MySQL section for details. To install in the terminal, enter:
Sudo apt-get install phpmyadmin
When prompted, select which web server will be configured for phpMyAdmin. This section assumes use as a web server Apache2.
Sudo ln -s /etc/phpmyadmin/apache.conf /etc/apache2/conf-available/phpmyadmin.conf sudo a2enconf phpmyadmin sudo /etc/init.d/apache2 reload
In your browser, go to http:// localhost/phpmyadmin. On the login page, enter root as the username, or another user if you configured one, and the MySQL password for that user.
If in the previous step, when you go to the address http:// localhost/phpmyadmin, the server gives an error 404 - Not found, check the file location phpmyadmin.conf. In case of ubuntu 12.04: if the file is missing at /etc/apache2/conf.d/phpmyadmin.conf and at the same time exists at the address /etc/phpmyadmin/apache.conf, then move the file and restart the server: sudo ln -s /etc/phpmyadmin/apache.conf /etc/apache2/conf.d/phpmyadmin.conf sudo /etc/init.d/apache2 restart
After that, try logging in through your browser again.
Settings
The phpMyAdmin configuration files are located in /etc/phpmyadmin. The main settings file is /etc/phpmyadmin/config.inc.php. This file contains configuration options that apply to phpMyAdmin globally.
To use phpMyAdmin to manage MySQL on another server, set up the following entry in /etc/phpmyadmin/config.inc.php:
$cfg["Servers"][$i]["host"] = "db_server";
Replace db_server to the current IP address of the remote database server. Also make sure that the computer with phpMyAdmin has access rights to the remote database.
After setup, log out of phpMyAdmin and log in again and you will have access to the new server.
The config.header.inc.php and config.footer.inc.php files are used to add header and footer HTML for phpMyAdmin.
Phpmyadmin is one of the most popular tools for managing mysql databases through a web interface. It is written in PHP and JavaScript and with it you can manage a local or remote database server.
Using PhpMyAdmin we can create, delete, rename, edit databases, tables, fields, as well as manage users, export, import records and execute any SQL commands. Currently supported database servers are MariaDB, MySQL and Drizzle. In this article we will look at how to install PhpMyAdmin Ubuntu 16.04 on an Apache or Nginx web server.
Installing PhpMyAdmin on Ubuntu 16.04
The phpmyadmin utility is available in the official Ubuntu repositories. So you can install it from there very easily. To do this, first update the list of repositories:
Then install the program itself:
sudo apt install phpmyadmin
The official repositories contain an older version, so if you want to install the latest version of phpmyadmin ubuntu, you need to use the PPA:
sudo add-apt-repository ppa:nijel/phpmyadmin
$ sudo apt-get update
$ sudo apt install phpmyadmin
During installation it will be necessary to select the web server with which we will install phpmyadmin, select Apache using spacebar and press OK:

Settings for Nginx will have to be specified manually and we will look at them a little later. Next you need to set a password for the PhpMyAdmin database, click Yes:

Then enter the required password twice. You are unlikely to need it in the future, so you can choose something complex:


You may have to include several php modules and the apache configuration file to make it work:
sudo phpenmod mcrypt
$sudo phpenmod mbstring
Then include the Apache configuration file:
sudo a2enconf phpmyadmin
Installing phpmyadmin nginx ubuntu is done by adding the following section to the /etc/nginx/nginx.conf file, we assume that nginx is running through php-fpm:
sudo vi /etc/nginx/nginx.conf
server(
listen 80;
server_name phpmyadmin;
access_log /var/log/phpmyadmin.access_log;
error_log /var/log/phpmyadmin.error_log;
location ^~ /phpmyadmin/ (
alias /usr/share/phpMyAdmin/;
index index.php;
location ~ /phpmyadmin(/.*\.php) (
include fastcgi.conf;
fastcgi_param SERVER_NAME localhost;
fastcgi_param SCRIPT_FILENAME /usr/share/phpMyAdmin$1;
fastcgi_pass 127.0.0.1:9000;
fastcgi_index index.php;
}
}
}
Save and restart your web server:
sudo systemctl restart apache2
sudo systemctl restart nginx
Now everything should definitely work. Open your browser and type http://localhost/phpmyadmin in the address bar:

Enter your username and password and then you can do whatever you need with the databases.

PhpMyAdmin protection
Installation of phpmyadmn Ubuntu 16.04 is complete. But this program gives full control over the database, so we need to ensure its maximum security. Let's make access to Phpmyadmin using a password. To configure Apache, create a file /usr/share/phpmyadmin/.htaccess with the following content:
sudo vi /usr/share/phpmyadmin/.htaccess
AuthType Basic
AuthName "Restricted Files"
AuthUserFile /etc/phpmyadmin/.htpasswd
Require valid-user

This is what these lines mean:
- AuthType Basic- this line sets the authentication type, we indicate that we will use a password;
- AuthName- set the message that will be seen;
- AuthUserFile- a file with data that will be used for authentication;
- Require- a necessary condition for authentication.
sudo htpasswd -c /etc/phpmyadmin/.htpasswd user

You can add multiple users, but do not use the -c option to do this:
sudo htpasswd /etc/phpmyadmin/.htpasswd user
Now, when you try to open the phpmyadmin address, the system will ask for a password. Only users who enter the password will be able to access the phpmyadmin login interface.
Conclusions
In this article, we looked at how to install phpmyadmin Ubuntu 16.04. As you can see, everything is very simple, and it only takes a little time to figure it out. If you have any questions, ask in the comments!
There are few truly effective solutions for working with databases. Basically, several programs and solutions are actively used. The phpMyAdmin application is known for allowing you to work without direct input in the SQL query language, providing simplicity and loyalty to the novice user. Installing phpMyAdmin Ubuntu is a trivial task for a professional. A novice user may encounter some surprises and controversial issues.
How to install and configure phpMyAdmin in Ubuntu environment.
phpMyAdmin is a traditional open source web application that is released under the GNU GPL license. That is, anyone can use the program for any purpose, as well as change its code and modify the software. The application allows you to perform various tasks for administering the MySQL DBMS, query language commands, and also view databases. And all this is available directly from the browser!
The program has really gained considerable popularity. It is widely used in various free and commercial projects, and PHP language experts can freely build their functionality into it. Now we'll take a quick look at what to do before installing phpMyAdmin on Ubuntu.
What to do first?
Before installing phpMyAdmin...
First of all, make sure that you have the required rights. There is no need to obtain root rights, but sudo command privileges must be present.
Secondly, your server must have LAMP configured. This is a stack of Linux technologies (including Ubuntu), the Apache web server, the MySQL DBMS and the PHP programming language. Without these technologies, there is no point in continuing work.

Third, get a domain with an SSL/TLS certificate. It is known that the phpMyAdmin Server installed on Ubuntu is often subject to attacks. If you need to protect your server from threats, it is better not to connect to it via an unsecured (HTTP) connection.
Next steps
To start installing the phpMyAdmin application on Ubuntu Server, you will need to update the package information:
"sudo apt-get update"
"sudo apt-get install phpMyAdmin php-mbstring php-gettext"
When setting up phpMyAdmin for the first time, Ubuntu will require additional information. Select server "apache2". When asked about using "dbconfig-common", answer "Yes". Then enter administrator information where necessary. After that, enter and repeat the password for the program itself.
Now enable PHP extensions. This will need to be done manually:
"sudo phpenmod mcrypt
sudo phpenmod mbstring"

Now restart the Apache program. This will apply the changes:
"sudo systemctl restart apache2"
The phpMyAdmin program interface can be accessed using...:
"https://x/phpMyAdmin"
where "x" is the domain name or IP address of the server. Now you can easily enter the configured program. To do this, use the standard name - “root”, as well as the password that you entered when setting up MySQL. The following steps to set up the phpMyAdmin application on Ubuntu OS will be necessary if you want to make your experience more secure.
Security
Using additional techniques, you can provide “bonus” protection when managing the DBMS through a browser.
The .htaccess file must be used to ensure that the Apache server can be controlled by the person using it. This file contains certain directives that are mandatory for execution on the entire web server. It should be placed in the root directory. It can also be located in any other location. Then the rules written in such .htaccess will have higher priority, although they will be valid for a specific location.

The directives available for .htaccess should be found on the official website of the Apache web server. Support for this type of file must be enabled in advance.
How do I enable permission to use?
Go to Apache configuration:
"sudo nano /etc/apache2/conf-available/phpMyAdmin.conf"
Here you need to add the following data:
«
Options FollowSymLinks
DirectoryIndex index.php
AllowOverride All
. . .»
After that, close the file, saving the changes. Restart Apache with a command like this:
"sudo systemctl restart apache2."
Creating a file for directives
Enter the command:
"sudo nano /usr/share/phpMyAdmin/.htaccess"
This will create a “.htaccess” file and give you permission to edit it. The file must contain information. Enter the following information into it:
"AuthType Basic
AuthName "Restricted Files"
AuthUserFile /etc/phpMyAdmin/.htpasswd
Require valid-user"
How to create a password file?
Previously, we suggested that you set the path for the password file. Now this file needs to be created and edited. The configured password will allow you to authenticate in phpMyAdmin from anywhere, and not just in Ubuntu.
Install the program support package “.htpasswd”.
"sudo apt-get install apache2-utils"

Create a “.htpasswd” file and add a new user to it. It's better to do it like this:
"sudo htpasswd -c /etc/phpMyAdmin/.htpasswd username"
where "username" is the username.
Rolling back changes. How to remove phpMyAdmin?
If you need to remove phpMyAdmin, Ubuntu allows you to do the following:
Remove packages (only in reverse order):
"sudo apt-get purge phpMyAdmin
sudo apt-get purge php5-mysql
sudo apt-get purge php5
sudo apt-get purge mysql-server
sudo apt-get purge apache2"
We remove dependencies:
"sudo apt-get purge apache2.2-common
sudo apt-get purge apache2-mpm-prefork
sudo apt-get purge libapache2-mod-php5"
If you are using Apache 2, you need to remove the directories:
"/etc/apache2/
/etc/php5/apache2/"
Conclusion
We figured out how to install and uninstall phpMyAdmin, as well as other useful details. If you have any questions, feel free to leave them in the comments. Visitors and administrators of our site will help you find solutions to many problems!