Installing ubuntu from a flash drive over the network. When you select the last item, a window opens
Gone are the days when in order to install on Linux computer, it was necessary in advance. I used to have, and still have, a large stack of disks with different versions Linux. Now that every computer can boot from a flash drive, you don’t have to buy disks at all.
Uploaded Linux image from the Internet, installed it on a flash drive, and then from this flash drive you install it on your computer. Grace! But not all young Linux users know yet how to install Linux from a flash drive and this short article is for them.
How to install Linux from a flash drive yourself?
To install Linux from a flash drive, you will naturally need a flash drive, at least 4 gigabytes for a medium-sized distribution and at least 8 gigabytes for a full Linux versions, which can usually reach 4 gigabytes.
After this, we need to download the Linux image that we will install. Which Linux to choose? Do I prefer the ones described in this article? However, you can choose any one you like. The downloaded file must have the extension .ISO Usually it is always like this, but some developers may upload images in other formats.
After this, we need to install Linux on a USB flash drive, as described in the article? The process is quite simple and after reading that article you can easily install any Linux on your own removable media. After you have installed Linux ON a flash drive, you can install Linux FROM a flash drive.
The next step is booting from this flash drive, and this can cause some difficulties. The fact is that many computers are configured to boot from your hard drive, and if you insert a flash drive into the computer and reboot, nothing will happen. To install Linux from a flash drive, you need to change the BIOS settings.
Don’t be alarmed, there’s nothing scary here, just read the article and everything will become clear to you. Let's assume you managed to boot from the flash drive and you saw your new operating system, working in live disk mode (in our case, in live flash drive mode:)
But that’s not all, of course, Linux is not installed yet, although you can already use it directly from the flash drive. But our task is precisely to INSTALL Linux from a flash drive.
Is the Linux installation described in this article? All installation steps are well described there, how to partition the disk, and so on. So there shouldn't be any difficulties.
But if there is something that is not clear to you, then write in the comments and I will try to help you with advice, since I have performed this operation more than once and personally it seems to me that everything is simple. But on the other hand, there may be situations that I have not encountered and I will be happy to complete the article.
In conclusion, I would like to feel sorry for people who use Windows; it still cannot boot from a flash drive and does not have LIVE mode work. Shame and disgrace!
For those switching from Windows to Linux, it's usually not an easy transition right away. In Linux, everything is new, yet unfamiliar. And if problems still arise, then so be it...
Quite a few articles have been written on how to install Ubuntu, but all of them are somehow incomplete, since pure Ubuntu unsuitable for work and needs to be supplemented...
Didn't find the answer to your question? Use the site search:
4 comments
Good day. I can't install Ubuntu in any way. I made a bootable USB flash drive and set everything in the BIOS, but it still doesn’t start.
p.s. formatted the flash drive to fat32, then using the unetbootin-windows-608 utility I wrote down Ubuntu 14.04.2 desktop amd64, freed up space in the hard drive by biting off 50 gigabytes from drive D using standard programs and left the space unoccupied so that Ubuntu itself would create a partition from this space with its file system(couldn’t find how to create Ext3/4(((
Please help me, what am I doing wrong?
Background
"Pocket distribution" is quite a convenient thing, because the vast majority of computers run on Windows control, and get the usual work environment Many people want to go outside.
For a long time I used an SD card with SLAX. The distribution is convenient, customizable, can completely load into RAM and free up the port. However, the project has been frozen for 3 years, has outdated software. Lack of support for ext4 file systems and new hardware (especially video cards and WI-FI routers) forced me to abandon this system.
UPD: Slax has already been defrosted and released new version. Details.
Next, I had the idea of installing the OS on a flash drive using the built-in tools of the Ubuntu system. But due to irrational preservation of changes, this system had to be abandoned. In the end, it was decided to use an installer called Ubiquity. It is he who is contained in the LiveCD and installs it on hard drive. Since this option requires much more space than the default CD image, I purchased new flash drive for 16 gigabytes - Apacer AH325:

The distribution for installation was selected Linux Mint 12, about which already earlier. In general, you can use any Linux system, but it is better to opt for Ubuntu or ubuntu-based distributions.
Note: if you are going to make full use of the temporary partition (for example, watch videos large size on YouTube), then it is better to increase the 100 megabyte limit. I don’t recommend removing the limit, because a frozen application can crash the entire system, filling up the temporary folder with its copies.
First boot
...as always, it lasts a long time. The main thing is to wait for the download to complete, do not interrupt it, otherwise you may suffer file system flash drives.You should then be greeted by the LightDM menu. After entering the password you will receive a fully functional system. You can start further customization and downloading packages. However, the best thing to do first is to open Update Manager and bring the system up to date. Everything else depends on your needs and tastes. But that's another story...
Results
So, the end result is a bootable flash drive, which is a full-fledged Linux desktop capable of handling almost any task.On my own behalf, I advise you to always produce backup important data "to the cloud" (Ubuntu One,
Installing Ubuntu from a flash drive has several advantages compared to installing from a CD. Firstly, not all computers even have a CD drive (this is especially true if you need to install Ubuntu on a netbook). Secondly, Linux installation from a flash drive it is much faster than from a CD (and this is especially important for “conveyor” installation on several computers). And thirdly, CDs in general have very unpleasant properties of being scratched and quickly failing.
So, how to create a bootable USB flash drive with Ubuntu Linux? To get started, you will need an Ubuntu disk image or the CD itself. If you don't have it yet, read where to get it.
Coffee break service in Moscow order viezdnoy-banket.ru
Creating a bootable Ubuntu USB flash drive
So, the first method of creating a bootable USB flash drive is intended for those who work in any Ubuntu versions or able to boot from Ubuntu LiveCD. For this purpose, Ubuntu has special utility usb-creator-gtk. To launch it, press ALT+F2 and enter “usb-creator-gtk” or in the application menu look for “Creating a boot disk”.
This program is outrageously simple: select the drive device where it is located Ubuntu disk, or Ubuntu ISO image file, select the flash drive device below. If necessary, you can also allocate space on the flash drive for saving personal files and settings (if you don’t do this, then when working from a flash drive they will be lost every time you reboot - but if you need the flash drive not for work, but only for installation, you shouldn’t worry about this).

Creating a bootable Ubuntu USB flash drive on Windows
If you only have Windows OS at your disposal, and for some reason you cannot boot from the Ubuntu CD, then there is a special utility for creating a bootable Linux flash drives from Windows - UNetbootin. You can download this program.

Everything here is also quite simple: select the distribution in top list(the program will download it itself), or an already downloaded disk image file (Diskimage). At the bottom of the window, select the flash drive. If necessary, select extra space for storing personal files (Spase used to preserve files across reboots).
I advise many people to use the so-called Live CD and Live USB with an alternative operating system Ubuntu system. But oddly enough, there is no well-written manual for creating a bootable USB flash drive with Ubuntu even on the manufacturers’ website.
In principle, with average knowledge English language this is not a problem, but with entry level something as simple as creating a bootable USB flash drive with Ubuntu It's just going to be a nightmare.
Why do I use a flash drive as a basis? The answer is quite simple - I have three of them and almost never have blank CDs or DVDs on hand, but a flash drive - please! The second reason for this post was the breakdown of the hard drive on my netbook, which without such a flash drive is just a stand for a cup of tea at the moment.
This manual can be used not only for creating Ubuntu Live Flash, but it will also work with others Linux distributions, except for very specific ones.
Create a bootable USB flash drive with Ubuntu
1. The first thing we need for installation is the system distribution. It is better to download it in advance, since the installation program will download it much more slowly (apparently it is configured to download from the USA, and not the nearest server). 
At this stage you need to be patient and download ISO image with Ubuntu on your PC. Important aspect to create a bootable USB flash drive with Ubuntu - You can't change the name of the ISO image!Most likely this is an overlooked glitch in the installer, but I’m seriously telling you: “The installer will not see the ISO image if you change the file name.”
2. Step two involves downloading the utility to create the bootable flash drive itself. You can download it from me - or latest version on the manufacturer's website. There is no need to install it, we can say that this is a portable version :)
3. Step three. You have a disk image with Ubuntu and a utility, as well as a flash drive with two gigabytes of memory on board.
We do the following:
- format the flash drive (preferably Fat32, default cluster, fast). The utility also provides formatting, but I had difficulties loading from a flash drive, so I advise formatting using Windows tools
- we launch the utility, it is important that the flash drive is already connected to the PC, otherwise it will not see it.
- select the specified distribution in it - the names must match, remember? (usually this is ubuntu №№...iso)
- select the address of the flash card (if you suddenly connected 3 pieces) and click Create

Now all that remains is to wait for the miracle of the utility completing its work and the flash drive is ready for use.
Booting from USB Live Flash Stick
Now you can try our new flash drive in action, but to do this you need to make changes in the BIOS of your PC, laptop or netbook.
Typically, you can enter the BIOS using the DEL or F2 keys while the PC is booting. You need to find the item Boot or Boot Priority (there may be combinations with the word Setup) and put the flash drive as the first boot location or, better yet, the only one.
I’ll show you using an ill-fated netbook as an example:

What to do if Ubuntu does not boot from the flash drive?
Additional information provided by Arthur from St. Petersburg, the story can be seen in the comments. There were problems installing UbuntuStudio on a netbook.
So, if the flash drive is not detected as boot device you need to “deceive the system” and present it as a hard drive. To do this, we need another specific utility - RMprepUSB.
The screenshot below shows step-by-step setup utilities:

Now in more detail:
- We will need ISO image file and a flash drive with 2 or more gigabytes of memory.
- Download the RMprepUSB utility (it is usually the first in the list Install_RMPrepUSB_2.1.628Full.zip, but the number may vary).
- Install the utility on your PC and run it.
- Configuring program parameters:
- select " Boot sector" - Syslinux
- file system FAT32 + Boot as HDD (or USB-Zip)
- check the box “Copy system files”
- agree with unpacking ISO and point the way to our Ubuntu distribution or what have you.
Upon completion of the utility, you will have a ready-made bootable flash drive, which will be detected in the system as a hard drive.
What can you do with a bootable USB flash drive from Ubuntu?
First of all, this is already the whole system, which will allow you to view, erase or write files to your (or someone else’s) PC. At the same time, it is not necessary to know the Windows password (except for the system drive). The system boot speed will depend directly on the PC parameters and the speed of the flash card.
Also, your PC will be able to connect to the Internet and allow you to work online without any significant loss in speed. Wi-Fi also works and you can find my articles about it, and also try to solve your problems.
You can also save your files to system disk, if Windows has given a long life.
Using this program you can format or repartition a disk or other flash drive.
That's basically all I wanted to write on this issue. Clarifications - in the comments!
A complete operating system in a small space external media- it's very convenient. You can run the system on almost any computer, and also have all your files and data always at hand, and you no longer need to keep it on the main drive large number systems
It is for these reasons that many computer users are interested in how to install Linux on a flash drive, whether it is possible, and if possible, then how to implement everything correctly. In this article we will try to answer such questions. We will also analyze in detail the installation process on a flash drive for one of the most popular distributions - Ubuntu.
Despite all the advantages of using an operating system from a flash drive, many say that this is not necessary. And not in vain, because this heavy use A flash drive can simply destroy it.
Non-volatile flash memory has one significant drawback- this is a limited number of rewrites of one data cell. There are no restrictions on the number of data reads, and the write limit is very significant - tens of millions of times. For using flash drives for their intended purpose, this is not critical, since the recording frequency is not very high and the flash drive lasts a long time.
But when you install the system on a flash drive, the kernel, the file system, programs constantly save their temporary files, constantly work with data and write something to the disk, the situation is further complicated by file system journaling, since it logs data about any changes to files, which further increases the number of rewrites of flash drive blocks.
You can say that there are SSDs made using the same technology that are used in computers. But everything is not entirely true, SSDs are designed for such a load, because they have a rewrite limit of several billion, as well as the ability to hot-swappable already failed blocks with backup ones.
Therefore, when you agree to install an operating system on a flash drive, you must understand that the flash drive will work much less than it could. But it's not all bad, you can perform some optimizations that will force the system to write less information to disk. If you agree with the risk, then next we will look at how to install Linux on a flash drive.
Installing Linux on a USB flash drive
operating room Linux system allows the user to do everything he needs, and if you want Linux on a flash drive, then that’s possible too. We don't even have to resort to any special tools.
We will consider the entire process using Ubuntu as an example, and everything will be done using the official installer. We won't be interested regular entry images to disk or working from RAM. In the end, we will get a full-fledged operating system on a flash drive.
First, do everything as usual, select the language, settings software and updates. The differences begin at the disk marking stage. Here you need to choose manual option, because automatic marking does not allow us to do what we need.
There will be one note here, you need to ensure that the system is not loaded from the flash drive on which you are going to install it, otherwise you will not be able to install ubuntu on the flash drive. That is, in addition to the installer, another clean flash drive must be connected to the system. If everything was done correctly, then in addition to the main disk /dev/sda, the /dev/sdb flash drive will appear in the layout window:
For a flash drive, its size, disk label will be indicated, and most likely there will only be one partition on it. This partition needs to be deleted to get free space.

The first partition must be created with the FAT32 file system and precisely the first one so that Windows can work with it. For example, if you have a 16 GB flash drive, then 5-4 GB can be allocated for data. The mount point for this partition is /home:


The second section applies to system files, here we need at least eight gigabytes. It’s better to use Btrfs as a file system, since we don’t need journaled ext4, and btrfs has compression and optimization for ssd. Specify / as the mount point:

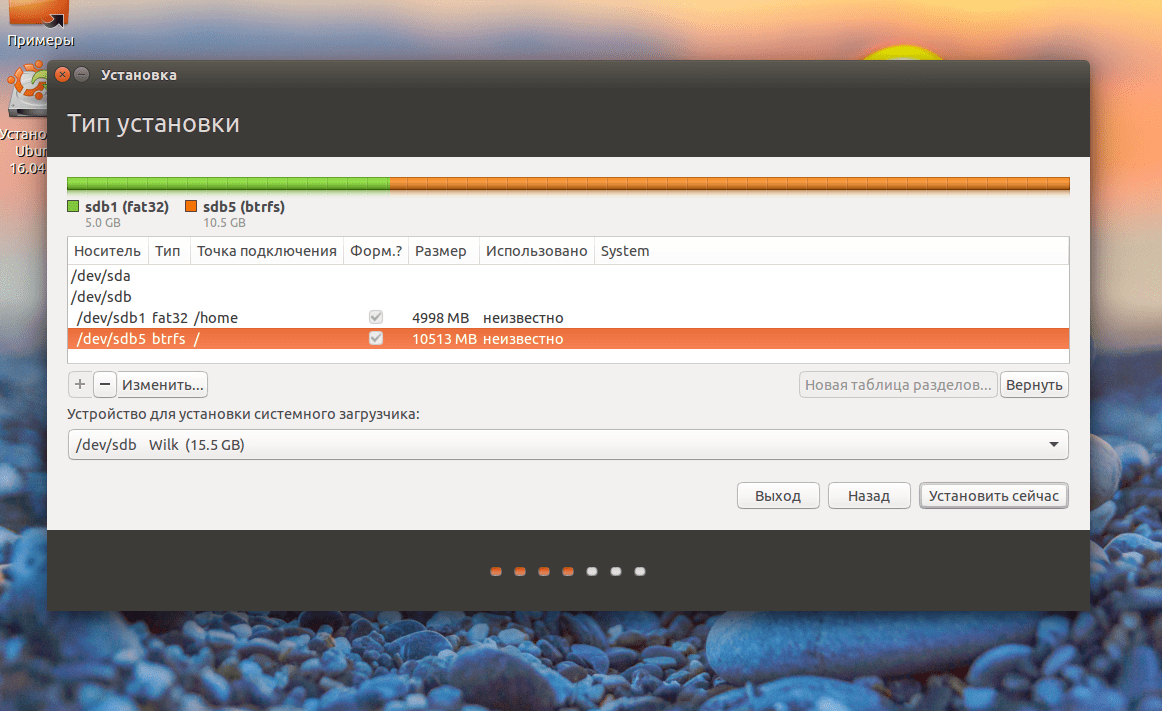
The last action at this step of the wizard is to specify the device for the bootloader, this should be the same flash drive on which you are installing the system.
Optimizing Ubuntu for working on a flash drive
Installing Ubuntu on a flash drive is complete, but now we just have to make it work in such a way as to write data to the disk as little as possible. All this must be done in an already installed system.
Most of the settings will be carried out in the /etc/fstab file, first we will enable compression of all files and optimization for ssd in btrfs, which is used as the root. For the root we used the /dev/sdb2 partition, since we used /dev/sdb1 for /home:
/dev/sdb1 / btrfs errors=remount-ro,noatime,nodiratime,compress=lzo,ssd,commit=60 0 1
It is possible that your disks in fstab will be named by UUID, then you will have to find the entry that indicates the mount point / and the btfs file system, and therefore change it. Let's look at the options:
- errors=remount-ro- remount read-only during errors;
- noatime- do not update file access time;
- nodiratime- do not update folder access times;
- compress=lzo- use lzo compression, this is the most fast algorithm zlib gives a higher compression ratio but takes longer to run;
- commit=60- by default, the file system writes all information about file changes every 30 seconds to disk, but using this parameter you can specify your own value, but not more than 300;
- ssd- a set of optimizations for solid-state drives.
Some folders in which temporary system files are most often written can be moved to RAM, to do this, add the following lines to the end of the /etc/fstab file:
tmpfs /tmp tmpfs rw,size=100m 0 0
tmpfs /run tmpfs rw 0 0
tmpfs /var/lock tmpfs rw 0 0
tmpfs /var/log tmpfs rw,size=10m 0 0
The kernel does not immediately write data to disk, but caches it in memory, and writes it when the disk is not loaded or it can no longer be stored in memory. To configure settings for flushing data to disk, use the files /proc/sys/vm/. The settings below reduce the number of entries by increasing RAM consumption.
Maximum time between data writes to disk:
sudo sysctl -w vm.laptop_mode=120
$ sudo sysctl -w vm.dirty_writeback_centisecs=12000
$ sudo sysctl -w vm.dirty_expire_centisecs=12000
Maximum amount of cache memory in percentage:
sudo sysctl -w vm.dirty_ratio=10
Write data to disk when only % of memory is free:
sudo sysctl -w vm.dirty_background_ratio=1
After these settings, the installation of ubuntu on the flash drive is completed, the system is more or less ready for use on the flash drive and will not harm it that much. But still don't forget to do it from time to time backups important data, because everything can break down at the most inopportune moment.


