What to make blanks from instead of a DVD drive. Where to buy an adapter for HDD to ODD bay
Install, since it is at times faster HDD, but I didn’t have it, and it was expensive. I used what I had at home.
The drive had a problem with a spring or something else, I'm not sure, and that's why the drive wouldn't close. If there is something wrong with your drive or you decide to replace the drive with hard drive, then this article is for you.
First, we need a special adapter, which looks like a DVD drive. I ordered this one from the Aliexpress store for 174 rubles, for those interested, here is the link.
This way you can replace a rather outdated drive with a hard drive or solid state drive.
How to choose a hard drive adapter?
The fact is that the drive size exists in two types - 9.5 mm and 12.7 mm - this is the thickness. I recommend that you measure the thickness of your drive before purchasing, and then purchase an adapter.
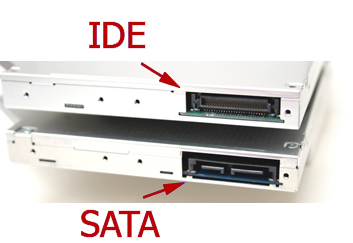
You also need to pay attention to what interface the drive is connected to, if SATA, then using an adapter that has an adapter from this interface you can easily install an HDD or SSD, but if your DVD drive is connected via IDE, which is already outdated technology , then connection additional disk, using of this adapter impossible.
As I already said, the adapters differ only in thickness, but the width and shape are all the same.
The adapter came to me in a regular plastic package, inside which was the adapter itself, a bag of bolts and a screwdriver.
Replacing DVD with HDD in a laptop
Now you can insert a hard drive into the adapter. Do this carefully so as not to break the SATA port. Now we take the bolts that were provided to us and tighten the disk on the sides.

Remove the drive from the laptop; naturally, before doing this, you need to unscrew it from the back of the laptop. It is usually held on by one bolt.

After this, you need to unscrew the drive mount and screw it to the adapter. This is necessary to secure the adapter in the laptop.
The appearance of this mount may vary depending on the laptop.
If we look at the adapter itself, or at the packaging, we can see instructions for installing hard disk into it, but we have already done that.
Install it on the adapter, there is a place for it.
Fully assembled adapter with hard drive can be placed in the drive slot. Snap it into place and then tighten the bolt.
Connect the battery to the laptop and turn it on, let's see what we got. And what we have now is what we have extra hard 1 TB disk.

If you have difficulties installing the adapter in your laptop, watch the detailed video:
After installation in your laptop ssd Instead of hdd, I began to experience a catastrophic lack of space on the first one. Purchasing a sata-usb adapter made it possible to expand my media library onto an old hdd. A couple of months passed and this option no longer suited me, namely, I was tired of carrying this “appendix” with me, and the speed left much to be desired. After some time, I came across a number of articles about installing a second drive using an ESPADA adapter. This miracle device with a second disc was inserted instead of the original DVD drive and delighted users. A search in electronics stores led to the understanding that this device is an unaffordable luxury for me. Prices start from 800 rubles here, from $6 in China. Further on the hub, I found articles on how to independently remake a DVD drive for additional installation of a second disk, but I was sorry to break the drive for such experiments, and then it started... At work, I took a dead hdd, sata cable, molex-sata from an old power supply.
Just my apartment was undergoing renovation and I had a lot of tools to “adjust” some parts for my idea.
Using an angle grinder, the sata connector was upgraded to Slimline SATA.

On the power side, 5 contact pads were left and other areas we did not need were cut down.

By removing unnecessary contact pads, I finally got the connector I needed, exactly like in a DVD drive.

In advance, a pinout diagram for the contacts was found on the Internet.

Armed with a soldering iron and a lot of patience, I soldered the whole thing into a SATA (ODA)->SATA (HDD) adapter.
 Having filled everything with ordinary shoe glue (well, I don’t have hot glue) and wrapped it with electrical tape, I got a completely aesthetic-looking wiring. After waiting for the glue to dry, I began to try to assemble the whole thing. I taped the HDD with double-sided tape, thereby creating a “cushion”.

I connected everything and inserted it tightly inside.

With my fingers crossed, I turn on the laptop and immediately run to the BIOS.

Hooray! WDC has decided.
I boot the system and everything is fine.
There are no limits to joy and pride! It turns out how easy it is to connect a second drive to a laptop at a minimum cost.
Hello friends! We receive many letters on our website with requests to describe DVD replacement drive on additional HDD or solid state SSD drivein a laptop, which is what we will do in today’s article. For readers who do not quite understand what we are talking about, I will briefly explain.
Now in computer stores and andonline supermarkets for computer and digital technology special adapters are sold SlimDVD -> 2.5 at a price of 1200-1300 rubles.The laptop hard drive is installed into the adapter itself, then the adapter is inserted into the laptop instead of the disk drive optical disks, and on HDD space The laptop is equipped with an SSD solid state drive. As a result, you have two in your laptop hard drives. On the SSD you install operating system (more advanced users can simply transfer Windows from HDD to SSD), and use the laptop hard drive to store files. In my opinion this is very good idea, remove the drive and install HDD instead, because if you ask when you are in lately you used the disk drive, you won’t even remember.
Hard drive Toshiba laptop in a special adapter Espada SS95
All your questions on this topic:
1. Is it possible to replace the DVD-ROM (disk drive) with a additional SSD using a special adapter, isn't that too complicated?
2. Will an SSD drive installed instead of a drive be visible in the BIOS and is it possible to install an operating system on it?
3. It may be better to install in this adapter regular HDD laptop and install an SSD instead of an HDD? If yes, then how to move the operating room in this case? Windows system 7, 8.1 to SSD from regular Laptop HDD?
To install an SSD drive in a laptop instead of a disk drive, you do not need to be computer technician, because you don’t have to disassemble the entire laptop, you just need to remove the drive and hard drive, but still to the point needs to be taken into accountin all seriousness, workcarefully and slowly.
Friends, this article is provided for your information and if your laptop is still under warranty, then after such a replacement you will naturally lose this warranty. If you are not confident in yourself, make such a replacement in the service, but still read the article first to decide what exactly you will install in such an adapter - a regular laptop HDD or an SSD, I recommend HDD, and install the SSD in the standard location of the hard drive laptop.
Prepare for the fact that in most cases not everything will go smoothly (I deliberately chose a difficult example so that you know some pitfalls), since such DVD -> HDD adapters are not officially made by any laptop manufacturing company, but despite this most These Chinese devices work great.
- Note: First of all, remove the battery from the laptop, if it is impossible to remove it, then be sure to disconnect it from motherboard, when disassembling a laptop, you should always do this. This way you will insure yourself and your laptop from possible troubles. When working, do not touch the components located on the laptop motherboard with your hands or a screwdriver.
Select and buy an adapter for HDD installations instead of a disk drive on a laptop
One of my friends bought this Espada SS95 9.5 mm SATA adapter for 1200 rubles

and asked me to replace the DVD-ROM with an HDD, but did not take into account the fact that there are two types of drives in laptops: a regular drive 12.7 mm high and an ultra thin drive from 9.5 mm. My friend’s laptop is not new and has a 12.7 mm drive, but despite this, the 9.5 mm adapter was still installed and sits firmly in its place.
Still, I advise you to buy an adapter the size of your drive and there will be fewer problems with installation.
When choosing an adapter for installing an HDD instead of a disk drive on a laptop, keep in mind that some adapters come with special “ears” and such an adapter can be easily removed back.
Removing the laptop drive
Friends, articles have already been written and are almost ready on how to make such a replacement on HP, Toshiba, ASUS laptops, and we will start with SONY.

Turn off our laptop and turn it upside down.
Disconnecting the battery
If battery not removable, which means you must disconnect the battery connector from the motherboard!
Disconnecting the DVD-ROM
Don't rush to disassemble your entire laptop! To disconnect the disk drive on a laptop, you usually do not need to remove the bottom cover of the laptop or, even worse, disassemble the entire laptop, but only need to unscrew two screws. If you have never done this, type in a search engine the request - How to remove a disk drive from (hereinafter referred to as your laptop model).

Disconnecting the laptop hard drive
In the case of SONY laptop There are no problems at all, we unscrew two screws and remove the cover and here is our hard drive. Unscrew two more screws

And carefully pull the silicone tab, the HDD is removed from its place.

Installing a laptop hard drive into the Espada SS95 adapter
In my opinion, you need to install a laptop hard drive in this adapter, and rightful place HDD we will install an SSD solid state drive onto which we will install or transfer the operating system. This needs to be done because the SATA port of the drive (up to 1.5 Gb/s) is often slower than the SATA port (6 Gb/s) of the hard drive.
Located on SSD Windows will work much faster than it would on a regular HDD. Almost all laptop HDDs have a 2.5 form factor, just like SSDs, so an SSD will fit perfectly in place of the HDD.
The laptop hard drive is located in special “slides” and is attached to them with four screws; unscrew them and release the HDD.


P adapter Espada SS95
Now, friends, the time has come for our adapter. We have it in this box,

In addition to the adapter itself, the plastic packaging contains a small screwdriver, a bag of screws, a plastic blanking panel and a spacer.

We take out the adapter

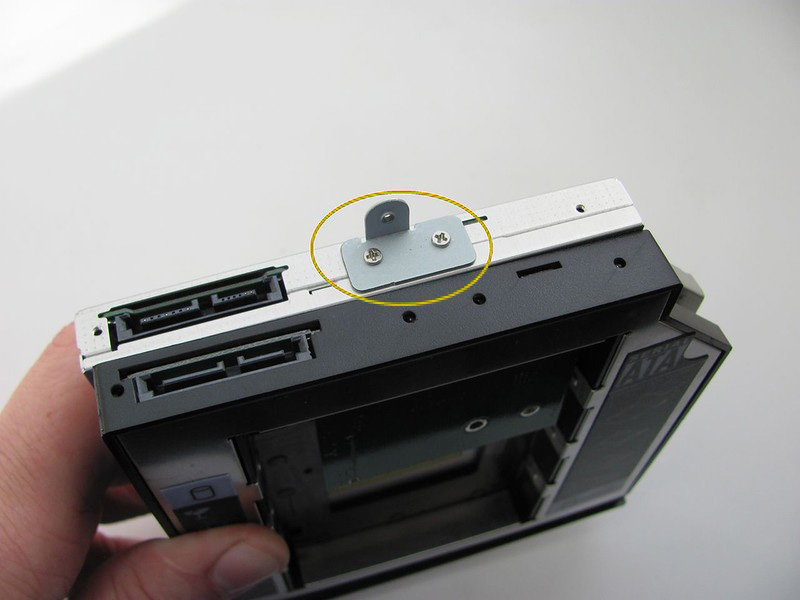
First, you need to remove the special fasteners from the drive and attach them to our adapter.
Please note. Located on top optical drive, and below is our adapter. This mount on the drive must be removed and attached with the same two screws to the adapter. Using this mount, the adapter will be attached to the laptop body.


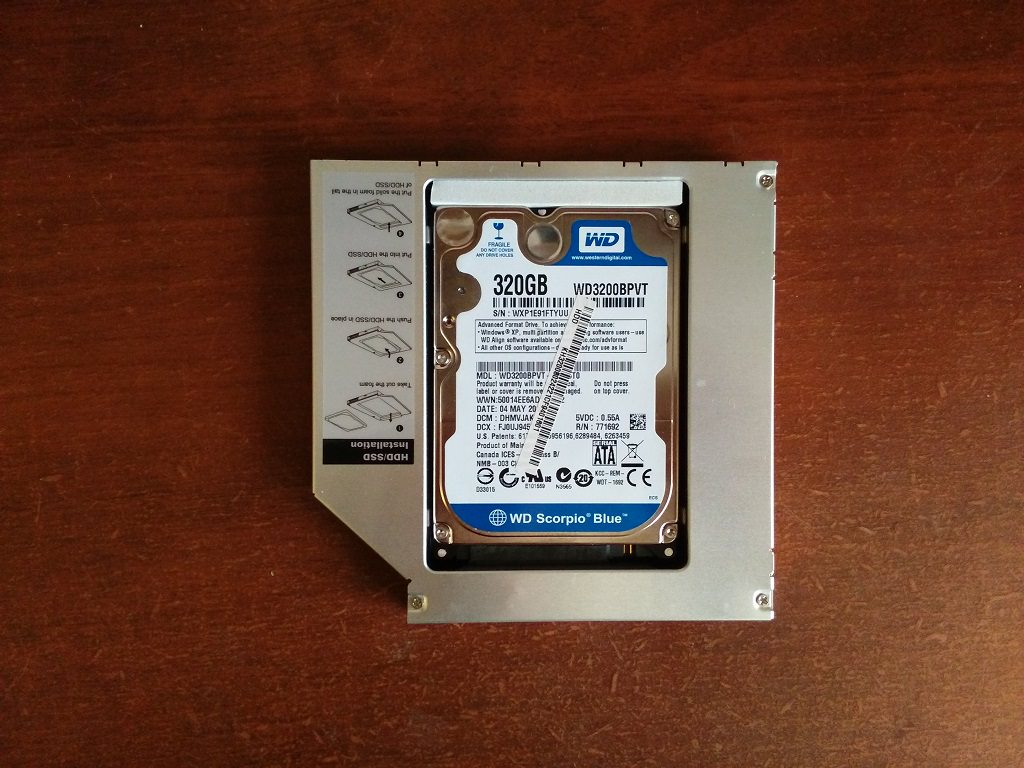
We install the laptop hard drive into the adapter and carefully insert it into the SATA connector.

Then we install the “spacer” into the adapter.


The hard drive in the adapter is secured not only with the help of a spacer. Turn the adapter over and tighten the screw securing the hard drive in the adapter.


On the other side of the adapter there is also a screw, only it is somewhat “recessed” in its place; we screw it in using a thin screwdriver.

Now remove another mount from the drive

and attach it to the adapter.

We put a plug on the adapter


We install the adapter in the laptop in place of the drive.

We attach the sleds remaining from the laptop hard drive to the solid-state drive


and install the SSD in place of the HDD and secure it to the laptop case with two screws.

Close the hard drive bay with a cover and secure it with screws. We also attach the adapter to the laptop body with two screws. We put the battery in place.

Side view of our laptop.

Installing Windows 8.1 on SSD
We enter the BIOS and see only one 120 GB SSD solid state drive; a regular laptop HDD connected via an adapter is not seen by the BIOS. This sometimes happens on various laptops, but nevertheless, if set to SSD operating system system, then in it the space connected through HDD adapter will be available.

Program Windows installations 8.1 still sees both drives: Disk 0 (SSD) and Disk 1 (HDD).

We install the Windows 8.1 operating system on the SSD.

We go to Disk Management and see our SSD solid state drive (120 GB capacity) with installed Windows 8.1 and a regular HDD (capacity 320 GB) with Windows 7 installed.

What happens if you leave one adapter in your laptop without an SSD?
You see for yourself, there are no defined hard drive models in the BIOS,

Conclusion:
Let’s say you are happy with everything in your laptop, then you definitely shouldn’t indulge in such experiments, another thing is, if you are an enthusiast and want to get the most out of your laptop, then definitely, our article is for you!
Every user would like to install a modern SSD drive on their PC for better productivity and more high speed system operation. Installing an SSD on your computer is incredibly easy, and the process itself is usually not accompanied by any difficulties.
By the way, previously there was similar article, but we are in it, for this we just needed to remove a small cover on the back of the case, which does not create any difficulties.
But installing an SSD in a laptop instead of a DVD drive is much more difficult, because first you need to carefully disassemble it. And many users already have difficulties at this stage. So let's look at the whole process in more detail.
What is required for installation?
First, you should familiarize yourself with the characteristics of your laptop to understand what components you need to purchase. As practice shows, in the majority modern models With a CD drive you can easily install an additional hard drive. Therefore, there should be no problems.
Before you start, you should make sure that you have everything you need for full-fledged work.
You will need:

Special attention should be paid to last point, so let's look at it in more detail
How to choose an adapter?
The drive size comes in two types and differs in thickness - 9.5mm and 12.7mm. Before purchasing an adapter, carefully measure the thickness of your drive and only then buy the appropriate adapter. Otherwise, SSD adapter The disc simply won't fit into the laptop in place of the DVD drive.


You should also pay attention to the interface through which the drive is connected. If SATA interface, then using an adapter with an adapter to mSATA, you can easily install an SSD instead of a disk drive. But if your DVD drive is connected via IDE, and this is an outdated technology, then for SSD connections you will need an IDE to SATA adapter.

As mentioned above, the adapters differ only in thickness, while their shape and width are the same. The adapter usually comes with a disposable screwdriver, screws for securing the hard drive, and a plastic cover. The latter is needed for installation on the adapter to cover the free space that appears after removing the drive.
Disassembling a laptop
After we have prepared everything necessary for replacement and purchased a suitable adapter for the SSD, we can begin opening the laptop and then replacing the drive.
You can do this as follows:

After the battery is disconnected, you need to remove installed hard disk.
To do this:

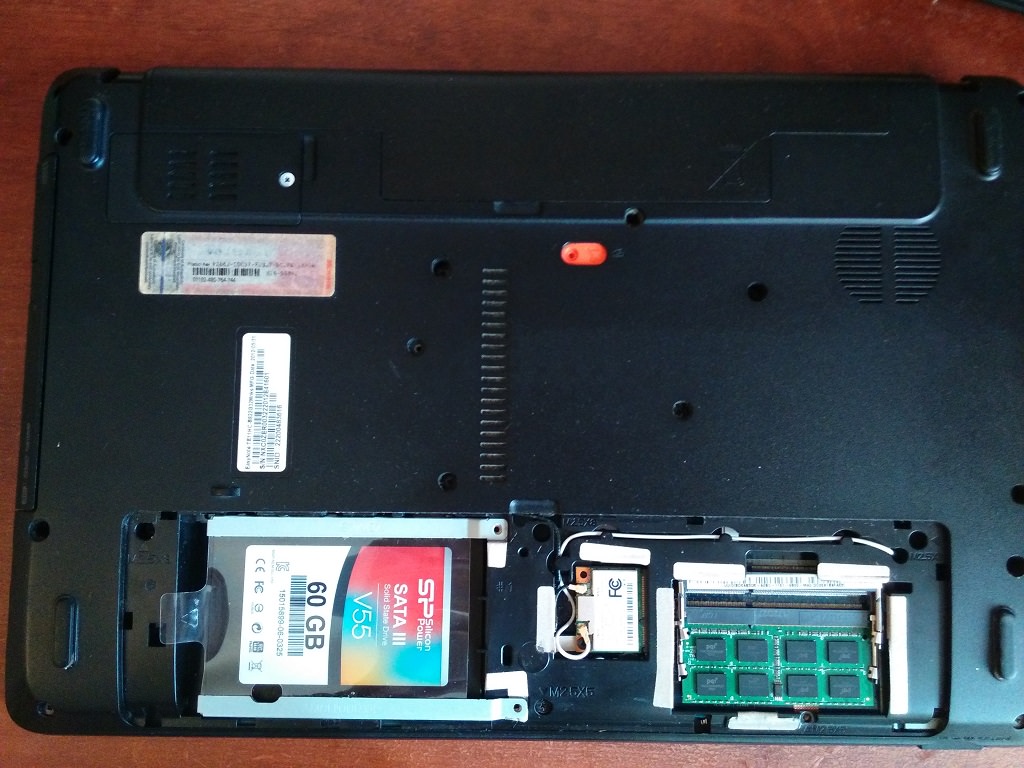
Under the cover there is a hard drive and memory modules. We need to remove the hard drive, since a solid-state drive will be installed in its place.
If you ask why we install the SSD here, and not instead of the drive, then there is a simple explanation for this.
When the speed of the bus to which the hard drive is connected is faster (in in this case the hard drive is connected via SATA 3, while the drive has SATA 2), then the SSD is installed in place of the HDD.
To properly remove the drive, you must carefully follow the following instructions:

We put both drives aside; we will return to them later.
Removing the Top Cover
Now we need to remove top cover laptop by unscrewing all the fixing screws. It should be taken into account that they are different sizes and you definitely need to remember where they came from.
After all the screws are unscrewed, the matter remains with the pick. Now you need to separate the bottom and top part laptop. You need to be extremely careful when opening it, as most models have unreliable latches that can easily break. Check again that all screws have been removed, otherwise there is a risk of damaging the device case.


To remove the cover, you need to insert the pick into the slot that is located between the top and bottom covers, and slowly turn it to release the latches located inside the case. You should start from the front of the laptop, where the indicator lights. It is necessary to walk the mediator around the perimeter of the entire body.
After you separate the top cover from the bottom, do not lift it up suddenly. Both parts are connected by cables, and you can damage them.
When working with some devices, you do not have to disconnect the cables, since sometimes you can replace the DVD drive without removing the top part of the device, which can significantly save your time.
DVD drive
Now unscrew the DVD drive. We will need a short screwdriver to remove the screw that secures the drive to the case. Once it is unscrewed, you can remove the drive without any problems.


Then remove the plastic cover from the DVD drive. To do this, you need to open it. To do this you will need a paperclip or a needle. Find a small hole on the front panel of the device and insert a paper clip into it. After lightly pressing, the drive carriage will move out of the housing, and you will have full access to its lower part and can easily separate the plug from the carriage.

Once the plug is removed, it will need to be placed on the adapter.


After this, we install the adapter in place of the drive we previously removed and tighten the fastening screw.

All that remains is to turn the laptop over and install the SSD drive in place of the old HDD. Close the cover removed at the beginning of disassembly and tighten the remaining bolts around the perimeter of the device, insert the battery.
The laptop is now assembled and ready to use. We installed two hard drives: old HDD we put it in an adapter and connected it instead of the drive, and a new solid-state drive was mounted in its place.
Software settings
The next step will be Bios setting, namely the inclusion AHCI mode. This mode allows you to increase the speed of the drive, mainly due to the advantages of NCQ technology. It also opens up other possibilities, such as hot swapping.

Now you know how to install an SSD in a laptop instead of an old DVD drive, and you can do it yourself without any problems, following our instructions exactly.
By the way, you can completely transfer the system without losing its functionality using special programs, for example, such as Acronis Universal Restore, Macrium Reflect and others. They have wide functionality and will help you in this situation.
The topic is fully discussed in this video
Unable to bear the constant lags of my laptop any longer, I finally decided to replace the hard drive in it with a brand new high-speed SSD. "Fatigue" hard drive is one of the main reasons for the decline in laptop performance, which I have already written about in more detail.
For 3,000 rubles I bought the cheapest one available at Citylink in availability of SSD 60GB (2300 rubles) and an adapter for connecting a 2.5″ HDD instead of a DVD drive (700 rubles).
 Despite the cheapness, the manufacturer provides a 3-year warranty on the drive.
It's easy to get to the laptop's original hard drive. Usually access to it and dies RAM It is covered with a separate, easily removable cover, so you don’t have to completely disassemble the laptop to replace it. In my case this was the case.
 Here it is, the original HDD, installed on a special slide. Let's get him.
 We unscrew the hard drive from the slide and screw the new SSD onto the slide.
 Installing an SSD in a laptop.
 Actually, that's all. The SSD is installed and ready to go.
Installing a native laptop HDD instead of a DVD drive
SSD installation- half of the whole matter. You need to connect your native hard drive to use it as file storage, because 60GB of volume solid state drive– it’s just about installing the operating system, basic set software and have 10-20GB in reserve free space for updates.
To install an HDD in a laptop, you need to remove the DVD drive and connect a hard drive in its place using a special adapter. Getting to the DVD drive is already much more difficult; manufacturers usually do not provide the possibility of quick replacement, and therefore you will have to open the laptop case.
But first we attach the disk to the adapter, and..
 Bummer. It turned out that I bought an IDE-SATA adapter, and in my case I needed SATA-SATA adapter. Those. The hard drive is inserted into the adapter, but the adapter itself cannot be connected instead of a DVD drive, the connectors do not match. In the next few days I will try to return the unsuitable adapter back to Citylink and buy the correct one instead, after which I will write a continuation.
UPD: I submitted the adapter to Citylink, but decided to refrain from purchasing the correct one and installing the HDD for now. Perhaps in the future I will return to this idea.
Conclusions
I installed it on a clean SSD pirated Windows 7 and immediately. There are no lags in work. With familiar tasks that were previously always accompanied by annoying slowdowns (Firefox with 15 open tabs, open Word or PDF file, launched book reader, video player with a movie paused), the system now flies. Which confirms my conclusion that the hard drive is the most weak point in laptop operation. Therefore, if you want to give new life If you have an old, slow laptop, feel free to replace the hard drive with an SSD. It is inexpensive compared to the cost of a new laptop, but the result is obvious. Naturally, after that upgrade, the laptop will not run the latest games (if it didn’t run them before), but it will be quite suitable for home and office use and will last a long time.


