How to find the problematic driver. How to open DMP file to view error analysis
Utility driver Verifier included with all versions of Windows, starting with Windows XP, and allows you to perform a driver check, identify problematic drivers that cause blue screen of death (BSOD- Blue Screen of Death) and write detailed information about the problematic driver to a memory dump for further analysis. The utility exposes the tested drivers to various " stress tests”, simulating various extreme conditions: lack of memory, I / O control, IRQL, deadlocks, DMA checks, IRP, etc. I.e. situations that occur infrequently on productive systems are simulated, and the behavior of the driver in them is monitored. The purpose of the utility is to identify situations in which the driver can lead to a system crash with a BSOD.
The executable file of the Driver Verifier utility is called verifier.exe and is located in the %windir%\system32 directory. There are two options for using the utility: from the command line or using the graphical interface.
To enable driver verification mode in Windows 8, run the Driver Verifier utility by typing
Verifier
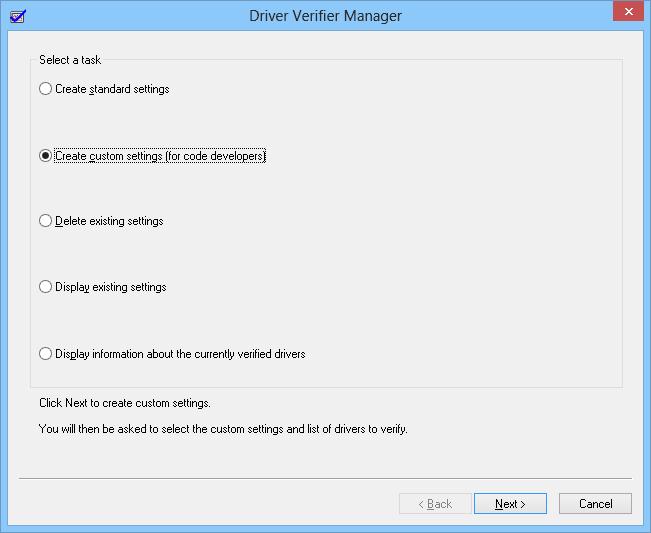
From the task list, select Create custom settings (for code developers) and press Next.
 Make sure options are selected standard settings, Force pending I/O requests and IRP Logging. Click Next.
 Next select .
 Sort the contents of the table by clicking on the Provider column heading and select the drivers you want to test from the list of drivers. In our example, we will run a check for all drivers that are not the developer of MicrosoftCorporation. We chose drivers: e1g6032e.sys (Intel) and lsi_sas.sys (LSI).

Note. The fact that the driver has a Microsoft digital signature indicates that the driver has been tested in a certain way for stability and its code has not been modified after that. That is why it is not recommended or to use.
It remains to press Finish and an information window will appear stating that you need to reboot the system for the changes to take effect.

Advice. The verification mode for the driver can also be enabled from the command line. For example, to run Driver Verifier with default settings for myPCDriver.sys, the command would be: verifier /standard /driver myPCDriver.sys
After a reboot, the system boots into driver checking mode. Driver Verifier runs in the background, performing various types of tests on selected drivers for errors. Use your computer as usual and wait for the BSOD to appear. If you know what actions caused the system to crash before, repeat them. In the event of a BSOD, you need to copy the memory dump file (by default, stored in the C:\Windows\Minidump\*.dmp directory) and analyze it using Windbg or equivalent.
Important! After activating the driver debug mode using Driver Verifier, this mode will work until it is forcibly disabled.
In the event that the problem does not recur within 1-2 days, then with a certain degree of certainty it can be concluded that the drivers being checked are not the cause of the system crash and the check mode for them can be turned off.
Advice. Using the Windows Driver Verifier significantly slows down Windows, so it is not recommended to run in this mode all the time.
You can disable the Driver Verifier check from the command line:
Verifier /reset
Or from the GUI by selecting the item Delete existing settings.
 In the event that you cannot log in to the system in normal mode, you can also disable debug mode from safe mode.
In the event that the system does not boot even in safe mode, try deleting the following keys in the registry by booting from the boot disk:
- HKEY_LOCAL_MACHINE\SYSTEM\CurrentControlSet\Control\Session Manager\Memory Management\VerifyDrivers
- HKEY_LOCAL_MACHINE\SYSTEM\CurrentControlSet\Control\Session Manager\Memory Management\VerifyDriverLevel
You can check the current status of the Driver Verifier utility as follows.
If you suspect that any of the drivers is not working correctly or, after analyzing the memory dump, you have identified the driver that caused the error, then for a more thorough check of the operation of the drivers, you can independently check the drivers using the checker built into the operating system Verifier.exe.
Check for unsigned drivers.
verifier and press Enter.
2) Select an item and press the button Further.
and press the button Further.
Simulation of a lack of resources and press the button Further.
Automatically select unsigned drivers and press the button Further.
If unsigned drivers are found, the system will display a list of them, which will include the driver files and their description. Moreover, the found drivers can belong to both devices and applications. Do not close the Driver Verifier window or press any buttons yet.
Option 1: Update the program or driver.
6) Visit the website of the device manufacturer or the author of the program and download the newer version.
7) Reinstall the program or update the driver.
8) After updating the application or driver, close the Driver Checker window by clicking the button Cancel.
9) Restart your computer and continue working in the operating system.
If the system does not have errors associated with this driver, then updating the driver or program eliminated it.
Option 2: Remove the program or driver.
6.1) Remove the program that owns this driver.
6.1.1) Open Control PanelAll Control Panel ItemsPrograms and Features and uninstall the application that owns the driver.
Before uninstalling a program, make sure that you have its installation disk or that its installation is saved on your disk.
6.2) Remove the driver in Device Manager.
6.2.1) In the menu Start right click on A computer and select the item Properties.
6.2.2) Click in the list on the left on Device Manager.
6.2.3) B Device Manager find the device, right-click on it and select the item from the context menu Properties.
6.2.4) Go to tab Driver and press the button Delete.
7) After uninstalling the application or driver, close the Driver Verifier window by clicking the button Cancel.
8) Restart your computer and continue working in the operating system.
If the system does not have errors associated with this driver, then uninstalling the driver or program eliminated it.
Option 3: Check for unsigned drivers.
Attention! After checking for unsigned drivers, the system may not boot (before proceeding with further steps, read this option to the end).
6) Press the button Ready and restart your computer.
7) Restart your computer
8) Before starting Windows, press the F8 key. When the disk selection window appears: select the disk on which you have Windows installed, press Enter, and then immediately F8.
9) Select item Safe mode
10) Open the dialog menu Run: Start ->
11) Enter command verifier.exe /reset and press Enter.
If the system booted normally, the check for unsigned drivers was successful - they are not the source of the problem.
Checking signed drivers.
1) In the start menu search bar, type verifier and press Enter.
2) Select item Create custom parameters (for program code) and press the button Further.
3) Set the radio button to Select individual options from a complete list and press the button Further.
4) Check all checkboxes except checkbox Simulation of a lack of resources and press the button Further.
5) Set the radio button to Select a driver name from the list and press the button Further.
6) Click on the column heading The supplier to sort drivers by their vendor.
7) Select the first 10-15 drivers by checking the boxes next to them in the column Verify.
Do not select all drivers at once, as checking them will take a lot of time and system resources.
8) Press the button Ready and restart your computer. If the system booted normally, the selected drivers were checked successfully - they are not the source of the problem. In this case, repeat the above steps by selecting the next 10-15 drivers.
If a blue screen with an error appears after the reboot, the problematic driver has been identified - its name will be included in the error message. In this case:
1) Restart your computer
2) Before starting Windows, press the F8 key. When the disk selection window appears: select the disk on which you have Windows installed, press Enter, and then immediately F8.
3) Select item Safe mode
4) Open the dialog menu Run: Start -> Run or press the combination Win + R
5) Enter command verifier.exe /reset and press Enter. If the check of all drivers was successful, then most likely the drivers are not the cause of the critical error that occurs on your system.
So, you have a recurring blue screen of death, and like many BSoDs, it's because a bad driver is to blame. However, the screen doesn't give you the correct information, either because it doesn't contain any driver at all, or because it lists a system driver that acts like a bogus one.
Driver Verifier is a free utility included with all versions of Windows from Windows XP. It literally checks every one of the drivers on your PC until it encounters the issue that caused the problem, intentionally creating the same blue screen but then writing the information to a log file helping you identify the issue.
Run driver driver
If you experience the same blue screen frequently and you would like to get active and fix it, here is how to use Driver Verifier.
- Click the button Start
- Click " Execute"...
- Enter cmd and press Enter.
- In the new window enter verifier and press Enter.

On Windows Vista and 7:
- Click the button Start
- Enter cmd in the box and click Enter.
- In the new window enter verifier and press Enter.

On Windows 8 and 8.1:
- Press key Windows+X
- Click " Command line" ("Administrator") (Windows PowerShell (Admin) in Windows 8.1)
- In the new window enter verifier and press Enter.

All versions of Windows:
- Make sure it's selected setting user preferences (for code developers) .
- Click " Further" .
- Select " Select individual settings" from the full list .
- Click " Further" .
- Deselect system simulation with low resource and standby I/O requests. (These two cause unnecessary workload on your PC.) Make sure everything else is selected.
- Double click " Further" .
- Select " Select Driver Names" in the list .
- Click " Further" .
- Select all drivers on this screen except those that say Microsoft Corporation under the provider. It is very unlikely that a Microsoft driver is causing this issue.
- Click " Ready" .

Note. If you are unable to complete the above steps because the blue screen continues to occur, try downloading to .
At this point, you must restart your computer. Then try causing the BSoD again by doing what you did before. Windows puts an extra load on your drivers to help you. If you are unable to reproduce the BSoD, try starting your computer overnight. Once the BSoD reappears, restart your computer and read the Minidump file.

Reading a dump file
The Verifier driver will run, run a blue screen, and write a log file. This log file is located in C:\Windows\Minidump\. Read it and you will see which driver is causing this issue. Try looking up the name of the driver to see what piece of hardware your PC is using.
So how do you read it? You need a debugging tool, which you can download from Microsoft.
AND . Download the SDK, install it, select debug tools, and deselect everything else.
Note that debugging tools for previous versions of Windows are no longer available; you will have to send the dump file to a Microsoft technician for analysis.

After installing it, look for it on the launch screen. It's called windbg (x64). Run it.
- Click " File", then " Open crash" .
- Switch to C:\windows\minidump\ and open the .DMP file contained inside.
- Look at the bottom of the resulting file where the line says " Probably caused". This is a good indicator of which driver is causing this problem.
Fix Driver
Update the driver associated with this hardware:
- Click the button Start
- Click Control Panel
- Click " Switch to classic view"
- Double click system
- Go to tab "Hardware"
- Click Device Manager
- Click " Update driver".
On Windows Vista and 7:
- Click the button Start
- Click Control Panel
- Double click Device Manager
- Find the device causing the problem
- Right click on it
- Click " Update driver".

On Windows 8 and 8.1:
- Press key Windows+X
- Click Control Panel
- View by small icons
- Click Device Manager
- Find the device causing the problem
- Right click on it
- Click " Update driver".
Or use our app not to be confused with Driver Verifier. Driver Reviver automatically updates all existing drivers on your PC and is especially good for updating underperforming drivers like this one to the latest and greatest version.
After fixing the problem driver, you will want to disable Driver Verifier.
Disable driver verifier
Once you're done using Driver Verifier, you'll want to turn it off as it's pretty heavy on your PC while it's running.
On all versions of Windows:
- Re-run Driver Verifier using the steps above.
- Select " Delete existing settings" .
- Click " Ready" .
- Restart your computer again.

Bookmark this article for the future so whenever you have a blue screen you can fix the problem. Also, check out our interactive and enter your error name for more tips on resolving your specific blue screen of death. Good luck!
A faulty driver can cause many problems with your computer. The main sign that your computer has a faulty driver is the blue screen of death, which is often caused by a driver being disabled.
In this article, we will tell you how you can find a faulty driver, and then update it or completely remove it.
Sometimes Windows notifies the user that one of the drivers has failed. However, it happens that the system cannot detect what the problem is, therefore it does not issue error messages, which is why it works slower or not as required. In this case Driver Check Manager(Driver Verifier) creates an additional load on system drivers, thereby trying to cause a crash. If one of the drivers fails, then Driver Check Manager report a problem with a blue screen.
Warning
Before use Driver Check Manager, please note that the tool may restrict you from using your own computer. Because the Driver Check Manager launches a blue screen of death when it detects a faulty driver, this can cause big problems when loading Windows.
If you don't have a chance to get into Windows to disable driver testing, your computer will go into a "boot -> load -> crash" loop that's pretty hard to get out of. The Automatic Repair feature is one of the few options to access Windows, but it's best to avoid this situation.
Before using Driver Verifier, make sure you have at least one of the following escapes:
- You can go into safe mode. Entering Safe Mode before Windows starts loading is usually done by repeatedly pressing F8 while the computer is booting. However, new computers boot up so fast that you simply won't have time to press F8 at the right moment.
- You created a system restore point before using Driver Check Manager. It's also a good idea to have a Windows installation disc so that you can restore your computer to factory settings.
How to run the Driver Verification Manager
Before starting the instructions for use Driver Verification Manager, make sure you read the "Warning" section above. It says how to avoid endless loading of Windows.
When you are one hundred percent sure that you have an emergency exit plan, click " Windows Key + R» and enter cmd in the dialog box Run", then press " OK».

In the command window, enter:
verifier

In the popup window select " Create custom parameters (for program code)", then press " Further».

You will see a list of all the tests that you can run to verify the drivers. Select all tests from the list, Besides"Simulate random resource shortage" and "Additional DDI Compliance Check", then click " Further».

On the next screen select " Choosedriver names from the list" and press " Further».

Here you can select the drivers you want to test. If you don't know which driver is malfunctioning, choose all but Microsoft because they most often work without errors.

When you click " Ready”, Windows will prompt you to restart your PC. After the computer turns on, continue using it as you normally would. If you get a blue screen, pay attention to the error message and restart your computer.
Once you have identified the faulty driver, you can disable Driver Check Manager in one of two ways. You can re-open the command prompt, enter the command verifier, and select " Delete existing options».

You can also open a command prompt and type:
Verifier /bootmode resetonbootfail

After disabling Driver Verification Manager, restart your computer. If the computer does not turn on, then use one of the emergency exits that we talked about in the "Warning" section.
Conclusion
If you think one of the drivers is malfunctioning but can't figure out which one, then Driver Check Manager will be a great help.
However, you should be prepared for the fact that the computer will not be able to turn on after testing the drivers, so consider an emergency exit, such as going into safe mode or starting a Windows restore point.
Have you ever had problems with drivers on your computer? How did you manage to find the faulty driver? Tell us in the comments below!
A faulty driver can cause many problems for a computer. The most common sign that drivers need to be updated is the blue screen of death. Fortunately, this blue screen shows us error codes, memory dumps, which allows us to identify the cause in a particular driver, device and update or delete it. It becomes difficult when memory dumps and error codes do not help, or the computer does not even show error codes, but simply blocks the system. What to do in these cases?
Embedded in Windows Driver Verifier designed to test drivers by causing extra stress on system drivers and stress tests to cause a crash. This will help you identify bad drivers in Windows.
Preparing the system for windows 10 driver check
Before switching on Driver Verifier, note that drivers can lock you out of your own computer if you're not careful. Driver Verifier, when a bad driver is detected, will give you a blue screen, if there are several of them, then a cycle will form and you will not be able to start back to the windows system to disable the crash test of system drivers. Therefore, we will prepare for every fireman, otherwise in our time the Russian "maybe a ride" is already weakly working. Do one of the following before enabling Driver Verification.
- Check that you can easily boot into Safe Mode without the need for BIOS. In common words, entering Safe Mode must be done using the windows desktop. Hold Shift + Reload, while pressing and holding the Shift button, click on Reload with the mouse. Try another way, install the option through Windows.
- Create a system restore point while disabling your antivirus products. Open Windows search and type Create a restore point choose from the proposed and follow the instructions offered to you.
- Create for your computer so that you can access the command line through options when using the recovery disk.
- You can or any other data you are concerned about.
- Be sure to read my crash test at the end of the article. He will help you in case of failure that happened to me.
Activating the windows function Driver Verifier
Before activating the drivers, make sure you read the section above on how to protect yourself from endless loading.
- Press Windows+R and type cmd to bring up the command prompt.
- Enter the following code on the command line:
verifier

- Specify item (for program code).

- Select all but "DDI Compliance Check" and "Emulate Random Resource Shortage".

- Then "Select a driver name from the list".

- Click on the vendor column to sort. It is not necessary to select all drivers, only from other suppliers where there is no Microsoft Corporation inscription. If you are sure that the error is in any driver, then select all the items with checkmarks.

After all the settings, click Done and you will be told that the check will be performed after the system reboots. If the checker gives a blue screen, then write down the error code, memory dump and restart the computer.
Back in windows, you can disable driver checking in one of the following ways:
- Go back, as you went through the command line and select the item delete existing options.

- Open a command prompt and enter the following code:
verifier /bootmode resetonbootfail

How to Fix Cyclic Boot with Blue Screen of Death
- 2. After 2-4 cyclic loading of the blue screen, the "system restore" option was automatically launched. in which I clicked troubleshooting>advanced options>boot options>restart. Once downloaded, select 4 or 5 to boot in safe mode. Disable Driver Verification Manager as above.
- 3. In order not to boot into safe mode, go to the parameter troubleshooting>advanced options and COMMAND LINE. In which just drive in the code verifier /bootmode resetonbootfail.
- 4. Copy or take a picture on your mobile phone, before starting to check the drivers, all 3 of the above points. Don't forget to copy the link to the article just in case.
How to open DMP file to view error analysis
- The test files are on the path C:\Windows\Minidump.
- You can open the DMP file format with


