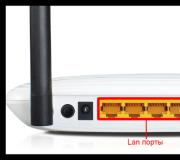
How do I configure and use the SSH port? Step-by-step instruction. SSH - access, program settings
" You are a novice admin and want, for example, to raise your web server. Go to the Internet, find an article that suits you and go! Let's pay attention to one important point, almost all of these articles provide a minimum of commands to start the necessary services and services. Good - it worked! Have you done everything in order to keep working? Are you using SSH over the internet? Why does no one in their articles cover the problems that newly-minted admins can get with this approach to setting up the server, after all, it is for beginners that the articles are written. In order for you to pay attention to the security issue in time, I will definitely make notes and links in my articles to this material. Forewarned - forearmed!"
So, SSH (secure shell) is a secure terminal server that provides remote access to the system. Safe because all traffic between client and server is encrypted. Is it so safe with the default settings? If you have a server with the ability to connect via SSH via the Internet, there will certainly be those who want to choose a password to enter. I don’t think it’s worth explaining that a potential attacker would be able to gain practically unlimited access to the system.
In all modern Ubuntu distributions, developers try to increase the level of security with standard parameters, but this is not always enough, and sometimes we ourselves choose the wrong concept and make mistakes.
Installing SSH Server on Ubuntu.
Installing an SSH server on Ubuntu is done with the following command:
Sudo apt-get install ssh openssh-server
After installing SSH, the server is automatically registered to autoload. You can control its starting, stopping or restarting using the commands:
Sudo service ssh stop | start | restart
Main SSH Configuration File - Server - File / etc / ssh / sshd_config, readable or editable only by the super user (root). To apply the changes, you need to restart the ssh server.
SSH server security settings.
Default protocol.
Again, modern distributions implement the SSH2 protocol by default. If in your case something like:
Protocol 2.1
Only 2 needs to be left:
Protocol 2
Using the insecure SSH1 protocol is not recommended.
By default, in recent releases of Ubuntu, SSH root access is restricted.
PermitRootLogin without-password
PermitRootLogin no
With these settings, the root user will not be able to log in over SSH.
Also, this parameter will be convenient if several administrators work with the server under the super user account. Administrators will log in under their own account and only then receive root privileges, this will greatly facilitate the audit of the server and the actions that administrators perform.
A little more about root in Ubuntu, a user created by default (when installing the system) can perform all administrative tasks through sudo. Activating the root user to access the system does not seem to me to be a reasonable decision.
Grant access to only specified users or groups.
Let's imagine that your server has a certain number of users, but only a few need to provide SSH access. So let's limit the range of users who have access:
AllowUsers user1 user2
You can also specify the required group, for example administrators:
AllowGroups administrators
Deny access with "blank" passwords.
You must explicitly deny remote access using blank passwords:
PermitEmptyPasswords no
Change the standard port.
SSH runs on port 22 by default. Accordingly, the bulk of attacks will be directed precisely at this port, then, using the selection of a username and password, attempts will be made to gain access to the server. We have already removed the most famous username from the database of a possible attacker (root) and allowed access only to certain users, now we will reduce the number of possible attacks (bots looking for vulnerabilities on standard ports) by changing the default port (the new port must be free!) ...
Let's change, for example, to:
Port 2220
It should be understood that changing the port will not help you in any way with a targeted brute-force attack (password guessing). An attacker can, for example, use a port scanner to scan the IP address where your server is located, as a result, he will receive a list of all open ports.
Also remember that now to connect to the server, in addition to the IP address, you need to specify the port number.
A really working option for brute-force protection is to use RSA keys for SSH2 authentication. With this method, the user generates a pair of keys, from which one key is secret and the other public. The public key is located on the server and serves to verify the user's identity. In addition, the key - public key combination can be secured with a passphrase, increasing the cryptographic strength of authorization. The logic is simple, do not use a password for authorization - there is nothing to guess!
We go into the system under the user for whom we will configure SSH access to the server.
Let's generate an RSA key with a length of 4096, you will be prompted to specify the storage location, leave it by default (/home/UserName/.ssh/id_rsa), you will also be prompted to set a password for the key being created. If you do not specify a password, then you will not have to enter it during authentication on the server using a certificate, this is less reliable. I recommend that you provide a password:
Ssh-keygen -t rsa -b 4096
A pair of keys will be created in the specified directory:
id_rsa.pub- public
id_rsa- private
Let's check if the files have been created:
Cd ~ / .ssh ls -al
Let's set the rights to the folder and files:
Sudo chmod 0700 ~ / .ssh / sudo chmod 0600 ~ / .ssh / id *
The private key must be transferred to the client in a secure manner and removed from the server to avoid key compromise.
The id_rsa key is passed to the client:
/home/UserName/.ssh/id_rsa
Then it is deleted from the server:
Sudo rm /home/UserName/.ssh/id_rsa
Create authorized_keys file (we are in the system under the same user “UserName” for which the certificate was created) and copy the contents of the file into it id_rsa.pub, define the owner and set the rights to the directory and file.
Cd ~ / .ssh sudo touch authorized_keys sudo chown UserName: UserName authorized_keys sudo cat id_rsa.pub >> authorized_keys sudo chmod 0700 ~ / .ssh / sudo chmod 0600 ~ / .ssh / authorized_keys
Let's check that the text has been copied:
Sudo cat /home/UserName/.ssh/authorized_keys
If the text is copied successfully, you can delete the public key:
Sudo rm /home/UserName/.ssh/id_rsa.pub
Sudo nano / etc / ssh / sshd_config
It is necessary to uncomment the lines and set the parameters as follows:
# allow authorization using keys PubkeyAuthentication yes # Path where the keys will be located, with which you can connect your own file for each user in his directory. AuthorizedKeysFile% h / .ssh / authorized_keys
Restart SSH server:
Sudo service ssh restart
After you have generated certificates for all users (who need SSH access), I recommend that you disable password authentication by editing the same file / etc / ssh / sshd_config
Caution before disabling password authentication, make sure key access is possible
PasswordAuthentication no Connect to SSH server via PuTTY using a certificate.
First, you need to convert the private key (the user's UserName key), which we previously took from the server.
For this we need the PuTTYgen program.
Loading the private key file " Conversions - Import Key".
If you have installed the password, enter it.
We choose " Save private key"and save the resulting ppk file. Store it in a place where it cannot be compromised.
Open the PuTTY program and set up the connection:
Session - Host Name (or IP Address) IP address of the host on which the SSH Server was configured;
Session - Port The port specified in the SSH server settings;
Session - Saved Session Session (connection) name;
Connection - Data - Autologin username Username;
Connection - SSH - Auth - Private key file for authentication The path to the ppk file;
Session - Save We save the session;
Session - Saved Session(select our session) - Load - Open- The session should start;
We enter the password and press Enter, after that we get into the system.
If the user's certificate has been compromised, we revoke the certificate and deny access to the user.
In order to close access for the UserName user to the Host by certificate, go to the folder where his certificate is stored:
Cd ~ / .ssh
Let's delete the file its public certificate authorized_key from the OpenSSH server, if you inadvertently did not delete files id_rsa.pub and id_rsa, delete them. We look through the contents of the directory with the command "ls".
We delete the necessary files:
Sudo rm authorized_key id_rsa.pub id_rsa
It is also good practice to limit the time for entering data for authorization, and a timeout if there is no activity.
In the example below, this time is limited to 30 seconds:
LoginGraceTime 30
Timeout when there is no connection activity.
Automatic disconnection of the connection after a certain period of time during which the console has been inactive.
ClientAliveCountMax - The parameter indicates the total number of messages sent by the ssh server to recognize the activity of the ssh client. The default is 3.
ClientAliveInterval- The parameter indicates the waiting time in seconds. Upon expiration, the ssh server will send a request message to the client. By default, the value of this parameter is 0. The server does not send a message for verification.
Disable ssh client automatically after 5 minutes (300 seconds):
ClientAliveInterval 300 ClientAliveCountMax 0
abstract: This article describes advanced features of OpenSSH that make life much easier for system administrators and programmers who are not afraid of the shell. Unlike most manuals, which do not describe anything besides the switches and -L / D / R options, I tried to collect all the interesting features and conveniences that ssh brings with it.
Warning: post very voluminous, but for ease of use, I decided not to cut it into pieces.
Table of contents:
- key management
- copying files over ssh
- I / O streams forwarding
- Mount remote FS via ssh
- Remote code execution
- Aliases and options for connections in .ssh / config
- Default options
- X server forwarding
- ssh as socks-proxy
- Port Forwarding - Forward and Reverse
- Reverse Sox Proxy
- tunneling L2 / L3 traffic
- Authorization agent forwarding
- Tunneling ssh over ssh through an untrusted server ( most likely you do not know this)
Key management
Theory in a few words: ssh can log in not by password, but by key. The key consists of an open and a closed part. The open one is put in the home directory of the user "who" logs into the server, the closed one - in the home directory of the user that goes to the remote server. The halves are compared (I exaggerate) and if everything is ok, they let it go. Important: not only the client is authorized on the server, but also the server in relation to the client (that is, the server has its own key). The main feature of the key in comparison with the password is that it cannot be "stolen" by hacking the server - the key is not transferred from the client to the server, and during authorization the client proves to the server that he owns the key (the same cryptographic magic).Key generation
You can generate your own key using the ssh-keygen command. If you do not set the parameters, then it will save everything as it should.The key can be closed with a password. This password (in conventional graphical interfaces) is asked once and stored for some time. If the password is empty, it will not be asked when using it. It is impossible to recover a forgotten password.
You can change the password for a key using the command ssh-keygen -p.
Key structure
(if the question about the location was answered by default).~ / .ssh / id_rsa.pub- public key. It is copied to the servers where you need to get access.
~ / .ssh / id_rsa- private key. It must not be shown to anyone. If you copy and paste it into a letter / chat instead of pub, then you need to generate a new key. (I'm not kidding, about 10% of people who are asked to give the ssh key post id_rsa, and of these ten percent are males, 100%).
Copying the key to the server
In the directory of the user you want to log under, if you create a file ~ / .ssh / authorized_keys and put the public key there, then you can log in without a password. Please note that the permissions on the file should not allow unauthorized users to write to this file, otherwise ssh will not accept it. In the key, the last field is [email protected] It has nothing to do with authorization and serves only for the convenience of determining where whose key is. Note that this field can be changed (or even deleted) without breaking the structure of the key.If you know the user's password, the process can be simplified. Command ssh-copy-id [email protected] allows you to copy the key without manually editing the files.
Note: The old ssh manuals mention authorized_keys2. Reason: there was the first version of ssh, then there was the second (current), they made their own set of configs for it, everyone was very tired, and the second version switched to versions without any "2" long ago. That is, always authorized_keys and not think about different versions.
If you have ssh on a non-standard port, then ssh-copy-id requires a bit of trickery: ssh-copy-id "-p 443 [email protected]"(attention to the quotes).
Server key
The first time you log into the server, ssh asks you if you trust the key. If you answer no, the connection is closed. If yes - the key is saved to a file ~ / .ssh / known_hosts... Find out where which key cannot be (because it is not secret).If the server key has changed (for example, the server has been reinstalled), ssh yells at forging a key. Please note that if the server was not touched, and ssh yells, then you are breaking into the wrong server (for example, another computer with the same IP appeared on the network, all sorts of local networks with 192.168.1.1, of which there are several million in the world, especially suffer from this) ... The scenario of "evil man in the middle attack" is unlikely, more often it is just an error with the IP, although if "everything is fine" and the key has changed, this is a reason to raise the level of paranoia by a couple of levels (and if you have key authorization and the server suddenly asked for a password - then paranoia can be turned on 100% and the password should not be entered).
You can remove the known server key with the command ssh-keygen -R server... In this case, you also need to delete the IP key (they are stored separately): ssh-keygen -R 127.0.0.1.
The server key is stored in / etc / ssh / ssh_host_rsa_key and /etc/ssh/ssh_host_rsa_key.pub... They can be:
a) copy from the old server to the new one.
b) generate with ssh-keygen. You do not need to set a password (i.e. empty). The ssh server cannot use the key with the password.
Note, if you clone servers (for example, in virtual machines), then the server ssh keys must be regenerated.
At the same time, it is better to remove the old keys from know_hosts, otherwise ssh will swear at duplicate key.
Copying files
Transferring files to the server can be tiresome at times. Besides fiddling with sftp and other weird stuff, ssh gives us the command scp which copies a file over an ssh session.Scp path / myfile [email protected]: / full / path / to / new / location /
You can also do the opposite:
scp [email protected]: / full / path / to / file / path / to / put / here
Fish warning: Despite the fact that mc can connect via ssh, copying large files will be very painful. fish (the mc module for working with ssh as virtual fs) is very slow. 100-200kb is the limit, then the test of patience begins. (I remembered my very early youth, when, not knowing about scp, I copied ~ 5GB via fish to mc, it took a little more than 12 hours on FastEthernet).
The ability to copy is great. But you want to "save as" - and immediately to the server. And in order to copy in graphic mode not from a special program, but from any familiar one.
This is also possible:
sshfs
Theory: The fuse module allows you to "export" requests to the filesystem from the kernel back to userspace for the appropriate program. This makes it easy to implement "pseudo-file systems". For example, we can provide access to a remote file system via ssh so that all local applications (with a few exceptions) will not suspect anything.Actually, the exception: O_DIRECT is not supported, alas (this is not a problem with sshfs, it is a fuse problem in general).
Usage: install the sshfs package (it will bring the fuse itself).
Actually, an example of my script that mounts desunote.ru (located on my home computer - pictures are shown from it in this article) to my laptop:
#! / bin / bash sshfs desunote.ru:/var/www/desunote.ru/ /media/desunote.ru -o reconnect
We make a file + x, call it, go to any application, say save and see:

Sshfs options that may be important: -o reconnect (tells to try to reconnect instead of errors).
If you work a lot with data from root, then you can (need) make an idmap:
-o idmap = user... It works as follows: if we connect as a user [email protected], and locally we work as a user vasiliy, then we say "consider that pupkin files are vasiliy files". well, or "root" if we connect as root.
In my case, idmap is not needed, since the usernames (local and remote) are the same.
Note that it turns out to work comfortably only if we have an ssh key (see the beginning of the article), if not, password authentication takes 2-3 connections.
You can turn it back off with the command fusermount -u / path, however, if the connection is stuck (for example, there is no network), then you can / need to do it from under the root: sudo umount -f / path.
Remote code execution
ssh can execute a command on a remote server and immediately close the connection. Simplest example:Ssh [email protected] ls / etc /
Will output the contents of / etc / to the server, while we will have a local command line.
Some applications want a control terminal. They should be run with the -t option:
ssh [email protected]-t remove_command
By the way, we can do something like this:
ssh [email protected] cat / some / file | awk "(print $ 2)" | local_app
This brings us to the following feature:
Stdin / out forwarding
Let's say we want to make a request to the program remotely, and then put its output in a local fileSsh [email protected] command> my_file
Let's say we want to put the local output remotely
Mycommand | scp - [email protected]: / path / remote_file
Let's complicate the example - we can transfer files from the server to the server: We make a chain to put stdin on 10.1.1.2, which is not available to us from the outside:
Mycommand | ssh [email protected]"Scp - [email protected]: / path / to / file "
There is also such a ridiculous method of using a pipe (kindly suggested in the comments in LJ):
Tar -c * | ssh [email protected]"cd && tar -x"
Tar packs files by mask locally, writes them to stdout, from where ssh reads them, transfers them to stdin on the remote server, where cd ignores them (does not read stdin), and tar reads and unpacks them. Scp is for the poor, so to speak.
Aliases
Frankly, until recently I did not know and did not use. Proved to be very comfortable.In a more or less large company, it often turns out that the server names look like this: spb-MX-i3.extrt.int.company.net. And the user there is not equal to the local one. That is, you need to log in like this: ssh [email protected] Typing every time - you can't get enough of tunnel syndromes. In small companies, the problem is the opposite - no one thinks about DNS, and the call to the server looks like this: ssh [email protected] In short, but still annoying. Even more drama if we have a non-standard port, and, for example, the first version of ssh (hello to cisks). Then everything looks like this: ssh -1 -p 334 [email protected] Strangle yourself. I don't even want to talk about the scp drama.
It is possible to register system-wide aliases for IP (/ etc / hosts), but this is a crooked way out (and print the user and options anyway). There is a shorter way.
File ~ / .ssh / config allows you to set connection parameters, including those specific to servers, which is most important, for each server its own. Here is an example config:
Host ric Hostname ooo-roga-i-kopyta.rf User Administrator ForwardX11 yes Compression yes Host home Hostname myhome.dyndns.org User vasya PasswordAuthentication no
All options available for use can be seen in man ssh_config(not to be confused with sshd_config).
Default options
As prompted by UUSER: you can specify the default connection settings using the Host * construct, i.e. for example:Host * User root Compression yes
The same can be done in / etc / ssh / ssh_config (not to be confused with / etc / ssh / ssh d _config), but this requires root rights and applies to all users.
X server forwarding
Actually, I spoiled this part a little in the example config above. ForwardX11 is just it.Theory: Unix graphical applications usually use an X server (wayland is on its way, but still not ready). This means that the application starts up and connects to the X server for drawing. In other words, if you have a bare server without gui and have a local x-server (in which you work), then you can enable applications from the server to draw on your desktop. Usually connecting to a remote X server is not the most secure and trivial thing. SSH simplifies this process and makes it completely secure. And the ability to harvest traffic also allows you to get by with less traffic (i.e., reduce channel utilization, that is, reduce ping (more precisely, latency), that is, reduce lags).
Keys: -X - forwarding of the X server. -Y authorization forwarding.
It's easy enough to remember the ssh -XYC combination [email protected]
In the example above (the company names are fictitious), I connect to the ooo-roga-and-hooves.rf server for a reason, but in order to gain access to the windows server. We all know the security of microsoft when working on the network, so exposing bare RDP to the outside is uncomfortable. Instead, we connect to the server via ssh, and then run the rdesktop command there:
ssh ric
rdesktop -k en-us 192.168.1.1 -g 1900x1200
And miracle, the login window in windows on our desktop. Note, it is carefully encrypted and indistinguishable from regular ssh traffic. 
Socks-proxy
When I find myself in another hotel (cafe, conference), the local wifi often turns out to be terrible - closed ports, no one knows what level of security. Yes, and there is not very much trust in other people's access points (this is not paranoia, I quite watched how passwords and cookies are taken away using a banal laptop, distributing 3G to everyone with the name of a nearby cafe (and writing interesting things in the process)).Closed ports are a particular problem. That jabber will be closed, then IMAP, then something else.
A regular VPN (pptp, l2tp, openvpn) does not work in such situations - it is simply not allowed through. It is experimentally known that port 443 is most often left, and in the CONNECT mode, that is, it is passed "as is" (normal http can still be wrapped transparently on a squid).
The solution is socks-proxy ssh operating mode. Its principle: ssh client connects to the server and listens locally. Having received the request, it sends it (via an open connection) to the server, the server establishes a connection according to the request and sends all the data back to the ssh client. And he answers the person who applied. To work, you need to tell the applications "use socks-proxy". And specify the IP address of the proxy. In the case of ssh, this is most often localhost (this way you will not give your channel to strangers).
Connection in sock-proxy mode looks like this:
ssh -D 8080 [email protected]
Due to the fact that other people's wifi is most often not only fig, but also laggy, it may be nice to enable the -C option (compress traffic). It turns out almost like opera turbo (only pictures are not too tight). In real surfing on http presses about 2-3 times (read - if you have a misfortune of 64kbit, then you will open megabyte pages not in two minutes, but in 40 seconds. Sucks, but it's better). But most importantly: no stolen cookies or overheard sessions.
It was not in vain that I said about closed ports. The 22nd port is closed in exactly the same way as the "unnecessary" jabber port. The solution is to hang the server on port 443. You shouldn't shoot with 22, sometimes there are systems with DPI (deep packet inspection) that your "pseudo-ssl" will not let you in.
This is how my config looks like:
/ etc / ssh / sshd_config:
(fragment)
Port 22
Port 443
And here is a piece of ~ / .ssh / config from a laptop that describes vpn
Host vpn Hostname desunote.ru User vasya Compression yes DynamicForward 127.1: 8080 Port 443
(note the "lazy" notation localhost - 127.1, this is a perfectly legal way to write 127.0.0.1)
Port forwarding
We move on to an extremely difficult to understand part of the SSH functionality, which allows you to perform puzzling TCP tunneling operations "from the server" and "to the server".To understand the situation, all the examples below will refer to this diagram:

Comments: Two gray networks. The first network resembles a typical office network (NAT), the second is a "gateway", that is, a server with a white and gray interface looking into its own private network. In what follows, we assume that "our" laptop is A, and the "server" is B.
Task: we have an application running locally, we need to enable another user (outside of our network) to look at it.
Solution: forwarding the local port (127.0.0.1:80) to a publicly accessible address. Let's say our "publicly available" B has occupied the 80th port with something useful, so we will forward it to a non-standard port (8080).
Final configuration: requests for 8.8.8.8:8080 will go to the localhost of laptop A.
Ssh -R 127.1: 80: 8.8.8.8: 8080 [email protected]
Option -R allows redirecting from a remote ( R emote) server port to your (local) port.
Important: if we want to use the address 8.8.8.8, then we need to enable GatewayPorts in the server B settings.
Task... On server "B" a certain daemon (for example, sql-server) is listening. Our application is not compatible with the server (different bitness, OS, evil admin, prohibiting and imposing limits, etc.). We want to locally access the remote localhost "y.
Final configuration: requests to localhost: 3333 on "A" should be served by a daemon on localhost: 3128 "B".
Ssh -L 127.1: 3333: 127.1: 3128 [email protected]
Option -L allows local calls ( L ocal) to send to the remote server.
Task: On server "B" a certain service is listening on the gray interface and we want to give a colleague (192.168.0.3) the opportunity to look at this application.
Final configuration: requests for our gray IP address (192.168.0.2) go to the gray interface of Server B.
Ssh -L 192.168.0.2:8080:10.1.1.1:80 [email protected]
Nested tunnels
Tunnels can of course be redirected.Let's complicate the task: now we want to show a colleague an application running on localhost on the server with the address 10.1.1.2 (on port 80).
The solution is tricky:
ssh -L 192.168.0.2:8080:127.1:9999 [email protected] ssh -L 127.1: 9999: 127.1: 80 [email protected]
What's happening? We tell ssh to redirect local requests from our address to the localhost of server B and immediately after connecting, launch ssh (that is, an ssh client) on server B with the option to listen on localhost and send requests to server 10.1.1.2 (where the client should connect). Port 9999 is chosen arbitrarily, the main thing is that it matches in the first call and in the second.
Reverse Sox Proxy
If the previous example seemed simple and obvious to you, then try to guess what this example will do:
ssh -D 8080 -R 127.1: 8080: 127.1: 8080 [email protected] ssh -R 127.1: 8080: 127.1: 8080 [email protected]
If you are a security officer whose task is to prohibit the use of the Internet on the server 10.1.1.2, then you can start pulling out the hair on the priest, because this command organizes access to the Internet for the server 10.1.1.2 through a sox proxy running on computer "A". The traffic is fully encrypted and indistinguishable from any other SSH traffic. And outgoing traffic from the computer from the point of view of the 192.168.0 / 24 network is indistinguishable from the normal traffic of computer A.
Tunneling
If by this point the security department priest is not bald, and ssh is still not listed as the number one security enemy, here is the ultimate killer of everything and everyone: IP tunneling or even ethernet. In the most radical cases, this allows dhcp tunneling, remote arp spoofing, wake up on lan and other second-level ugliness.(I myself, alas, did not use this).
It is easy to understand that in such conditions it is impossible for any DPI (deep packet inspection) to catch such tunnels - either ssh is allowed (read - do what you want), or ssh is prohibited (and you can safely leave such a company of idiots without feeling the slightest regret).
Authorization forwarding
If you think that this is all, then ... ... however, unlike the author, whose "bottom" has not yet been written, the reader sees in advance that there are many letters below and there is no intrigue.OpenSSH allows servers to be used as a springboard to connect to other servers, even if those servers are untrusted and can be abused in any way they want.
I repeat the picture:
Let's say we want to connect to server 10.1.1.2, which is ready to accept our key. But we do not want to copy it to 8.8.8.8, because there is a passageway and half of the people have sudo and can browse through other people's directories. A compromise would be to have a "different" ssh key that authorizes [email protected] on 10.1.1.2, but if we do not want to let anyone from 8.8.8.8 to 10.1.1.2, then this is not an option (especially since the key can not only be used, but also copied for themselves "for a rainy day").
Ssh offers the ability to forward the ssh agent (this is a service that asks for a password for a key). Option ssh -A forwards authorization to a remote server.
The call looks like this:
Ssh -A [email protected] ssh [email protected]
The remote ssh client (on 8.8.8.8) can prove to 10.1.1.2 that we are us only if we are connected to this server and have given the ssh client access to its authorization agent (but not the key!).
Most of the time it works.
However, if the server is really bad, then the server root can use the socket to impersonate when we are connected.
There is an even more powerful method - it turns ssh into a simple pipe (in the sense of a "pipe") through which we work through and through with a remote server.
The main advantage of this method is complete independence from the proxy server. He can use a fake ssh server, log all bytes and all actions, intercept any data and fake it as he wants - the interaction goes between the "final" server and the client. If the data on the terminal server is tampered with, the signature will not converge. If the data is not tampered with, then the session is established in secure mode, so there is nothing to intercept.
I didn't know this cool setting, so I dug up its redrampage.
The configuration is tied to two features of ssh: the -W option (turns ssh into a "pipe") and the config option ProxyCommand(command line options, it seems, no), which says "run the program and stick to its stdin / out". These options have appeared recently, so centos users are out of the question.
It looks like this (numbers for the picture above):
Ssh / config:
Host raep HostName 10.1.1.2 User user2 ProxyCommand ssh -W% h:% p [email protected]
Well, the connection is trivial: ssh raep.
Again, an important point: Server 8.8.8.8 cannot intercept or spoof traffic, use a user authorization agent, or otherwise alter traffic. Deny - yes, it can. But if allowed, it will pass through itself without decryption or modification. For the configuration to work, you need to have your public key in authorized_keys as for [email protected] and in [email protected]
Of course, the connection can be equipped with all other baubles - port forwarding, file copying, sox proxies, L2 tunnels, X-server tunneling, etc.
ssh tunneling add tags
SSH - (Secure Shell) is a protocol for remote control of a computer running Linux. Mainly ssh is used to remotely manage servers via terminal. If you are an administrator of several servers or even an advanced webmaster, then you probably often face the need to work with one or another computer via ssh. In Linux, for this, an ssh server is used on the machine to which you need to connect and the client on which you are connecting.
In this tutorial, we will look at how to use ssh, as well as its features that you did not even know about. Most likely, you already know how to connect to a server using ssh, but this utility has many more features, such as ssh file transfer, passwordless connection, or script execution on a remote server. We will consider all this later in the article.
But let's start with the very basics.
The command syntax is as follows:
$ ssh [options] Username@server [command]
It is important to note that ssh can operate on two protocol versions. Versions 1 and 2. It's clear that version 2 is better and supports more types of encryption and authentication. We will not talk more about the protocol differences in this article, and I will mean that you are using version 2.
SSH command options
Now let's take a look at the most basic options for the ssh command:
- f- put ssh in the background
- g- allow remote machines to access local ports
- l- username in the system
- n- redirect standard output to / dev / null
- p- ssh port on the remote machine
- q- do not show error messages
- v- debug mode
- x- disable X11 redirection
- X- enable X11 redirection
- C- enable compression
These are not all the options of the utility, the rest are beyond the scope of this article. Many ssh settings can be changed through the ~ / .ssh / config configuration file, but we will not consider this in detail here either.
Setting up an SSH server
SSH server settings are located in / etc / ssh / sshd_config. We will not touch many of them either. Let's consider only the most interesting ones. First open the file /etc/ssh/sshd.conf
Ssh port
By default, ssh runs on port 22. But this behavior is insecure because an attacker knows this port and can try to perform a bruteforce attack to brute-force the password. The port is set by the line:
Change the port value as required.
SSH protocol
By default, the ssh server can run in two versions of the protocol, for compatibility. To use only protocol version two, uncomment the line:
And bring it to this form:
Route access
By default, Root ssh access is allowed, but this behavior is very insecure, so uncomment the line:
PermitRootLogin no
Only a specific user can access SSH
We can only allow ssh access for a specific user or group. To do this, add the lines:
AllowUsers User1, User2, User3
AllowGroups Group1, Group2, Group3
Here User1 and Group1 are the user and group to which you want to allow access.
Executing X11 Applications
Not everyone knows, but it is possible to use ssh to run full-fledged X11 applications. We'll talk about this below, but for everything to work, you need to enable this feature on the server side, add the following line:
X11Forwarding yes
The main options are considered, before moving on, do not forget to restart the ssh server to save the changes:
service sshd restart
Using SSH
The main purpose of this article is to show you interesting and useful ways to use ssh that you may not have known about. Let's move on to the tasty part - ssh capabilities.
Server connection
To simply connect to the server via SSH use the following command:
Execute command
We are used to connecting to a remote server and only then executing the necessary commands, but in fact, the ssh utility allows you to immediately execute the required command without opening the terminal of the remote machine. For example:
ssh [email protected] ls
Runs the ls command on the remote server and return its output to the current terminal.
Run local script
Let's execute the bash interpreter on the remote server and feed it our local script using Bash input redirection:
ssh [email protected]"bash -s"< script.sh
Backup to a remote server and recovery
We can save a disk backup immediately on a remote server using ssh. Let's redirect the output of dd using the redirection operator |, then save it on that side to a file:
sudo dd if = / dev / sda | ssh [email protected]"dd of = sda.img"
Now, to restore the state of the disk from the made copy, run:
ssh [email protected]"dd if = sda.img" | dd of = / dev / sda
Here and above / dev / sda is the filename of your hard drive.
Passwordless authentication
Using an ssh password to log into the server is not only inconvenient but also insecure, because this password can be brute-force at any time. The most secure and commonly used authentication method is with an RSA key pair. The private key is stored on the computer, and the public key is used on the server to authenticate the user.
It is very easy to configure this behavior. First, create a key with the command:
ssh-keygen -t rsa
During key creation, you will need to answer a few questions, leave the default location, if you want to connect without a password, leave the Passphare field empty too.
Then we send the key to the server:
ssh-copy-id -i ~ / .ssh / id_rsa.pub [email protected]
Take password from local file
Let me remind you that storing passwords in regular text files is unsafe, but if you want, then yes - it is possible. For this, the Bash input redirection operator is used:
ssh [email protected] < local_file.txt
Change SSH greeting
When logging in via ssh, a greeting may be displayed, and it is very easy to change it. The file / etc / issue is responsible for this. Just open this file and enter the text you want:
Watching unsuccessful SSH login attempts
Want to see if there have been any attempts to unsuccessfully access your server via ssh and from which IP addresses? Easily, all requests are logged to the / var / log / secure file, we filter out only the necessary data with the command:
cat / var / log / secure | grep "Failed password for"
SSH File Transfer
In addition to executing commands, you can copy files via ssh. The scp utility is used for this. Just specify the file to transfer, the remote server and the folder on the server, here:
$ scp / address / local / file user @ host: adders / folders
For example:
scp ~ / test.txt [email protected]: documents
Besides the scp utility, ssh file transfers can be done in a more tricky way. Let's read the file and using cat, transfer it, and then save the stream to a file:
cat localfile | ssh [email protected]"cat> remotefile"
ssh [email protected]"cat> remotefile"< localfile
tar czf - / home / user / file | ssh [email protected] tar -xvzf -C / home / remoteuser /
Copying ssh files in this way allows entire folders to be sent at once.
Running graphical applications over ssh
If you need to run this or that graphical application on a remote machine, it is not necessary to use VNC for this, you can get by with ssh. The program will run on the server side, and you will only be broadcast a window so that you can do whatever you need to do. Moreover, all data is encrypted. For this feature to work, you need to enable it on the server side.
Then we simply execute the command to launch the graphical application on the remote server like this:
ssh -XC [email protected]"eclipse"
As you have seen, the X option allows X11 redirection on the client side, and the C option allows data compression.
Ending ssh session
If you have used ssh with an unstable Internet, when the connection is interrupted from time to time, then you are probably already tired of closing the terminal, because otherwise, at first glance, the session will not be terminated. When the connection to the remote server is disconnected, you cannot enter any command and the keyboard shortcuts Ctrl + C, Ctrl + Z, Ctrl + D do not work. And they won't work because the client tries to send these commands to the server. But there is a solution - Escape sequences. To activate their support add the line:
To the file / etc / ssh / ssh_config
We present to your attention a new course from the team The codeby- "Penetration Testing of Web Applications from scratch". General Theory, Work Environment Preparation, Passive Fuzzing and Fingerprinting, Active Fuzzing, Vulnerabilities, Post-Exploitation, Tools, Social Engineering and more.
What is SSH and what is it for
Secure Shell (SSH) is a network protocol that provides shell functionality to a remote machine over a secure channel. SSH brings various security enhancements, including user / host authentication, data encryption and data integrity, making it impossible for popular attacks like eavesdropping, DNS / IP spoofing, data forgery, connection hijacking etc. For ftp, telnet, or rlogin users who use a protocol that transfers data in clear text, it is highly recommended that they switch to SSH.
OpenSSH is an open source implementation of the SSH protocol that encrypts a network connection using a suite of programs. If you would like to have SSH on Linux, you can install OpenSSH, which consists of an OpenSSH server and client packages.
OpenSSH server / client packages come with the following utilities:
- OpenSSH server: sshd (SSH daemon)
- OpenSSH client: scp (secure remote copy), sftp (secure file transfer), slogin / ssh (secure remote login), ssh-add (private key addition), ssh-agent (authentication agent), ssh-keygen (authentication key management ).
Installing OpenSSH Server and Client on Linux
If you want to install the OpenSSH server / client and set up the OpenSSH server to start automatically, follow the instructions below, which differ depending on the distribution.
Debian, Ubuntu or Linux Mint
$ sudo apt-get install openssh-server openssh-client
On Debian based systems, immediately after installation, OpenSSH will start automatically at boot. If for some reason the OpenSSH server does not start automatically at system startup, you can run the following command to unambiguously add ssh to the boot at system startup.
$ sudo update-rc.d ssh defaults
Fedora or CentOS / RHEL 7
$ sudo yum -y install openssh-server openssh-clients $ sudo systemctl start sshd service $ sudo systemctl enable sshd.service
CentOS / RHEL 6
$ sudo yum -y install openssh-server openssh-clients $ sudo service sshd start $ sudo chkconfig sshd on
Arch Linux
$ sudo pacman -Sy openssh $ sudo systemctl start sshd service $ sudo systemctl enable sshd.service
OpenSSH server setup
If you want to configure the OpenSSH server, you can edit the system-wide configuration file located in / etc / ssh / sshd_config.
There are a couple of OpenSSH options you might be interested in:
By default, sshd listens on port 22 and listens for incoming ssh connections. By changing the default port for ssh, you can prevent various automated hacker attacks.
ListenAddress 192.168.1.1
If your machine has more than one physical network interface, you may want to check which one is sshd related, you can use the ListenAddress option to do this. This option helps improve security by restricting incoming SSH only through a specific interface.
HostKey / etc / ssh / ssh_host_key
The HostKey option determines where the personal host key is located.
PermitRootLogin no
Option PermitRootLogin - Whether root can log in via ssh.
AllowUsers alice bob
Using the AllowUsers option you can selectively disable the ssh service for specific Linux users. Multiple users can be specified, separated by spaces.
After modifying / etc / ssh / sshd_config, make sure to restart the ssh service.
To restart OpenSSH on Debian, Ubuntu or Linux Mint:
$ sudo /etc/init.d/ssh restart
To restart OpenSSH on Fedora, CentOS / RHEL 7, or Arch Linux:
$ sudo systemctl restart sshd.service
To restart OpenSSH on CentOS / RHEL 6:
$ sudo service sshd restart
How to connect to SSH
Connecting to SSH from Linux
Linux users do not need to install additional software.
Connect to SSH from Windows
For Windows, many people recommend and use PuTTY successfully. I have nothing against this program, but I prefer and recommend Cygwin myself.
Cygwin is not just an SSH client. It is a powerful combine that supports many Linux commands. For example, it is very easy to create SSL certificates in Cygwin (just like in Linux). In Windows, you need to dance with a tambourine to create self-signed certificates. Cygwin is very convenient to use cURL (you don't need to install anything separately), etc. Those who lack the command line and Linux programs on Windows will find an outlet for themselves in Cygwin.
Installing Cygwin is straightforward. Go to the official website and download the 32-bit or 64-bit version.
A tiny file is downloaded - this is the installer. The installer is graphical. Although it contains a large number of options, they are all fairly simple and many are familiar from other graphical installers. If something is not clear, just click "Next". Perhaps only the following window can be confusing:
Here are all the items available for installation. We don't need to understand them right now. Since the most requested ones are already marked for installation. And if something is missing in the future, then you can easily install the necessary one.
SSH connection (common for Linux and Windows)
Linux users open a console, Windows users type in Cygwin.
SSH needs the following information to connect:
- IP or hostname
- port number
- Username
- user password
Two of these parameters SSH can assume: username and port number. If no port is specified, the default port is assumed. If no user is specified, then the same name is used as in the system from which the connection is made. For example, the host address for the connection is 192.168.1.36. If I type
Ssh 192.168.1.36
I see the following
[email protected]~ $ ssh 192.168.1.36 The authenticity of host "192.168.1.36 (192.168.1.36)" can "t be established. ECDSA key fingerprint is SHA256: sIxZeSuiivoEQ00RXAQHxylxuEA8SC5r / YPhL8wfp8s. Are you sure you want to continue connecting?
Since I am connecting to the host for the first time, it is an unknown host. They ask me if I want to continue. I am typing yes:
Warning: Permanently added "192.168.1.36" (ECDSA) to the list of known hosts. [email protected]"s password:
Okay, host 192.168.1.36 has been added to the list of familiar hosts. I am prompted for a password for user Alex. Since there is no such user on the server with SSH, but I click Ctrl + C(to break) and enter the command along with the username of the remote system. The user is entered before the address of the remote machine and is separated from the address by the @ symbol. The @ symbol in English is read as at and can be translated as "in". Those. recording [email protected] can be interpreted as "user mial on machine 192.168.1.36".

Invitation [email protected] gave way to an invitation [email protected] This means that we are already on a remote machine, that is, we already have a connection. If you need to specify a port (if it differs from the standard one), then the port must be specified after the -p switch. For example like this:
Ssh [email protected]-p 10456
After connecting, we are greeted with something like the following greeting:
Linux mint 3.16.0-4-amd64 # 1 SMP Debian 3.16.7-ckt11-1 (2015-05-24) x86_64 The programs included with the Debian GNU / Linux system are free software; the exact distribution terms for each program are described in the individual files in / usr / share / doc / * / copyright. Debian GNU / Linux comes with ABSOLUTELY NO WARRANTY, to the extent permitted by applicable law. Last login: Tue Jun 16 15:32:25 2015 from 192.168.1.35
It implies that the remote machine is Linux Mint, with kernel 3.16, 64-bit version. Also important information about the time of the last login and the IP address from which the connection originated. If the time and IP are unfamiliar to you, and you are the only user, then your system is compromised and you need to take appropriate action.
Let's type a few commands to make sure where we are and who we are: pwd, uname -a etc.:

To end the session (disconnect), type
Or press Ctrl + D.
Login to SSH without entering a password
First, it's just more convenient. Secondly, it is safer.
First, we need to create rsa keys. If you are a Linux user, then you are fine. If you are a Windows user, but you did not listen to my advice and chose PuTTY, then you have a problem and think for yourself how to solve it. If you have Cygwin, then everything is also fine.
If you managed to log in to the remote system, log out. Then type
Ssh-keygen -t rsa
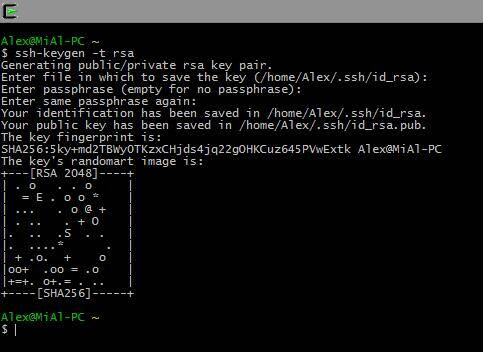
We are asked for the file name, no need to enter anything, the default name will be used. The password is also asked. I do not enter a password.
Now on the remote machine, we need to create the .ssh directory. The execution of the command on a remote machine will be described below. For now, just copy the command, remembering to change the IP address and username to your own:
Ssh [email protected] mkdir .ssh
Now we need to copy the contents of the id_rsa.pub file to the remote machine. It is very easy to do this (do not forget to change the data to your own):
Cat .ssh / id_rsa.pub | ssh [email protected]"cat >> .ssh / authorized_keys"

Now we just log in and no longer ask us for a password. And now it will always be so.
Executing commands on a remote server without creating a shell session
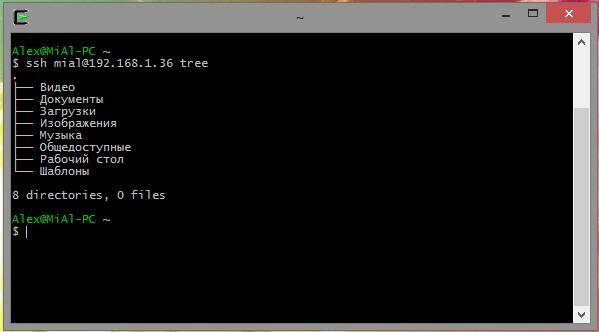
In addition to opening a shell session on a remote system, ssh also allows individual commands to be executed on the remote system. For example, to run the tree command on a remote host named remote-sys and display the results on the local system, you would do this:
ssh remote-sys tree
My real-life example:
Ssh [email protected] tree
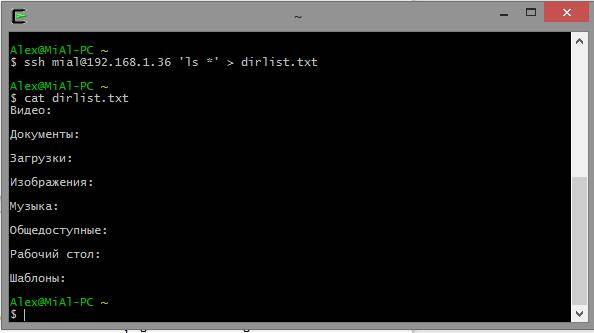
Using this technique, you can do interesting things, such as executing the ls command on the remote system and redirecting the output to a file on the local system:
ssh remote-sys "ls *"> dirlist.txt
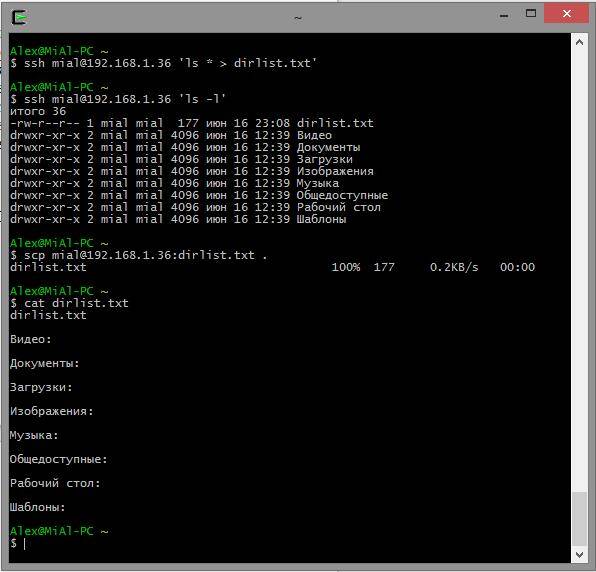
A real example:
Ssh [email protected]"ls *"> dirlist.txt cat dirlist.txt
Note the single quotes in the above command. This is because we do not want the path expansion to be done on the local machine; since we need this execution on a remote system. Also, if we want to redirect standard output to a file on the remote machine, we can put the redirect statement and the filename inside single quotes:
ssh remote-sys "ls *> dirlist.txt"
Sending stdout from local machine to remote ssh
An equally interesting version of command execution is shown a little above:
Cat .ssh / id_rsa.pub | ssh [email protected]"cat >> .ssh / authorized_keys"
- The cat command reads and displays the contents of the .ssh / id_rsa.pub file on the local machine line by line.
- | (pipe) passes what should appear on stdout to another command.
- Instead of a command that should have processed the lines passed to it, a connection is made to the remote system (ssh [email protected]).
- The remote system receives lines for which the cat >> .ssh / authorized_keys command is provided. Those. the contents of standard output are written line by line to the .ssh / authorized_keys file on the remote machine.
Opening a graphics program located on a remote computer
The next trick requires two Linux computers. Unfortunately, not even Cygwin can handle this trick. Moreover, both Linux "s must be with a graphical user interface.
Tunneling with SSH
Among other things, what happens when a connection is made to a remote host via SSH is the creation of an encrypted tunnel that forms between the local and remote systems. Typically, this tunnel is used to ensure that commands typed on the local machine are safely transmitted to the remote machine, and the result is also safely sent back.
In addition to this basic function, SSH allows most types of traffic to be routed over an encrypted tunnel, creating a kind of VPN (virtual private network) between the local and remote systems.
Perhaps the most commonly used of these features is the ability to broadcast X Window System traffic. On a system running an X server (these are machines that have a graphical user interface), it is possible to run an X client program (graphical application) on a remote system and see the results of its work on the local system. This is easy to do. For example, I want to connect to the remote host remote-sys and on that I want to run the xload program. At the same time, I will be able to see the graphical output of this program on the local computer. This is done like this:
ssh -X remote-sys
A real example:
Ssh -X [email protected] gedit
Those. SSH is started with the -X switch. And then the program just starts. Take a look at the screenshot.

I am on Kali Linux. I am successfully logging into the remote computer via SSH. After that, I ran the gedit program. This program may not even be available on Kali Linux, but it certainly is in Linux Mint, to which I connected. I can see the result of this program on the screen as if the program was running locally. But, again, I want you to understand this, there is no running gedit program on the local computer. If I want to save the result of the work of gedit (or any other program opened in this way), then it turns out that it works in the environment of the remote computer, sees its file system, etc. This is convenient when you want to configure the remote computer using a graphical interface ...
You will learn how to transfer an image from the entire desktop in the same article later, in the section "How to configure VNC over SSH".
On some systems, this "focus" requires the use of the -Y option instead of the -X option.
Copy from / to remote computer (scp and sftp)
scp
The OpenSSH package also includes two programs that use an encrypted SSH tunnel to copy files over the network. The first program is scp("Safe copy") - used more often, as well as a similar program cp for copying files. The most noticeable difference is that the source of the file can be a remote host followed by a colon and the location of the file. For example, if we want to copy a document named document.txt from our home directory to the remote-sys system in the current working directory on our local system, we can do this:
Scp remote-sys: document.txt. document.txt 100% 177 0.2KB / s 00:00
A real example:
# delete the file on the local machine, if present rm dirlist.txt # create the file on the remote ssh machine [email protected]"ls *> dirlist.txt" # check its presence ssh [email protected]"ls -l" # copy it to the local machine scp [email protected]: dirlist.txt. # check its contents cat dirlist.txt
To copy a file from a local machine to a remote one:
scp file-local remote-sys :.
Real example
# create a new touch file nfile.txt # send the scp file nfile.txt [email protected]:. nfile.txt 100% 0 0.0KB / s 00:00 # check if the file exists on the remote ssh machine [email protected]"ls -l"
In the send command:
- nfile.txt - file name,
- [email protected]- username and remote host,
- ... (dot) means that the file should be copied to the current working directory on the remote server, while the file name will remain the same, i.e. nfile.txt
Memo:
To copy a file from B to A when logged in to B:
scp / path / to / file [email protected]: / path / to / destination
Copying a file from B to A when logged in to A:
scp [email protected]: / path / to / file / path / to / destination
sftp
The second program for file copying over SSH is sftp... As its name suggests, it is a safe substitute for ftp programs. sftp works like the original ftp program. However, instead of sending in clear text, it uses an encrypted SSH tunnel. An important advantage of sftp over ftp is that it does not require a running FTP server on the remote host. It only requires an SSH server. This means that any remote machine that is connected via an SSH client can also be used as an FTP-like server. Here's an example session:
[email protected]~ $ sftp [email protected] Connected to 192.168.1.36. sftp> ls dirlist.txt newfile.txt nfile.txt temp Videos Documents Downloads Images Music Public Desktop Templates sftp> lls dirlist.txt nfile.txt sftp> ls temp temp / TakeMeHome sftp> cd temp / sftp> get TakeMeHome Fetching / mial / temp / TakeMeHome to TakeMeHome sftp> bye
SFTP protocol is supported by many graphical file managers found in Linux distributions. Using both Nautilus (GNOME) and Konqueror (KDE), we can enter URIs (links) starting with sftp: // into the navigation bar and work with files located on a remote system running an SSH server.
The Guarantor is a trusted intermediary between the Participants in the transaction.
This document will help you connect to your virtual server using SSH and SFTP protocols.
SSH (English Secure SHell - "secure shell") is a session-level network protocol that allows remote control of the operating system and tunneling of TCP connections (for example, for file transfer). It is similar in functionality to the Telnet and rlogin protocols, but, unlike them, encrypts all traffic, including transmitted passwords.
SFTP (English SSH File Transfer Protocol) is an application layer protocol designed to copy and perform other operations with files over a reliable and secure connection. There is a misconception that SFTP is just regular FTP running over SSH. In reality, SFTP is a new protocol developed from the ground up.
Data for connecting to a virtual server
All the data required to connect to your virtual server via SSH, you can get on the main page of the control panel.
We need to know the IP address of the virtual server (1) and the password for the root user (2).
Having received the necessary data for connection, you can proceed directly to the process.
Connect to a virtual server via SSH from Mac OS X or Linux
Users of Mac OS X or Linux operating systems can use the standard terminal application to connect to a virtual server via SSH protocol. To connect to your virtual server use the following command (change 188.127.236.62 to the IP address of your virtual server):
This is how the process of connecting to a virtual server in a Unix or Mac OS X terminal looks like:
Ssh [email protected] The authenticity of host "188.127.236.62 (188.127.236.62)" can "t be established. RSA key fingerprint is 4f: e8: 84: 42: 51: 80: 48: 70: 45: 6c: 69: 47: 79: e7: c0: 56. Are you sure you want to continue connecting (yes / no)? yes Warning: Permanently added "188.127.236.62" (RSA) to the list of known hosts. [email protected]"s password: #
Connecting to a virtual server via SSH from Windows
Windows users can use PuTTY to connect to the virtual server via SSH. PuTTY is a very popular telnet / ssh client, distributed free of charge.
Official site of the program - http://www.chiark.greenend.org.uk/~sgtatham/putty/ Russian-language support site - http://putty.org.ru/
After starting the program, you will see the following window:

Enter in the “Host Name (or IP address)” field the IP address of your virtual server (for example, helios.asu is entered). Make sure the “SSH” radio button is selected under “Protocol”.

Also, in order not to enter the address and protocol type each time, you can save the session. To do this, enter its name in the “Saved Sessions” field and click the “Save” button.

After that, your session will appear below in the list. In order to load a saved session, you need to select it from the list and press the “Load” button.
To connect, click the “Open” button at the bottom of the form. The following message may appear:

If you are sure that you are connecting to the correct host, then click the “Yes” button. The following will appear:

Enter your username (root), then password. Here is the system console:

To exit enter:
Connecting to a virtual server via SFTP
By default, you don't need to configure FileZilla, we'll just start using the program right away.
To connect to the SFTP server, enter the IP address of your virtual server in the quick connection field (instead of example.com, as shown in the figure below, enter sftp: // your_vps_ip_address). Enter the connection port in the corresponding field, for SFTP - 22. Enter the username and password in the corresponding fields. Click on the “Quick Connect” button or press Enter to connect.

Note that the quick connection panel, as the name implies, is adapted for quick connections, i.e. you cannot edit the list of the last 10 connections. Use the Site Manager to save connection settings.
Use FileZilla Site Manager to set specific site parameters and connect to the desired SFTP server. In the Site Manager, you have the ability to save your connections and configure more parameters than are available in the quick connection panel.
After connecting, a list of files and directories will be displayed on the right side of the main window. The current directory will be shown in an editable field at the top. Below the remote directory tree is displayed, and even below - the contents of the current remote directory. You can switch to another directory in three different ways. First, double click on the directory in the list. Second: click on the directory in the tree. Last way: enter the name of the directory in the editable field and press Enter. Pay attention to the directory "..", which is present in almost all other directories. This link allows you to navigate to the parent directory of the current directory.
Navigation on your computer works in much the same way as on the server. The current local directory and directory tree are displayed by default on the left side of the main window.
You can find detailed documentation on working with FileZilla on the official website at http://filezilla.ru/documentation/Using
Terms of use of the document
The material presented on this page can be used by you at your own discretion. It is allowed to copy and distribute the provided material without changing the content and without prior notice to the administration of Clodo.ru.
We would be grateful for the error messages in the submitted documentation and for suggestions for improving the documentation. For these questions, please contact [email protected]... Please be sure to include the URL of the publication when contacting.