How to secure your smartphone and backup Android firmware. How to quickly backup an Android device
With the release of Android 6.0 Marshmallow, a truly necessary feature became available to users - automatic backup of user application data to the Google Drive service. But even though Google took care of users by adding this feature, not all developers are in a particular hurry to update their products and add a similar function to them. So after changing the device or resetting to factory settings, you have to play through the games again, change program settings to your taste, etc. Of course, having root rights on the device can help you out of such a situation. But what if it is not possible to get them? In addition, to do this you will often need to unlock the bootloader, which automatically leads to the loss of all information on the device. In this case, ADB comes to the rescue.
Few Android device users know that it is possible to make a backup copy of all installed applications and their data without additional manipulations with their device. And in today’s article we will tell you how to make a backup of the entire system, without unlocking the bootloader and obtaining superuser rights.
How to backup all information on your device
In order not to bother yourself and save all the accumulated photos, music, videos yourself, this method will be an excellent choice. And here's what you need:
- Create a folder named Android in the root of the C:\ drive.
- Install USB drivers for your device (you can find links to universal drivers for some devices).
- In some cases, installing drivers will require you to disable authentication.
- For Windows 7:
When turning on the computer, after loading the BIOS, you must press the F8 key. In the “Advanced boot options” menu that appears, select “Disable mandatory driver signing.” This method may not work the first time, so you should repeat the action or open a command prompt as an administrator and enter two commands:
"bcdedit.exe /set loadoptions DDISABLE_INTEGRITY_CHECKS";
"bcdedit.exe /set TESTSIGNING ON." - For Windows 8:
You need to press the Win+I key combination, hold down the Shift key and select “Shutdown” > “Restart”. When you turn on your computer, select Diagnostics > Advanced Options > Boot Options > Restart. When loading, select the “Disable mandatory driver signature verification” mode by pressing the F7 key. - For Windows 10:
You must hold down the Shift key and select the Start menu > Shutdown > Restart. After booting, select Troubleshooting > Advanced Options > Boot Options > Restart. Then select “Disable mandatory driver signature verification” by pressing F7.
- For Windows 7:
- Download the archive and unpack the files into the Android folder.
- Activate the “USB Debugging” item on your smartphone.
This can be done in the “For Developers” section. If this section is hidden, instructions will help you open it. - Change the duration of the standby mode.
To do this, in the screen settings you need to select the “Sleep mode” item and set the switch to the maximum possible time. - Connect your phone to your computer via a USB cable.
It is recommended to use an original or good quality cable, as well as the USB 2.0 port located on the motherboard (for PC). - Change the connection type from “Charging only” to “File transfer (MTP)”.
This is not required on every device, but many manufacturers require it as a security measure before allowing ADB to work. - Open a command line and go to the created Android folder with the command “cd c:\Android\” (commands are written without quotes).
- Make sure that the computer finds the device via ADB.
To do this, you need to enter “adb devices” into the command line. When a request appears on your phone for permission to debug via ADB on this computer, you must click “Ok” and select “Always allow from this computer.” If the device is visible, the text “List of devices attached” and a list of all devices (for example, xxxxxxx device) will be displayed. If instead of “device” it says “offline” or the list is empty, then you need to update ADB, check the drivers/cord, change the USB port/computer. - At the command line, enter “adb backup -apk -shared -all -f path/to/backup.ab”, where path/to/backup.ab is the path to the directory and the name of the backup file.
The operation may take quite a long time, everything will depend on the amount of information on the smartphone.
How to Backup Only App Data
Unfortunately, like everything in this life, the previous method is not ideal. Not all data can always be saved correctly. It is recommended to manually save media files and documents to your PC or to the cloud, and then start backing up user application data. To do this, you will need to follow steps 1 to 10 and then enter “adb backup -apk -all -f path/to/backup.ab” in the command line, where path/to/backup.ab is the path to the directory and backup file name. After that, on your smartphone, enter a password to protect the backup copy and click the “Back up data” button in the lower right corner.
How to back up some apps
If you do not need to back up all programs installed on the device and it is enough to save the data of some applications, then you will need the following:
- Follow steps 1 to 10 from the first method.
- Install the App Inspector application on your smartphone.
- Launch the App Inspector utility and select App List (Ordered by name). Find and select the application that you want to restrict from running in the background. The package name and version will be displayed below the program name.
- Enter the command “adb backup -f path/to/backup.ab -apk name.of.package”, where path/to/backup.ab is the path to the directory and the name of the backup file, and name.of.package is the name of the package , which was previously recognized in the App Inspector.
- A window will appear on your smartphone asking you to enter a password to further protect your backup. After entering it, you need to click the “Back up data” button in the lower right corner.
How to restore data from a backup
To restore data, you only need to enter “adb restore path/to/backup.ab” on the command line, where path/to/backup.ab is the path to the backup file and press Enter. On your smartphone, enter the password in the window that appears and click the “Recover data” button. After a certain time, depending on the file size, the phone will display “Recovery complete” in a pop-up window.
Additional information
In addition to the above, I would like to supplement the article with several more commands and parameters that can help in certain situations.
Command format for creating a backup:
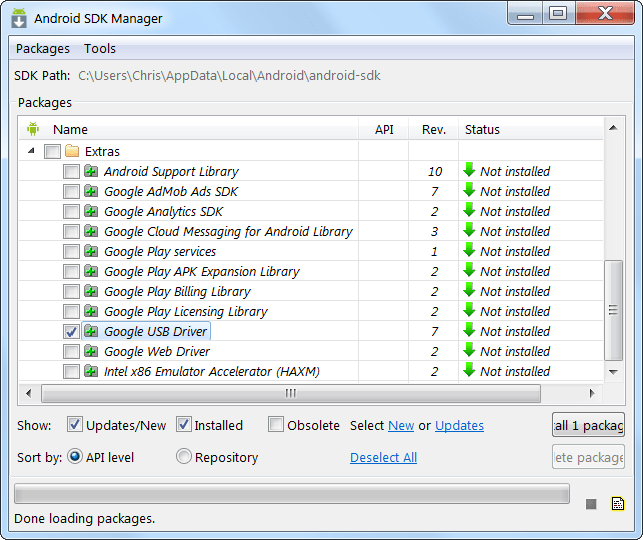
Adb backup [-f The simplest command to create a backup is: adb backup -all After entering this command, a backup copy of only the data of all applications (without APK files) will be created in the current directory with the name backup.ab. If after running this command an error occurs (something like “adb: cannot open file ./backup.ab”) you need to enter the following: Adb backup -all -f C:\backup.ab In this case, the backup file will be created in the root directory of the C:\ drive. Instead of C:\backup.ab, you can specify any necessary address and file name. Here is a description of some of the options you can use when creating a backup: F This parameter is used to indicate the path and name of the backup file. For example, "-f C:\Backup\mybackup.ab" points to the Backup folder located on drive C. The backup name is mybackup.ab. Apk | -noapk This flag indicates whether the application's APK files should be included in the backup or only the corresponding data. It is recommended to use "-apk" when the application is not available on Google Play or is using an older version than the one on the Market. The default is "-noapk". Shared | -noshared This flag is used to enable/disable backup of the contents of the device's internal memory/SD card. The default is "noshared". It is recommended not to back up the internal memory in this way, but to manually save all necessary files, since not all data can be saved/restored. This flag is the easiest way to backup your entire system. System | -nosystem This setting determines whether system applications will be included in the backup. The default is "-system". It is recommended not to include system applications in the backup to avoid possible errors during recovery in the future. Here you can specify the names of the packages (for example, com.google.android.apps.plus) that you want to save. Only used if you need to back up a specific application. That's all. Write in the comments whether these instructions helped you and whether all the information was saved correctly. When purchasing, servicing, or changing a phone, you may experience data loss. To avoid this, we need to back up the files (data) we need. This process is also called - backup (backup). Many programs today do automatic backup data from your Android and iOS phone on its servers, protecting them from sudden problems with your smartphone. So, for example, all the materials of your conversations and correspondence in Telegram are automatically saved on the messenger servers and thus you can always read the dialogue you need from absolutely any device in which you are logged into your profile. But today we will talk about the more prosaic and pressing problems of any smartphone owner: how to backup your phone book, files, calendar events, photos on your Meizu, Samsung, iPhone and tablet using 4 free servicesGoogle. Before we begin to analyze the tools for backing up your data, it is worth mentioning that there are some differences in backing up files for Android And iOS. Users of Apple devices are luckier, since their phones are capable of making backup copies to iCloud without installing third-party software. Here is a list of what can save your iPhone to the cloud automatically: This is very convenient and thoughtful, since you don’t need to do anything extra: just mark what you want to save and everything will be automatically uploaded to the cloud. But an obvious disadvantage of this method can be the fact that you are allocated free of charge for iCloud drive total 5 GB, which is very little if you upload photos there, actively use notes, Keynote and Numbers, and also if you save email. Therefore, if you work with large files or have a huge photo library, then you either have to use other services or buy more space on iCloud. That is why this article will be relevant for many users. iPhone who are not willing to pay for additional space or use multiple devices on different platforms. As for Android users, not everyone is lucky enough to have pre-installed Google services that help with backup, so some of them will have to be installed from the Play Market. Although, for example, calendars and contacts are already recorded in your account by default on almost every Android device. But the clear advantage of backup services for Android is that they are, for the most part, cross-platform and do not tie you to one OS. But, unfortunately, this thesis is not always relevant for a backup copy of the phone in case of flashing it, and therefore the best way to backup the phone before flashing the firmware is to save all its data to a folder on the computer, since for Android there is no cloud storage of the firmware by default, like in iOS. The first service that will help us solve the common problem of losing contacts when purchasing a new phone is called Google contacts. To start enjoying all the benefits of the service, you just need to have a Google account and check the necessary boxes on your phone. From now on, contacts will be backed up automatically on Android and iOS smartphones. Moreover, you will have access to them from your computer through the Contacts tab in Chrome. Most often, phones from Samsung, HTC, LG, Lenovo and many other manufacturers automatically backup phone book contacts to Google contacts. Users of these smartphones simply need to enable synchronization and all their contacts will be automatically available on all devices after logging into their Google account. But if you have Meizu or Xiaomi, then you will have to spend some time setting up automatic saving of contacts not to the Flyme (Mi Cloud) account, but to the Google one we need. Below are instructions for finding such settings using Flyme 5 as an example. Also don't forget to check included Is it possible to synchronize contacts in your Google account? As I already wrote in the paragraph above, Apple products can automatically backup contacts, but if you just switched to iOS from Android or use several devices on different platforms, then it is likely that Google contacts- your option. Using this service, it will be easy for you not only to switch from one platform to another, but also not to lose contacts when servicing the device. In addition, Google Contacts interacts well with various email clients and makes it possible not to lose potential partners and work colleagues. So that your iPhone makes automatic backups to Google contacts You just need to log into your Google account from your phone and check one box in the settings. Instructions using iOS 10 as an example are given below. Shortage free space in a smartphone is one of the biggest problems of a modern person, after the lack of Internet and low battery. Today, our smartphones take pictures better and better, and if you have ever bought 16 GB a phone that can take pictures 4K, then you understand perfectly well what regular cleaning of unnecessary photos is. And what can we say about how, with theft or an unsuccessful update, all the best photos go into oblivion. This is, to put it mildly, terrible, but fortunately there are several solutions to this: The disadvantage of the first method is the limited space on the cloud disk: 15 GB – Google, 5 GB – iCloud, 5-15 GB – Dropbox. And if you shoot in good resolution, and also like to shoot video, then you won’t have enough space on more than one cloud. Google Drive has 15 GB of free space, which is more than enough to store documents. But main valueGoogle Drive it's not just a file backup, it's built-in free office: Google Sheets, Docs, Slides and a huge number of different services and virtual machines, which can be downloaded for free in the official Chrome online store. So, for example, you can edit the code and view it directly on disk, without being tied to paid software or a computer. You can also listen to and convert music, edit photos and much more completely free of charge. Plus, the Google Drive app is available in the browser, on Android and iOS, so you can access your files from absolutely any device. If you need to backup your files, I would recommend Google Drive, because thanks to additional utilities, the service can cope with almost any task related to editing, reading or converting files. Google calendar another service that will help you backup your smartphone. Thanks to its simplicity, Google Calendar is suitable for absolutely everyone: from a schoolchild to a serious manager. In addition, Google calendar is integrated into almost any email program, which is very convenient to use. The created event will be visible on all your other devices. By saving all the dates in the calendar in this way, you will never forget someone’s birthday and can easily return everything in case of phone service. But let me remind you what you need initially login to gmail account on your smartphone. In this article we looked at 4 free backup tools on Android and iOS from Google. Indeed, using such services greatly simplifies life: you do not need to be afraid that you will lose all your photos, contacts, files or events in your calendar; all this is synchronized automatically and is accessible from absolutely any device. This is precisely the main advantage of using Google cloud services rather than any others. Of course, service repairs sometimes take you by surprise, and you never know when your phone will be stolen... Besides, I’ve compiled a short summary for you checklist, by completing which you will be sure that you will not lose data from your phone: And of course, in case of theft, do not forget to give Apple and Google “Find My Phone” services access to geo-location. This will help you block and find your phone. In addition, I strongly recommend that you save a backup copy of your smartphone in iCloud (just activate it in the settings), and when flashing Android - in a folder on Google Drive, in order to secure the backup phone. That’s all, if the article was useful to you, give it a 5-star rating, and if you liked the topic, write right now in the comments: “I want more!” and suggestions for new useful articles. See you soon! Backup is required. You love it or hate it; backup is essential. Sometimes when we get updates, factory reset the device or even update a custom ROM, or in the worst case the phone gets lost, then backup becomes a savior in case something goes wrong. If you back up your data, you won't have to cry tomorrow. It is also true that data backup will not be done with a simple click of the mouse. Read below to know the 10 best apps to backup your Android phone without root. So, we have come up with a step-by-step guide on how to back up the data on your device. This is a universal guide for Android phone or tablet. App Backup & Share Pro is a decent app to backup your Android device data without the need to root your smartphone. This app offers you all the features like management/backup/restore/sharing software etc. In addition, this application allows you to backup any data from the SD card or internal memory of the device. Moreover, you can backup files from USB drives via OTG or any cloud storage. One of the best features of this app is that it allows you to share any regular as well as system apps from your device through other sharing sources to other devices. It also supports app sharing between supported apps like Facebook Messenger, WhatsApp, etc. You can save your data to cloud storage like Google Drive, OneDrive, Dropbox, etc. without any hassle. In addition, this application allows you to automatically save all data or one at a time. You can also uninstall an app on your device without going into the app manager, and it also gives you the option to rate or review any app directly from the Play Store. It has a clean user interface and no ads, and includes 2-3 themes for customization. Another basic solution for backing up all the data on your device is the Backup Your Mobile app. You can use this application to backup system settings, SMS, call logs, MMS or any other data you want to backup. You can store all this data on an SD card or any cloud storage like Google Drive, OneDrive, Dropbox, etc. One tip: you should restore system settings or other system settings on another device running the same version of Android to avoid any conflicts. The app has a nice user interface but looks outdated compared to other apps. However, it does the job very smoothly and without any lag. Another application for backing up your contacts is the Easy Backup application - Transfer and Restore Contacts. This application is specially designed to backup contacts on your device and save them in .vcf format. You can backup all your contacts with one tap and email them to yourself for later recovery. The .vcf file is the most convenient means of backing up contacts and restoring an extension that is read by all smartphones. Moreover, you also get support for backing up your data to any cloud storage, namely Google Drive, OneDrive, Dropbox, etc. One of the best features of the app is that you can backup your contacts also offline and no active internet connection is needed. Moreover, it also supports Google, Exchange, Yahoo, Facebook, LinkedIn, Gmail, iCloud, Outlook or any other provider. The app is also available in 15 different languages and also offers a clean user interface. Probably the best app for backing up your data, and the app I personally use, is App Backup & Restore. You can extract, share, edit any APK file in the app. Moreover, it also offers to backup your app data either to an SD card or to any cloud storage. One of the best features of the app is that it allows you to batch backup your app data or APK. You can also create your own app store and share apps with others through different platforms. The app also allows you to automatically back up your data with accurate notifications. Moreover, you can also schedule backup for timely saving. With this application you can also prevent your backup file from being deleted or accidentally deleted. Other features include a mobile security scanner, app update, cache cleaner and more. Helium - App Sync and Backup also does not require rooting your device to create a backup. You can back up your app or data and sync it to cloud storage or save it to an SD card. It also allows you to sync app data from another device, even if they are not on the same network. You can set up a schedule to backup your files and create a backup file from them in a timely manner to restore them in the future. The application has a clean user interface and you can easily use this application to create backups. The app allows you to enjoy its features without any annoying advertisements and allows you to sync your Android files to Android. It also offers you automatic synchronization. It supports cloud storages such as Google Drive, Box, Dropbox. It is made specifically for backing up device storage. You can manually or automatically save your MS messages, contacts, photos, videos, music, documents, call logs and other various files and create backups in the G Cloud Backup app. Moreover, it also allows you to save some settings in many cases, which is nice. It backs up your data in an organized timeline so you can go back to the exact time and restore your data backup from that point. Moreover, it supports seamless data exchange with all platforms from different sources. it gives you 1GB storage space which can be expanded up to 10GB. Moreover, you can also backup camera, WhatsApp, Viber photos and videos. This application allows you to protect your data with passwords and ensures secure data transfer. Also allows you to switch to a new device with one click, as well as share a backup with one click of a button. This app does not require any special permission or rooting of your device. Resilio Sync is a new backup and recovery application with a modern design. This is one of the best cloud storage apps as reported by many users. One of the best features of the app is that instead of creating a backup and saving it to any third-party cloud storage, you can save them directly on your computer. This helps in improved security as no one except you has access to your data. But to set it up you need to spend some time and follow all the steps to work properly but after that you will love this cloud storage app. There are no storage limits, as you can save as much as your hard drive allows. The app also allows you to create automatic backups of all your photos and videos. It supports all types of devices from tablet, PC, Mac, NAS and even server from anywhere in the world. One of the best ways to send and save your personal data in your own cloud storage i.e. on your PC's hard drive. As you all know, Dropbox is a cloud storage service that allows you to save all your files and save them in Dropbox cloud storage. You can access them from anywhere by simply logging into your Dropbox account. Moreover, you can send, share, save, collaborate on any project or work as part of a team with this cloud storage app. You also get real-time notification if someone changes or updates files. You can also convert whiteboards or receipts to PDF using the built-in document scanner. It allows you to store everything backed up from photos, videos, files, data, contacts or almost everything to cloud storage and access them anywhere. You can set up manual and automatic backups of your files very smoothly. The app offers a clean user interface and you will get what you want very easily. One of the best cloud backup and storage options for your device is the Google Drive app. Additionally, you can also set permissions on your shared folder or file, such as who can view, comment, or edit. You can use the built-in camera to easily scan paper documents and store them in the cloud. You can also view any files stored in your Google drive very easily and without any network connections, i.e. offline. Additionally, you get up to 13GB of storage, which is enough to save any type of file. The last app on this list is All Backup Restore for Android. This app allows you to backup your contacts, call log, SMS, apps, browser history or even calendar and restore them at any time. This app stores all your data in Google Drive, making it easy for you to access it from anywhere in the world. You can back up any applications and restore them with one click. Moreover, this app also allows you to backup call logs and other data such as calendars to perfectly sync your new device with all the memorable dates from your old device. It also has automatic backup of all your apps and other data, and you can also install it manually. You will be notified in a timely manner when backups have been made or are in progress. Additionally, you can also set up a schedule to back up your data and sync it to your Google Drive account. I hope you enjoy this article on the 10 best apps to backup your Android phone without root. Please let us know in the comments which app from the above list you will find more useful and also let us know any other app if you know enough to be on this list. Everyone knows that an unpleasant surprise can await any owner of a smartphone or tablet. This means that you need to periodically save the data in a safe place - do backup android. And it’s absolutely necessary to do this before launching a new suspicious application or if you are going to dig deep into the device’s hardware. For “hacked” devices there are plenty of programs specializing in this, but for those who like to do everything legally - without - everything is a little more complicated. Android includes a built-in feature to create a full backup of your Android phone without root, as well as a tool to restore it. All you need is a computer and a device running Android 4.0 (Ice Cream Sandwich). You can also create and restore a backup of your Android device using the Titanium Backup utility. Titanium Backup is perhaps one of the best backup solutions, but it requires root access. To create and restore a backup, we will use ADB (Android Debug Bridge) commands. This utility is included in the Google Android SDK, which you can download for free. First, you need to install the Java Development Kit (if not installed), since the Android SDK requires it. Download and install the 32-bit version of the Java Development Kit (Android SDK requires the 32-bit version even if you have a 64-bit version of Windows). Next, download and install the Android SDK. If the SDK says it can't find Java, then you may have installed a 64-bit version, in which case install the 32-bit version. After you have successfully installed the SDK, launch Android SDK Manager from the Start menu. Check the box next to Android SDK Platform-tools and click the install button to install the platform tools package that contains ADB. If you see an error, run SDK Manager as Administrator (click on the SDK Manager icon in the Start menu and select “Run as Administrator”). You must enable USB debugging on your device. You can do this from the developer tools in Android settings. Now connect your PC and your device using a USB cable. You must have drivers installed for your smartphone; usually they can be downloaded from the manufacturer’s website. Install Google USB Driver via Android SDK Manager (Extras subfolder), it might work. Remember the path where Android SDK is installed. It appears at the very top of the Android SDK Manager window next to SDK Path. You need to find the adb.exe file in the platform-tools folder. It is usually located at C:\Users\NAME\AppData\Local\Android\Android-sdk\platform-tools. Go to this folder and, holding down the Shift button, right-click on an empty space, select “Open command window” in the context menu that opens. To check the adb connection to your device, run the adb devices command. Your device should appear in the list. If it is not there, then the driver is installed incorrectly. Now you can use adb commands to create a backup copy of your device files. For a full backup, run the following command: When you run the command on your phone, you must confirm the creation of the backup. You can also protect your backup with a password. Depending on the amount of data, the process may take some time. To restore a backup, you need to run the following command: To create a full backup of an Android phone without root rights, you need to be an average user who understands the peculiarities of Android, but with the help of our instructions, even a beginner can do this. We hope this feature will be available in the Android interface in the future.
Features of backup on different platforms
![]()


![]()
How to backup contacts (phone book) on Android and iOS smartphones
![]()
How to set up automatic contact backup on Android?


How to set up automatic contact backup on iOS


How to create a shared photo gallery on devices with different operating systems?
![]()

Universal public calendar
![]()
The principle of storing events in Google calendar is the same on both iOS and Android:
How to backup your smartphone in 5 minutes?
![]()
1. Backup & Share Pro app

2. Backup Your Mobile

3. Easy Backup – Transfer and restore contacts

4. App Backup & Restore

5. Helium – App Sync and Backup

6. G Cloud Backup


8. Dropbox

9. Google Drive

10. All Backup Restore for Android

Conclusion

In fact, if you need a backup for one time or don’t mind $3.99 for the official full version, there is an ideal option. MyBackup Pro app can do everything that could be needed in this area: save data of various types on an SD card or in a cloud storage offered by the developer, restore it at the right time, set up a schedule for regular backup saving. Free version MyBackup Pro for Android allows you to use all functions for 30 days. 
It's easy to back up using. A few simple steps can be easily followed from the screenshots posted on the application page on the market. To get started, choose what you need to do: Backup
- backup saving. Then decide what you will save: applications and media files (applications & media) or information in general (data). 
Then you will need to choose where you will save the data: on an SD card or online, on the developer’s server. You can tick the types of data that need to be saved in the list: 
Installing the Android SDK

Preparing the device

ADB check

adb backup -apk -shared -all -f C:\Users\NAME\backup.ab
The command will create a backup copy of all installed applications (apk files) and data on the SD card to the C:\Users\NAME\backup.ab file on your computer. Replace NAME in the command with your computer's username or specify a different location.

Restoring a backup
adb restore C:\Users\NAME\backup.ab
A confirmation message appears indicating that the backup will replace all data on the device. If a password is set for the backup, you will need to enter it.


