How to assemble a computer. What is the difference between a home computer and an office and gaming computer? We assemble a computer from components with our own hands
Greetings, dear readers. Surely there are people among you who are planning to buy a computer in the near future. So, in fact, I decided to write a short series of articles about how to build a computer yourself and how to choose the optimal components based on your needs. We will not talk about the process of physical assembly itself, but about how assemble the optimal configuration.
To prevent the article from becoming huge and difficult to read, I divided it into separate articles:
- How to assemble a computer yourself(you are here)
Desktop or alternative
Why do we need desktop computers these days? After all, progress does not stand still and there are an abundance of more modern devices on the market, such as tablets, smartphones, all-in-one PCs, ultrabooks, and so on. And the point is this. Modern gadgets may satisfy most of the modern needs of mankind, but there are always tasks that require more productivity than mobile gadgets can provide. That's when desktops come to the rescue.
Before you wonder " how to build a computer yourself“First of all, you need to decide what you need a PC for. Even when you go to a store to buy a computer, the first thing they ask you is how you are going to use it. Maybe you need it for office work, or maybe, on the contrary, you need it. But these are two completely different computers.
I'm sure you already have a rough idea in your head of what kind of computer you want to build. And I’ll just describe the possible options for what might be in your head right now.
Do you want to build a gaming computer?
If you like to game, then you most likely want to build the most powerful gaming computer (or something close to it). By the way, it will be said that a gaming computer is suitable not only for games. It is also great for video and graphics processing, 3D modeling, and audio processing (if you add a professional sound card to it). In general, this PC is suitable for everything. But his appetites are not childish either (in terms of electricity consumption).

Every gamer's dream
To build a gaming computer, Intel Core i5 / Intel Core i7 / and preferably at least 6th generation. Its analogue could be AMD FX / AMD RYZEN 5 / AMD RYZEN 7, if you are a fan of AMD processors. must be at least NVidia GeForce 780Ti or higher. I don’t see any point in taking it, since its price is inflated out of proportion to its power. you'll need 16GB, but it's not difficult if the motherboard has enough free slots for it. And it’s definitely needed for the system, or better yet, for all software, including games. Fortunately, the volume of solid-state drives is now growing in leaps and bounds. Soon we will completely forget what it is.
Want to build an office PC?
In fact, these are the weakest computers; sometimes it is really better to prefer such a PC. So, if you decide to build an office computer, then you will need an inexpensive Pentium or Celeron processor (but Pentium is better), or a dual- or quad-core AMD processor of similar power. The video card will have a fairly built-in head. However, you should not install less than 4 GB of RAM.
Do you want to build a PC for video processing, graphics, design work, layout
This is, in fact, a medium-power computer. About 8-16 GB of RAM. The main load will fall on the central processor and video card. Therefore, at a minimum, you need an Intel Core i5 processor (preferably the latest or penultimate generation). And consider video cards from .
If we are talking about layout or programming, then you can assemble a system that is a little weaker. For example, an Intel Core i3 processor (also the latest or penultimate generation) will suffice. And since you don’t have to work with graphics, an integrated video card may well be enough.
How to assemble a computer yourself: summary
Now you know in general terms how to assemble a computer yourself. We will look at each point in more detail very soon. In the meantime, a checklist on the topic “Build a computer yourself”:
- Any case will fit. Take a beautiful one.
- The more powerful the computer, the more powerful the power supply.
- The motherboard must support the connection interface for each component you choose. For example, processor chipset or .
- There is no need to skimp on the processor.
- If you plan to overclock the processor (), then take care of good cooling.
- System performance depends not only on the amount of RAM, but also on the frequency of the RAM bus.
- Often, a video card of the penultimate generation will be enough for any modern game. Don't waste your money on the latest generation video cards.
- The hard drive can also affect the speed of the system. If this is important, then it is better to look towards SSD drives. They are much faster and quieter.
- An optical drive is a completely optional attribute. You can save money on it.
Did you read to the very end?
Was this article helpful?
Not really
What exactly did you not like? Was the article incomplete or false?
Write in comments and we promise to improve!
Article001 - How to assemble a system unit from components yourself (v.1.1)
This article will describe how a person with relatively little knowledge of computers can assemble a system unit (SU) from components.
The reason for writing this article is this - there is a type of computer user who, in general, has a good understanding (or is beginning to understand) about computers, but they themselves have never assembled a computer and have the desire, but do not have detailed instructions on exactly how to do this (i.e., “theorists” " and "newcomers").
The author does not claim the uniqueness and “correctness” of the method of its assembly, since there can be many assembly options, depending on various conditions. An experienced assembler can assemble a computer in a slightly different way. This can be compared to different options for solving a mathematical problem, where the result is generally the same.
As a rule, a standard computer consists of:
Monitor;
Keyboards and mice;
From the title it is clear that the methodology for assembling the “system unit” will be explained. Moreover, the case is of the ATX form factor.
Any microATX, flexATX, mini-ITX, BTX are not considered.
The standard system unit consists of nine components. Here they are:


5. CPU cooler

6. hard drive (aka hard)

7. DVD drive (or any type of optical disc drive - further, for simplicity, we will assume that this is a DVD drive)

8. power supply (aka PSU)


So let's get started. The SB assembly consists of three parts. Let's look at each in detail. I won’t describe absolutely everything - there are instruction books for the motherboard and the case for that. I will dwell on the important details.
I. Preparing the body.
First of all, we take the body.
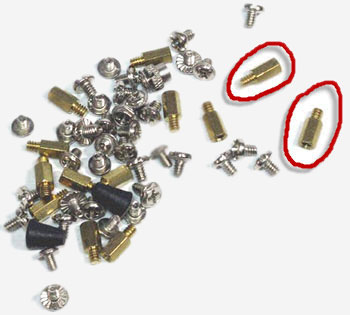
1. [Columns (pegs)]
The case comes with a plastic bag that usually contains the following things:
1.1. There are two types of fastening bolts (with frequent threads and with rare threads.
The photo below clearly shows that on the left there are bolts with sparse threads, and on the right - with frequent threads.

1.2. Hexagonal bolts with a screw hole at the back (the so-called “pins” - for simplicity, I will continue to call them “columns”).
Their cuts also come in two types - with frequent and rare threads. This is clearly visible from below.

1.3. It is also worth checking the following in advance - do the internal threads of the post fit a bolt with a rare or frequent thread?
Bolts with a wide (large) head are good for securing the motherboard - they are easy to tighten and they provide better and more reliable clamping. That's why all the photos show exactly the same bolts.

1.4. PC speaker (aka "tweeter").
[I'll add a photo later]
In top-end cases, the equipment may be richer - additionally included are ties, branded case mounts and holders for hard drives and drives, adapters from 5.25" to 3.5"/2.5", stickers with the name of the manufacturer, additional USB3 ports. 0 and e-SATA and much more...
This bag is needed - you will need columns.
1.5. We take the motherboard and place it on the case tray in the place where it is attached (i.e. the motherboard).
We remember by the holes in the motherboard those places (holes) where the posts need to be secured, then we remove the motherboard so that it does not interfere. Immediately mark the required holes with a marker.

1.6. Then tightly screw the posts in the pallet with pliers or another suitable tool in the marked places.
Sometimes it happens that the posts were already pre-installed - in this case they should, if necessary, be moved to the desired hole and/or screwed tightly to the end.
There should not be any extra posts on the pallet - they will interfere with the installation of the motherboard and may damage it. Usually there are 9 holes (and therefore posts) in an ATX form factor board.

2. [Stub]
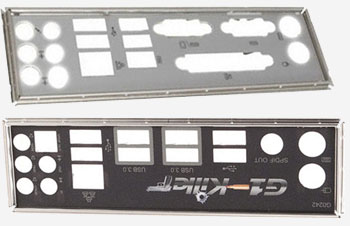
2.1. The motherboard package includes a plug for the motherboard connectors.
She looks like this.

2.2. There is a corresponding place at the back of the case for the plug.

2.3. We take the plug and secure it from the inside of the case using strong pressure, very strong :)

3. [Hard drives + DVD drive]
After this, the hard or hards are secured in the body. In conventional cases, the hard drive is fixed with four bolts (two on each side), which are screwed into the holes provided for this purpose:
The hards are secured with thinly threaded bolts.

In top-end (and not so top-end) cases, the manufacturer has the right to change the method of mounting hard drives, guided by the following goals:
Simplification (rarely - complication - for good reasons) of the fixation method to save time and nerves;
Reducing vibration and noise from hard drives;
Using your hands yourself, without the participation of various kinds of tools - pliers, screwdrivers...
In my case, these are special screws with a rubber washer in the middle - they are screwed in by hand.

And we fix the DVD drive with four bolts with rare threads. As a rule, in the uppermost 5.25" slot of the case.
The power supply in modern power supplies can be located either at the top or at the bottom. Although there is a tendency towards a “lower” location of the power supply. It is also secured with four thinly threaded bolts.
Moreover, if the power supply is at the top, there is only one fixation option for it - with the grille facing down. In this position, it takes in hot air from below and passes it through its “insides” to the outside of the body.
If the power supply is at the bottom, it can be fixed either with the grille down or up. Typically, the case manufacturer chooses only one of these two options for fixing the power supply - which one can be determined by the corresponding holes for the bolts.
But there are also often such options when the assembler himself is given a choice - and he can fasten as he wishes, since in this case there are twice as many “holes” - “fasten as you want.”
The answer is simple - because the power supply has a bunch of cables that often interfere with “digging” in the system unit. This saves time, although... this is not so important.
The two photos below show that with two different positions of the power supply, the holes are also in different places.
Fan below:

Fan on top:

II. Preparing the motherboard.
1. [Processor]
We take the motherboard in our hands and place it on the table, first placing a layer of soft material under it - a towel, a thick layer of newspaper or paper - to protect the legs on the back of the board.

Then we open the socket and carefully remove the dark plug designed to protect the “legs”. Before doing this, carefully read the instructions for installing the processor on the motherboard several times. Then you should calmly and slowly, clearly “place” the percent on the socket and close the socket. The percent is placed in the only correct way, since there is a “key” on the side and there is no other way to place it.
But why am I signing here? In the motherboard manual, everything is very clearly explained how to do this, and even with photos.


2. [RAM]
So, the processor is in place. Next comes the installation of RAM sticks. To do this, in the slot for the strips, open the latches on the side, of which there are two pieces per strip. Then we take the bar and gently press it into the “socket”. As soon as the bar drops into place, the clamps on the side will move down and “grab” the bar on both sides. We perform this operation for all planks. This operation is also described in more detail in the manual.
They also suggested to me that it is now fashionable to mount dimkas on one side - I don’t know whether it’s convenient or not.


The cooler is used to cool the processor during operation. The cooler is “docked” into the surface of the processor not just anyhow, but through a “thermal interface” - thermal paste, which, by filling the unevenness of the “docking” of two metal surfaces, ensures better heat transfer.

In fact, the process of attaching a cooler to a processor with a motherboard deserves a separate article, since this is a rather difficult task (and an extensive/controversial topic) for a beginner, since several important factors must be taken into account (in relation to a top-end cooler):
CPU cooler, method of mounting it, mounting fans, backplate and others;
The thermal paste itself, its thickness/viscosity, thermal conductivity (in relation to the evenness of the cooler base);
Amount of thermal paste applied;
Method of applying thermal paste to both surfaces;
Method of fixing the cooler to the motherboard.
Although it seems that everything is simple - take it with your finger and smear it. For me personally, not everything is so ordinary.
We placed the cooler after the memory sticks because in some cases an already installed cooler interferes with the subsequent installation of the sticks.

III. Final assembly.
1. We bring the case prepared in the first part (with hard drives, drive and power supply) into a horizontal position.

We carefully place the motherboard prepared in the second part (with a cooler and RAM) in the right place and secure it with bolts.

2. [Wires, cables, cables]
Before connecting the video card, you should connect the power cables, interface cables, case fan wires, USB cables and wires, audio, power, reset and LEDs. All this is again described in detail in the motherboard manual.
2.1. We connect the 24-pin power wire of the motherboard and then the 4-pin (or 8-pin) power wire of the processor to the motherboard.

2.2. We connect the thin wires power, reset, power led and hdd led (according to the pictures in the manual), as well as the USB2.0 and USB3.0 connectors (if any) and the audio wires of the connectors on the front of the case;

2.3. Then comes the turn of SATA interface cables - from the motherboard to the corresponding connector on the hard drives.
Don’t forget about the wires of the case fans (we also connect them to the corresponding connectors on the motherboard according to the manual).

2.4. And last are the power cables for SATA hard drives - from the power supply to the corresponding connector on the hard drive.

3. [Video card]
The last thing we connect is the video card. We take it in our hands, carefully bringing it closer to the PCI-E connector on the motherboard and pressing it until it goes in completely. And we fix it on the left with two bolts for reliable fixation.
Don’t forget to connect additional power cables from the power supply to the video card. Usually they are either. "pin" is the number of pins on the power connector.

And finally, when finished, we get the following picture:

Iron used:
Processor Intel Core i5 2500K, 4600 MHz, 1.35 V
Cooler ThermalRight Archon, TR TY-150 x 1000 rpm, TR TY-140 x 1300 rpm
Thermal interface Arctic Cooling MX-2
Motherboard ASRock P67 Extreme6 P67 (bios P1.60)
Memory DDR3, 2 x 4 Gb, 1333 @ 2133 MHz, HMT351U6CFR8C-H9, 10-11-10-30-2T, 1.59 V
Hard drive 500 Gb, WD5000AAKS (SATA2, 7200 rpm, 16 Mb)
1.5 Tb, WD15EARS x 3
2 Tb, WD20EARS x 2
640 Gb, WD6400AADS x 1
160 Gb, Seagate ST3160815AS (backup OS/off)
1.5 Tb, Seagate ST31500541AS
2 TB, Seagate ST2000DL003
2 Tb, Samsung HD204UI
Lian Li PC-A70FB case, and 4 original built-in fans.
Reobass Zalman ZM-MFC1 Plus
PSU AeroCool Strike-X 1100 (1100 W, 80+ Gold)
Video Inno 3D Geforce GTX570 (732/1464/3800, 1,000 V) - reference CO replaced by Zalman VF3000F
Monitor 24" Acer P246H 1920*1080
FavoritesSometimes it happens that the computer that is in the house, due to its advanced age, began to work poorly, or, even worse, it simply died a quiet and unexpected death. Or, perhaps, everything is not so dramatic and the old iron machine is simply tired of its owner, who always strives to keep up with new technologies.
There can be many reasons why there is a need or desire to acquire a new computer. But the question is not even that, but where to get a new computer. Of course, you can simply buy it at your nearest hardware store. But, you can assemble it yourself, which is much more interesting and, importantly, significantly increases self-esteem. And such a computer will be much more functional than its store-bought counterpart, since you can select parts for it at your discretion.
Almost every user can assemble a computer on their own. But in order to do this correctly, it is necessary to tighten up the theory a little about computer internals and about what should be inserted, screwed, connected, etc. where and in what order. In addition, the theoretical part will be very useful for those who have decided to build a computer for the first time. It is precisely so that such beginners do not have trembling in their hands and an irresistible desire to find valerian in the closet, this article was written, which is essentially instructions for assembling a computer, and even with illustrations. Therefore, there is nothing to be afraid of, grab a screwdriver and go!
What you need to have with you:
· A longer Phillips screwdriver (you can use a regular one, but it will be more difficult).
·Ring-nose pliers (pliers).
·Plastic ties or clamps.
·Medicines (for the most suspicious).
Assembling and installing the motherboard into the case
The first step is to assemble all the proper components for the motherboard. The motherboard itself is shown in the figure below. Let's look at its components:
1.CPU socket (socket);
2. Sockets for RAM (their number may vary, 4 are shown here);
3. Connector for video card;
4. Motherboard power socket;
5.SATA connector;
6. Front panel connectors.

These components of the motherboard will be discussed in more detail below during the assembly.
Processor Installation
A processor is a small flat square with contacts on one side. There are no other similar parts in the computer, so it is quite difficult to confuse the processor with something else.

In order to correctly insert the processor into the socket, you must do it in a certain way. One of the corners of the processor has a special mark in the form of a triangle. Your task is to find this corner on the part, then release the fasteners on the motherboard, find the same corner in the processor socket (socket) and insert the processor so that the marks match.

Before securing the processor, it is very important to make sure that it is inserted smoothly, since attempting to close an incorrectly inserted part can lead to damage to the processor contacts or their complete breakage.
Cooler installation

A cooler, or, in other words, a fan, is installed on the processor. But first, the surface of the processor must be smeared with thermal paste, unless, of course, it is applied to the surface of the cooler.
To make the layer thin, the paste (which should be about the size of a pea) can be spread over the surface using a piece of cardboard or plastic card. After the processor is lubricated, you need to install the cooler and secure it using special legs, as shown in the picture.

Installing RAM

In the image of the motherboard, the RAM slots are shown as number 2. Their number may vary. The RAM sticks themselves look as shown in the following picture. In order to insert RAM into the slot, you need to open the plastic clips that are located at the edges of the slot. Then directly insert the bar vertically until it stops. If the procedure is done correctly, then the clips will snap into place by themselves.
If you have identical RAM sticks, it is better to insert them into slots of the same color. This will make it possible to significantly speed up your computer.
Installing the motherboard into the system unit
After the motherboard is fully assembled, you need to insert it into the computer case, which looks like this.

The motherboard is installed on the side wall of the unit. Don't worry if you notice that there are more mounting holes in the case than necessary. This is necessary so that you can install motherboards of different sizes.
First, you need to “try on” the motherboard, placing it tightly against the case. This is necessary to see if the motherboard connectors fit into the protective panel. If everything matches, the motherboard can be mounted. If something does not match, then you need to break out the protective plate with the holes using pliers and insert another panel there.

Installing a hard drive, drive, video card
In order to install a drive or hard drive, you don’t need much effort, the main thing is to know what to connect to what. So, to connect a hard drive or drive, a SATA data channel is used, which is shown in the first figure as number 5.

A pair of cables for connection are included with the motherboard, so you don’t have to look for them. The cables can be connected to any SATA pins.
Since usually not one hard drive is installed, but several, you need to remember one important point. It is best to install hard drives not too close to each other. Typically, a system unit has three or more slots for hard drives. Therefore, you can install one hard drive in the bottom cell, and one in the top, so that air circulates between them, which prevents overheating of the surfaces of the parts.
If all the hard drive slots are occupied, then it is advisable to install an additional fan to cool the hard drives, since overheating significantly shortens their service life.

The slot for connecting a video card is located in the image at number 3. The video card itself looks like this.

Connecting it is not difficult, but first you also need to “try on” the video card to the slot. This is done in order to determine exactly where to insert the card and which plug will have to be removed from the back wall of the computer. The further process is identical to connecting the RAM: insert it straight and all the way. The final touch is to secure the video card with a special mount or bolt.
Installing the power supply
The power supply looks like a metal box with many wires coming out of it. The system unit has a special place for the power supply. It is clearly depicted below.

The power supply is inserted so that the network output and the button are on the outside, and the bundle of wires is on the inside.

After the power supply is in place, you need to connect the wires. First, connect the widest plug to the motherboard. It is difficult to confuse it with another wire, since it consists of 24 segments, which are usually called pins. However, 4 of these pins can be “separated” and form a separate cable that can be attached to the main one if necessary. This is necessary so that the power supply can be connected not only to modern motherboards, but also to old ones that have only 20 pins.

This cable is a weave of four wires: two yellow and two black. The place where it needs to be connected is usually located above the processor and is a four-pin input.

The power cables for the drive and hard drive are as follows.

It is not difficult to find where such a cable is inserted, since it has a special shape and will only fit into its place.

In this case, it will also not be difficult to find what and where to insert. But, you need to pay attention to the fact that there are video cards that do not have a connector for the power cable. This means that the spare part is an old model and it has enough power received from the motherboard. In this case, power from the unit is simply not connected.
Additionally, such wires come out of the power supply.

They are necessary to connect the Floppy diskette and card reader.
Connecting the Front Panel Connectors
The front panel on the system unit also has many elements that require connection to the motherboard. This could be a power button, a reset button, indicator lights, USB ports, and more. The connection cables are as follows.

Power SW – is responsible for the computer’s power button.
Reset SW – responsible for the reset button.
Power LED – responsible for LED power indication.
H.D.D. LED – an LED that shows the operation of the hard drive.
MIC-IN – microphone output.
Spkout L, R – Right and left speaker outputs.
GND – ground to the microphone and speaker contacts.
It is also important to connect all these elements correctly because otherwise the machine will not turn on. Any motherboard has a kind of block of contacts, which are called Front panel (F-panel) and look like this.

These wires are connected according to the instructions that come with the motherboard. But if there is no such instruction, it’s not scary. There are hints on the motherboard itself that you can use. They are usually located next to the F-panel.
There is also a USB connector on the front panel of the computer (system unit). There may be one, or there may be several. This also includes ports for connecting a microphone, headphones and speakers. This whole “structure” looks something like this.

To connect all these elements you also need cables (so-called pins). The appearance of the required pins is shown in the picture below.

Fortunately, they all come included and connect to the motherboard, namely to blocks called F-USB1 and F-USB2. The color of these blocks and location on the motherboard may be different, but the components are the same.

The ports for connecting audio inputs look similar, but differ in the position and number of pins. They connect quite simply, if only because they simply won’t fit into other blocks. In addition, you can always use the tips in the instructions, if, of course, there are any.

At this point, the main assembly of the computer can be considered complete. All that remains is to connect a variety of additional elements, such as a keyboard, mouse, speakers and other small things. And then you can enjoy the subject of your labor.
Finally, a few more points about assembling computers yourself. In addition to the pleasure of the work done, you can get significant cost savings, which can amount to 20% of the cost of the finished computer. In addition, self-assembly allows you to gain important skills in working with this type of equipment. These skills can be useful when the question arises about the need to repair a computer or its components. There is also no need to call a specialist to set up your computer, because you can do it all yourself and thereby save a lot of time and money.
Still, it is necessary to pay attention to some negative factors. In the computer parts market, there is a possibility of purchasing a defective item. Therefore, you need to take a responsible approach to choosing components for your future computer and carefully study the theory of its assembly. By following these simple recommendations, you will build a wonderful computer that will last for a long time.
Before you start assembling the computer yourself, let's look at the picture below. It presents all the main components from which the computer will be assembled with your own hands (our own hands) :)
When you click on the picture, it will open in a modal window in improved quality.
Let’s briefly go through the individual components of our “experimental subject” so that assembling a computer with our own hands will present itself to us more holistically. Using the link below, open a new window with the top image, which will contain numbers (from 1 to 10), and on this page below we will give a brief description of each of the components.
- At number “1” we have -
- number “2” - PCI Express standard
- “3” - cooling system (aluminum radiator and cooler for heat dissipation)
- “4” - itself for the socket (connector) LGA 775
- “5” - two DDR2 modules
- “6” - IDE cable (for connecting or CD-DVD of the old standard)
- "7" - DVD-ROM
- "8" - computer
- “9” - hard drive (hard drive) standard SATA
- “10” - cable (for connecting a hard drive or CD-DVD standard SATA)
- “11” - floppy disk (disk drive) and its data cable
Naturally, all this “stuff” needs to be packed somewhere. For this we need a good one.
Assembling a computer with our own hands occurs in the following sequence: first we install (actually screw) the motherboard into our case, install the processor and its cooling system into it, and then we connect and secure the remaining necessary elements to this “foundation”.
Another link, which in a separate window schematically shows in what sequence the computer should be assembled.
So, at the initial stage of self-assembling a computer, we need to install the motherboard into the case. Regarding it, there may be the following recommendations: the case should be spacious enough so that we can easily install all the components we need into it.
The board is attached to it using screws that are screwed into special mounting sleeves (metal hexagons). They come complete with the case.
The bushings are screwed into special holes on the back wall of the computer (on the inside of its right side wall), the motherboard is placed on top of them and tightened with screws.
Hexagons are needed in order to create a gap between the board itself and the metal surface of the system unit (to exclude the possibility of electrical contact between the soldering of elements from the rear surface of the board and the case). Such contact may well cause a short circuit () and damage the electronics. The more bushings you manage to use, the more secure the fixation will be (look at the number of mounting holes on the case and the board itself).

Tip 1: remember, mounting sleeves for the motherboard must go complete with computer case . If you buy a case, then only with them. This is important because these fastening elements vary in height and differ in the width of the thread at the base. With others you simply cannot install the fee!
Tip 2: If you plan to change the motherboard (you buy it secondhand or in a store), then be sure to make sure that it comes with a panel with holes for connectors? When assembling the computer with your own hands, you will need to install the socket on the back wall of the system unit. Pay attention to the photo below:
Please note that the location of the holes for the connectors is different for each batch of boards, and if you are not sold the panel corresponding to the motherboard right away, then it will be very difficult to get it separately later.
The panel is installed in a specially designated place. This needs to be done before placing the motherboard in the case.

Orient it correctly in relation to the main connectors and install it by pressing firmly with your fingers. The plug should fit tightly and lock into place with a characteristic click.
Below you can watch a video that clearly demonstrates the entire process:
We continue assembling the computer with our own hands. After we have secured the motherboard in the case, we need to install the central processor in the slot (connector) of the board. Let's look at the picture below and comment on some points.

The installation procedure in the slot is as follows: press down and bend the clamping latch to the side (indicated in the photo above as number 2). To do this: we snap it out from under the special hook (number 1 in the photo), lift the metal frame (number 3), which secures the processor in the socket. After this, all we have to do is install the CPU itself (indicated by the number 4).
Attention! Take a good look at the processor and determine on which side the “key” is located (a corner specially cut off on one side or two small indentations on the sides). The socket has the same corner or protrusions in the appropriate places. When installing the processor into the socket, they must be aligned with each other.
When the installation is complete, we repeat all the steps in the reverse order: place the fixing cover (No. 3) on the processor, lower (with a certain force) the pressing metal rod (No. 2), move it slightly to the side at the lowest point and thread it under a special hook on the side No. 1.
To learn how to install an old PGA processor (believe me, you need to know this), watch the video below:
In the process of assembling a computer ourselves, we need to be able to install a cooling system (radiator with fan). It should be noted that now we are installing a cooling system for a product from Intel; in the case of AMD, it looks a little different.

In theory, it looks like this: at the four corners of the processor slot there are special holes in the motherboard, and it is through them that the entire air cooling system is attached.
Accordingly, there are four special plastic clips on the radiator, which, when pressed, press the radiator against the processor and, at the same time, fix the entire structure on the motherboard.
Here's what a close-up of the cooling system looks like for our CPU that we just installed:

And this is one of its latches on the board in close-up and we snap it into place.

Pay attention to the photo below:

Do you see the slots (grooved indentations) on each of the four plastic clips? The position when the recesses are located perpendicular to the radiator fins corresponds to the closed state of the latch-clamp (in the photo above all the latches are closed). This is exactly the position they should all be in before installing them on the board! Remember this!
The arrows indicate the direction in which you need to turn (you can do this with a screwdriver) the latch in order to move it to the open position.
Advice: After placing the radiator clamps strictly above the holes around the mounting slot (you need to ensure that the plastic tips of the fasteners “fall into them” a little), you need to simultaneously smoothly but firmly press two clamps located diagonally from each other (until they click and are securely fixed in the board ). Then we carry out the same procedure for the two remaining clamps. All! Cooling system installed!
It’s much easier to show the whole process once in a short video than to describe it in words, so watch the video below:
If the need arises to remove the cooling system, then simply move all four latches to the “open” position and pull the structure towards you (it can be removed quite easily).
Advice: Some people find it more convenient to install a computer cooling system before that How the motherboard will be secured in the case. This makes it possible to clearly see what snaps where and where, and to measure the force applied to securely fix the elements.
The design for mounting the cooling system on processors from AMD is somewhat different from what we can see in products from Intel. It consists of two components: a plastic base frame, securely fixed around the processor socket, and a radiator with a fan, which are attached (snapped) onto this frame. Here, for example, is what it looks like for the AM3 processor socket:
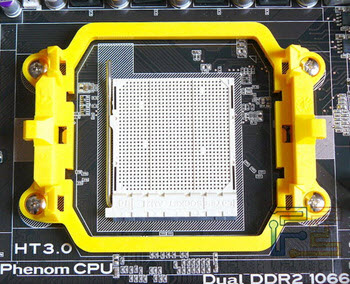
As you can see, with this approach, the pressing pressure force from the radiator is first transferred directly to the plastic base (frame) and only then evenly distributed over the PCB of the motherboard itself.
By the way, when removing cooling systems from motherboards running Intel processors, quite often you have to observe how the very base of the motherboard (textolite) has a visually noticeable curvature (from the constant pressure on it of the cooling system radiator), which is attached directly to the board itself . This is bad and could potentially lead to micro-cracks in the very core of the motherboard.
Assembling a computer with your own hands, in particular, installing a processor and motherboard, often involves installing third-party cooling systems on the processor, which can weigh half a kilogram, or even more! In this regard, to prevent the motherboard from deflecting at the mounting location, they come with a special metal cross, which is located on the back side of the board (under the processor).

This additional mount is called the word “Backplate” and, as we have already said, it serves to remove unnecessary physical stress from the motherboard. The only caveat of this design is that it must be installed to fixing the board in the computer case.
Don't forget: a properly installed cooling system can prevent future problems!
When assembling a computer ourselves, we need to remember to do one more thing: from the cooling system fan there is a small (3 or 4) pin wire that supplies power from the motherboard to the fan so that it spins and dissipates heat. We need to find the corresponding connector on the board (usually 3-4 pins next to the processor socket) next to which there is the inscription “CPU_FAN” and connect our power cord to it.
The most important components and cooling system are installed. Now we need to install all the remaining devices. And since assembling a computer with your own hands is quite a responsible and painstaking task, then, for the general readability of the text, let's continue our description on the next page.
In conclusion (to better secure the material), you can watch a video on how to install a processor and cooling system on products from Intel:
A gaming computer can be considered a computer that is capable of playing all modern games, providing an acceptable level of comfort from this entertainment. But user requirements differ, so very different devices fall into the category of gaming PCs. For many users, it is enough that games play smoothly, the game world is displayed correctly and there are no control problems. Professional gamers (who make money from gaming) and those who spend a significant portion of their leisure time playing games have more stringent requirements for PC performance.
This material will tell you how to assemble a gaming PC with your own hands, both for users who just need a smooth rendering of the picture on the screen, and for gamers for whom the quality of graphics is paramount. Of course, for these two categories of buyers, both the performance of the components and their cost will differ significantly (up to ten times). But the general recommendations on how to assemble a gaming PC with your own hands will be similar for everyone.
Assembling a PC on your own is, first of all, a solution that allows you to select the optimal configuration for the needs of a particular user. Also, setting up your own computer is a way to save money. The question of how to build a cheap gaming PC interests many users. Unfortunately, the performance of a computer largely depends on its cost. Therefore, it is now impossible to assemble a completely cheap (for example, for 10-15 thousand rubles) gaming PC.

Where to start
Budget is a key factor when choosing components. Therefore, first of all, you should decide how much money will be allocated for the purchase. It also matters whether you need the system unit itself, or peripheral devices (monitor, acoustics, keyboard, mouse).
Each manufacturer's model range includes several sockets (processor sockets). Each of them requires a motherboard with its own connector. If the CPU is equipped with Socket 1155, then the motherboard must have the same. In addition, you should consider the compatibility of the board with specific processor models. As a rule, board manufacturers publish lists of supported CPUs on their official websites.
The requirements for the board itself are determined based on the number and capacity of RAM sticks that will be installed, the number of connected drives (HDD, SSD), their interfaces (SATA, PCI-Express or M.2) and overclocking capabilities. The future upgrade also matters: if one is planned in a couple of months or years, you need to choose a motherboard with a large number of interfaces and a fresh chipset (for example, MSI H61M-P31/W8 for Intel, ASUS M5A78L-M LX for AMD). If you are renting a computer for a long time and there is no provision for upgrading its components, you can save a little on the system board.

An advanced motherboard is needed if an upgrade is planned
Video card
The GPU in a gaming computer is just as (if not more) important than the CPU. It is the video card that is responsible for processing the three-dimensional image and displaying it on the display. However, you can’t just pick up and install a powerful video card and save on other hardware. Information for subsequent processing by the graphics processor is prepared by the “CPU + RAM” combination, which, in turn, receives data from the drive (HDD and SSD).

A weak processor will not allow you to unleash the potential of a gaming video card
The “weak link” (regardless of whether it is the processor, video card or hard drive) will drag the system down, becoming a bottleneck. An analogy can be drawn with a logistics terminal: no matter how high its throughput is, no matter how many cars are loaded, if there is a lack of loading equipment and labor, expanding the capabilities of the terminal itself will not help speed up its work.
Tandems like “inexpensive Intel Core i3 (or similar AMD FX 4xxx series) + Geforce GTX Titan X” are thus extremely ineffective and a waste of money. The “ceiling” of such processors is video cards of the Geforce GTX 750 Ti class. Such a chip will not reveal the potential of a more productive GPU.
To assess whether the combination of the selected processor and video card will have the optimal balance of capabilities, you can compare their prices. The cost of the GPU should exceed the price of the CPU. In the budget category (Intel Core i3, AMD FX 4xxx and 6xxx series) the difference is 10-30%, and in the niche of more expensive devices it can reach 100%. That is, if you plan to buy a processor for 8,000 rubles, then there is no point in installing a video card for 15,000 or more. But the GeForce GTX 980, costing up to 50 thousand, will be optimally combined with an Intel Core i7 CPU for 25-30 thousand.
You can install 2 video cards if the motherboard supports SLI (for Nvidia GeForce) or CrossFire (AMD Radeon) technologies. In the budget segment, such a solution looks pointless (1 GPU for 15 thousand will be more productive than 2 for 8 thousand). In the top class, connecting two video cards allows you to achieve an increase in performance that cannot be realized in other ways.

Two video cards in SLI will increase the performance of your gaming PC
If you plan to upgrade your PC, you can purchase a motherboard that supports two video cards and get a GeForce GTX 960-level GPU. For now, the capabilities of this video card are enough to play all games, and in a year you can pair it with another one of the same kind to improve performance.
It should be remembered that to work in SLI/CrossFire, video cards must be, if not identical, then built on the same version of the graphics processor.
RAM
When choosing RAM, the main thing is to take into account the compatibility of generations and operating frequencies. For example, sixth generation Intel Core i7 processors (and motherboards compatible with them) work with DDR4 RAM sticks, and AMD FX 8xxx - DDR3.

DDR4 memory is faster, but not supported by all processors
The amount of RAM is limited by the wallet and the number of slots on the motherboard. RAM is a resource that can never be enough (thanks to software developers who, after switching to 64-bit Windows, do not bother themselves with excessive efforts to optimize memory consumption). Therefore, whether to install 8 GB of RAM or 32 is up to users to decide.
When selecting RAM sticks, it is recommended to install them in pairs or triplets. In this case, the chips operate in two or three-channel (depending on the CPU model and motherboard) mode. In this case, the speed of data exchange theoretically increases, respectively, by two or three times. Two 4 GB modules will work faster than 1 8 GB module.

Drives
Hard drives are gradually losing ground under the pressure of rapidly reducing prices, gaining capacity and becoming more reliable SSDs. Since it is impossible to build a powerful gaming PC without a high-speed drive, a gaming computer cannot do without a solid-state drive. A capacity of 256 or 512 GB is enough to install Windows and games, and for multimedia content (music, movies), you can simultaneously install a capacious HDD of 2, 3 or more terabytes.

The capacity of modern HDDs has already reached 10 TB


