How to create a localhost. How to create a local server on Windows
 The architecture of the location of the directories of the software package implies a clear separation of two different types of data: dynamic user data (settings, temporary files, logs, etc.) and static data (modules, programs, service files).
 In simple terms, in the modules folder, no files are ever changed, created or deleted, while in the domains and userdata folders, on the contrary, the data is constantly changing. This architecture was created specifically to simplify data synchronization between different copies of the complex and save space when backing up.
Installation and launch
Installation
OSPanel is a portable software package and does not require installation. The assembly can be placed on an external hard drive or flash drive, this will allow you to use OSPanel on any computer that meets the system requirements.The distribution kit is a self-extracting archive in 7ZIP format (.exe extension). Run the distribution executable and select the path to unpack the files.
System requirements
- Required minimum system resources: 200 MB RAM and 1 GB HDD;
- Windows (32-bit or 64-bit): Windows 8 / Windows 7 / Windows Server 2008 / Windows Vista / Windows XP SP3;
- Installed set of libraries Microsoft Visual C++ 2005-2008-2010 Redistributable Package x86;
launch
To launch OSPanel use the file OSPanel.exe. If possible, the program should only be run as an administrator. After starting the program, you will see a red flag in the Windows tray (the area near the system clock). To enable the web server itself, click on the checkbox, then select the menu item [Menu → Start].If the server does not start, go to the section in this help guide.
Attention
Before using OSPanel, please execute [Menu → Advanced → First start]. The presence of an installed set of libraries Microsoft Visual C ++ 2005-2008-2010 Redistributable Package x86 is a mandatory system requirement, OSPanel will not work without them.Start from CD/DVD
OSPanel can run from CD/DVD discs in the same way as from a conventional HDD or flash drive, with the only difference that when working from an optical disc, no changes and files will be saved after the program exits.As you know, the CD/DVD disk is available only in read mode, which makes it impossible to start and use the server on such a media. A rather simple mechanism is built into OSPanel to get out of this situation: at startup, the server is copied to a temporary folder on the computer, and when the program exits, this folder is completely deleted. Thus, all OSPanel work takes place on the user's computer, and not on the optical drive.
Installing updates
OSPanel is a fairly complex software package with a constantly improving architecture. As such, there is no update procedure. When a new version of OSPanel is released, you need to reconfigure all settings, copy your site folders and migrate databases. Do not unpack the distribution files over the existing version, and also do not try to copy the configuration and profile files from the old version of the program to the new one! Since OSPanel releases can sometimes be quite frequent, it's not a good idea to update your build every time, it's better to skip a few versions.If it is possible to update by simply copying files, then a link to the patch is always published in the news on the site along with an annotation to the new version.
Compatibility
Some of the new OSPanel modules (PHP 5.5, MongoDB, Apache 2.4) are not compatible with outdated operating systems such as Windows XP, Windows 2003, Windows Vista. When using such modules and running the server on legacy systems, you will receive an error message. You should also be aware that some modules can only work together, for example, Apache 2.4 and PHP 5.5.Connection
Below are the parameters for connecting to modules installed in OSPanel by default. You can always change these settings yourself to your liking.Connecting to MySQL
- Address: your site's domain*
- Port: 3306
- User: mysql
- Password: mysql
ROOT connection to MySQL
- User: root
- Password: (blank)
Information
The default encoding set in the MySQL server settings does not affect the ROOT user. The encoding will need to be explicitly specified in the database connection scripts, so using the ROOT user is not recommended.Connecting to PostgreSQL
- Address: your site's domain*
- Port: 5432
- User: postgres
- Password: (blank)
Connecting to MongoDB
- Address: your site's domain*
- Port: 27017
- User: (blank)
- Password: (blank)
Connecting to Memcache
- Address: your site's domain*
- Port: 11211
Connecting to FTP
- Address: your site's domain*
- Port: 21 (990 for FTPS)
- User: ftp
- Password: ftp
domain localhost
If you want to use the usual localhost address to connect to a MySQL, PostgreSQL, FTP, or Memcache server, then just create a standard domain or alias called localhost.Connection automation
When you work with local copies of live web projects, it is difficult to constantly edit configuration files, mainly in relation to database connection settings. To avoid this, it is recommended:- Locally create a database user with the same username, password, and privileges as used on the remote server.
- Create an alias with the same name as the database host on the remote server.
* For example, if your script is located at test.server.loc/mysql.php, then the host (address) of MySQL, PostgreSQL, FTP and Memcache servers will be the domain: test.server.loc
Domains and aliases
Domain Management Modes
There are three domain list management modes in OSPanel: auto search, manual control, and manual+auto search. By default, the first mode of automatic connection of folders from the root directory specified in the settings is used.How auto search works
The program scans the specified web directory for folders with domains, after which, in each found folder, it searches for subfolders (the root folder of the domain) that are specified in the autoscan settings. If none of the supposed root subfolders is found, then the folder with the domain itself becomes the domain root.How does combined control work (manual + auto search)
When using the combined domain management mode, the program first connects manually created domains, after which automatic scanning is performed according to the procedure described above.Creating a domain in automatic mode
To create a domain or subdomain, open [Menu → Folder with sites] and create a folder with the name of the future domain. After creating the domain, restart the server.Creating a domain manually
To create a domain or subdomain, go to the [Menu → Settings → Domains] section and create an entry of the form: domain => folder. As a domain folder, you can select an existing folder on the disk or create it directly in the directory selection window. After creating the domain, save the settings.Creation of a Cyrillic domain
OSPanel supports Cyrillic domains, but be careful, the folder with the domain must be named with its real name, not a pseudo name in Cyrillic. For pivo.rf, the real name (punycode format) will be xn--b1altb.xn--p1ai and by creating such a domain you will get access to http://pivo.rf. To convert domain names to punycode format and vice versa, use [Menu → Advanced → IDN Converter].Create a subdomain
The process of creating a subdomain is similar to creating a regular domain. When creating only a subdomain, the availability of the main domain existing on the Internet is not lost, i.e. you will be able to work with a local subdomain while having access to a working domain on the Internet.Create an alias
To create an alias, go to the [Menu → Settings → Aliases] section and create an entry of the form: source domain => destination domain. After creating the alias, save the settings.Please note that creating an alias like *.xxx.xx does not mean that any domains like test.xxx.xx, mail.xxx.xx, etc. will be available to you. It is still necessary to create a specific alias or domain in order for it to become available, this is a feature of the Windows operating system.
Site icon in the domain menu
If there is a correct favicon.ico file in the root folder of the domain, the site icon will be displayed in the program menu.Limited mode of operation
In some cases, domain and alias management is not available (see ).Web tools
You can open the start page with links to domains and a list of tools by adding the prefix /openserver/ to any existing local domain. For example: http://localhost/openserver/Working with MySQL
Creating a MySQL user
- Enter username root without password (default)
- In PHPMyAdmin, open the [Privileges] section
- Click the link [Add new user]
- Fill out the form and click the [Create User] button
Information
In the event that, among other privileges, the SUPER privilege is checked for the user, then the encoding set by default in the MySQL server settings will not affect him. The encoding will need to be specified in your scripts individually for each connection to MySQL, therefore it is not recommended to mark the SUPER privilege.Creating a MySQL database
- Open [Menu → Advanced → PHPMyAdmin]
- Use root without password to login (default)
- In PHPMyAdmin, open the [Databases] section
- Enter the name of the new database and select its encoding
- Click the [Create] button
How to login to PHPMyAdmin / MySQL manager
- Open [Menu → Advanced → PHPMyAdmin / MySQL manager]
- Enter username root without password
- Click the [Login] button
Specifying the connection encoding to the MySQL server
The cp1251 encoding is Russian, it can be replaced with the name of any encoding you need.Switching database modules
Be careful when changing the active database module. Each module has its own separate storage of databases and settings, they are not related to each other in any way, so you will not see the databases you created when you switch to another module.Long connection to MySQL (more than 1 sec)
Before using OSPanel, you must disable the IPv6 protocol via [Menu → Bookmarks → Registry Fixes → Disable IPv6]. If this is not done, then the process of connecting to the MySQL server can take a very long time (more than 1 second) and the speed of php script execution will not please you.Working with Path
To add your own paths to the PATH environment variable, you can use the file ./userdata/config/path.txtPaths must be added one by one, entering each on a new line, for example: C:\Windows D:\My Programs %realprogdir%\data\dll C:\Windows\System32
Information
By default, the path.txt file is not included. See [Menu → Settings → Server].| Variable | Variable description |
|---|---|
| %realprogdir% | |
| %progdir% | |
| %sprogdir% | |
| %dprogdir% | |
| %dsprogdir% | |
| %realsitedir% | |
| %sitedir% | |
| %ssitedir% | |
| %httpport% | HTTP server port |
| %httpsport% | HTTPS server port |
| %postgresqlport% | PostgreSQL server port |
| %mysqlport% | MySQL server port |
| %mongodbport% | MongoDB server port |
| %memcacheport% | Memcache server port |
| %ftport% | FTP server port |
| %httpdriver% | HTTP module name |
| %phpdriver% | PHP module name |
| %mysql_driver% | |
| %pg_driver% | PostgreSQL module name |
| %mongo_driver% | MongoDB module name |
| %memcachedriver% | Memchache module name |
| %dnsdriver% | DNS module name |
| %ip% | server IP address |
| %disk% | |
| %osdisk% | |
| %sysdisk% |
DNS server
The built-in DNS server is intended for use in local networks or for debugging web applications. For detailed settings, the general server configuration is available, as well as the configuration of domains.To use the built-in DNS server, you must configure the network interface on each computer BEFORE starting the server itself. You need to complete the configuration both on the local machine and on other computers on the local network that want to access your domains. Without specifying a local DNS server in the network connection settings, it will be impossible to start the server (if the DNS module is enabled in the OSPanel settings).
By default, the TTL setting is set to 60 (seconds), you can change this value in the ./userdata/init.ini file, however, be aware that thoughtlessly changing the TTL may cause other computers on your network to cache out-of-date records. Change this setting only if you truly understand its purpose.
- As the server IP address, select the IP address of your computer in the local network or the Internet in the OSPanel settings (do not select the All available IPs option).
- Open the properties of the desired network connection:
Network and Sharing Center → Connection xxx → Properties → Internet Protocol version 4 → Properties → General → Use the following DNS server addresses.
Enter the following NS server addresses: xxx.xxx.xxx.xxx 8.8.8.8 (or any other real backup DNS) Instead of xxx.xxx.xxx.xxx, enter the IP address of your computer on the local network or the Internet.
- Repeat the setup procedure on other computers on the local network.
- Do not configure aliases from the instructions section of this guide. This configuration is not required, since remote computers will directly work with your DNS server and will have access to all domains.
- Save the settings and start the OSPanel server.
Maintenance of real domains
To use a local DNS server to serve real domains on the Internet, make the following entry in the DNS settings of each of the domains (the domain.ru and ip parameters must be replaced with the domain name and IP address of the server with OSPanel, respectively): # Settings are made in the control panel at the registrar company domain # For DNS based on registrar servers ns1.domain.ru. 3600 IN A ip # For DNS based server OSPanelns1.domain.ru → ipTask Scheduler
Using the task scheduler (Cron)
Time values are entered as numbers, a combination of numbers, or *.You can specify times using commas as separators: For example: 1,2,3 Result: the task is executed 3 times, at the 1st, 2nd and 3rd minutes of the hour. You can specify a range using a hyphen: For example: 5-7 Result: The task is run 3 times, at the 5th, 6th and 7th minutes of the hour. You can set the frequency of execution using an asterisk (*) and a slash (/): For example: */2 Result: the task is executed every 2 minutes. You can combine the methods to create an accurate schedule: For example: 1,5,11-15,30-59/2 Result: the task is executed at 1.5, from 11 to 15 and every 2 minutes from 30 to 59. The above scheme for specifying the time relevant for all time periods (minute, hour, day, month, day of the week). To request a URL in the scheduler, you need to use the Wget helper utility (see examples). You can use substitutions in the command line.
Using variables as substitutions
| Variable | Variable description |
|---|---|
| %realprogdir% | Real path to OSPanel folder (backslash "\") |
| %progdir% | Generated path to the folder with OSPanel, taking into account the virtual disk (backslash "\") |
| %sprogdir% | Generated path to the folder with OSPanel, taking into account the virtual disk (slash "/") |
| %dprogdir% | Generated path to the folder with OSPanel, taking into account the virtual disk (double backslash "\\") |
| %dsprogdir% | Generated path to the folder with OSPanel, taking into account the virtual disk (double slash "//") |
| %realsitedir% | Real path to the root folder of domains (backslash "\") |
| %sitedir% | Generated path to the root folder of domains, taking into account the virtual disk (backslash "\") |
| %ssitedir% | Generated path to the root folder of domains, taking into account the virtual disk (slash "/") |
| %httpport% | HTTP server port |
| %httpsport% | HTTPS server port |
| %postgresqlport% | PostgreSQL server port |
| %mysqlport% | MySQL server port |
| %mongodbport% | MongoDB server port |
| %memcacheport% | Memcache server port |
| %ftport% | FTP server port |
| %httpdriver% | HTTP module name |
| %phpdriver% | PHP module name |
| %mysql_driver% | MySQL / MariaDB module name |
| %pg_driver% | PostgreSQL module name |
| %mongo_driver% | MongoDB module name |
| %memcachedriver% | Memchache module name |
| %dnsdriver% | DNS module name |
| %ip% | server IP address |
| %disk% | Drive letter from the generated path to the folder with OSPanel, taking into account the virtual drive (letter only) |
| %osdisk% | Drive letter from the real path to the folder with OSPanel (letter only) |
| %sysdisk% | Windows system drive (letter only) |
An example of a scheduled task (requesting the cron.php file via HTTP and saving the response to a temporary file so that garbage does not accumulate): Time: */30 * * * * Execute: %progdir%\modules\wget\bin\wget.exe -q - -no-cache http://xxx.ru/cron.php -O %progdir%\userdata\temp\temp.txt An example of a scheduled task (requesting the cron.php file via HTTPS and saving the response to a temporary file so that garbage does not accumulate) : Time: */30 * * * * Run: %progdir%\modules\wget\bin\wget.exe --secure-protocol=TLSv1 --no-check-certificate -q --no-cache https:// xxx.ru/cron.php -O %progdir%\userdata\temp\temp.txt Scheduled task example (execution of cron.php by PHP interpreter): Time: */30 * * * * Execute: %progdir%\modules\php \%phpdriver%\php-win.exe -c %progdir%\modules\php\%phpdriver%\php.ini -q -f %sitedir%\xxx.ru\cron.php
Predefined Scheduler Variables
In addition, any environment variables, such as %COMSPEC%, can be used as scheduler variables.
Call the shell to execute the command: Time: 0 * * * * Execute: %COMSPEC% /c del /S /Q c:\temp\* Variable %COMSPEC% in this case will be deployed in C:\Windows\system32\cmd.exe
Task Scheduler Features
It is very important to understand that the task scheduler (cron) is not a command line or a console. The scheduler only launches the program with the parameters specified in the task. Thus, those programs that can only run in the console must also be run through the console and in the scheduler itself.For example, such a task will not be executed ( wrong entry): %realprogdir%\modules\database\%mysql_driver%\bin\mysqldump.exe -A -a --add-drop-database --opt --host=%ip% --user=root > %realprogdir%\ %DD%_%MM%_%YYYY%_%hh%_%mm%_dump.sql Now look at the correct job entry: %COMSPEC% /c %realprogdir%\modules\database\%mysql_driver%\bin\ mysqldump.exe -A -a --add-drop-database --opt --host=%ip% --user=root > %realprogdir%\%DD%_%MM%_%YYYY%_%hh%_ %mm%_dump.sql The above correct job, when executed by the scheduler, will be expanded into the following command: C:\Windows\system32\cmd.exe /c C:\OpenServer\modules\database\MySQL-5.3.1\bin\mysqldump.exe -A -a --add-drop-database --opt --host=127.0.0.1 --user=root > C:\OpenServer\09_01_2013_14_25_dump.sql
Information
You should take into account the fact that tasks are executed without switching to the working folder of the program specified in the task. Some PHP scripts may not work correctly if the root folder definition is implemented incorrectly.Bookmark menu
For quick access to the necessary pages on sites and working folders, to launch and execute any programs and commands in OSPanel, it is possible to create bookmarks.Types of bookmarks
- Link
- Folder
- Program (can be launched with parameters)
- Command in Windows command line format
Using variables as substitutions
| Variable | Variable description |
|---|---|
| %realprogdir% | Real path to OSPanel folder (backslash "\") |
| %progdir% | Generated path to the folder with OSPanel, taking into account the virtual disk (backslash "\") |
| %sprogdir% | Generated path to the folder with OSPanel, taking into account the virtual disk (slash "/") |
| %dprogdir% | Generated path to the folder with OSPanel, taking into account the virtual disk (double backslash "\\") |
| %dsprogdir% | Generated path to the folder with OSPanel, taking into account the virtual disk (double slash "//") |
| %realsitedir% | Real path to the root folder of domains (backslash "\") |
| %sitedir% | Generated path to the root folder of domains, taking into account the virtual disk (backslash "\") |
| %ssitedir% | Generated path to the root folder of domains, taking into account the virtual disk (slash "/") |
| %httpport% | HTTP server port |
| %httpsport% | HTTPS server port |
| %postgresqlport% | PostgreSQL server port |
| %mysqlport% | MySQL server port |
| %mongodbport% | MongoDB server port |
| %memcacheport% | Memcache server port |
| %ftport% | FTP server port |
| %httpdriver% | HTTP module name |
| %phpdriver% | PHP module name |
| %mysql_driver% | MySQL / MariaDB module name |
| %pg_driver% | PostgreSQL module name |
| %mongo_driver% | MongoDB module name |
| %memcachedriver% | Memchache module name |
| %dnsdriver% | DNS module name |
| %ip% | server IP address |
| %disk% | Drive letter from the generated path to the folder with OSPanel, taking into account the virtual drive (letter only) |
| %osdisk% | Drive letter from the real path to the folder with OSPanel (letter only) |
| %sysdisk% | Windows system drive (letter only) |
When creating bookmarks on [launch programs with parameters], the path separator to the program and launch parameters is the # sign, otherwise the bookmark will be executed via the command line!
Examples of creating a bookmark: # Example 1 (link) Name: My site Execute: http://xxx.ru # Example 2 (launching the program with parameters) Name: MySQL manager Execute: %realprogdir%\modules\heidisql\heidisql.exe# -h=%firstsite% -u=root -P=%mysqlport%
Program menu
Adding a portable program
When using the Full version of OSPanel, it is possible to add your own portable program to the menu. To do this, you must perform the following steps:- Open the folder with the category of programs you need in the subfolder ./progs/ and create a folder in it with the name of your portable program
- Copy your portable program along with its folders and files to the directory you created
- Restart the OSPanel program (not the server)
Attention
The name of the folder with the program and the name of the portable program (without extension) must be identical!Adding a program category
To add your own category to the program menu, create a folder of the same name in the directory ./progs/. Programs added to the Default folder are displayed immediately in the program menu, without a category.Adding a program shortcut
In addition to portable software, shortcuts to locally installed programs can be added to the program menu. Such a program pointer will be displayed in the menu along with other programs and will work like a normal menu shortcut. To add a shortcut to a locally installed program, simply copy it to the folder ./progs/program_category you need/.Attention! Do not try to copy non-software shortcuts to folders, sites, etc. into the menu of portable programs. Such shortcuts will not appear in the menu and therefore will not work. To create shortcuts to sites, folders, etc. use [Menu → Settings → Bookmarks] (see ).
Start/stop scripts
Addition of scripts for starting and stopping the server
In OSPanel, it is possible to supplement scripts for starting and stopping the server with your own .bat files (batch files).To complete the launch script, you need to create a template file /userdata/start.tpl.bat, to complete the stop script, respectively, you need to create a template file /userdata/stop.tpl.bat. You can write arbitrary sequences of commands to such files to be executed by the Windows command interpreter.
Before launch
Executing the /userdata/pre_start.bat file (template: /userdata/pre_start.tpl.bat) happens BEFORE start all modules. The file must process correctly and complete, otherwise the server will wait for its execution indefinitely.After launch
Executing the /userdata/start.bat file (template: /userdata/start.tpl.bat) happens AFTER start all modules, but before the status flag turns green. The file must process correctly and complete, otherwise the server will wait for its execution indefinitely.Before stopping
Executing the /userdata/stop.bat file (template: /userdata/stop.tpl.bat) happens BEFORE stopping modules. The file must process correctly and complete, otherwise the server will wait for its execution indefinitely.After stop
Executing the /userdata/post_stop.bat file (template: /userdata/post_stop.tpl.bat) happens AFTER stopping modules, but before the status flag turns red. The file must process correctly and complete, otherwise the server will wait for its execution indefinitely.Using variables as substitutions
In template files with the extension .tpl.bat substitutions can be used. Available substitution options for program variables:| Variable | Variable description |
|---|---|
| %realprogdir% | Real path to OSPanel folder (backslash "\") |
| %progdir% | Generated path to the folder with OSPanel, taking into account the virtual disk (backslash "\") |
| %sprogdir% | Generated path to the folder with OSPanel, taking into account the virtual disk (slash "/") |
| %dprogdir% | Generated path to the folder with OSPanel, taking into account the virtual disk (double backslash "\\") |
| %dsprogdir% | Generated path to the folder with OSPanel, taking into account the virtual disk (double slash "//") |
| %realsitedir% | Real path to the root folder of domains (backslash "\") |
| %sitedir% | Generated path to the root folder of domains, taking into account the virtual disk (backslash "\") |
| %ssitedir% | Generated path to the root folder of domains, taking into account the virtual disk (slash "/") |
| %httpport% | HTTP server port |
| %httpsport% | HTTPS server port |
| %postgresqlport% | PostgreSQL server port |
| %mysqlport% | MySQL server port |
| %mongodbport% | MongoDB server port |
| %memcacheport% | Memcache server port |
| %ftport% | FTP server port |
| %httpdriver% | HTTP module name |
| %phpdriver% | PHP module name |
| %mysql_driver% | MySQL / MariaDB module name |
| %pg_driver% | PostgreSQL module name |
| %mongo_driver% | MongoDB module name |
| %memcachedriver% | Memchache module name |
| %dnsdriver% | DNS module name |
| %ip% | server IP address |
| %disk% | Drive letter from the generated path to the folder with OSPanel, taking into account the virtual drive (letter only) |
| %osdisk% | Drive letter from the real path to the folder with OSPanel (letter only) |
| %sysdisk% | Windows system drive (letter only) |
In addition to writing commands, the listed substitutions can be used to specify real environment variables, for example: setx DIR_PHP "%realprogdir%\modules\php\%phpdriver%" You need to understand that files with the extension .tpl.bat are only templates for .bat files and will not be executed. In the process of starting or stopping the server, the template files will be converted into executable .bat files in the same folder with the replacement of substitution variables, and these ready-made .bat files will be sent for execution.
Attention
Once the Windows shutdown procedure has begun, it is not possible to start any new processes, so the STOP scripts ( stop.bat And post_stop.bat) are not fulfilled. If you require mandatory execution of shutdown scripts, then you must shut down OSPanel manually just before you want to shut down the computer.Limited Mode
If the HOSTS file is not writable (as a rule, this happens when the program is started without administrator rights), the program switches to a limited mode of operation with reduced functionality.In restricted mode, the following functionality will not be available to you:
- Using your own aliases and domains (except for the localhost domain);
- Specifying the server IP address (except for addresses 127.0.0.1 and *);
You can work in restricted mode only if you do not have administrator rights at all. If you have the opportunity to run the program with the necessary rights, then it is recommended to use this by all means. In case you constantly forget to run the program with the necessary rights, enable the [Require an Administrator account] option.
If in the startup logs you see a message that the Hosts file is not writable and OSPanel is running with administrator rights, then this means that access to this file is blocked by antiviruses / firewalls (even for trusted programs) or Windows access restrictions are in effect.
Add OSPanel, as well as all other components that the antivirus / firewall will ask about, to trusted programs. Disable protection of the HOSTS file (or system files) in your antivirus/firewall settings, if such protection is present. Try deleting the file C:\Windows\System32\Drivers\etc\hosts and re-create with the following content: 127.0.0.1 localhost If you work without administrator rights, but with the HOSTS file writable, the program works in normal mode without any restrictions. Allow writing to the HOSTS file for all users by running the following command via the console (run as Administrator): attrib -s -r -h -a C:\Windows\system32\drivers\etc\hosts
Attention
When the User Account Control (UAC) service is enabled and run without administrator rights, OSPanel will not have access to the HOSTS file and will automatically switch to a restricted mode of operation.Run without making entries in the HOSTS file
OSPanel implements the ability to fully launch without making entries in the HOSTS file. This feature will be useful for users of office networks and terminals, where only a senior administrator has access to the HOSTS file. If the [Do not make changes to the HOSTS file] option is enabled, then the server starts without editing the HOSTS file, i.e. without editing the HOSTS file. Access to this file is not required at all.You should know and understand that during startup, the program makes a DNS request to each domain you create, and if there is no entry in the HOSTS file for any of the domains, this will lead to the [Startup Failed] error. Do not forget to contact your network administrator after each domain creation, the administrator must make the necessary entries in the HOSTS file, otherwise you will not be able to start the server.
The format for making entries in the HOSTS file is standard - ip space domain eg: 192.168.5.10 rhino.acme.com 192.168.5.10 x.acme.com
Sending mail via SMTP
Yandex Mail

Mail.ru mail
The following shows typical settings for sending mail via the SMTP server of the selected mail provider.
Gmail mail
The following shows typical settings for sending mail via the SMTP server of the selected mail provider.
By default, Gmail does not allow you to use SMTP, so access must be activated separately. You need to complete the following activation steps:
1. Log in to your Gmail account
2. In the same browser tab, go to https://www.google.com/settings/security/lesssecureapps
3. Activate account access for "unverified applications" (see picture below)
4. Perform a test sending of a letter through your script on the OSPanel server
5. Refresh the page https://www.google.com/settings/security/lesssecureapps and reactivate account access for "unverified applications" (you can ignore the received letter about an attempt to access your account)
Now try to send the letter again, this time the sending should work.

External access
Working with external networks
OSPanel can work in local networks and the Internet as a web server. To work on the Internet, you need a static (white) IP address. To open access to the server from the outside, you must specify * as an IP address in the OSPanel settings, in this case access will be opened immediately for all networks to which your computer is connected. If you want to open access for only one specific network (for example, local), then specify in the program settings the IP address assigned to your computer in this network.Information
When working through a router or other gateway, additional configuration may be required. See the documentation for your equipment, contact your network administrator.External access to local domains
After you set up remote access to your server, all local domains will become available remotely. But how do you open them? To open the desired site from a remote machine, you will need to make an entry in the HOSTS file of such a computer with the address of your local domain, for example: 64.55.96.24 supersite (where 64.55.96.24 is the address of your computer, and supersite is the name of the local domain). After making such an entry in the HOSTS file on the remote computer, the supersite domain will be available by normal typing in the browser line.Please note that simply typing your computer's IP address http://64.55.96.24/ or attempting to access a non-existent local domain will open a blank page.
In order to open a specific local site when typing the IP address of your computer, you can create an alias like your_external_ip => your_local_domain. After these steps, the local domain you specified, for which you created the alias, will become available via the local network or the Internet at http://your_external_ip/ (for example, http://64.55.96.24/). If your computer is connected to several networks and IP=* is set in the server settings, then such an alias must be created for each IP address assigned to your computer in each of the networks.
Computer Security
When working with external networks, there is no guarantee that your computer is safe. The server starts with Administrator rights, which means that scripts running under its control can do whatever they want on the computer. Security holes in scripts can give hackers access to your computer. We do not recommend this use of OSPanel! Before setting up remote access to the server, be sure to read the section in this reference guide.External management
OSPanel can accept some commands via the Internet, for this there is a built-in control panel that runs on a dedicated port. The program can also be controlled via the command line.Web Control
To access the control panel, type http://localhost:1515/ (by default). The port, login and password for the control panel can be specified directly in the OSPanel settings [Menu → Settings → Miscellaneous]. The control panel is available on any IP address from which your computer is accessible, as well as on any local domain created on the server. To control the program via the Internet, your external IP address must be "white", i.e. accessible from the Internet.Commands to use on the command line
"C:\openserver\OSPanel.exe" # start the program "C:\openserver\OSPanel.exe" /start # start the server "C:\openserver\OSPanel.exe" /restart # restart the server "C:\openserver\OSPanel .exe" /stop # stop the server "C:\openserver\OSPanel.exe" /exit # exit the programServer protection
Security settings
When a server is exposed to the Internet, it becomes extremely vulnerable, especially with default settings. Many spiders and viruses constantly scan the Internet for open ports, and usually an unprotected server is hacked within a few hours after appearing on the network.A few steps to protect the web server from unauthorized access:
- Change default FTP user passwords [Menu → Settings → FTP server];
- Set your own passwords for root (and other) users of all DBMS modules;
- Enable protection of web tools and disk from access from external networks in the program settings [Menu → Settings → Server];
- Now restart the daemon itself (not the server);
- Configure the firewall by closing ALL ports for outside access except those that you plan to use (for example: 80,443,21,990,53);
Attention
The web server runs on behalf of the administrator of your computer, when running on external IP addresses or IP = *, the security of your computer will be at risk! Prevent the use of vulnerable scripts, incorrect module configuration, simple passwords.Built-in protection against external access
Selecting the [Protect server from external access] option will disable some dangerous PHP functions, access to web tools from outside will be blocked, and disk access for PHP scripts will be limited to the root folder of domains. This option reduces the performance of PHP scripts by 3-4 times.Working with Pear and Composer
Pear installation
To install Pear, start the server and execute [Menu → Advanced → Console], then type the command in the console go-pear and follow further installer commands.Install Composer
Composer is compatible with all PHP modules since version 5.3. To install Composer, start the server and execute [Menu → Advanced → Console], then go to the folder with the site where you plan to install Composer (for example: cd C:\openserver\domains\localhost). After you are in the folder with the desired site, type the command in the console composer init and generate a Composer configuration file (composer.json). When the composer.json file is generated, type the command in the console composer install and wait for the installation of the selected projects, as well as their dependencies. In the future, you can update installed projects with the composer update command, for example: cd C:\openserver\domains\localhost & composer update -vInstalling Composer projects
- Execute [Menu → Advanced → Console];
- Go to the folder with the site where you plan to install the project;
- Install any project you need, for example:
Working in the console
To launch the built-in console, start the server and execute [Menu → Advanced → Console]. The environment environment (eng. Environment) is formed at the time of server startup and is transmitted to all launched modules. Any other programs, be it a console or an IDE, can also get the right environment, just run these programs from the OSPanel menu. To do this, you can either make a bookmark or add a shortcut to the program menu (see sections and ).You need to be aware that if you launch the console or any other program from the standard Start menu or from a desktop shortcut, and not from the OSPanel menu, then they will not be able to work with the virtual environment formed in OSPanel.
The built-in console can be launched even if the server is turned off, in the Full version, go to [Menu → Programs → Internet → Console]. However, when the server is turned off, the environment is not formed and therefore it will be impossible to work from the console with PHP and other modules or programs (Pear, Composer, scripts, etc.).
Important Features
If you first started the console and only then started the server, then the environment will NOT be available in the console. To start full-fledged work with modules after starting the server, you need to close and reopen the console, because only when the server is active, the console receives a correctly formed environment at the time of launch from the menu. Similarly, the environment won't be updated in the console if you switch to a different PHP or MySQL module and restart the server, but don't restart the console!Registry fixes
Fixes are offered for self-installation from the OSPanel menu among the bookmarks created by default. You can also find fixes in the folder ./modules/system/ and apply them yourself.Registry fix to disable IPv6
This fix disables all IPv6 components except for the loopback interface. The fix also tells Windows to prefer IPv4 over IPv6 by changing entries in the prefix policy table. It is recommended to apply this fix only to those users who use the localhost domain and at the same time OSPanel does not have write permissions to the file Windows\System32\Drivers\etc\hosts.Registry fix to customize system behavior
This hotfix allows you to customize the behavior of the system during a shutdown of Windows. The fix disables automatic termination of processes and increases the waiting timeout (after which the process is considered hung) to 30 seconds.Registry fix to optimize SSD performance
This hotfix allows you to disable Link Power Management (LPM) and DIPM in SATA AHCI drivers. Using LPM with SSD drives often leads to the possibility of "freezes" in the operation of the operating system, from small freezes to a complete system freeze. To prevent wear on the SSD, this fix disables the Superfetch and Prefetch services, as well as updating the last file access time in NTFS.You should not apply the fix if the system does not use SSD drives. Notebook users should use the fix wisely, as the power consumption of the drives will increase slightly, which will reduce the laptop's battery life.
Registry fix for TCP tuning
This fix optimizes the TcpTimedWaitDelay and MaxUserPort values so that your system can run faster and with more TCP connections. In particular, the problem with torrents will disappear: it is not possible to perform an operation on the socket because buffer too small or queue full. Other programs that create a large number of simultaneous TCP connections will also be able to work normally.Fix TCPIP driver for Windows XP
Half-open limit fix is designed to change the maximum number of simultaneous half-open outgoing TCP connections (half-open connections or connection attempts) in the system file tcpip.sys. The limitation is that a computer is not allowed to have more than 10 simultaneous half-open outgoing connections. Thus, the speed of connection to other computers is actually limited. The patch allows you to remove this limitation, that is, increase the maximum limit of half-open connections. For the vast majority of users, a limit of 100 will be sufficient. The patch is applicable to older versions of Windows x32 and x64: XP, 2003 Server, Vista. Starting with Windows Vista SP2 and Windows 7, there is no need to apply the patch, and if it starts, it will inform you that the installation is impossible.Attention
After applying the fixes, be sure to restart the computer.Questions and answers
Nothing starts up?
Do not despair, take a look at the general program log and other component logs [Menu → View logs]. In the vast majority of cases, you will find the reason for the unsuccessful start there. In more complex cases, enable the [Run server in debug mode] option, which will allow you to see debug information on startup. Also add OSPanel to trusted programs your firewall or antivirus, if you have one.Writes that port 80, 3306, etc. already taken!
Enable the [Run server in aggressive mode] option in the OSPanel settings, in this mode all programs occupying the required ports will be forcibly closed. Add OSPanel to trusted programs your antivirus/firewall/proxy server or disable snooping on ports 80/443/21/90xx/3306 if it exists. In individual antiviruses / firewalls, their own additional ones are possible. settings related to interception of program connections to the network.Writes that there are no access rights to work in this folder!
You are trying to launch OSPanel from a folder that belongs to another user, or the OSPanel files have been written to the computer by another user. If OSPanel will be run by the Pavel user (for example), then log in with the Pavel account and copy the OSPanel to a folder that belongs to the Pavel user (there are write rights), after which it will be possible to start the server for this user. Instead of copying, you can set special access rights to the OSPanel folder, contact your computer administrator.Why are the buttons gray and not pressed?!
At any time, only those buttons and menu sections that can perform the action assigned to them are active. For example: if the server is not running, then the PHPMyAdmin menu item will be inactive; if the server is running, then the buttons for clearing the logs will be unavailable, etc.I can't open the menu when the flag is yellow!
A yellow flag indicates that a command is being executed (such as starting, stopping, or saving settings). During the execution of commands, the program menu is not available.Created 3000 domains and now the server won't start!
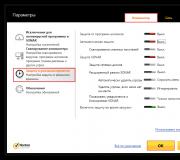
Increase the number of server status checks to 20-30 or more in the program settings [Menu → Settings → Miscellaneous]. Switch to using the Apache HTTP module if you are using the Nginx module.I want to test the site taking into account different Internet speeds (mobile devices for example)!
OSPanel has the ability to limit the data transfer rate to simulate a slow loading site. To limit the speed, use the OSPanel menu: [Menu → Settings → Miscellaneous]. The speed can be limited within 1-40 KByte per second, setting the value to 0 or more than 40 cancels the limit. The speed limit is set for each request, so if the client opens 4 images on the site at the same time (4 connections), then each of them will be loaded at a given speed.Where to edit module settings?
To edit module settings, use the OSPanel menu: [Menu → Advanced → Configuration].Where are my emails saved?
By default, all emails are saved to a temporary folder. userdata/tmp/email/, this folder is not cleared when the server is stopped. You can set up sending emails via a remote SMTP server: [Menu → Settings → Mail].I click on the desired site in the program menu, but nothing opens!
Many menu items require a properly installed and working default browser. You can also directly specify your browser in the program settings: [Menu → Settings → Menu].I created local_site.loc domain but it doesn't work!
An underscore cannot be in a domain name, so that domain is not connected. Allowed characters: .The server does not start from ip 192.168.0.1 and says that localhost only works on ip 127.0.0.1!
Indeed, the localhost domain can only be used with the ip address 127.0.0.1, so either rename this domain or delete it if you don't need it.I want to work without virtual disk!
Select in the OSPanel settings to work without a virtual disk and copy the folder with the server to such a directory, the path to which contains only Latin characters or numbers, otherwise work without Wirth. disk will not be possible.I can't see the virtual disk!
If you are not running under an administrator account, but OSPanel is running with administrator rights, then the virtual disk (if used) will be inaccessible to you. OSPanel will work just fine. You can disable the use of virtual disk in the settings, while taking into account the absolute path requirements described in the previous answer.The server starts, but the browser says that the domain is not found!
If your browser is configured to work through a proxy server, then local sites will not be available to it. To fix the situation, refuse to use a proxy in your browser or add local domains and server IP address to the list of proxy exceptions in your browser settings. In some cases, you need to recreate the HOSTS file (see).Why do I need to configure the output of bookmarks instead of sites?
In this mode, created bookmarks are displayed instead of a list of domains, this will be useful when creating demo builds with installed scripts (see ).It's hard for me to re-create bookmarks, FTP users, etc. I just need to edit them!
There is no need to re-create the records again, just double-click on the record you are interested in in the table, after which this record will immediately be removed from the list and will be returned to the editing fields. Don't forget to add the edited entry back to the spreadsheet!The connection to the database takes more than 1 second!
Disable the use of the IPv6 protocol using the instructions in the section of this guide.I copied my script to the folder with the domain, after restarting the server does not see the files and shows an error!
Most likely, you have copied or created such a subfolder in the folder with the domain, the name of which matches the conditions for automatic search of the domain root folder (see ).The server gradually took up all the disk space!
The gradual disappearance of free space indicates that you have disabled auto-cleaning of logs at server startup. As a result, with the active use of the server, log files grow to enormous sizes and take up all the free space on the disk. Clear the log entries in the log view window and enable auto clear logs on startup in the OSPanel settings. Empty the folder .\userdata\tmp from temporary files.How do I create my own host configuration for a domain?
Use the virtual host configuration template in the desired domain folder to create a specific domain configuration. When creating/changing a file, a server restart is required. The configuration template for the desired module can be found in the folder ./userdata/config/.For example, if you want to create your own xxx.ru domain configuration for the Apache-2.4.2 module, then copy the file ./userdata/config/Apache-2.4.3_vhost.conf to the folder with the desired domain, edit this file to suit your needs and restart the server.
Or another example, when using the Apache + Nginx module, you can copy both configuration files for each server to the domain folder: Apache-2.2.23+Nginx-1.2.4_vhosta.conf And Apache-2.2.23+Nginx-1.2.4_vhostn.conf.
Please note - when editing the host configuration, you cannot delete or replace the %...% system variables, you can only make new entries that complement the configuration.
How and where are component configs edited?
OSPanel uses configuration template files that are available through the general menu of the program. Do not try to edit temporary config files that are created at the time of server startup, it does not make sense. Configuration templates are individual for each module, i.e. if you select any of the modules as active, then the settings templates of this particular module will be activated. For example: you configured the php.ini file template with the PHP 5.2 module active, and then you selected the PHP 5.3 module as active. In this case, you need to configure the php.ini file template again for the PHP 5.3 module.The settings templates themselves for all modules and tools are stored in the folder ./userdata/config/, they cannot be used as real configs and specified when launching modules, consoles and scripts. During the launch process, configuration templates go through the parser, which replaces all substitution variables with real data and saves ready-made configuration files to a folder ./userdata/temp/config/.
How to specify specific settings for connecting to the SMTP server for the selected domain?
OSPanel has the ability to send mail through a third-party SMTP server, while all domains use the connection settings that were specified by the user in the OSPanel settings window. In order for a specific domain to use its own settings for connecting to an SMTP server, you need to specify them in the configuration template for this host. Open the virtual host configuration template (how to create it is described in the previous answer) in the folder with the desired domain and add the following content to the host description (in one line): php_admin_value sendmail_path "%mailway% -t --smtp-ssl=none --smtp- server=smtp.xxx.xx --smtp-port=xx [email protected] [email protected]--smtp-pass=xxxxxx --pop3-server=pop3.xxx.xx [email protected]--pop3-pass=xxxxxx" For example:It must be remembered that when specifying your own settings for connecting to the SMTP server, sending mail for the selected domain will work regardless of the main OSPanel settings. Also note that all SMTP server data, including login and password, will be available in php scripts and visible in phpinfo() information, therefore, for security reasons, it is not recommended to use the described option to specify mail sending settings in the host config.
Problem solving
The following is a list of steps to take to resolve problems starting the server. After performing each action, you must repeat the trial run of the server, and if the launch fails, you can proceed to the next step.- Execute [Menu → Advanced → First start]. Optionally, you can agree to make fixes in the registry.
- Make sure that the IP address specified in the settings exists (except for [*]). Also make sure that all other program settings are correct.
- Add OSPanel to trusted programs your firewall/antivirus or configure them properly, if any.
- Launch [Menu → View logs], try to find the cause of the problem and fix it (if possible).
- Enable the [Run server in debug mode] option in the OSPanel settings and try to find the cause of the problem and fix it (if possible).
- Run the following command from the console (run as administrator): attrib -s -r -h -a C:\Windows\system32\drivers\etc\hosts
- Activate the DNS service if it is disabled and start it, disable all services in the name of which there is IIS.
- Disable global proxies and proxifiers if they are installed on your computer.
Information
A very common problem is a busy port 80, usually occupied by Skype. To fix the problem, go to [Skype Settings → Advanced → Connection] and uncheck the box [Use ports 80 and 443 as alternatives].User Account Control (UAC)
When the User Account Control (UAC) service is enabled and run without administrator rights, OSPanel will not have access to the HOSTS file and will automatically switch to a restricted mode of operation. As a rule, limited mode is signaled by the presence of only one localhost domain in the program menu, while other domains were previously created. To fix the situation, enable the [Require an Administrator account] option in the OSPanel settings and restart the program, or disable User Account Control (UAC).If you do not have the ability to disable UAC or run the program with administrator rights, then there are several options for solving this problem:
- Using the built-in DNS server (setting according to the Guide);
- Activation of the option [Do not make changes to the HOSTS file] + manual editing of this file;
- Set write permissions to the HOSTS file for all Windows users;
- Rejection of the ability to manage domains and work with a single localhost domain;
Create assemblies
What is it and why is it needed?
For example: you have your own website, script or your own CMS, which you need to present to future customers for review, show to the customer, or simply make a demo package for your software product. It is necessary that your software product works equally well for everyone, in the same configuration, already installed and ready for work or review. OSPanel will help you with this!You can create a ready-made mini-server with an installed script, CMS system, website, project, etc., and future users or clients will only have to download and run it! Your product will be functional from the start, you won't need to find a server for it, you won't need to install, configure, etc. Moreover, demo materials can be distributed to customers on CD/DVD. OSPanel can be launched from such media as from a regular HDD or flash drive, with the only difference being that when working from an optical disk, no changes and files will be saved after the program exits.
How to create a demo build
- Download the latest OSPanel Mini distribution package and extract it to a temporary folder. Go to the folder where the distribution was unpacked and run the program OSPanel.exe.
- Delete unnecessary modules in a folder ./modules/php/*, ./modules/database/* And ./modules/http/* leaving only one module in the folders that will be used for your software product. If you do not plan to use the DNS and Memcached modules, then the folders with these modules can also be deleted: ./modules/dns/* And ./modules/memcached/* respectively.
- Press [Menu → Settings] and select to use those modules that you have not removed. Set the server IP address to 127.0.0.1 , disable [Automatically check for updates], do not disable the option [Automatically detect the need for a virtual disk]. Set any other settings you need.
- Press [Menu → Advanced → Configuration] and configure the configuration templates of the necessary modules for your product (script/website/cms), if necessary.
- Start the server and install your software product (script/website/cms) on the domain localhost, which is present in OSPanel by default. Perform the necessary steps to configure the script and then exit all authorization forms where you are authorized (for example: personal account, administration, etc.).
- Press [Menu → Settings] and create bookmarks for the main pages of your software product (for example: Admin panel, Personal account, Home page). Enable the [Show bookmarks instead of websites] option in the OSPanel settings. Now stop the server and save the settings.
- Press [Menu → Exit] and rename the program file according to your product name, for example ./temp folder/OSPanel.exe in ./temp folder/MegaCMS Server.exe.
- Now you can add your product documentation to the assembly in the form of a .chm file. The file must be copied to a folder ./modules/system/docs/, it will be displayed in the [More → Documentation] menu later.
- Now pack the contents of the temporary folder into a self-extracting archive or burn its contents to a CD/DVD. The choice depends only on the intended form of distribution of the assembly.
In the above way, you can prepare not only demo builds, but also dev packages for developers, site presentations, portal archives, interactive materials on CD, etc.
A few days ago a Thought came to me once again. The thought was not new and rather obsessive: “let's switch to Windows8. Well, please." And since there was no way to drive her away, I stocked up on tea and cookies and started.
It took no more than two hours to install the system and all the necessary programs, but then the most interesting moment came: I needed to deploy a working environment, namely GIT + a local server (Apache, MySQL, PHP, nginx, memcached, mongodb). Bearing in mind the experience of previous installations, this time I decided to document the whole process and save it for posterity.
Disclaimer number one:“I’m not a programmer” (c), but an interface designer and front-end technologist (but in some cases I can help my colleagues and code something like that, and they won’t even beat me for it later)
Disclaimer number two: yes, I perfectly imagine that in Ubuntu all this is done many times faster. But I work on Windows, so historically.
So let's get started.
Our work plan includes the installation of the following products:
- PuTTY
- Denver (Apache, MySQL, PHP)
- Nginx
- memcached
- MongoDB
1. PuTTY
PuTTY is a freely distributed client for various remote access protocols, including SSH, Telnet, rlogin.
PuTTY comes with several utilities, but I only need PuTTY and Pegeant (an SSH authentication agent that stores keys to git repositories).
Offsite:
If you don't need any SSH, forget about this point and move on.
2. Git
To work with git I've been using it for over a year TortoiseGit, which is stable, goofy and covers all my needs by 146%. All in all, I recommend it.
Offsite:
2.1
TortoiseGit requires git for Windows, which can be picked up on Googlecode;
2.2
myself TortoiseGit install from here
3 Denver
Denver- Web developer's gentleman's kit ("D.n.w.r", read "Denver") - a project by Dmitry Koterov, a set of distributions (Apache, PHP, MySQL, Perl, etc.) and a software shell used by Web- developers to develop sites on a "home" (local) Windows machine.Offsite:
3.1 Installation
We need to download basic kit and additional PHP5 modules.Lyrical digression:
no, not just download, but get download links by email! That is, you will have to drive in your mail, as well as your first and last name, twice in the form under the large heading "Registration". "Registration required due to future release of Denver 4." For many years now, the form has been as if apologizing, but I no longer believe it (.
Usually installing denver is quick and painless, but on Windows8 I was attacked by an error that cursed for a missing library msvcr71.dll. The library can be placed in a folder "\Windows\System32\"(x32) or "\Windows\SysWOW64\"(x64). After the file has settled into the folder, open its properties and click the "Unblock" button.
3.2 Functional check
After installing Denver, we will create a test script, on which we will check the performance of everything that we will install later.Let's go to Z:\home and add a new site: create a folder test.local, in it a folder "www" to which we add the file index.php with incredibly creative text:
";
Restart Denver, open in browser www.test.local, impress and move on
4. Memcached
memcached- middleware that implements the service of caching data in RAM based on the hash table paradigm.
memcache is a php extension that provides a convenient procedural and object-oriented interface to memcached, a highly efficient caching daemon that has been specifically designed to reduce database load in dynamic web applications.
4.1 Installing memcached
BUT. download archive with binary: Memcached 1.4.5 for Windows from hereIN. \usr\local\memcached
4.2 Installing memcache
BUT. download the archive with the library from hereIN. unpack the contents of the archive into \usr\local\php5\ext\
FROM. open file php.ini (\usr\local\php5\php.ini) and connect the extension:
extension=php_memcache.dll
4.3 Setting up Memcached launch along with Denwer launch
To run the script with Denver we need:- write a script containing the commands to start and stop the application / service and put it in a folder \denwer\scripts\init.d
- create a link to this script in the startup/shutdown config folder \denwer\scripts\main\
BUT. create a file called "memcached.pl" in the directory \denwer\scripts\init.d\
#!perl -w package Starters::Memcached; BEGIN ( unshift @INC, "../lib"; ) use StartManager; my $basedir = "/usr/local/memcached/"; chdir($basedir); StartManager::action $ARGV, start => sub ( ### ### START. ### print "Starting memcached\n"; system("memcached.exe -d"); print " Started!\n"; ), stop => sub ( ### ### STOP. ### print "Stopping memcached\n"; system("TASKKILL /F /IM memcached.exe"); print " Stopped!\n"; ); return 1 if caller;
b. now we will create a link to the script - a plain text file containing an indication that when starting, restarting and stopping Denver, you must execute init.d/memcached.pl
In a text editor we write
init.d/memcached
and save the file with the name "40_memcached" to the following folders:
- \denwer\scripts\main\start
- \denwer\scripts\main\stop
- \denwer\scripts\main\restart
4.4 Checking the result
In our test script (index.php) add:$memcache = new memcache; $memcache->connect("127.0.0.1", 11211); echo ‘Memcache ver: ’ . $memcache->getVersion();
Restart Denver and see what happens
5.nginx
Nginx- simple, fast and reliable server, not overloaded with features.Offsite:
5.1 Configuring Nginx
A. download the Windows version from the offsite and unpack it into \usr\local\nginxb. setting up a virtual host for our test site. For this we open \usr\local\nginx\conf\nginx.conf and add there
Server ( listen 127.0.0.1:80; server_name www.test.local test.local; if ($host = "test.local")( rewrite ^/(.*)$ http://www.test.local$1 permanent ; ) location ~* \.(jpeg|jpg|gif|png|css|js|pdf|txt|tar)$ ( root Z:\home\/test.local\www; ) location / ( ssi on; proxy_pass http ://127.0.0.1:8080/; proxy_set_header X-REQUEST_URI $request_uri; proxy_set_header X-Real-IP $remote_addr; proxy_set_header X-Forwarded-for $remote_addr; proxy_set_header Host $host; proxy_connect_timeout 60; proxy_send_timeout 90; proxy_read_timeout 90; proxy_redirect off; proxy_set_header Connection close; proxy_pass_header Content-Type; proxy_pass_header Content-Disposition; proxy_pass_header Content-Length; root Z:\home\/test.local\www; ) )
This is an example of settings from a real project, your settings may obviously differ.
5.2 Configuring Apache
By default, Apache runs on port 80, but we just gave this port to Nginx, so now we need to change the virtual host template in Apache settings and assign it a port other than 80 (for example, 8080).We open \usr\local\apache\conf\httpd.conf and change the port number
## ## BEGIN VIRTUAL HOST TEMPLATE. ## ## If you want Apache to run on a port other than 80 by default, ## change the port number in the following directive. ## #Listen $&(ip:-127.0.0.1):$&(port:-8080) #NameVirtualHost $&(ip:-127.0.0.1):$&(port:-8080) #
5.3 Configuring Nginx launch along with Denwer launch
A. create a file called "nginx.pl" in the directory \denwer\scripts\init.d\#!perl -w package Starters::Nginx; BEGIN ( unshift @INC, "../lib"; ) use StartManager; my $basedir = "/usr/local/nginx/"; chdir($basedir); StartManager::action $ARGV, start => sub ( ### ### START. ### print "Starting Nginx\n"; system("start nginx.exe"); print " Started!\n"; ) , stop => sub ( ### ### STOP. ### print "Stopping Nginx\n"; system("nginx.exe -s stop"); print " Stopped!\n"; ); return 1 if caller;
b. write in a text editor
init.d/nginx
and save the file with the name "50_memcached" to the following folders:
- \denwer\scripts\main\start
- \denwer\scripts\main\stop
- \denwer\scripts\main\restart
5.4 Checking the result
Put the file next to the script style.css with contenth1( color: red; ) h2( color: green; )
And we will ennoble our index.php:
test me
memcached
connect("127.0.0.1", 11211); echo "Memcached ver: " . $memcache->getVersion(); ?>Now we restart Denver and admire the result. If the CSS file is included, Nginx is working fine.

6 MongoDB
MongoDB is an open source document-oriented database management system (DBMS) that does not require a description of the table schema.
Offsite:
6.1 PHP drivers
BUT. Downloading the library php_mongo.dll from this site: and drop it into a folder \usr\local\php5\ext\By trial and error, it was found that the appropriate driver is contained in the archive mongo-1.2.5.zip/mongo-1.2.5-php5.3vc9ts.zip. If for some reason it does not start for you, try other versions.
b. connect the extension to php.ini
extension=php_mongo.dll
6.2 Install Mongo
A. download the archive from Mongo and unpack it into a folder \usr\local\mongodb . In the same folder, create two more folders:b. install service
> cd C:\WebServers\usr\local\mongodb\bin\
> mongod.exe --install --dbpath=C:\WebServers\usr\local\mongodb\db\ --logpath=C:\WebServers\usr\local\mongodb\logs\
6.3 Setting up MongoDB launch with Denver
A. create a file named mongod.pl in the directory \denwer\scripts\init.d\#!perl -w package Starters::mongoDB; BEGIN ( unshift @INC, "../lib"; ) use StartManager; StartManager::action $ARGV, start => sub ( ### ### START. ### print "Starting mongoDB\n"; system("net start mongoDB"); print " Started!\n"; ), stop => sub ( ### ### STOP. ### print "Stopping mongoDB\n"; system("net stop mongoDB"); print " Stopped!\n"; ); return 1 if caller;
b. write in a text editor
init.d/mongod
and save the file with the name "60_mongod" into the folders already familiar to us:
- \denwer\scripts\main\start
- \denwer\scripts\main\stop
- \denwer\scripts\main\restart
6.4 Checking the result
Let's start the mongo console interface> Z:\usr\local\mongodb\bin\mongo.exe
And we will insert and output the test value into the “test” database
> db.test.save(( name: “Habr!” ))
> db.test.find()
The result should be the following:
6.5. Installing the Mongo database management interface
The MongoDB offsite has a list and brief overviews of admins, so you can choose according to your taste.I chose RockMongo for myself, so it is with its help that we will finally make sure that everything works for us and does not fall anywhere.
BUT. download the archive with the admin panel from this page. We choose, of course, Windows version. At the time of writing, this RockMongo-on-Windows v0.0.4
b. take folder from archive \rockmongo-on-windows\web\rockmongo
and copy it to the directory of our test site
We open config.php and change the parameter value
$MONGO["servers"][$i]["control_auth"] = true;
on the
$MONGO["servers"][$i]["control_auth"] = false;
C. We check the result at the link www.test.local/rockmongo/index.php 
Congratulations! Now we are final and irrevocable fellows.
Bonus #1. Working with php from windows console
Perhaps someone will come in handy. It came in handy for me when our evil tech lead decided that "SQL files are the last century, let's use migrations." Of course, for decency, I tried to portray complete misunderstanding and even shed a tear, but I was exposed and sent to figure out how it works on Windows.It turns out that all you need to be happy is add PHP directory to PATH.

Click on "Edit" and add to the end of the line
;Z:\usr\local\php5
Now let's check that everything worked.
In the directory of the test site, create a file console.php
Opening the console(you can directly from the same folder - right-click with SHIFT held down on an empty space and select "Open command window").
Enter:
> php console.php “UserName”
The console replies:
> “Hello, UserName!” 
PHP defeated, general rejoicing, applause, curtain call.
Bonus #2.
All files and examples mentioned in the article in one archive for free without SMS: on githubI hope that this material will be useful.
I would be grateful for comments and suggestions.
Tags: Add tags
General information about the local server and the principle of its functioning. Creating a local server based on the Denver assembly: preparation, installation and first launch.
Any programming is integral to the testing process - this is an axiom. Speaking about the development of web applications, the question inevitably arises of the presence of a certain "environment" that allows you to emit the work of an Internet server. In other words, we need local server.
local server(English) local server) - a program or a set of programs that perform service (servicing) functions at the request of the client on the home (local) computer.
Such a "gentleman's set" consists of Apache, PHP and MySQL - this is usually enough. On the other hand, other components may also be included, depending on your needs. For us, the important thing here is that we can use the ready-made assembly - Denver. Thus, we do not have to understand the features of installing and configuring a local server - everything has been done before us.
The only thing I want to draw your attention to in the work of a local server is the need to reserve certain IP addresses for servers that will be available only on our computer. In the case of Windows, the file is responsible for reserving IP addresses. hosts. Depending on the Windows version, the file hosts may be:
- Windows 95/98/ME: WINDOWS\hosts
- Windows NT/2000: WINNT\system32\drivers\etc\hosts
- Windows XP/2003/Vista/7: WINDOWS\system32\drivers\etc\hosts
If you decide to use a local server based on the Denver distribution, you do not need to edit this file, everything will happen automatically, but it is useful to have a general idea of the essence of the issue.
Preparing for local server operation
From words to deeds. We assume that you have already downloaded the latest version of the Denver assembly and are ready to rush to storm the citadel. Kidding. The main thing is not to rush and first of all check installed on your computer network protocols or not. How to do it? The easiest way:
Installing a local server
Now that we have made sure that our computer is ready to work with the network, we can proceed with the installation of the Denver distribution. Close all browser(s) windows. By running the downloaded Denver installer, you will see a window in front of you:

Denver distribution installer window
Confirm your intentions by clicking the "Yes" button. The unpacking process will begin. Then a browser window will open with the following message:

Message in browser window
Close the browser window and continue the installation in the installer window.
Following the instructions, we install the Denver distribution kit.
Note: you can abort the installation process at any time using the keyboard shortcut Ctrl+Break. On most modern laptops, a key combination is used to do this. Ctrl+Fn+Pause.
- The directory where the distribution will be installed. I advise you to leave the default option, i.e. C:\WebServer - so press Enter .
- The name of the virtual disk that will be associated with the newly specified directory. I advise you to leave the default option, i.e. Z: . The main thing is that the disc with the same name did not have in the system - most often this happens with the Z: drive. So we press Enter again.
- Starting and stopping Denver. We will be offered two options:
- Create a virtual disk when the machine boots (naturally, the installer will make sure that this happens automatically), and do not disconnect it (the disk) when the servers stop.
- Create a virtual disk only by an explicit command to start the complex (by clicking on the launch shortcut on the Desktop). And, accordingly, disconnect the disk from the system - when the servers stop.
I advise you to use the second option, because. running programs will constantly "hang" in the computer's memory, which adversely affects its performance and may cause conflicts with other programs.
Note Note: In some versions of Windows 98, an error may occur due to which the virtual disk does not turn off, at least the first time. This is not a distribution bug, but a bug in subst and there's nothing to be done about it.
That's all, the installation is over.
First start of the local server
Finally, the installation is complete. Three icons should appear on the desktop: Start Denwer(starting Denver), (stopping Denver).
Denver management icons
Click the icon Start Denwer and wait until all console windows that pop up at boot disappear. We open the browser and type in it the address: http://localhost/ , or rather http://localhost/denwer/ - but this is not essential. It is not necessary to leave the Internet. The main thing is that the following page should appear in front of us:

Test page when accessing localhost
If the test page does not load, check:
- Do you have a proxy server disabled in your browser settings?
- Is Denver running? If so, are there any errors when clicking on the pen icon (see bottom right corner)?
- Are you running some other web server that could conflict with Denver? If yes, disable it.
Other options are possible, but this is no longer within the scope of this note.
Due to the fact that my blog is absolutely devoid of any chronology, I decided to fix it. The next series of articles will be devoted to creating your site.
In this article, we'll look at: what is a local server, where to download it, how to install, how to setup, how to make a local server available on the internet.
What is a local server?
local server- software that allows you to debug a site on a local (home) computer, without access to the Internet. The local server completely imitates the work of hosting and has a similar functionality.
Those who have been building sites using only html and css know that there is no need for a local server, since the browser perfectly processes and understands hypertext markup language and cascading style sheets. But, it is worth adding some PHP script and you will immediately get embarrassed - the browser will not display the result of PHP work. And this happens because browsers do not understand PHP. And in order for the user to see the site page in the form in which this page should be, it is necessary that the server processes and converts the PHP code into html.
All CMS a la WordPress and Joomla contain PHP scripts. Accordingly, in order for sites created using content management systems to be able to work on a home computer, a local server is required.
My site was created using WordPress, I constantly have to test some plugins, extensions, dig into the PHP code. It is quite logical that sooner or later, such actions can lead to the loss of site performance due to a mistake. Of course, most hosting supports restoration (backup) of the site and database. Yes, and competent webmasters keep, just in case, a spare on their computer. I'm generally paranoid, in addition to hosting and my computer, I also wrote it down on a USB flash drive. It will be necessary to throw somewhere else on the cloud service =).
And don't forget that not all plugin developers take care of the correct deletion of their products, and often, even after deleting a product, you can see traces of a plugin that has not been completely deleted in the database. And the longer the site lives, the more such rubbish will hang in the database.
As a matter of fact, with the listed tasks and problems (and not only) the local server will help to cope.
How to create a local server?
In fact, you don’t need to create a server, everything has already been created, just download and install a ready-made set of necessary components. We will consider installation and configuration of one of the popular local servers below.
How to install a local server?
One of the most popular and stable local servers - Denver. The name stands for: gentleman's set of web developer - D. n. in. R. We will consider its installation.
Basic package contains:
- Installer.
- Apache server.
- PHP5.
- MySQL5 supporting transaction.
- phpMyAdmin is a MySQL management system that allows you to work with databases through a browser.
- Sendmail and SMTP server emulator - emulates the function of sending mail. All sent emails will be located in the Z:\tmp\!sendmail directory in .eml format, and will not be sent to the specified email.
One of the advantages is that the server can be installed on a flash drive. And wherever you are, you can work on your projects.
And, of course, the most important plus - Denwer is absolutely free.
Denver installation
- 1. Run the downloaded file and agree to install the base package.

- 2. Then, a browser window will open, which must be closed to continue or cancel the installation.
- 3. To continue the installation, press Enter.

- 4. Then, you need to specify the directory in which the files will be located. Default: C:\WebServers. Feel free to press Enter and continue.

- 5. Following the instructions, press Enter.
- 6. Next, the installer will prompt you to select a virtual drive letter. By default, the letter Z is suggested. If the computer does not have a disk with that name, then you can safely continue the installation by pressing Enter, but if there is, then select another one.

- 7. After all the distribution files have been copied, you will be offered a choice of 2 options for creating a virtual disk:
- Create a virtual disk when you turn on the computer.
- Create a virtual disk only when explicitly called, that is, when clicking the start shortcut on the desktop (I chose this option).
That's actually all, this Denver installation is over.
Now you can test the local server. If everything is done correctly, then 3 shortcuts will appear on the desktop: Start Denwer, Stop Denwer, Restart Denwer.

Click Start Denwer to launch. If you go to my computer, you can see that the selected local disk has appeared. And in the tray (near the clock) there will be 2 icons in the form of a hat and a feather.
Open a browser window and enter the following in the address bar: http://localhost/
A window will open with the message: "Hurrah, it worked!", symbolizing that everything is done correctly and you can safely start working with the local server.
The page that opens contains a lot of useful information:
- You can find the necessary documentation for PHP, MySQL, Apache, Perl, PostgreSQL using the appropriate search.
- Since Denver is free software, the creators accept donations from grateful users to support the project. Well, I noticed an affiliate link to Gino hosting.
- You can check the operation of the components by clicking on the following links:
subdomain.localhost/ssl.php - check if SSL is active.
subdomain.localhost/ - check "non-Internet" second-level domains, as well as SSI
test1.ru/ - checking second-level domains.
subdomain.test1.ru/ - checking subdomains (subdomains)
localhost/Tests/phpnotice/index.php - You can test the PHP Notice hook.
localhost/Tests/PHP5/index.php5 - PHP 5 information.
localhost/Tools/phpMyAdmin - Access to phpMyAdmin and MySQL.
custom-host:8648 - check a host with a different IP address and port (127.0.0.2:8648)
localhost/Tests/sendmail/index.php - check the work of sendmail (sending mail).
Site in Denver displayed in hieroglyphs
The problem with hieroglyphs sometimes happens if utf-8 encoding is used. In Opera and Chrome, instead of my text, terrible rock inscriptions were displayed. And Internet Explorer, oddly enough, showed everything as it should. But be that as it may, the problem must be solved. And you can do it in the following way:
Create an .htaccess file in the root directory of the site (in the www folder) and write the following there: AddDefaultCharset UTF-8
If the file already exists, then just add this line there.
How to uninstall Denver?
Uninstall through the control panel - Denver programs cannot be uninstalled, since it does not write files to the Windows directory and does not leave entries in the registry, so an uninstaller is not needed. Therefore, we simply delete the folder with the local server files (having previously stopped Denver using a shortcut on the desktop): C:\WebServers, delete the shortcuts from the desktop and from Startup.
How to make a local Denwer server available on the Internet.
First of all, it is worth understanding that Denver is intended for local use. And the developers warn that by making a local site visible on the Internet, you can expose the local machine to the danger of being hacked, since Denwer is not a reliable and full-fledged server.
Denver runs with administrator rights, so unfinished scripts can pose a potential danger, namely, open a "hole" through which a hacker can harm the computer.
If you are a competent administrator and fully understand what you are doing, then in order to open access to the local site, you should:
- First of all, you need to have a static ip address. Dynamic IPs will change when the machine (router) is rebooted.
- Windows has a built-in antivirus - a firewall that blocks access from external computers. In order to make the local site accessible, this blocking must be disabled in Start - Windows Firewall. It should be understood that this will also reduce the protection of the computer.
- Well, the last thing to do is to create the following hierarchical folder structure on the Denver virtual disk: /home/192.168.0.1/www
Instead of the ip address specified in the previous paragraph, you must specify your own, issued by your Internet provider.
If the provider provides, in addition to the IP address, also a domain attached to it, then the site will be accessible via it.
In the next article, we will look at installing WordPress on a local server.
HAPPY NEW YEAR 2014 ALL!!!
In this issue, you will find an overview and detailed instructions for installing and configuring the Open Server service platform. Thanks to this platform, a web developer can debug the code and the plug-in under conditions of imitation of a real server, as well as carry out various work on the site.
Purpose of Open Server
The developers website says that Open Server (https://open-server.ru/) is a portable server platform and software environment created specifically for web developers, taking into account their recommendations and wishes.
The platform, running under Windows, is designed to debug code before it is used on a real project, which is incredibly useful and convenient for developers. This can be debugging both the code and the plugin, as well as updating existing CMS.
For example, when I need to check the functionality of a plugin, script, or update the CMS, I do this:
- I make a fresh backup (backup copy) of an existing project and deploy it locally;
- update or make certain changes in the code;
- I check if everything works correctly;
- I roll out to the working site.
Platform installation
1. Choose the version that suits us openserver and download the package here: https://open-server.ru/download/ . For my work, the Basic package is enough (Premium and Ultimate packages, which include useful programs, can be found here: https://open-server.ru/#progs). If you make a donation, the download will take you 5 minutes, if it's free - more than two hours
2. Then we start the installation of the package by double clicking. The distribution file (version 5.2.5) looks like this:

3. After starting the unpacking of the distribution, specify the disk on which we want to install the package. After installation, the Open Server folder will appear at the specified path with the following contents:


Assembly components are available in 32-bit and 64-bit versions.
Launching, configuring and using Open Server
1. To launch the software environment, click on the desired version 64 or 86 (32-bit). You will see a red flag in the tray:

Clicking on it opens a menu:

2. In this menu, select "Start", after which all components and other menu items are activated:

The menu contains everything you need to work with the platform: a list of sites, links to the Console (collected in "Advanced"), database tools, configuration files.
3. The "Settings" item allows you to customize the platform to suit your needs. The most interesting for me is the item Modules:

As you can see, here you can choose your server configurations: Apache, Nginx, PHP, MySQL. In this way, you can simulate a real server on which your site and / or script will live in the future.
To get started with code, necessary:
- create a domain in the "OpenServer/domains" folder, for example, test.local;
- create a file with the .php extension right in the root of this folder;
- restart Open Server;
- find and open your test.local in the "My Sites" submenu.
The site will launch in your default browser.
By the way, by default in the “OpenServer/domains” folder there is a “Localhost” folder with the file index.php, and if you write in the browser https://localhost/, you will see a page like this:

This is the content index.php. You can use this folder to work with your sites and scripts. But when you have several projects (sites), then, of course, it is better to create a domain folder for each of them.
- deploy a clean distribution of any CMS;
- write your own script and debug it;
- deploy a site backup, update the CMS on it to the latest version and / or install plugins and check that they do not conflict with each other;
- try on a new template or write your own - in general, whatever your heart desires.
The only thing is that you cannot show such a site to anyone by simply dropping a link to it. But on the other hand, your test site can always be transferred to a real domain / server or thrown onto a USB flash drive and transferred, for example, to your colleague or brought home from work.
More detailed information on installation, components and work with Open Server is presented on the official website.
I, in turn, want to thank all those who worked on the creation of this wonderful tool. And to all readers of our blog, I wish you good luck in, perhaps, the first steps towards web development.
Have questions? Write in the comments below this article!