What program to flash Android. Getting additional features and system settings
You are the happy owner of a tablet or smartphone, and for some reason you are interested in the question: You have come to the right place. In this article, I will write in detail about what you will need for this, provide appropriate instructions, indicate what you need to pay special attention to, and give some useful recommendations.
I’ll say right away that you are far from the first user who wants to re-flash Android. This question becomes relevant for all owners some time after the purchase. This is mainly due to the fact that new versions, which include some useful features, come out more and more often. And some are simply not satisfied with the work of the already installed version.
So, what do we need in order for the new one to be installed on your device. First of all, charge your device (tablet or smartphone) that you are going to reflash. Take care of installation file drivers that will be necessary for the computer to correctly recognize the device. Next, prepare a cord that will connect the gadget to the computer. From software you will need Odin as well as the required firmware file.

Now we bring to your attention instructions on how to flash Android. So, connect your phone or tablet to your computer. Before doing this, install required driver. It is located on the disk that came with the device. If you don't have it, download it this software on the official website. After that, download the desired firmware file to your computer. They are usually “distributed” on various forums or file sharing sites. Please make sure that the file has the OPS extension.
When all these conditions are met, press three buttons on the device at the same time: power, menu and volume down. The display will show “Downloading”. This will mean that your device is ready for flashing. Next, connect it using a cord to your computer. After that, launch the Odin program. Try to download the most latest version when you perform this procedure. After startup, you should see a firmware selection message, under which there is an OPS button. Click on it and specify the path to the firmware file. That’s it, now click on “Start” and wait for the process to complete, which will last about four to five minutes. You will then see a PASS message. This will notify you that the procedure is complete. Now you have received the answer to the question: “How to flash Android?”

Please note that the phone may reboot before the flashing is completed. Do not interrupt this process under any circumstances. Just wait for it to complete.
A few more important recommendations. Before flashing Android, save all important information, which is located on your device, since all data will be deleted. I already mentioned battery charge at the beginning, but this important aspect. Under no circumstances should the battery be allowed to discharge before the process is completed. If a crash or hang occurs during the firmware, use the three buttons again. That's all.
Not many users imagine what phone firmware is until they encounter problems such as decreased performance, bugs, frequent freezing, unauthorized shutdown devices for no apparent reason. Firmware provides a unique opportunity to eliminate factory defects on a newly purchased smartphone. It also helps to modify and modify the gadget’s software according to the tastes and needs of a particular user.
As a result, reflashing literally gives a new Android life gadget, allowing you to eliminate many common problems associated with its long-term operation. Thanks to this procedure, cell phone shows high performance for several more years.
Update and new life Android systems
Phone firmware: what is it?
In a nutshell, for the uninitiated user, firmware is a complete update of the non-volatile memory of a digital device, that is, something like replacing the built-in software.
The operating system that the phone runs on is the holy of holies of any digital model devices. From optimal settings The system depends on full performance and expansion of all available functionality.
By firmware we mean full set everyone software settings, this is both the process of uploading a new software shell to the device, and a file image that includes the entire “flash” memory of the phone.

Firmware adds security to a digital device
Customize your smartphone, that is, update the operating system, expand functionality and add everything modern devices you can do it yourself using a computer. Firmware installed at home according to all the rules does not cause further malfunctions in the operation of mobile devices.
Important! Within one line, you can improve some options in the phone, for example, improve image brightness, add resources battery, . But you shouldn’t naively expect that an old device will transform into a new generation phone.
Why do you need to flash a digital phone?
Partial or complete software updates are usually carried out for three reasons:
- The need for Russification of digital devices. These are models imported from abroad that have an interface on foreign language and completely deprived of Russian language support.
- In case of replacing outdated software with a newer version. Digital devices are flashed in order to “enrich” the phone with improved, trendy functions that were not originally provided by the manufacturers.
- Because of serious damage in the software shell of the smartphone. This can be either partial inoperability of individual built-in functions or a complete failure to start the system.
What do you need to flash your phone yourself?
A user who does not have initial skills and knowledge of the principles of operation of the software, and has little understanding of computer programs– you shouldn’t take risks, but it’s better to trust digital gadget specialist.
Flashing is only a small part of what is loaded into the memory of a digital device. If you decide to do the firmware yourself, then first of all you should familiarize yourself with components this process, and familiarize yourself with the terminology.
The main parts of the firmware consist of two elements:
- Fullflash is a complex of all software utilities, built into the device, that is full image memory.
- Monsterpack (monsterpack) is a software “fill” from the manufacturer. It is a complete set of all programs and consists of three parts: a program image of the device (firmware), FlexMemory (flex) and EEPROM.
These above components must be replaced, both individually and collectively. However, for the uninitiated user the question will be: where to get source codes manufacturer for complete update these parts?
It is practically impossible for the average Internet user to find original codes, and homemade codes can easily turn a smartphone into a “brick.” Based on this, it is recommended to limit ourselves to replacing only the firmware, or to trust digital device specialists.

Tools for Android updates on your gadget
What tools will you need:
- Directly the smartphone itself.
- Computer or laptop.
- Special USB cable.
- Required drivers.
- Suitable firmware version.
Saving the installed firmware version
Before installing the firmware mobile phone, try to save all data (settings and programs) using a special backup application to a memory card or computer. A backup copy of the existing version may be needed if, of course, it’s not a fact, but something goes wrong or the new firmware will worsen the performance of the device.
- Launch ClockworkMod Recovery and go to the “Save current ROM” tab.
- Click “ok”, thereby starting the creation of a data backup.

Backup button for backing up files
- Restoring the saved version is started by opening the same CWM Recovery option, then launching the “Restore” function.
Preparing the smartphone for the firmware procedure
Firmware for various model range smartphones will require “uploading” of suitable software. Therefore, it is recommended to study all the intricacies of the firmware for your phone model. There are many special resources on the Internet, for example, 4pda, where you can find suitable software, a program for installing firmware, drivers, as well as instructions for the process itself.
Important! Before starting the firmware, you should disable antivirus program on a digital device, otherwise it will not allow the new software to launch.
The preparatory process takes about half an hour, complete the following steps:
- Download and install the “MobileuncleMTC Tools” application, if Google help Play.

Steps to install the application
- Install the program with administrator rights.
- Download the “CWM – recovery” file suitable for flashing specific model smartphone.

Submenu of built-in options in ClockworkMod Recovery
- Transfer to smartphone CD-card ZIP folder with downloaded files (firmware, recovery).
- Open main menu installed utility Mobileuncle, find the Recovery file.
- Start the update by simply clicking “ok”.

The main program window, and the option “replacement recovery via update from sdcard”
The procedure for self-firmware Android via computer
After carrying out the preparatory steps, the Android device is completely ready for the most important procedure. The recommendations below will familiarize users with how to properly flash Android on our own through a computer and avoid mistakes. Recommended procedure:
- Check your phone's charge, it should be at least 50%. Flashing smartphones different manufacturers differs in time spent. This is the firmware procedure Chinese model will take much less time, unlike European analogues.
- Connect your smartphone via USB port to the computer, wait for it to be detected.
- Open ClockworkMod Recovery.
- Select and click on “Wipe” in the menu. This option will reset all data from the device.
- Then select "Wipe" cache partition", press.

Main Recovery menu and the “wipe cash partition” option, responsible for erasing all temporary accumulated files
- After agreeing and confirming, click on the “Install form scard” item, after which the “Choose Zip from internals sdcard” option will open. Click on the pre-loaded flashing file image.
- Wait until the download is complete installation process and reboot the device. Throughout the entire process, it is strongly recommended not to disconnect the connecting USB cable.
Alternatively, after reinstalling the software, your smartphone will not want to turn on the first time. Don't worry, try rebooting it again. If no changes appear, it is recommended to reflash it again, or restore the old saved version.
For those who would rather see once than hear a hundred times, it is recommended to watch the video from detailed instructions about Android firmware:
Smartphone firmware provides users with opportunities that are difficult to overestimate. This is an effective increase in the performance of almost all the functionality of your favorite gadget. However, if you decide to do this procedure yourself, you should take into account that the process is quite risky.
Phone firmware is software that is installed on the microchip during manufacturing. Sometimes there is a need to reflash a smartphone. That is, update the device's operating system. Why is this needed? Flashing is necessary if various OS failures occur while working with the smartphone. Or if you need to Russify the device. In any case, information on how to flash an Android phone via a computer will certainly not be superfluous.
Before proceeding directly to flashing the smartphone, it is necessary to carry out preparatory measures. This event must be approached very responsibly. Otherwise, serious problems with the gadget may occur. So, before flashing Android, you need to:
- Charge your smartphone. If the gadget turns off during flashing, this will lead to undesirable consequences (loss of system files, data). Therefore, make sure that your device is charged to maximum. Better yet, connect the device to a power source while reinstalling the OS. Then the device will definitely not turn off.
- Specify current version OS specific to your device. To do this, use the information stored in the “Settings” menu in the “About phone” section. There you can view current firmware, device build number, number of cores, etc.
- Download new firmware. Using the information received, find the new firmware on the Internet and download it. Remember that the OS must match all the characteristics of your device.
Flash the device via PC
If you want to reflash your smartphone yourself using a computer, then first you need to download the appropriate software to your PC. The program must be selected depending on the brand of your phone. For example, if you own a smartphone from Samsung, then download and install a utility called Odin on your PC. Here detailed list utilities for specific manufacturers:
- Lenovo - Flash Tool;
- Sony - Flashboot;
- LG - KDZ Updater HTC;
We will use a software called Fastboot. It is suitable for people who use devices from Nexus or HTC.
Instructions for flashing
Find the Fastboot program on the Internet and download it to your computer. Unpack the downloaded files in the root system disk C. As a result, the path to the file should look like C:\Android. The downloaded utility consists of two folders. The directory called Tools contains utilities that are needed to update the system. The Driver folder, as the name suggests, contains drivers. 
The next step is to connect the device to be flashed to the PC via a USB cable. After the computer connects to the device, the automatic installation drivers. However, sometimes the gadget cannot find firewood on its own. In this case, you need to go to the manufacturer’s official website and download the latest version of the OS from there. Do not forget that the downloaded version of Android must meet all the characteristics of your phone. After downloading the appropriate OS, upload it to Tools as a .zip archive.
Before flashing Android via PC, you need to unlock the so-called bootloader on your mobile device. To do this you need to open command line. To do this, click hot combination R + Win, after which it will open standard utility"Run." Type cmd into the line, and then press Enter. Window for Windows commands opened. 
Enter cd C:\Android\Tools into the terminal, and then press Enter. You will be taken to the Tools section. We need to use fastboot command devices. After this, the console will display the code for your mobile device. This indicates that the utility has identified the device and you can proceed directly to flashing it operating system. If the line waiting appears for device, this means that the smartphone was not found. To get the device code, you need to install the drivers. 
To update the Android OS on your gadget, you need to use the fastboot update command. Enter fastboot update ***.zip into the console and click on the Enter button. Instead of *** you need to specify the name of the file with the finished firmware. The system update process will begin, which will take a certain amount time. After the firmware is reinstalled, you need to restart the mobile phone.
Firmware via Recovery
There is another way to flash an Android phone without a computer. The essence of the method is to use a custom or standard Recovery. So, to update Android, find the firmware on the Internet that matches the characteristics of your mobile phone. After that, download the OS and transfer it to the root file system gadget. If you want to use custom Recovery, then install TWPR or CWM on your smartphone (you can download applications for free via Play Market).
After this, you need to reboot the device and enter recovery mode. Recovery Mod is activated differently on different smartphones. It all depends on the manufacturer. As a rule, recovery is turned on by simultaneously pressing the Power (smartphone on/off button) + Volume Down (volume down key) keys. After you go to the Recovery menu, you need to open the section that is intended for installing firmware. IN standard recovery this item called " apply update from external storage". Regarding custom Recovery, then in TWRP you need to select “Install ZIP”, and in CWM - “apply update from sdcard”. Navigating through the recovery is done using the Volume Down and Volume Up keys. 
After you click on desired item, you must specify the path to the firmware that you previously downloaded to your device. The operating system update process will begin. After you finish flashing, you need to restart your mobile device and reset the characteristics to factory settings. To do this, go to the “Settings” section on your smartphone and find the “Reset settings” item there.
Flashing via ROM Manager
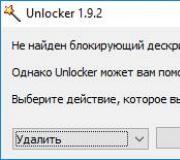
You can flash the firmware at home using a program called ROM Manager. The utility, unlike the same CWM and TWRP, has simple interface, which simplifies the firmware update process. In addition, the program has a couple of interesting properties. For example, you can do backup copy system and return the OS to original state, if the firmware process was unsuccessful. So, in order to flash an Android phone yourself via ROM Manager, you must have root rights. possible through special applications like Unlock Root, Vroot, etc. In addition, the smartphone must have on board custom recovery(the same CWM or TWPR).
If you have all of the above, then download and install the ROM Manager application from the Play Market or the Internet. Then we look for suitable firmware and download it too. Then launch ROM Manager and follow the following instructions:

How to restore the system via ROM Manager
If any problems arise after updating the OS, you can roll back the changes by returning old version firmware. This is done as follows (provided that you made a backup in advance):

If you have any questions about the firmware of your phone or something doesn’t work, leave your comments. Also, one of the methods is shown in the video below using Lenovo as an example:
Today we will talk to you about how to independently reflash a smartphone to Android via a computer. The procedure is not easy, and the firmware of each gadget has its own nuances, which you will have to clarify on specialized forums. But in general terms you will understand that when the right approach You can restore the device at home, install third-party firmware on it, or update the stock one to new version.
Firmware for an Android smartphone using a computer
To begin with, we will warn you that in this way you can “kill” your gadget. In the language of people who understand, turn it into a “brick”. In this case, you won’t be able to get rid of it without going to the service center. You shouldn’t even bother flashing NoName firmware for gadgets from China; if you break it, they may not be able to be repaired at the service center.Be that as it may, we live in the age of technology, the age of the Internet - world wide web, where, if you wish, you can learn literally everything: even the firmware of Android phones. Actually, what are you doing now? Well, let's get started....
Finding and installing the software required for firmware
It's no secret that different device manufacturers require different drivers. Fortunately, they can also be downloaded on the Internet. For example, you have a smartphone from Samsung– drivers for subsequent firmware can be found on the official website. There are also alternative option without searching for drivers - just connect the phone to the computer, after which the operating system will independently select and download them (applies to owners of Windows 7 and newer versions of window operating systems).The next task is to download the firmware itself. The most popular Russian-language resource with official and custom firmware is 4pda.ru. Go to the forum, look for your device and firmware there. Choose the one that is most interesting to you and download it to your computer.
Then you need to assign Superuser rights to the program, that is, give Root access. How exactly to provide it, see our previously written article.
Now we return to the already familiar website 4pda.ru, or more precisely, to its forum and download the CWM-recovery file for your gadget (it is important that it is specifically for your device, otherwise you risk turning it into a “brick”).
We write a zip archive with the firmware and Recovery downloaded earlier into the device’s memory, or better yet, onto an SD card.
We return again to installed program Mobileuncle MTK Tools, launch it and it's in automatic mode will find CWM-recovery on your smartphone, you will only need to confirm the update process by pressing the “OK” button.
Preparing for firmware
Without a backup copy - nowhere! It will be useful to us in case unsuccessful firmware to restore the device's functionality. Let's go:
So, the backup has been created. To restore it, go to installed application CWM recovery, tap on the “Backups” item and select the recently created one there.

You should also save as a backup copy all data that may be erased during the firmware update of the device - contacts, photos, etc.: 
To restore data from a backup copy, use the nearby “Restore” button - that is, “Recovery”. You will only need to indicate the path to the previously created backup and confirm its installation. As you can see, absolutely nothing complicated.
Installing firmware on an Android smartphone
So, new Recovery installed, now you need to log into it. First, fully charge your device. Turn it off and, using a combination of Power buttons and Volume Up, go to Recovery. Depending on the device manufacturer, the combination may differ.

Here we select “Wipe cache partition” and confirm our actions;
Now let's move on to the most interesting part - installing the operating system. Click on “Install from sdcard”, then on “Choose zip from internal sdcard” and find the file with the firmware downloaded earlier;

We confirm our consent;

We wait for the installation process to complete, after which we reboot the device and wait for it to boot. Don't be alarmed if the first download takes longer than usual - that's how it should be.
What to do if the phone does not start after flashing the firmware
If the startup process of the smartphone has not progressed beyond the logo, it makes sense to reboot it again. Didn't that help either? Then reflash again. Otherwise, we need to roll back to the standard firmware and restore the Backup. You already know how to restore a backup, but how to roll back to an earlier one installed version firmware? There is only one answer - no way, it will have to be installed via a computer.Let's look at the process using Samsung devices as an example:
If the method does not work, and this happens, the road to the service center is paved. We warn you: the names of the programs and drivers are different for all programs, but in general the installation process is similar, so it will not be difficult to figure it out. We hope everything worked out for you!
We continue the topic of experimenting with my new phone. From the experience of using routers and other equipment, I have developed a strong habit - first of all, update their “brains”. The thing is that from the moment the device leaves the factory until the time it falls into your hands, more than one month may pass, and during this time its firmware could undergo significant changes and open up more information for the user. ample opportunities use. And today we will clearly check how to flash a phone Samsung on Android 4.4 and how safe is it to do it yourself?
Ways to flash a Samsung phone on Android 4.4
There are several ways to flash an Android phone. The first is directly from him through the system. On my Samsung there was Android version 4.4, in it, if you go to the “Settings > Phone information > Software update” section, you can configure automatic check new firmware for your model. To do this, check the “Auto-update” box. I also recommend activating the “Wi-Fi Only” item, in this case the presence of a new version will be checked only when the phone is connected to wireless network, otherwise you will constantly waste your mobile traffic through mobile operator, which is fraught with loss of money.
The scan can be started manually by clicking on “Update”.
Firmware Samsung phone on Android, like any other, you can start only with a 100% charged battery
However this option firmware updates Samsung Galaxy not entirely comfortable and can fall off in the middle, as happened with me. Therefore, I recommend doing this task with the help special program installed on the computer, and when connected to it via USB cable phone.
There are also variations here - you can do it using the official program Samsung Kies, you can use the popular Odin or its equivalent. IN the latter case it is possible to use it as official firmware for Samsung Android phones and from third party developers, which are often more convenient and open up wider possibilities for the phone, but it will void the factory warranty. Therefore, it is recommended to install third-party firmware only after warranty period.
How to officially flash a Samsung phone on Android?
So, let's start figuring out how to flash Android using the example of a Samsung update, and turn to Samsung program Kies, which can be downloaded here. By the way, it was created by analogy with Apple's iTunes and with its help you can completely synchronize your phone with your PC - contacts, files, music, etc.
Before you start updating Samsung firmware on new Android, it is recommended to avoid possible loss make a backup copy of your data using your phone or via Kies
First we install the program. At the same time, drivers for all kinds of devices from this company will be added to the computer, including yours. We launch it, connect the phone to the computer via USB and wait until it is recognized.
Next, after a window opens with all the basic data about your phone, select “Firmware update” and if it is available, this will be reported in an additional window that opens.

Click the “Update” button, agree to the rules and confirm our desire. And we wait for the end.. Do not touch the phone during this time and under no circumstances disconnect it from the cable from the computer. By the way, I don’t recommend leaving for a long time either, since your antivirus or firewall may crash a couple of times, in which you will need to allow Kies to perform its functions. Also disable the antivirus on the mobile phone itself, otherwise it will not allow the system to update.

As a result, we get this and confirm the end of the software update.

Updating Android Firmware on Samsung Phone via Odin
Now let's turn to the “gray” firmware. I suggest you watch the step-by-step video first, and then we’ll continue.
First of all, you need to put the phone into download mode (“Downloading”), which is done by simultaneously pressing the “Home”, “Power” and “Volume minus” (or “Volume plus” depending on the model) key combination. If done correctly, the Android logo and the inscription about boot mode.

Next, download and install the Odin MultiDownloader program (you can easily find it on any thematic site or Google it in a search engine) - this is a professional program designed for service centers, so you don’t have to worry, if you do everything correctly in it, then nothing bad will happen to the phone.
And you will also need the firmware files that you downloaded from the official website or any support forum third party firmware. As a rule, there are four of them - PDA, the main firmware file; PHONE, which is responsible for working with the cellular operator’s network; CSC - phone settings; and PIT - service information storage. Make sure they are all included in the set. However, there are also single-file versions, in which case it will need to be imported in place of the main one - PDA.

If you are working on a computer that has Windows system 7 and above, then this will be enough. If you have XP, then you will definitely have to install the Kies program that we have already disassembled, which will install drivers for your Windows Android phone, or separately the firewood itself - Samsung USB Driver for Mobile Phones. On the same site you can also select firewood specifically for your model and version of the computer OS.
Now you must first kill all Kies processes if you installed and launched it. To do this, press the key combination Ctrl+Alt+Del on your computer and look for processes whose names contain the word “Kies”. And we complete them. Then we launch Odin - our smartphone is already in download mode - connect it via a USB cable and press the “Volume Up” button (in relation to the Samsung Galaxy S2).
Now you can start updating the software.
IN Odin program must yellow one (first) ID:COM section will be displayed (there are several of them for simultaneous work with several phones). In the program, check the boxes for “Re-Partition”, “Autoreboot” and “F.Reset Time”.

Now press the “Start” button and wait for the process to complete until the process graph reaches the end, lights up green and “Pass” will appear.

After this, the phone will reboot and start working on the new software version. Additional for checking current version you can use the command *#1234#. You can also do complete cleansing all data using service code *2767*3855#.
That's it for Samsung phone firmware Android based OS is complete, thank you all for your attention!