You can record a conversation on Skype. How to record a skype conversation on a computer
Skype is the most used program for communication over the Internet. Using Skype and a laptop, you can conduct telephone interviews, round tables, create tele- and video conferences, as well as communicate in a regular chat.
But, regardless of the purpose for which Skype is used, one day it may be necessary to record one or even several conversations and save them on a computer.
This will eventually allow you to re-listen to them yourself or transfer them to someone else. But, unfortunately, the Skype function does not include a call recording. This was the impetus for the development of third-party add-ons and programs that could replace the missing features.
In general, there are various solutions, but the most optimal for the average user are MP3 Skype Recorder and iFree Skype Recorder. Both presented programs fully fulfill their main purpose, they are convenient and have an intuitive interface, which is easy to understand even for an inexperienced user.
Having studied the operation and characteristics of both options, I preferred the iFree Skype Recorder program. The user-friendly interface, flexible settings, several recording modes, and most importantly, excellent recording quality make it the best option! It will be discussed in this article.
If you want to record video from Skype, you need to use programs. These programs record both video and sound well.
In this case, Skype will not differ from any other program, everything that happens on the screen or only the program window is simply written to the file, read the article.
Let's take a closer look at iFree Skype Recorder
The program is in English, but it is very easy to work with it. It is distributed on the basis of a free license and allows you to record all conversations, even conference calls. It can be used both for recording the full version of the conversation, and for "one-sided" sound recording (for example, only from the side of the interlocutor, or sound from the user's microphone). All conversations are saved as an mp3 file.
For the impatient, here's a video tutorial:
The most up-to-date version can be found at:

With the advent of new versions of Skype, it may turn out that not a single add-on will work. Then you need to use screen recording software.
Now launch Skype followed by iFree Skype Recorder. If the program is launched for the first time, it will immediately want to connect with Skype itself. To do this, she will need access authorization, which must be confirmed manually.

The Skype window will pop up before your eyes, possibly with a resized window, and there, in the window that appears, click "Give access".
If everything went well, then your login and the phrase “Ready for Recording” will be written at the bottom left of the program window.

If not, look at the end of the article.
Now the program will automatically capture and record all Skype calls.
Call recording window
The program works only during calls, i.е. starting to write something “just like that”, for example, speaking into a microphone, will not work. iFree can start recording in two modes:
- automatic (activation of the recording during the beginning of the conversation, and termination - after the end)
- manual (the user controls the start and pause of the recording process on his own)
Now consider the program window:

1 - User status in Skype
2 - Start/Stop recording
3 - Pause/Resume Recording
5, 6 - Program status. The text "Recording in progress" appears while recording.
7 - Dialog box displaying the recording history sorted by the creation time of the audio files. At any time, the user can select the desired audio file and listen to it (the program has its own player for this), or go to the folder to transfer/delete the audio track

8 - Open a window with advanced settings (we will return to it later).
9 - Enable/Disable display on top of all windows.
10 - Help window. In fact, the command simply calls up a page on the official website of the program, which briefly describes how to save records. The site only supports English.
iFree Skype Recorder Settings
The settings dialog can be called up by clicking on the classic “tools” icon (see #8 above). This should open the following window:

The first tab, General, is a list of basic settings. Here you can configure several algorithms for launching the program. For example, in order for the program to start automatically when you turn on the computer, you just need to check the box "Start when I start windows".
In the same window, you can give the program a command, in accordance with which, at startup, it will immediately minimize to tray (near the clock). To do this, check the option "Hide to system tray startup". The remaining items, which are marked by default, can simply be left untouched.
Go to the next tab "Call Recording"

Here you can specify when to record and what to record. In the first block, the recording start is configured:
- If you select "Automatically" (default), ALL calls will be recorded automatically.
- When selecting the "Manually" mode, the user can turn on the recording of conversations manually. To do this, press the button with a red circle (see button No. 2)
The second block allows you to choose in which direction the recording will be made:
- both sides - the sound is recorded from both sides, that is, incoming and outgoing. Thus, you can record the conversation in full
- my side - outgoing sound is recorded, that is, only your voice
- remote side - incoming sound is recorded, that is, only the voice of the interlocutor
Please note that when recording in both directions, the sound of the interlocutor will also get into the recording through the microphone if you are not listening with headphones! If the quality suits, then everything is fine.
And at the bottom you can see a path called "Recording folder". This item is a place to save the created files. You can go to the folder (“Open” button), or you can change the storage location (“Browse” button).
In the "Mp3 Quality" tab, you can set the quality in which the recorded audio will be stored:

I recommend choosing the “Mono” mode so that the voices are guaranteed to sound from both speakers. The recording quality in the "Recording Bitrate" block, select at least 128 and a sampling rate of 48000 (the more, the better). The size of the resulting file also depends on these three parameters. But even with the maximum settings, an hour of recording will take up only about 100MB on the disk.
The last tab "Chat reply" provides the ability to enable and configure an auto-response for chat windows. Also, the program has "quick settings". You can find them by clicking the right mouse button on the program icon (usually it is located at the bottom of the screen, on the right). This will bring up the following context menu:

Here you can find already familiar settings, such as selecting the recording direction, turning on / off the automatic recording mode, and an answering machine. From here you can exit the program (“Exit”).
As you can see, it is not at all difficult to understand the operation of the program. Even the absence of Russian localization will not become an obstacle for its development by any user, regardless of the experience of working with a computer.
Possible problems
If something went wrong and access was not granted, then the program window will display the messages “Searching for Skype” and “Waiting to access Skype…”
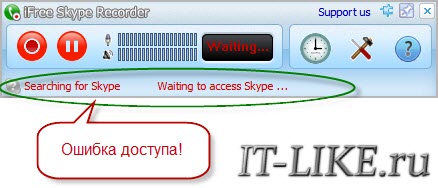
And on the desktop, a message of this kind may pop up:

In this case, you need to go to Skype settings and add rights manually. Let's go to the menu "Tools -> Preferences -> Advanced" and click the "Control other programs' access to Skype" button.

If there is already an entry about the program, then click "Change" and allow the program to use Skype

If it was empty, then we try everything again: close iFree Recorder and Skype and try to start again, only this time iFree first, then Skype.
Some users may sooner or later need to record a Skype conversation. How to do it?
It’s worth mentioning right away that this cannot be done using the program itself, but you can use third-party software. By the way, there are plenty to choose from. Let's focus on the simplest ones in terms of interface.
Call Graph Program
This simple and free program only records audio files in .mp3 format. Recording starts with a call (incoming/outgoing) and stops when it ends.
Close Skype before installing Call Graph to avoid possible conflicts.
Installing the program is very simple, and the next time you start Skype, it will ask for the appropriate write permission. You will need to confirm the request, after which the next call will be recorded.

You can also test the recording of the conversation by calling the Sound Test Service.
You can manage the program using the Toolbar.

iFree Skype Recorder
And although this program has an English interface, it is easy to manage. The principle of installation is similar to Call Graph - first we launch the installer, and then the installed program. It will send Skype permission for authorization. You need to confirm access. 
Calls in the program are also recorded automatically, and you can also manage it with such a window.

The buttons here are intuitive, so each user can figure it out without difficulty.
iFree Skype Recorder records conversation in .mp3 format. The program settings provide for setting the recording quality.
MP3 Skype Recorder
Probably the most user-friendly program because it has everything you need to record in the control window.
Installed in exactly the same way as the previous two programs.

The main window allows you to change various settings in a couple of clicks: recording quality, save location, launch options. 

By pressing the red button you turn on the automatic recording of all calls.
Video Call Recorder for Skype
And this free program can also record video calls. It's also nice that the program has a Russian interface.
Skype must be closed before installation, otherwise the installation will fail.

During installation, you will also be prompted to install additional software. Be careful.
The main window of the program is very simple in terms of functionality, in fact, you don’t even need to understand it. But if there are any questions, then detailed instructions on the functionality of the main window are on the official website of the program.

Unlike other programs, this one works in manual mode, but you can also enable automatic recording. To do this, in the main program window, select Instruments, parameter Options, tab video input. Check the box as shown in the screenshot.

Please note that the program can record not only a video call, but also an audio call.
All conversations in the Skype program you can easily record and save the recordings on your computer. Of course, it is not possible to do this with built-in Windows functions, but any third-party software designed for Skype will help you. So you can listen to your conversations again, send them to friends and colleagues. If you make calls to mobile phones through the Skype program, then you get the opportunity to record and telephone conversations, which is sometimes simply necessary, as it will easily prove your case in a particular issue. This article will consider two of the most popular and simple programs: Amolto Call Recorder and iFree Recorder.
How to record a Skype conversation using iFree Recorder
This software is easy to install, small volume, and easy to use. The iFree Recorder program is distributed free of charge, so you can download it freely from the official website of the developer at the link http://www.ifree-recorder.com
- Click on the “Free Download” button to start downloading the software.
- After saving the distribution, double-click on it with the mouse. The installation process is relatively simple and will not cause you any problems.
- Specify the folder for saving the program and click "Install", in all other points you just need to click "OK" and "Next".


- Once iFree Recorder is installed, Skype will open in front of you. If you are not logged in to the system, you will need to enter your username and password.
- An orange frame will appear at the top of the window, notifying you that iFree Recorder is trying to access Skype. For it to work properly, you need to give your permission for this by clicking on the “Give access” field.


This is what the iFree Recorder window looks like. This is a small and simple program:
- There is a round red button in the upper left corner. It is similar to the "Rec" button on old tape recorders and is intuitive - this is the start of recording.
- Next to it is a button to pause the conversation if you need to interrupt the conversation.
- The “History” window will display all the entries that you made using this utility.
- By going through the field with the hammer and screwdriver icon, you can adjust the recording quality and other audio options.
To stop recording when needed, simply click the record button again.

How to record a Skype conversation using Amolto Call Recorder
This program has a more flexible interface for customization and a lot more options. With it, you can record not only an audio call, but also a video of the interlocutor. Amolto Call Recorder has a ten-day trial version, after which you will be offered to buy it for $29.99. You can download it on the official website at the link http://amolto.com, or from your own sources.
- Follow the link above and click on the “Download” button.


- You will find yourself on the page for choosing versions: trial or full paid. It is better to choose a trial one, since it is free and is given for ten days, during which you can manage to record all the conversations you need. Click "Download" again.

- Once the software is saved on your computer, proceed with the installation. The process is not particularly difficult: you will only need to specify the installation path and check the license agreement.

The program window is miniature and has several buttons:
- The bottom left button starts recording the conversation.
- Nearby you will see the pause and stop buttons. The first only interrupts the recording, and the second completely ends it.
- By clicking the “Options” button, you can set the quality of audio, video, as well as the save path.
- “Recording History” allows you to view all recorded files through this program.
In the general window, you can see in what format audio and video are recorded, as well as which devices are involved for this.
One of the main features of Skype is the ability to make video calls. But there are situations when a user wants to record video of conversations via Skype. There can be many reasons for this: the desire to always be able to update valuable information in memory in an undistorted form (this primarily applies to webinars and lessons); the use of video as evidence of the words spoken by the interlocutor, if he suddenly starts to refuse them, etc. Let's find out how to record Skype video on computer.
Despite the unconditional demand of users for this function, the Skype application itself did not provide built-in tools for recording a video of a conversation for a long time. The problem was solved by using specialized third-party programs. But in the fall of 2018, an update for Skype 8 was released that allows you to record video conferences. We will talk about algorithms for various ways to record video in Skype further.
Method 1: Screen Recorder
One of the most convenient programs for capturing video from the screen, including when conducting a conversation via Skype, is the Screen Recorder application from the Russian company Movavi.
- After downloading the installer from the official site, run it to install the program. The language selection window will immediately appear. The system language should be displayed by default, so often you don’t need to change anything here, but you just need to click OK.
- Start window will open "Install Wizard". Click "Further".
- You will then be asked to confirm your agreement to the license terms. To perform this operation, set the radio button to "I accept…" and press "Further".
- You will be prompted to install supporting software from Yandex. But you do not need to do this at all, unless you yourself think otherwise. To refuse to install unnecessary programs, simply uncheck all the boxes in the current window and click "Further".
- The Screen Recorder installation location selection window will open. By default, the folder with the application will be placed in the directory "Program Files" on disk C. Of course, you can change this address by simply entering a different path in the field, but we do not recommend doing this without good reasons. Often in this window you do not need to perform any additional actions, except for clicking on the button. "Further".
- In the next window, you can select a directory from the menu "Start" where the program icons will be placed. But here, too, it is not at all necessary to change the default settings. To activate the installation, click "Install".
- The application installation procedure will start, the dynamics of which will be displayed using the green indicator.
- When the application is installed, a shutdown window will open in "Setup Wizard". By placing checkboxes, you can automatically launch Screen Recorder after closing the active window, set the program to automatically load at system startup, and allow anonymous data to be sent to Movavi. We advise you to choose only the first item out of three. By the way, it is enabled by default. Next click "Ready".
- Thereafter "Setup Wizard" will be closed, and if you selected in its last window the item "Launch...", then you will immediately see the working shell of Screen Recorder.
- Immediately you need to specify the capture settings. The program works with three elements:
- Webcam;
- System sound;
- Microphone.
Active elements are highlighted in green. To solve the goal set in this article, it is necessary that the system sound and microphone are turned on, and the webcam is turned off, since we will capture the image directly from the monitor. Therefore, if the settings are not set in the way described above, then you just need to click on the appropriate buttons to bring them into proper form.
- As a result, the Screen Recorder panel should look like the screenshot below: the webcam is disabled, and the microphone and system sound are enabled. Activating the microphone allows you to record your speech, and system sounds - the speech of the interlocutor.
- Now you need to capture a video in Skype. Therefore, you need to launch this messenger if you have not already done so. After that, you should stretch the Screen Recorder capture frame to the size of the plane of the Skype window from which the recording will be made. Or, on the contrary, you will need to narrow it if the size is larger than the size of the Skype shell. To do this, place the cursor on the border of the frame by holding the left mouse button ( paintwork), and drag it in the desired direction to change the size of the captured space. If you need to move the frame along the screen plane, then in this case, place the cursor in its center, which is indicated by a circle with triangles emanating from it in different directions, clamp paintwork and drag the object in the desired direction.
- The result should be a result in the form of a framed section of the shell of the Skype program, from which the video will be recorded.
- Now you can actually start recording. To do this, return to the Screen Recorder panel and click on the button "REC".
- When using the trial version of the program, a dialog box will open with a warning that the recording time will be limited to 120 seconds. If you want to remove this restriction, you will have to purchase a paid version of the program by clicking the button "Buy". In the case when you do not intend to do this yet, press "Proceed". After purchasing a license, this window will not appear in the future.
- Then another dialog box will open with a message about disabling effects to improve system performance during recording. There will be options to do it manually or automatically. We advise you to use the second method by clicking on the button "Proceed".
- After that, the video recording will start immediately. For trial version users, it will automatically end after 2 minutes, and license holders will be able to record for as long as they need. If necessary, you can cancel the procedure at any time by pressing the button. "Cancel", or temporarily pause it by clicking the element "Pause". To end the recording, press "Stop".
- After the procedure is completed, the built-in Screen Recorder player will automatically open, in which you can view the resulting video. Immediately, if necessary, it is possible to trim the video or convert it to the desired format.
- By default, the video is saved in MKV format in the following path:
C:\Users\username\Videos\Movavi Screen Recorder
But it is possible in the settings to assign any other directory to save the recorded videos.


The Screen Recorder program is easy to use when recording video in Skype and at the same time quite advanced functionality that allows you to edit the resulting video. But, unfortunately, for the full use of this product, you need to purchase a paid version, since the trial version has a number of serious limitations: the ability to use is limited to 7 days; the duration of one video cannot exceed 2 minutes; displaying the background caption on the video.
Method 2: Screen Camera
The next program that can be used to record video on Skype is called Screen Camera. Like the previous one, it is also distributed on a paid basis and has a free trial version. But unlike Screen Recorder, the restrictions are not so strict and actually consist only in the ability to use the program for free for 10 days. In terms of functionality, the trial version is in no way inferior to the licensed one.
- After downloading the distribution, run it. A window will open "Install Wizard". Click "Further".
- Then you should act very carefully so that along with the "Screen Camera" you do not install a bunch of unnecessary software. To do this, move the radio button to the position "Settings" and uncheck all checkboxes. Then click "Further".
- At the next step, accept the license agreement by activating the corresponding radio button and click "Further".
- Then you need to select the folder for placing the program in the same way as it was done for Screen Recorder. After press "Further".
- In the next window, you can create a program icon on "Desktop" and pin the app to "Dashboards". The task is performed by placing checkboxes in the appropriate checkboxes. Both features are enabled by default. After specifying the options, click "Further".
- To start the installation, click "Install".
- The installation process of the "Screen Camera" is activated.
- After successful installation, the final installer window will be displayed. If you want to activate the program immediately, then put a check in the checkbox "Launch Screen Camera". After that press "To complete".
- When using the trial version, and not the licensed version, a window will open where you can enter the license key (if you have already purchased it), proceed to purchase the key, or continue using the trial version for 10 days. In the latter case, press "Proceed".
- The main window of the Screen Camera program will open. Launch Skype if you haven't already done so and click "Screen Recording".
- Next, you need to configure the recording and select the type of capture. Be sure to check the checkbox "Record sound from microphone". Also note that in the dropdown list "Sound recording" the correct source has been selected, that is, the device through which you will listen to the interlocutor. Here you can also adjust the volume level.
- When choosing a capture type for Skype, one of the following two options will do:
- Selected window;
- Screen fragment.
In the first case, after selecting the option, you just need to click on the Skype window, click Enter and the whole messenger shell will be captured.

In the second, the procedure will be approximately the same as when using Screen Recorder.

That is, you will need to select the area of the screen from which the recording will be made by dragging the boundaries of this area.
- Once the screen capture and audio settings have been made and you are ready to chat on Skype, click "Record".
- The procedure for recording video from Skype will begin. After you finish the call, just press the button to end the recording. F10 or click on the element "Stop" on the On-Screen Camera panel.
- The built-in Screen Camera player will open. In it, you can watch the received video or edit it. Then press "Close".
- Next, you will be prompted to save the current video to a project file. To do this, click "Yes".
- A window will open where you need to go to the directory where you want to store the video. In field "File name" its name must be entered. Next click "Save".
- But the resulting file will not be played in standard video players. Now, in order to view the video again, you need to open the Screen Camera program and click on the block "Open Project".
- A window will open where you will need to go to the directory in which you saved the video, select the desired file and click "Open".
- The video will be launched in the built-in player of the Screen Camera. To save it in the usual format, in order to be able to open it in other players, go to the tab "Create Video". Next, click on the block "Create Screen Video".
- In the next window, click on the name of the format in which you prefer to save.
- After that, you can change the video quality settings if necessary. Click to start the conversion "Convert".
- A save window will open, in which you need to go to the directory where you intend to store the video, and click "Save".
- The video conversion procedure will be undertaken. Upon completion, you will receive a video with a recording of the Skype conversation, which can be viewed using almost any video player.


Method 3: Built-in Toolkit
The recording options described above are suitable for absolutely all versions of Skype. Now we will talk about the method that is available for the updated version of Skype 8 and, unlike the previous methods, is based only on the use of the internal tools of this program.
- After starting a video call, hover over the lower right corner of the Skype window and click on the item "More Options" in the form of a plus.
- In the context menu, select "Start Recording".
- After that, the program will start video recording, after notifying all participants of the conference by text message. The duration of the recorded session can be observed in the upper part of the window where the timer is located.
- To complete the specified procedure, you must click on the element "Stop Recording", which is located next to the timer.
- The video recording will be saved directly to the current chat. All conference participants will have access to it. You can start watching a video by simply clicking on it.
- But in a chat, the video recording is only kept for 30 days, and then it will be deleted. If necessary, you can save the video to your computer's hard drive so that you can access it even after the specified period. To do this, right-click on the video in the Skype chat and select the option "Save as…".
- In the standard save window, move to the directory where you want to place the video. In field "File name" enter the desired video name or leave the one displayed by default. Then click "Save". The video will be saved in MP4 format in the selected folder.


Mobile version of Skype
Recently, Microsoft has been trying to develop the desktop and mobile versions of Skype in parallel, equipping them with identical functions and tools. Not surprisingly, the app for Android and iOS also has the ability to record calls. How to use it, we will tell further.
- Having contacted by voice or video with the interlocutor whose communication you want to record,

open the conversation menu by double-tapping on the button in the form of a plus sign at the bottom of the screen. In the list of possible actions that appears, select "Start Recording".
- Immediately after that, the recording of the call will begin, both audio and video (if it was a video call), and your interlocutor will receive a notification. At the end of the conversation or when there is no need to record, tap on the link located to the right of the timer "Stop Recording".
- A video of your conversation will appear in the chat, where it will be stored for 30 days.


This is how easy it is to record a call in the mobile version of Skype. This is done according to the same algorithm as in the updated desktop program, endowed with similar functionality.
Conclusion
If you are using an updated version of Skype 8, then you can record a video call using the built-in tools of this program, a similar feature is also available in the mobile application for Android and iOS. But users of earlier versions of the messenger will be able to solve this problem only through specialized software from third-party developers. True, it should be noted that almost all such applications are paid, and their trial versions have significant limitations.
Almost everyone has Skype installed on their computer. A very convenient thing, thanks to which you can communicate and see each other at the same time. Video calls are made in fairly good quality, so we can perfectly see the interlocutors on the other end. Many users think about recording a conversation for later saving to their computer. Such a need arises when, for example, you receive step-by-step instructions from someone, or webinars. In general, there are different cases, but the goal is the same - record skype conversation on computer.
There are plenty of programs for recording video conversations in Skype. However, today I will show you on the example of one proven free utility " Free Video Call Recorder for Skype, how to quickly and easily record a Skype conversation. Go to http://www.dvdvideosoft.com/ru/products/dvd/Free-Video-Call-Recorder-for-Skype.htm and click Download,

When the program is loaded, open the installation file. In this window, click Next,


After the program has been installed, click Finish.

A small window of Free Video Call Recorder for Skype will open,

If desired, you can select the recording mode: record all interlocutors or record audio only. You can also specify the path of the output folder where the recorded videos of conversations will be saved,

You can also go to Options and set your preferred video and audio settings and the location of My Video,

So, we figured out the program. Now let's record our first conversation. Choose an interlocutor and call him. After the connection is established and you see each other, deploy the Free Video Call Recorder for Skype program and press the Red button. This utility will start recording your conversation.