Setting up the DataLife Engine. General DLE Settings
Based on the DLE engine (DataLife Engine). I will describe the setup in great detail, trying not to miss anything; I think that setting up dle will turn into a long series of posts. In this series of posts, we will not only look at the setup in detail, but also figure out why each setup function is needed.
For posts dedicated to setting up the DLE engine, I will use the DataLife Engine v.9.4., or rather the demo version of this engine. This is enough for me to tell you about the settings and capabilities of DataLife Engine.
The first article will be devoted to the admin section: “ General script settings". You can find this section as follows: after going to the DLE (DataLife Engine) admin panel, which is located at site.ru/admin.php, you will see quick access to the main sections of the admin panel. Today we need the item " system setup" , and in it there is a section “ general script settings". There are, of course, other ways to get to this section, but in my opinion this is the easiest way.

So let's start setting up the dle engine, the first point is title. In the title write the name of your project, for example: Everything for beginner webmasters. Your title can sound anything, by default it is on the DLE engine, the site is called DataLife Engine, if we enter any other name, it will be changed. And it will form a title dle, which will be displayed in the browser tab, as well as on the search results page. Therefore, take the title seriously. Here, I think it's clear.

Well, home page, I think it's clear. Enter your domain name, for example: site.ru and that’s it.
Encoding used, by default, is windows-1251, which means that your resource supports the Russian language. If you have a demo version of the DataLife Engine, you don’t need to change anything here. If the CMS is purchased, then the encoding can be changed, for example, to UTF-8 and then your project will become multilingual, at this stage we will not consider the encoding in detail, I think it’s understandable if we don’t change your demo, even if it’s purchased, but the domain is located in the ru zone, to be honest, I don’t see the point in changing the encoding.
Next point: Description, in which we briefly describe the content of our project, for example: Everything about creating, setting up and promoting blogs or websites, etc., but no more than 200 characters. In theory, this description should be displayed in search engines, so take this seriously, and do not forget to include in the description the keywords by which your resource will be promoted in the future. It will look something like this in a Google search:

Next, Keywords(we enter the words separated by commas), also according to these words, search engines will pay attention to your page, the keywords should correspond as closely as possible to the direction of your website or blog, first you need to make a list of keywords and check the number of requests for these words. To check the number of requests, we use this page on the Internet http://wordstat.yandex.ru. We will not consider this in more detail at this stage, since this no longer relates to this topic of the post, but to optimization in search engines. Here you see for yourself what to write in this field, the keywords will be different for each.
Short name, here I think everything is clear. This name will be displayed in the speedbar module. You can, again, repeat the name of the project. So we've sorted out the names, let's continue. The speedbar module (aka breadcrumbs) looks like this:

Correction of time zones, serves to correct the time on the site. For example, your server is configured for Moscow time, but you live in a different time zone and want the time on the site to correspond to your time zone, this can be corrected in this column. How to fix it is all clear there, we write the hours in minutes, the current server time is also written in this column, you can navigate by this time.
In the column (human-readable URL), it is advisable to select “Yes”. It is needed so that your address is visually perceived by users, which has a good effect on the usability of your resource. To make it clearer, I will give examples of news with and without CNC, news with CNC dle: http://site. ru/addnews.html, without CNC: http://site.ru/index.php?do=addnews, that is, with CNC the visual perception of the link is much better than without it.
Then select CNC type, everything is in your hands here, but I don’t recommend choosing the third type as it increases the load on your server.
Handle invalid CNC URLs: Here I advise you to put “Yes”, since this option is useful for SEO, but you can not enable this option if you want. More details about what it is needed for are written in the settings, it’s quite clear.
Then select language used, since I have a demo version, I don’t have much choice, only one language, it’s Russian, but for the ru domain zone, this will be enough.
Next, default site template — is default, but you can choose another one. A separate article will be devoted to this topic, on how to install a template on DataLife Engine (DLE). Of course, we all want some kind of special, non-standard template, looking ahead, I will say that installing a template on dle is very simple. Download the template you like from the Internet or make your own, copy the template folder to the engine directory, into the templates folder, and if your resource is on a local server, restart it. And now the template will appear in the default site template selection column.
After choosing a template, go to two settings “ Enable WYSIWYG editor...“, in both cases I recommend choosing “Yes”, so using a visual editor it is much easier to edit news (articles) and comments than using BB codes. Although, it’s your choice, experiment and opt for convenience. DLE WYSIWYG editor is a visual editor.
This is what the editing panel looks like using BB codes.
This is what the editing panel looks like using DLE WYSIWYG.
Next comes a rather useful option: “ turn off the site“, this option transfers the resource to the offline state. If you think that your project is not yet ready to be seen by users, then enable this option. If everything is ready, then turn off the option and release the project to the network. You can also use this function when updating the structure or template of your resource. I note that this option is useful if your “experimental” is on hosting, and not on a local server, like mine.
Last option ( reason for shutdown) will be useful to those who take advantage of the site shutdown. The reason for the shutdown is already written in the text field, which you can edit to suit yourself or write your own reason.
That's it. You have taken the first step towards setting up DLE (DataLife Engine). Now all that remains is to save the general dle settings and wait for the next post about setting up the DLE engine.
Note: posts about setting up DLE (DataLife Engine) will be presented in this form, for better perception of the information received, so that you don’t end up with a mess in your head. Of course, it was possible to describe the entire setup in one article, something like this: select this here, put this here, write this there. But I want you to understand what each function does. There are too many settings and features in DLE for one post. I hope for your understanding.
The following changes were prepared and implemented:


1. Added the ability to log in to the site using social networks. This support is enabled in the script settings in the control panel. And setting up social networks directly is carried out in a special new section of the control panel: “Setting up social networks”. In this section, you can configure which social networks you want to support on your website, as well as specify the necessary parameters and keys for the operation of a specific social network. This section also provides detailed help on how to create applications on social networks for authorization. In total, six social networks are currently supported: Vkontakte, Odnoklassniki, Facebook, Yandex, Mail.ru, Google. Thus, your visitors can quickly log in to your site using their login and password on social networks, without having to go through the registration procedure with entering captchas, confirming E-mail, and so on.
text, which display the text enclosed in them if support for authorization using the VKontakte social network is enabled. And also the tag (vk_url)
text, which display the text enclosed in them if support for authorization using the Odnoklassniki social network is enabled. And also the tag (odnoklassniki_url), which displays a URL link to authorization in this social network. networks.
text display the text enclosed in them if support for authorization using the social network Facebook is enabled. And also the tag (facebook_url), which displays a URL link to authorization in this social network. networks.
text, which display the text enclosed in them if support for authorization using the Google social network is enabled. And also the tag (google_url), which displays a URL link to authorization in this social network. networks.
text, which display the text enclosed in them if support for authorization using the Mail.ru social network is enabled. And also the tag (mailru_url), which displays a URL link to authorization in this social network. networks.
text, which display the text enclosed in them if support for authorization using the Yandex network is enabled. And also the tag (yandex_url), which displays a URL link to authorization on a given network.


7. For the user profile editing template (userinfo.tpl) new tag added (timezones) which displays a list of available time zones in the system, and allows him to select his own time zone for his profile on the site.
8. Added possibility for polls, added to publications, display them not only when viewing full news, but also when viewing short news. To do this, in the short news template (shortstory.tpl) you can use tag (poll). The survey itself is also designed in the poll.tpl template
9. For short news output templates (shortstory.tpl) added the ability to use banner tags added in managing advertising materials in the admin panel. Thus, you can very flexibly display banners on the pages of your site together with tags (banner_x) and independently determine after which news on the page you want to display advertising.
10. For templates for displaying short and full news (shortstory.tpl and fullstory.tpl) new tags added text, which display text in them in the form of a link to add news to bookmarks on the site, and tags are also added text, which display the text in them in the form of a link to delete news from bookmarks on the site. These tags will allow you to more flexibly customize the design of your site, for those who want to abandon the general tag (favorites), which displays only one pre-programmed picture for the given action.
11. Added new global tags for templates: text, which display the text contained in them if the site is viewed using a smartphone, as well as tags text, which display the text enclosed in them if the site is viewed by the visitor not from a smartphone. These tags are global and can be used in all template files. Thus, you can flexibly customize the display of your website content, depending on the device used by the visitor, for example, manage the display of advertising for devices and much more.
12. Added new global tags for templates: text, which display the text contained in them if the site is viewed using a tablet, as well as tags text, which display the text enclosed in them if the site is viewed by the visitor not using a tablet. These tags are global and can be used in all template files. Thus, you can flexibly customize the display of your website content, depending on the device used by the visitor, for example, manage the display of advertising for devices and much more.
13. Added new global tags for templates: text, which display the text enclosed in them if the site is viewed using a desktop browser (desktop computers, laptops), as well as tags text, which display the text enclosed in them if the site is viewed by the visitor not using a desktop browser. These tags are global and can be used in all template files. Thus, you can flexibly customize the display of your website content, depending on the device used by the visitor, for example, manage the display of advertising for devices and much more.
14. Added the ability to specify static pages template files located not only in the root folder of the template, but also files located in subfolders of the template.

16. For full-text search on the site, a logical search mode has been added, which can significantly improve site search and the relevance of the information found for the search query. This innovation allows you to show the visitor the most suitable news, comments or static pages that match his request.
17. Improved processing algorithm already existing links on the page when replacing keywords from the cross-referencing module. Now the mandatory absence of HTML tags inside links is no longer required; replacement in them will not be made regardless of this.
18. Improved algorithm for finding and replacing keywords from the cross-references module, thanks to which it was possible to significantly increase the speed of the script with a large volume of links.


21. For a template for displaying information about a registered user on a website (login.tpl) added the ability to display the values of his additional fields that he filled in during registration or in his profile settings. To display additional profile fields, exactly the same tags are used as in profile templates (userinfo.tpl) and comment templates (comments.tpl).
22. The stationary ICQ field has been removed from the user profile database. This decision was made because this messenger has lost its relevance and the use of this field is insignificant, despite the fact that it takes up space in the database. In this case, if necessary, you can create this field as an additional field for your profile and use it if necessary on the site.
23. Added indication of the page number being viewed full news, in the meta title tag, if the news was divided into several pages.
24. Added the ability to the script settings purpose of the separator symbol for the "speedbar" module (breadcrumbs). This symbol will be used when displaying the navigation of this module, separating sections of the site. Thus, you can specify any custom separator, instead of the previously always used """. 25. Added the ability to the script settings assigning a separator symbol for the list of categories assigned to the news. This symbol will be used when displaying a list of categories when displaying news on the site, separating the assigned categories. Thus, you can specify any custom separator, instead of the previously always used """.26. Added information output about third-party modules installed in the script control panel, in the left side panel for quick module navigation in the admin panel.


29. Added automatic cache reset compressed CSS and JS files when editing these files in the control panel template editor.
31. Added support for apostrophes, for additional news fields that are of the "Use values as hyperlinks" type and for which secure mode has not been enabled. Thus, you can use, for example, words such as O'Brien, d'Artagnan, etc.
32. Added automatic generation of the CNC name for a category when it is created in the admin panel, if it has not been specified by the user. In this case, when creating this name, transliteration from the specified category name is applied.
33. When adding and editing categories in the script admin panel, added control of reserved CNC link names for categories so that users do not add names that are reserved in DLE for other needs. For example, you won't be able to add a root category named "catalog" because that name is used to organize directories on the site, but you can use that name for a subcategory where that name is no longer reserved, etc.

36. The Jquery library has been updated to the latest version v1.11.1
37. TinyMCE visual editor has been updated to the latest version.
38. Updated to the latest version of HTML5 player, which fixed some playback issues.
39. Problem fixed, in which managing script settings in the admin panel did not work when using smartphones and tablets.
40. Problem fixed, in which there was an incorrect check for the completeness of the additional. fields, if before a field with the "list" type, there was a mandatory field with a different type.
41. Problem fixed, in which if the search is repeated, and the user was not on the first page of the search results, he could receive an empty page if fewer news items were found in the new results. Now a new search returns the user to the first page of search results.
42. Problem fixed, in which the “speedbar” module (breadcrumbs) displayed the user’s nested location on a static page, while in fact he was on the main page of the site if the display of a static page by default for the main page of the site was enabled in the script settings.
43. Problem fixed, in which if the user edited a news item that was awaiting moderation on the site, he could not manage the pictures uploaded to this news, and if, while editing the news, he re-uploaded the pictures, they were not assigned to this news.
44. Problem fixed associated with incorrect operation of text tags when used in a custom tag news output (custom ...)
45. Previously discovered and reported minor errors in the script have been corrected.
Information for downloading the script for clients:
Attention! Viewing this information is available only to users who have a license for the script. If you have already purchased the script, then you need to log into the site under your client account.
If you are not our client yet, then you can on our website.
You can discuss the release at
Hello friends. I spend almost all my time. Since most of my sites are built on CMS DLE, I have to work a lot with this engine. I said before that developers are not friendly with SEO, and in general we have never heard such a word, but it turned out to be even worse than it could have been. I even prepared a whole series of posts dedicated to the “sewing” of the people’s engine (see in the category).
But today I would like to talk about such an important thing as an html sitemap for DLE. No matter how much I searched on the Internet for a normal card module, I never found it. There are, of course, several solutions, but all of them do not give the desired result, and sometimes even cause harm. I had to write the module myself, or rather, entrust professionals with the implementation of my “wants”. I express my deep gratitude to Alexander Fomin for his enthusiasm and incredible speed of work.
The sitemap module for DLE, which I am about to present to you, meets all SEO requirements and is extremely easy to install.
SiteMap – HTML site map generation module for DLE
Original title: SiteMap
CMS Compatibility: DLE 8.2- 10.6
Spreading: Free, As Is, when distributing, a link to the source is required
Current version: 2.2 (from 05/08/2014)
Purpose: Display an unordered list with links to all publications, categories and static pages.
Peculiarities: Visual embed code generator. Detailed configuration of the principle of displaying all elements of the site - news, categories, static pages - the number of elements displayed, the sorting principle and sorting order, displaying elements as a link or in plain text, the ability to include/exclude specific elements.
Description and configuration of the HTML sitemap module for DLE
Friends, June 3, 2012 is a big day, a completely new sitemap version 2.0 has been released. We are raising the bar for the ease of use of our module to a new level. We (I hope you too) really liked the visual code generation system implemented in the system and we decided to implement it in the site map module. Now you don’t need to read manuals and descriptions of all functions and their meanings - just go to the admin panel, specify a few values and that’s it - the module is ready to use!

In addition to what has been said above, I would like to list a few more important features:
- the module is fully cached;
- the module uses the DLE API;
- the map does not display publications that have not passed moderation, as well as those planned for the future;
- the presence/absence of CNC, as well as the type of CNC, is taken into account;
- such a subtlety is provided - if anyone has been working with the DLE engine for a long time, they will remember that in the early versions there was no CNC at all, and then it appeared, but only of one type (the same as type 3 is now being formed). So this is also provided in this module - new publications are displayed with a url whose CNC type is selected in the admin panel, and old ones, respectively, with a CNC url of the old type.
Despite the appearance of a visual generator, I suggest you familiarize yourself with the mechanics of the module.
The module is inserted into the main.tpl template using the tag:
(include file="engine/modules/sitemap.php?param1=value1¶m2=value2")
param1= — module parameter, value1 — parameter value. Module settings follow the sign? and are separated by &.
Example of insertion (displays a site map with a list of static pages and news from categories with id=2,3,4):
(content)
(include file="engine/modules/sitemap.php?show_static=1&need_cats=2,3,4")
In order for the sitemap to be displayed on a separate page, the (include ...) tag must be enclosed in , and the (content) tag must be enclosed in . After this, the module will be available at http://site.ru/sitemap/
After any changes to parameters and their values, you must clear the cache in the admin panel.
Module parameters passed via tpl during insertion:
- need_cats — list of category IDs separated by commas for display in the map
- exc_cats — list of category ids, separated by commas, excluded from the map
- need_news — list of article ids separated by commas for display in the map
- exc_news — list of article ids, separated by commas, excluded from the map
- It makes no sense to specify these parameters at the same time
- need_static — list of static page ids separated by commas for display in the map
- exc_static — list of id static pages, separated by commas, excluded from the map
- It makes no sense to specify these parameters at the same time
- cats_as_links — show category names as links (1 or 0)
- show_static — display static pages (1 or 0) in the map
- cats_sort — sorting field for the list of categories (field from the dle_category table)
- cats_msort — sorting direction for the list of categories (ASC or DESC)
- news_sort — sorting field for the list of articles (field from the dle_post table)
- news_msort — sorting direction for the list of articles (ASC or DESC)
- static_sort — sorting field for the list of static pages (field from the dle_static table)
- static_msort — sorting direction for the list of static pages (ASC or DESC)
- There are 2 options for sorting direction:
- ASC - ascending (alphabetical)
- DESC - Descending (in reverse order)
- if the field and sort order are not specified, the specified category settings or standard DLE parameters are used
- cats_limit — maximum number of subcategories displayed
- news_limit — maximum number of articles displayed from a category
- static_limit — maximum number of static pages displayed
Please note none of the above settings are required, you don’t have to specify anything at all - just insert a tag (include file="engine/modules/sitemap.php") - then the default settings will be used.
Sitemap Appearance and Style Classes
It is optionally possible to change the appearance of the site map; to do this, open the style file (style.css) of your template and write the classes described below.
List of CSS sitemap classes:
Sitemap_categories - element
- list of categories
- list of categories
.sitemap_items - element- list of articles
- list of articles
.sitemap_static_pages - element- list of static pages
- list of static pages
Root - class for the above elements located at the root of the list
Sitemap_categories a - element with category name
.sitemap_categories span - element with category name
.sitemap_items a - element with the title of the article
.sitemap_static_pages a - element with the name of the static pageInstalling, removing and updating the sitemap module on DLE
Installing the module
- Unpack the archive with the module;
- Copy the contents of the uploads folder (except /templates/) to the server;
- Place the contents of the uploads/templates/Default/ folder in your template folder;
- Run the file http://site.ru/sitemap_installer.php and follow the instructions;
- Remove the sitemap_installer.php file from the server;
- Go to the admin panel, select the SiteMap module and generate the code;
- Open your template's main.tpl file and find:
RewriteEngine On
Add below:
$metatags =<<
Above add:
if ($do == "sitemap" ) ( $nam_e = "Sitemap" ; $metatags [ "title" ] = "Sitemap ($config["home_title"]) "; $metatags["description"] = "Sitemap ($config["description"]) "; $canonical = "" ; ) if ($do == "sitemap") ( $nam_e = "Sitemap"; $metatags["title"] = "Sitemap ($config["home_title"])"; $metatags["description"] = " Sitemap ($config["description"])"; $canonical = ""; )
- The installation process is complete - the site map is available at http://site.ru/sitemap/
Removing a module
- Upload the sitemap_uninstaller.php file to the server (to the folder where DLE is installed);
- Run the file http://site.ru/sitemap_uninstaller.php and follow the instructions;
- Remove all module files downloaded during installation;
- Undo all edits to the engine files (main.tpl and .htaccess) made during installation;
- Don't forget to delete the sitemap_uninstaller.php file.
Module update
- Download the new version of the module from the page http://site/blog/post/1974
- Unpack the archive with the module.
- Copy the contents of the upload folder (except the sitemap_installer.php file and the /templates/ folder) to your server, answering “Yes” to your FTP client's questions about replacing existing files.
Attention! To upgrade from v.1.x to v.2.x:
It is necessary to completely copy the new files from version 2.x to the server, and if the names match, confirm the replacement. After this, you need to run http://site.ru/sitemap_installer.php and follow the instructions. This completes the update.Download HTML SiteMap module for DLE
Version History (History Log)
- v.2.2 — 08.05.2014
- The module design has been completely redesigned for all versions of DLE.
- Minor bugs have been fixed and improvements made. When updating, be sure to follow the step of editing the engine.php file in the update instructions.
- v.2.1.1 - 17.04.2014
- The module code has been updated to be compatible with the new DLE settings file format version 10.2 and higher.
- v.2.1 — 08.10.2012
- Fixed a bug in the code generator.
- Typos in the admin panel have been corrected.
- v.2.0 — 03.06.2012
- Installer added.
- An admin panel has appeared with a code generator for inserting into the template.
- v.1.2 — 02.06.2012
- DLE version control has been introduced.
- The module is now compatible with the DLE 8.2-9.6 line.
- v.1.1 — 02.11.2011
- Bugs with some module functions have been fixed.
- v.1.0 — 16.03.2011
- Official release.
FAQ - answers to frequently asked questions
Q: Why do I need two sitemaps xml and html? What is their difference? Can they be used at the same time?
A: These are completely two different entities: an xml sitemap is intended only for search engines. An html sitemap is intended for users to navigate around the site. They can and should be used simultaneously.Q: Which sitemap should be added to the Yandex and Google webmaster panel?
A: Search engines need to “feed” the xml sitemap, and not the map that this module creates.Q: A link to which sitemap can be placed on the site (for example, in the footer)?
A: You only need to link to the html sitemap, i.e. the one that is created by this module and is available at http://site.ru/sitemap/Q: I got the following error, what should I do?
Fatal error: Cannot redeclare class Sitemap in /.../engine/modules/sitemap.php on line 55
A: Use the alternative installation of a sitemap through static pages - the method is described hereQ: Does this module work on DLE 10?
A: Yes, everything works fine. But if you have any difficulties, then there is another alternative option. Thanks to the user under the nickname Ryan - the method is described hereQ: I have a lot of publications on the site, and all these links are displayed on one page. This is crap, Yandex is swearing!
A: Yes, Yandex swears. To reduce the number of links on a page, use the news_limit parameter to limit the number of news items (see details in the list of parameters).Q: How many links can/should be displayed on a map page?
A: From the official response from Yandex support: the recommended number of links in an html sitemap should not exceed 3000 links.Q: What about dividing the sitemap into pages? Please do it.
A: The pagination of the site map is not implied by the database structure and module logic. Pagination is not expected to be available in the near future.So I told you everything, please download, test and write reviews. If you find any errors, write to us, we will correct everything as quickly as possible. Also, if you have any suggestions regarding functionality, improvements, write too, we’ll discuss everything and get it done!
DISCLAIMER Recently, it has been noticed that this module has been distributed on various sites dedicated to DLE, under different names, with modified code, deleted/changed copyright, etc. But, nevertheless, signs that this particular module was developed by Alexander Fomin remain. So - I do not bear any responsibility for distributions downloaded from other sites.
Best regards, Alexander Alaev
The following changes were prepared and implemented:

1. Added the ability to upload images to the server for comments published on the site. This feature is enabled and configured in the group settings. For each user group, you can allow or disable the loading of images for comments. Also, for each group, you can set various individual parameters for uploaded images, for example, the maximum number of uploaded images for comments, their sizes and weight, etc. When uploading images to comments, a simplified form for uploading comments is available to the user, and the images are uploaded according to the parameters specified in the group settings. At the same time, the user can manage his uploaded images. He can delete or replace them if he is allowed to edit his comments.
2. Added support for the InnoDB engine for the MySQL database. When installing the script, you can choose which storage type to use. You can choose to use either InnoDB or MyISAM. When choosing an engine, we recommend being guided by the following criteria. If your site is rarely updated with new content (registration of a large number of users, active addition of new comments, etc.), i.e. site "directory", it is recommended to use MyISAM type, it is faster when fetching from the database. If the site plans to actively discuss something with a large number of users, then it is recommended to use InnoDB type. For most sites, InnoDB will be the optimal choice, because... it will be more easily scalable in the future. The choice of database engine is only available if your server has a version of MySQL no lower than 5.6.4 installed. If the MySQL server version is lower, then only MyISAM is available.
3. Added the ability to create and use playlists when playing videos on the site. To do this, video files are simply listed in the video tag, separated by commas. For example:
4. Added the ability to create a description, for a video that will be visible when displayed in the player, for this purpose the following format is used in the video embed tag: , the same can be set for all files if a playlist of files is used, separated by commas. You can see an example of the display in the screenshot above.5. Added the ability to use in a tag, also links to videos on Youtube. Thus, you can organize mixed playlists that include your video and videos on the Youtube service.
6. Added the ability to create and use playlists when playing audio on the site. To do this, audio files are simply listed in the audio tag, separated by commas. For example:
7. Added the ability to create a description, for audio that will be visible when playing music in the player, for this purpose the following format is used in the audio insertion tag: . You can see an example of the display in the screenshot above.8. Added the ability for the audio player adding links to play streaming audio. Thus, you can set and display playlists for listening on your radio station website.
9. In the player settings, in the admin panel, the ability has been added choosing a theme for the player. You can choose from either a dark or light theme for the player, which makes the player display on your site more organic.
10. The procedure for inserting video and audio materials in editors has been improved. When adding videos, you can immediately create playlists, and you can also immediately set in the input window not only a link to the video and audio, but also links to posters for them, and a description for video and audio files.
11. A new WYSIWYG editor has been added to DataLife Engine. The name of the new editor is FroalaEditor. This editor has an easy and intuitive interface (in our opinion, the best interface) for creating and editing content, the HTML code it generates is one of the cleanest and has practically nothing superfluous, is relatively lightweight and has fast rendering of the editor on the page.


12. Added a new type for additional publication fields:"Downloadable image gallery." When you create this field type, you can set parameters for the images to be uploaded, as well as the maximum number of images that can be uploaded for a given gallery. When adding a publication in the admin panel or on the website, the image can be downloaded in one click. When this field is displayed on the website, the images will be grouped into a gallery of pictures, which can also be flipped through each other when viewing, if small copies have been created for the pictures.
13. For additional fields of type"Downloaded image" and "Downloaded file", added an automatic ban on re-downloading images and files until the previous downloaded image or file is deleted. This reduces the likelihood of unused files and images being attached to the news.
14. For additional fields of the “Uploaded image” type new tags added: And , which output only the URL for the thumbnail of the uploaded image and the URL for the full image respectively, where "X" is the name of the additional field. These tags will be useful for webmasters who want to personalize uploaded publications on the site, for example, together with other additional fields.
15. For additional fields of the “Yes or No radio button” type, added the ability to set the default state to “Enabled” or “Disabled”, which will be used when adding a new publication.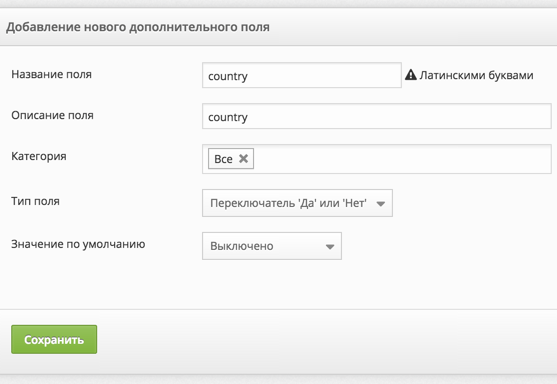
16. Added the ability to view documents online, uploaded to the site via the DataLife Engine script. To do this, the following tags were added to the output template for downloaded files (attachment.tpl): (online-view-link) which displays a URL link to view the document online in a browser, as well as tags text, which display the text enclosed in them if the loaded document has a format supported for viewing. The following document types are supported for online viewing: Adobe PDF, Microsoft Word, Microsoft Excel. Documents are viewed directly in the visitor's browser using the Google Docs Viewer service, so visitors do not need to have Microsoft or Adobe programs installed.
17. Due to the fact that the developers of the WYSIWYG editor LiveEditor decided to stop any work on this editor, and it had not received any updates for several years, it was decided to remove this editor from the DataLife Engine. Sites that previously used this editor will automatically switch to using the FroalaEditor.
18. Added the ability to set image descriptions (alt attribute) when bulk inserting images into news. To do this, you need to select the desired images, and by clicking on any of them, set a description. Then click on the “Insert selected” button. The specified description will also be added to all images when inserted.
19. Added automatic reset of Zend OPCache cache when changing site settings. Thus, if this caching is enabled in the server settings, you do not need to reset the cache yourself or wait for the changes to take effect.
20. When viewing the list of categories in the admin panel, in the category editing section, the type of display of the list of categories has been changed. Now all subcategories are shown collapsed, and can be opened directly if necessary for a specific parent category. Buttons have also been added, thanks to which you can quickly expand or collapse all categories in the list in one click. Adding a new category is done in a pop-up window. This simplifies working with a large number of categories and subcategories in the admin panel.
21. Added the ability to unsubscribe all users, subscribed to comments, for each news separately. If the news has subscribed users, then when editing this news in the control panel, in the “Advanced” tab, you can see the number of subscribers and unsubscribe them from comments on this particular publication. This innovation will be useful, for example, if the news is closed from further commenting.
22. Added the ability to subscribe to comments to the news, when publishing a comment, even when the comment is sent for moderation.
23. In the user profile on the site, the opportunity has been added unsubscribe from subscribed comments on publications, indicating the number of publications to which the user has subscribed. To do this in the template userinfo.tpl (unsubscribe), which displays a checkbox for unsubscribing from comments, and the number of subscribed publications.
24. In the user profile on the site, the ability to automatically subscribe to receive notifications of new comments added to news stories authored by him. Thus, the user does not need to subscribe separately to each of his news; just uncheck the corresponding checkbox in his profile settings. To display a checkbox in the template userinfo.tpl added use of new tag (news-subscribe).
25. In the user profile on the site, the ability to automatically subscribe to receive notifications of new comments that are replies to his own comments. To do this, just uncheck the corresponding checkbox in your profile settings. To display a checkbox in the template userinfo.tpl added use of new tag (comments-reply-subscribe).
26. Added support for the PHP Memcached extension. The DLE script automatically determines which PHP extension is installed, Memcache or Memcached on the server, and depending on this, uses one or another PHP extension if Memcache caching is enabled in the script settings. Thus, there is no longer any need to install the PHP Memcache extension on the server.
27. In the admin panel, in the publication editing section, The ability to add categories to publications has been added to the list of mass actions on publications. Unlike the existing “Change categories” item, the “Add category” item allows you to massively assign new selected categories to publications, without changing old, previously added categories.
28. Added the ability for the Text template tag indicate the news range using the dash symbol. For example, you can specify Text Text. This makes it easier to create the design you need, and there is no need to enter all the required publication IDs separated by commas.
29. Added the ability for the Text template tag specify the range of pages you want using the dash symbol. For example, you can specify Text. Similarly, the range can be set for the opposite tag Text. This makes it easier to create the design you need, and there is no need to write down all the page numbers you need, separated by commas.
30. Added the ability to unsubscribe site users from mailing lists, which are sent from the “Message sending” section of the admin panel. To do this, when sending letters, you can set either in the template or directly in the text of the message a tag (%unsubscribe%), which displays in the sent letter the URL for unsubscribing from receiving the newsletter for the user. When you click on this link, the user profile status is set to “Do not receive emails from the site.” At the same time, the user simply needs to follow the link; he does not need to log in or perform any other actions on the site. Thus, he can easily unsubscribe from letters from the site if he has long lost interest in the site. Despite the fact that sending letters allows you to still send a message to the user, even if he has expressed a desire not to receive letters. We strongly recommend that webmasters, in order to avoid the server getting caught in spam filters, always take into account the status that the user has set in their profile when sending messages.
31. Added automatic adding for all external links, which are published in news and comments, attribute rel, containing the parameters "external noopener noreferrer". This attribute allows you to reduce the likelihood of a possible attack on the site using social engineering mechanisms.
32. In the script settings, the ability to specify the number of days has been added during which to cache the full news after its publication. Creating and updating a cache is also a resource-intensive operation. Over time, the publication also loses its popularity, and if it is not often read, then creating and monitoring a cache constantly is impractical for it. If little news is published on your site, then you can increase the number of days during which to cache; if there is a lot, then reduce it. In any case, we do not recommend setting the cache time to less than 30 days. Use a small number of days only if there are problems with free space on the server’s hard drive, or if you publish a very large number of news per month. But for those who have little news on their site, we recommend increasing this value.
33. In the admin panel, in the user editing section, the ability has been added quickly transfer all publications from one user to another. To do this, you need to click on the number of user publications, select the transfer of publications to another user, and indicate the user login to which you want to transfer the publications. This innovation will be useful if, before deleting a user from the database, you need to transfer all of his publications to another user.
34. In the admin panel, in the user editing section, the ability has been added quick recalculation of the number of publications a user has. To do this, click on the number of user publications and select recalculation of publications in the menu. This option will be useful if mass manipulations of publications were made, or additions to the database without a script.
35. In the admin panel, in the user editing section, the ability has been added quickly recalculate the number of user comments. To do this, click on the number of user comments and select recalculation of comments in the menu. This option will be useful if mass manipulations with comments were made, or additions to the database bypassing the script.
36. Improved performance of news output when using sorting by rating and views. The performance of displaying comments that use sorting by rating has also been improved.
37. Improved system for recording the number of user comments in his profile statistics. When news is mass-deleted, user comments are also automatically recalculated. This eliminates the need for periodic recalculation of statistics.
38. The display of the DataLife Engine admin panel has been optimized on mobile devices in portrait orientation. Thus, the control panel has become more convenient when used on smartphones.
39. The Jquery library has been updated to the 2.xx line
40. TinyMCE editor has been updated to the latest version.
41. Fixed an issue where it was impossible to use the point in extra. fields that have a cross-reference type.
42. Fixed an issue where Invalid layout of HTML comments was generated when using tree comments.
43. Fixed an issue where for the tag (category-url), the URL to the category was displayed using CNC, regardless of the CNC settings in the script admin panel.
44. Fixed an issue where there was a duplication of indexes of additional fields, which had a cross-reference option, if the news was published in several categories.
45. Fixed an issue where The text and text tags for the main page did not work correctly if the script settings enabled showing a static page on the main page as the main one.
46. Fixed an issue where if in the publication editing section the news was cleared of comments, it always returned to the first page of the news editing section, regardless of the search filters set and the display of publications for editing.
47. Fixed an issue where It was impossible to enter the correct answer to the Question-Answer system if the user replies to a comment rather than adding a new one.
48. Previously discovered and reported minor errors in the script have been corrected.
Information for downloading the script for clients:
Attention! Viewing this information is available only to users who have a license for the script. If you have already purchased the script, then you need to log into the site under your client account.
If you are not our client yet, then you can on our website.
You can discuss the release at
You can read about all the new features of DLE 12.1 in this article.
DataLife Engine v.12.1 Press Release will tell you about the addition to the advertising module, now the module supports the category function, in this version you can keep track of the number of views of advertising materials and other additions related to advertising management.
It is good that using canonical links is added in the code for all pages of the site, including navigation through sections, viewing the full news, etc. This is a trick to improve SEO optimization of projects, it will eliminate duplicate pages if incorrect links to your site are published somewhere on the Internet, or if for some reason it is necessary to disable control of incorrect CNCs.
For security purposes, a function has been added to automatically protect the site from flooding code or inserting frames on third-party sites. When you enable this setting, display of your resource will be automatically blocked if it is embedded in an iframe on someone else's site. This way you can protect your website from attacks such as clickjacking.
Another interesting feature for SEO website optimization is the expanded capabilities of the “Metatags” module; now you can set not only meta tags for pages, but also any separate title for the page and page description, which you can later display anywhere in your template.
(Recommended)
Hosting with free SSL certificate for the site, modern equipment on SSD - one of the leaders in quality and low price. In this article we read.For example about free hosting no ads and conditions running DataLife Engine 12-9.x or any other CMS - this service will help you understand within a month whether hosting is suitable for you or not.
We offer download DLE different versions on http://www.site in the section for everyone without registering (licensed versions UTF 8 and Win 1251).
The main stage of development of version 12.1 has been completed, the release is in testing and pre-release preparation, but in the meantime we invite you to familiarize yourself with the information about what awaits you with the release of the new version.
The following changes were prepared and implemented:
1. Added support for categories in the advertising management module. You can create categories in this module and place your advertising materials in these categories. Headings are displayed at the very top, in front of the list of added advertising materials, in the form of folders. Within the categories themselves, you can also create additional subcategories in an unlimited number. Thus, if you have a large number of advertising materials, you can place them for ease of navigation through them in various sections and subsections.

2. Added the ability to count the number of views for advertising materials, added to the script control panel. Views are recorded only for real users who accessed the site using a browser. Bots crawling the site are not counted. View counting is enabled directly for each banner, so you can count views only for the advertising materials you need. You also have the opportunity to specify whether you want to count all banner views, or only count views from unique users.

3. For advertising materials in the admin panel, the ability to limit banner display has been added based on the number of views it has, and you can disable the banner when it reaches a specified maximum number of views.4. Added the ability to count the number of clicks for advertising materials added to the script control panel. DataLife Engine automatically intercepts HTML tags published using the tags and automatically records clicks on them. These links do not require any special design; they can lead to any addresses you need. You also have the option to specify whether you want to count all clicks on a link, or only count clicks from unique users.
5. For advertising materials, the admin panel has added the ability to limit banner display based on the number of clicks on your banner, and you can disable banner display when the specified maximum number of clicks on it is reached.

7. Added use of canonical links, in the page code, for all pages of the site including navigation through sections, viewing the full news, etc. This feature allows you to increase SEO optimization of sites, and also allows you to avoid duplicate pages if incorrect links to your site are published somewhere on the Internet, or if for some reason it is necessary to disable control of incorrect CNCs.

8. In the category settings in the control panel, added the ability to set by default for a category whether it is allowed to publish news from this category on the main page of the site. These settings are in effect at the time of adding or editing a publication, and if publication on the main page is prohibited for a category, then the corresponding option is removed at the time of adding or editing a publication.
9. In the category settings in the control panel, added the ability to set by default for a category whether comments are allowed for posts from this category. These settings are in effect at the time of adding or editing a publication, and if comments are disabled for a category, then the corresponding option is removed at the time of adding or editing a publication.
10. In the category settings in the control panel, added the ability to set by default for a category whether ratings are allowed for publications from this category. These settings are in effect at the time of adding or editing a publication, and if the use of ratings is disabled for a category, then the corresponding option is removed at the time of adding or editing a publication.

11. In the script settings in the control panel, in the security settings section, the ability to enable automatic site protection from embedding into frames on third-party sites has been added. When you enable this setting, your site will be automatically blocked if it is embedded in an iframe on someone else's site. This way you can protect your website from attacks such as clickjacking.

12. The capabilities of the "Metatags" module have been expanded, This module has been renamed to "Titles, Descriptions, Meta Tags". Now in this module you can set not only meta tags for pages, but also a separate title for the page and a description of the page, which you can later display anywhere in your template. For this purpose, new global tags for templates have been added: (page-title) - displays the title you specify for the page, (page-description) - displays the description you specify for the page. It is also possible to use BB and HTML tags in the page description. Thus, using this module, you can, for example, create and display titles and descriptions for the tag cloud for each tag personally, etc.
13. Added new global template text tags, which display the text enclosed in them if a title for the page being viewed was specified in the “Titles, Descriptions, Meta Tags” module. And also added opposite text tags that display the text enclosed in them if the title for the page being viewed has not been set. Similar tags were also added for the description: text , which display the text enclosed in them if a description for the page being viewed was specified in the "Titles, Descriptions, Meta Tags" module, text , which display the text enclosed in them if there was no description for the page being viewed given.
14. Support for new text tags has been added for the category menu template (categorymenu.tpl), which display the text enclosed in them if the category or news being viewed on the site does not belong to the category from the menu. This tag can only be used inside tags and is used, for example, to display some information (for example links) only for inactive categories from the menu.
15. Expanded capabilities for displaying publications based on the values of additional fields in publications. When accessing the address http://yoursite/xfsearch/field name/field value/, publications will be displayed, as before, containing the specified value in this particular field, if the “use as cross-references” option is set for the field. When you access http://yoursite/xfsearch/field value/, publications containing this value for all additional fields will be displayed. When you access http://yoursite/xfsearch/field name/, all publications in which this specified field is filled in will be displayed.

16. The ability to assign a separate page named 404.html at the root of your site to display pages for which there is no content has been added to the script settings. If you enable this setting, instead of the standard system message “Unfortunately, this page is not available for you, its address may have changed or it has been deleted.”, you can display a separate, specially prepared page with a completely separate design. This innovation will be useful for webmasters who want to create a separate design for the 404 pages of their website.

17. The ability to assign an HTTP header has been added to the script settings, from where it is necessary to obtain user IP addresses. This innovation will be useful for sites that use various external proxy servers and do not have the ability to correctly reconfigure the server for them in order to obtain the correct real IP addresses of visitors. For example, when using the cloudflare service and others to protect against DDOS attacks and using a regular hosting plan without access to server settings. Now you can, in the script settings in the admin panel, tell the script where to get the IP address of site visitors from.

18. When deleting a category in the script control panel, the ability to choose what to do with publications that are in this category has been added. You can: “Remove this category from publications”, “Replace the category with another or other categories”, and also “Delete all publications in this category”. Moreover, if a category is deleted or replaced from a publication, only the category being deleted will be removed or replaced. For example, your publication is in the categories “In the world”, “News”, “Popular”, and you, for example, delete the category “In the world”, then for publications located in this category only the category “In the world” will be deleted or replaced, all other categories in the list of these publications will remain in place.

19. A new type of additional field has been added for publications: "Pure HTML and JS." When using this field, DataLife Engine will not interfere with the text written in it and will not filter the HTML code of this text, and also allows pure javascript code to be written in it. This field will be useful when you need to insert some code into the news that does not require a security check, for example, your own player, etc. Attention, given that the script will not filter the text from this field, when creating it, be sure to set restrictions on which groups are allowed to use it. Do not allow its use by ordinary users whom you do not trust, otherwise it may pose a security risk to your site.

20. For additional publication fields, which have the "Use as cross-references" option, the ability to specify a separator for link data has been added. You can specify either individual characters or HTML code as a delimiter. Previously, a comma was used as a list separator; now you can set your own personal separator for each field, which allows you to create a unique output design for each field in the template.
21. Added support for Yandex Turbo technology for regular RSS channels, without using the inclusion in the settings of the RSS stream type as "Yandex news", for this, support has been added for displaying the full news tag (full-story) for any type of RSS stream. The standard template /templates/rss.xml has also been updated, which demonstrates what a template with full Yandex Turbo support should look like. Similarly, the ability to customize an RSS template for Yandex Zen technology is fully supported.

22. Added the ability to reply to comments when viewing all the latest comments on the site, if support for tree comments is enabled in the script settings. Thus, you can, for example, quickly respond to comments received on the site without going into each news item, due to the fact that some heavy scripts have been transferred to delayed loading and independent of page rendering. These scripts are loaded into the browser in parallel with page rendering and are launched only after the page is completed in the browser. Which visually ensures faster page display.24. Added an option for users who are not registered on the site, send complaints to the site administration about news and comments, just as such an opportunity existed previously only for registered users.
25. Added the use of schema org micro markup to display ratings with the "Evaluation" type. The use of this micro-markup allows for full news, when displayed in search results on Google, to also display the rating of the publication.
26. Added automatic detection of the orientation of photos when uploading them to the server, based on meta-information contained in graphic files. If the original photo was upside down, then when it is uploaded to the server, the script will also automatically rotate it to the desired position. This eliminates the need to additionally edit pictures on a computer if the camera was rotated when taking photographs.
27. Added the ability to automatically notify the site administration about the arrival of new news from users, which is under moderation (if this is enabled in the script settings), if the news was added from the script control panel. Previously, a notification was sent only if a post was added directly from the site.28. If the user edits a publication in the control panel, which was previously published on the site, but according to the settings of his group, he is prohibited from publishing without moderation, or is not allowed to publish in all categories, then the site administration will also be sent a corresponding e-mail notification that this news is awaiting moderation.
29. Changes have been made to the operation of the Breadcrumbs module on the site. If you are viewing news from a certain category, then for the category in which the user is directly located, this category will be displayed in the form of plain text and not a link. Only categories higher in the hierarchy will be displayed as a link, or a link to this category will appear if, for example, the user has gone further in navigating pages in this category. Thus, this innovation allows you to avoid cyclic links of pages to themselves.

30. For the "Cross-references" module in the control panel, added two new replacement areas for links. You can optionally specify a replacement only in static pages, and you can also select a replacement in static pages, news and comments.

31. For the "Search and Replace" module in the control panel, the ability to mass replace text in surveys for publications and in voting on the site has been added.

32. Added the ability to delete all publications, awaiting moderation from a specific user. To do this, in the user management section, click on the number of his publications and select the appropriate menu item.33. Added the ability to delete all comments, awaiting moderation from a specific user. To do this, in the user management section, click on the number of his comments and select the appropriate menu item.

34. Formatted output of the number of different counters (views, publications, comments) has been added to the script's admin panel. The output of these counters is carried out in formatted form, separated by a space of hundreds, thousands, millions, etc. Which gives a more visual representation and perception of these numbers.35. For templates for displaying comments and adding comments (addcomments.tpl and comments.tpl), support has been added for new tags text - displays text in the tag if the news belongs to the specified categories, as well as tags: text - displays text in the tag if the news does not belong the specified categories. Thus, you can set different formats for displaying comments and adding comments for publications from different categories.
36. Added support for word declinations for the tag displaying the number of votes, which were exposed for rating publications. For example, you can use (vote-num) review||a|s. Previously, this was not available for this tag, because... it contains HTML code, not just a number.
37. If the script settings enable the use of the site only via the HTTPS protocol, then cookies by the browser will also be sent to the server only via the HTTPS protocol and will be automatically blocked if the regular HTTP protocol is used.
38. Added control of incorrect CNC for static pages, the publication text of which is divided into several pages. If an incorrect page number is specified, an automatic 301 redirect will be made to the starting address of this page.
39. For RSS import of publications, support has been added for importing pictures from the enclosure tag containing the image for the publication. If the short description in the RSS stream is just text, and the picture is given in it as a separate tag, then when importing the short news, the picture for this publication will also be added to the very beginning.
40. Added support for redirects to receive full news when using RSS import of publications. If the link from the RSS feed is a redirect for further transition to the full text of the news on the source site, then DataLife Engine will automatically follow this redirect and take content from the final source. Thus, receiving complete news will be of higher quality than before.
41. Changes have been made to the operation of tags and. If the use and addition of comments is prohibited for a particular publication, then these tags will also hide the content in them.
42. If comments are allowed for publication, but at the same time, according to other settings, the user or group of users was prohibited from publishing comments, then a message about this will not be displayed at the end of all comments, but in the place where in your template you define the display of the form for adding a comment with the tag (addcomments), thereby you can determine the location of this message on your site.
43. For authorization using the Odnoklassniki social network, the ability to automatically receive the user’s E-mail has been added, provided that the application itself has received the appropriate rights from Odnoklassniki. Attention, by default Odnoklassniki does not provide rights to receive E-mail, and to obtain appropriate access you must additionally contact social media. network to allow receiving e-mail. If permission is received, DLE will also automatically import the e-mail address.
44. Improved system for calculating image proportions when creating small copies. This creates a more correct and high-quality reduced copy.
45. Improved search system for publications when enabled in the script settings, a simple search type. The new algorithm allows you to more accurately and correctly find publications.
46. Improved system for controlling the appearance of duplicate pages, when viewing all the latest comments on the site.
47. Optimized processing of additional publication fields when displaying short publications, as well as during the operation of the module for displaying popular publications.
48. Visual editors TinyMCE and Froala have been updated to the latest versions. A number of identified errors in these editors have been corrected.
49. Added support for inserting hidden text tags for the TinyMCE editor, using the corresponding button in the editor.
50. When using the Floara editor for comments, added the ability to quickly download and insert images into comments. You can either click on the insert picture icon and select a file to upload, or simply drag the picture file from your computer into the editor field with the mouse, after which the picture will automatically be loaded and inserted at the cursor position in the editor.
51. Small changes have been made to the layout of the script control panel, aimed at eliminating some layout errors and improving interaction with the control panel.
52. The library for sending mail from the site has been updated to the latest versions, as well as a mobile device detection library.
53. Fixed an issue where the and tags were not processed in the post preview.
54. Fixed an issue where meta tags for social media were generated incorrectly. video and audio networks, if the video was published in additional. fields and consisted of playlists and descriptions of video and audio files.
55. Fixed a problem where, under certain situations and server settings, previewing publications might not work when adding publications from the site.
56. Fixed an issue where dynamic loading of comments did not work, if this is enabled in the script settings, and the tag (jsfiles) is placed at the very bottom of the site.
57. Fixed an issue where displaying the latest comments did not work, in case viewing of certain categories was prohibited for a certain group.
58. Previously discovered and reported minor errors in the script have been corrected.
.sitemap_static_pages li - element - list of static pages
.sitemap_items li - element - list of articles
.sitemap_categories li - element


