Why don't I receive emails? Letters do not arrive at Yandex mail - what to do? Message "550 message sending for this account is disabled"
The letter may not reach the addressee by various reasons. The first is the incorrect spelling of the recipient's address. In case of incorrect spelling of the index, a letter to best case scenario wandered from one post office to another, and did not always reach the addressee, or was simply returned to the sender. If there was no index at all, then the postal workers either added it themselves, or the letter could be sent further with only the address. But now modern electronic sorting technology simply will not let through letters with an incorrectly written index or without it, and the correspondence will be sent back to the sender.
In the case of an incorrect spelling of the address, everything is clear - the address was not indicated, the letter did not arrive. Moreover, this will happen even if you forgot to indicate only the apartment number. The postman will not search the entire house for Vasya Ivanov, who lives in one of a couple of hundred apartments! In this case, the letter will be returned to you. . Write the address in detail, legibly and correctly. First write the street, apartment house number, below - the city, below - the region, region or republic. And if in regular letters they don’t pay too much attention to the incorrect order of lines, then they simply won’t let you send a registered letter with an incorrectly filled in address.
Postmen are also living people and sometimes they make mistakes, for example they can confuse the house 22/12 with the house 12/22. Or address 15-25, which usually means house 15, apartment 25, is regarded as 15/25, and the letter addressed to you will end up in another house, and there is no guarantee that the people who received it will bring the letter to you.
After all, our mailboxes aren't perfect either. It's good if you have your own home. But residents of high-rise buildings are often faced with broken, old boxes that anyone can climb into. There is a way out - create a PO Box in post office, or ask friends to send registered letter instead of the usual one. It will not reach your mailbox, you will receive it in person at the post office.
But with registered letters, not everything is so smooth. A notice is brought to the addressee, but not given personally, but thrown into mailbox, therefore it may get lost. And if you do not pick up your registered letter within a month, it will be returned due to the expiration of the storage period.
If a letter is delayed, you can control its delivery using the official website of Russian Post www.russianpost.ru. Refer to the sections: “Tracking postal items", "quality control and search for postal items."
Many job seekers often forget to pay due attention to the proper writing of a letter to the employer. This is a common mistake when searching for a job. The employer pays attention primarily to the content of the letter itself, and not to the resume attached to it. If the letter fails to attract his attention, then it may not come to the point of viewing the resume.
Instructions
If there is no information about the employer (name, position), you should call and check with the company. If for some reason this was not possible, then you can use the following addresses, for example: “Dear employer.”
It is advisable to try to endure uniform style letters and resumes. If possible, the scale and font should also match. You are trying to convey to the employer that you are the person who deserves this position. The letter, in turn, testifies to you, so it’s worth paying special attention to all the little things.
Don't overuse "I". This can lead to monotony and discourage further reading. Combinations such as “I am capable, I did, I can” should be replaced. better: “I have the ability”, etc. This will make the text more rich.
The letter should duplicate your resume and describe the most significant skills and abilities. Don't lose sight of your personal
From time to time (but on an ongoing basis) I get asked questions related to receiving e-mail letters, or rather non-receipt. People write that they stopped receiving letters (usually from a certain address), although they were sure that these letters should have reached them.
One example is my letters. It happens that my subscribers received one or two letters, and then there was silence, although they did not unsubscribe from the mailing list.
IN this lesson I will tell you about the main reason why letters do not reach the addressee, and I will show how you can solve this problem in just a couple of minutes.
First of all, let's talk about why emails aren't being delivered. So…
Each of us has a certain one, and therefore uses some kind of email service - for example, Mail.ru, Gmail, etc. (usually the name of the service is indicated in the address after the @ icon). And every self-respecting email service tries with all its might to fight spam, i.e. by using special programs(spam filters) tries to block junk mail(usually advertising).
Spam filters are different (soft and hard, smart and not so smart), and therefore sometimes they make mistakes and can classify a “normal” letter as spam. For this reason, such a letter can, for example, be moved to separate folder, marked as SPAM or even deleted.
Meanwhile, an unsuspecting novice user looks for letters among incoming correspondence (usually the “Inbox” folder) and naturally does not find the expected letters there.
What to do in such a situation?
It's very simple!
First of all, go to your mailbox (mail service) and check all the folders that we have, and pay special attention to the folder Spam, which is among other folders in almost every email service (in the photo this is the Gmail service):

There is a high probability that the expected letters are located in this folder (unless, of course, they have already been deleted). Let's go to this folder and check.
If our letter is here, then you just need to select (1) the desired letter (or several letters) and then click the button Not spam (2):

Perhaps in the email service you use, it will look different, but the actions will be approximately the same and the meaning will not change - a letter from a folder Spam will be moved to the folder Inbox.
In addition, if a training spam filter is installed in the mail service (in lately there are more and more of them), then he will remember your choice and next time the letter from this sender will not be placed in spam. Although it is possible that the spam filter will need to be trained several times in this way.
Often such simple actions it's enough to important mail did not go to spam, but sometimes this does not help, and useful emails continue to be sent to spam.
In this case, you need to act even more decisively and simply create your own filters for incoming mail. In other words, you have to give postal service specific instructions regarding specific letters.
I will show how this can be done using the settings in Gmail service(mail from Google) and in the service from Yandex. I think that these two examples will be enough to understand the principle of operation, so if you use another service, you can certainly do the same at your place.
Let's start with Gmail.
We go to the mail and on the right top corner We are looking for the gear icon, which is responsible for the settings. Click it and select the item in the menu that appears Settings:


After that, create the desired filter.
If we want all mail to pass through normally from a certain address, then we just need to specify required address in the field From ( those. indicate “From” the letters should come).

In the next window, we need to indicate what exactly needs to be done with letters coming from the previously specified address. As you can see, there are several options here and among them is the one we need - Never send to spam:

Check the box and click Create filter, after which we see that the filter has been created and its description is present in the list of created filters:

If necessary, we can create other filters in the same way by clicking the link Create a new filter.
As you can see, nothing complicated! Filters are created in much the same way in other services.
Let's look at an example with Yandex mail.
The beginning is the same! We look for an entrance to the service settings using the menu item of the same name (also in the upper right corner):


In this section, you can configure the service so that incoming letters are sorted into required folders, forwarded to another address or simply deleted. In addition, here you can set up an autoresponder or manually create a black and white list.
All mail from blacklisted addresses will not be sent to our mailbox, and mail from whitelisted addresses will not be placed in SPAM.
This is exactly what we need! Specify the desired address in the section Whitelist and press the button Add:

After this we see that new address appeared in the white list.
If any of the addresses in the list need to be deleted, then simply put a tick next to this address and press the button Remove from list:

That's it for spam filters!
I hope you understood everything by this issue, and now you can configure your postal address so that all important emails reach you. Well, if you wish, then using settings and creating filters you can also sort incoming mail, filter out obvious advertising, etc.
In addition, I would like to draw your attention to such a seemingly banal thing as overflowing mailbox. This is also one of the reasons why you may not receive the letter you need!
Check your mailbox - maybe the letters simply no longer fit in it, and if this is the case, then simply delete all old and unnecessary messages.
Probably everyone has ever encountered problems when working with Mail.ru mail. One of the most common mistakes is the inability to receive a letter. There may be several reasons for this error and, most often, the users themselves, through their actions, led to its occurrence. Let's look at what could go wrong and how to fix it.
Reasons why you cannot receive emails on email, maybe several. If any error occurs on the Mail.ru website, you will receive a message. If there is no message, then the problem is on your side.
Situation 1: You received a notification, but there is no message
You may have a filter configured that automatically moves all messages that match its settings to "Spam" or deletes them and moves them to "Basket". Check these folders, and if the letters are really there, check the filtering settings.

If the letters are not in the above folders, then perhaps you have selected other sorting options and the mail is sorted not by date from new to old, but by some other criteria. Set default sorting.

Otherwise, if the problem persists, we recommend contacting technical support.
Situation 2: When opening a letter, it automatically redirects to the authorization page
If with similar problem If you encountered it for the first time, then simply clear the cache in your browser settings. Otherwise, go to settings email box to section "Password and Security" and uncheck the box “Session from only one IP address”.

Situation 3: The sender received a message about the impossibility of sending the letter
Ask your friend to email you something and notify you if he receives an error message. Depending on what he sees, there are several ways to solve the problem.

Message "550 message sending for this account is disabled"
This error can be corrected simply by changing the password for the mailbox that sent the message.
The error is related to "Mailbox Full" or "User quota exceeded"
This error appears if the recipient's email address is full. Clear your mailbox and try sending the message again.
The message text contains "User not found" or "No such user"
If you see this message, this means that the specified recipient address is not registered in the Mail.ru database. Check that your login is entered correctly.
Error "Access to this account is disabled"
This notice indicates that account With specified address deleted or temporarily blocked. Check again that all entered data is correct.
If you didn’t find your problem here, you can find a more detailed list on the Mail.ru help site
Thus, we have looked at the main reasons why you may not receive messages by mail.ru. We hope we were able to help you. And if you have problems and you can’t cope with them, write in the comments and we will definitely answer.
Sometimes light shines through the gray everyday life of a system administrator when it is possible to solve a non-standard user problem. One day, a user complained that his corporate mailbox seemed to be frozen and did not want to receive letters at all. To find the cause of the failure, it was decided to send an email to the user short message. As a result, the server responded with an interesting message.
If you look at the picture, you can clearly see the message quota exceeded, which means nothing more than the volume of mail has been exceeded, that is, no more letters can be crammed into it because the quota has been exceeded.
The solution to the problem is quite obvious. You need to somehow clean up your cluttered mail, and set up a rule in the settings that allows you to delete unnecessary letters in automatic mode to always have free space for new letters. This can only be done manually via the web interface mail client. IN in this case system administrator I used the address mail.cbx.ru. After clicking on the link, a form opens that must be filled out with the login and password of the email where the quota was exceeded.

Then, going to the user's mail program on his computer, you need to configure the storage of letters. In our case we're talking about about the program – Windows Mail included in the package Windows programs Live. We are interested in the “Advanced” tab, where you need to find the “Delivery” section. There is an option that means that copies of letters remain stored on the server if it is checked. You just have to take it off green tick, how we will immediately oblige the mail to delete all copies, leaving more space for new mail user.
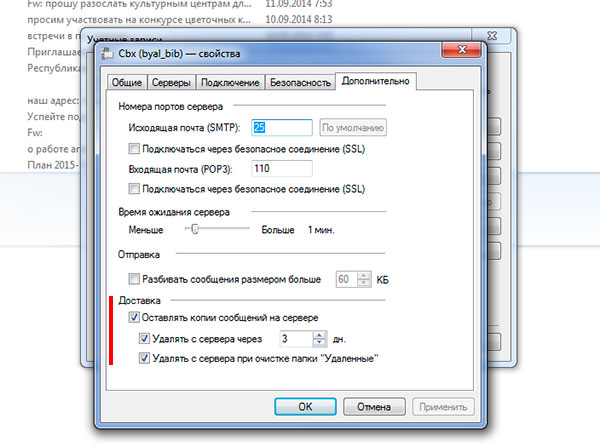
However, a different situation arises when one box is used for different computers, for example, at home and in the office. Then you should set a different order: leave new correspondence on the server on a certain amount days, but how alternative option, provide for deletion only after moving letters to the trash. The second option allows you to remove unnecessary emails from the server immediately when emptying your trash through the interface mail program Windows.

One of the common email problems is the inability to receive emails. This can happen due to many reasons. This mainly happens due to incorrect user actions.
And if you don’t know why emails aren’t coming to Mail.ru, then you’ve come to the right place. Here we will look at the main reasons for this and help solve them.
So why don't we see new letters?
1. Technical work
The most common problem is technical work on mail.ru servers. Usually developers report them. In this case, you just need to wait for the service to resume.
2. Running out of free space
The second most common reason is, insufficient quantity memory for storing letters.
Although during registration you most likely saw that an “unlimited” mailbox is provided. Actually this is not true. To verify this, follow the link https://e.mail.ru/settings/mailboxsize.

You will see the total amount of memory and how much has been used. As you can see, 10GB is provided free space. Accordingly, as soon as it is full, you will stop receiving letters.
To continue working, you just need to delete old letters. Don't forget that they all go into the basket first. To free up memory, you need to clear it too. To do this, on the left side, next to the words “Trash” there is a button “Empty”. Click on it. 
Attention! All messages from the trash can are deleted without the possibility of recovery.
3. Emails end up in spam
If the senders tell you that everything was sent successfully. But you still don’t see the letters. They most likely end up in Spam. To verify this, click on the appropriate section. 
The solution to this problem is to set up a special filter that will add trusted addresses to the Inbox folder.
To create it, go to “Mail Settings”. Click on the name of your Mail.ru mailbox and see the corresponding menu item 
In the window that opens, select “Filtering Rules” 
Next, click “Add filter” 

1. Add a trusted address that will go to the “Inbox” folder
2. If you need to add several addresses, then click “Add condition”
3. Select the folder into which letters from the selected addresses will go.
4. Click save.
Everything is ready.
4. The authorization page appears when opening emails.
To solve this problem, go to the “Passwords and Security” section, also by clicking on the name of your mailbox. 
In the next window, uncheck the box next to “Session from only one IP address.” Most likely you will have it installed. 
This function allows you to prevent access to your mail from other computers. But this is convenient when your provider uses static IP addresses and you work from only one PC. In other cases, we do not recommend enabling this service.
These methods will help restore the functionality of your mail. Now you know what to do if you don’t receive emails at Mail.ru.


