How to register a flash drive in the BIOS. Booting from a flash drive in the BIOS on the motherboard from msi
Hi all! Yesterday I got my hands on a new ASUS X501A laptop. It was necessary to install Windows and everything necessary, turnkey in short :). I turned it around and discovered that it does not have a CD/DVD drive. This means that you need to create a bootable USB flash drive and install Windows 7 from it. The drivers for it are also included on the disk, and you also need to copy them onto the USB flash drive. It’s actually strange that the laptop doesn’t have a drive, but the drivers are on the disk. You need to put the included drivers on the flash drive, or an external drive :).
Oh well. I created a bootable USB flash drive. First created using a special program Windows 7 USB/DVD Download Tool(I wrote about this), but I’ll say ahead of time that for some reason the installation of Windows 7 from this flash drive did not work. The white cursor simply blinked and the installation did not continue. I recorded it and everything worked. Why this is so, I didn’t bother to figure it out :).
That's it, the flash drive is ready. Now you need to set the BIOS to boot from this flash drive. Now I’ll tell you how to do this.
We set boot from a flash drive on an Asus laptop
We go into the BIOS. For me, and most likely for you, this is the key F2 (if not, then try DEL). Press it immediately after starting the laptop.
The flash drive should already be connected to the laptop!
As you can see (in the screenshot below), under me Boot Option #1 there is a hard drive. And under Boot Option #2 flash drive. You need to install a flash drive under #1.
To do this, click on Boot Option # 1 and select the flash drive. And the hard drive will automatically take second place.

You can return to the previous menu by clicking on Esc and you will see that a USB device is installed under Boot Option #1.

Don't forget to click F10 And Yes to save settings.
That's it, after rebooting the laptop it should boot from the flash drive (if it is created correctly).
There is one caveat. Perhaps I made a mistake when setting the parameters in the BIOS; there I probably just needed to create another boot rule (Add New Boot Option). But it's okay.
If you did everything like I did, then most likely during the Windows installation process, after a reboot, booting from the flash drive will begin. Is it necessary with drive C to continue installation. I'm just at the point of rebooting pulled out the flash drive. And when the download started from drive C, I inserted it back (although it seems that it is no longer needed for installation, the files have already been copied, but I could be wrong).
Possible problems when installing Windows 7 from a USB 3.0 flash drive
You may have noticed that my USB drive has the new USB 3.0 interface. But Windows 7 does not support USB 3.0, special drivers are required.

If the drive itself is USB 3.0, then it's okay. Just plug it into the laptop connector USB 2.0 and everything will work.
This is what a USB 2.0 connector looks like on a laptop:

And this is what a USB 3.0 connector looks like:

The third one is blue and there are two letters SS next to the icon.
Well, if you have everything USB 3.0, then you will have to integrate the drivers into Windows 7. This is a topic for another article. Perhaps I’ll write how to do this. In the meantime, you can find this information on the Internet.
You can also find and download an assembly with Windows 7, which already has integrated drivers for USB 3.0. There are such people.
This site probably contains all the information that may be useful for installing the operating system and for solving problems that may arise during the installation process. You can use the site search. And if you can’t find something, then ask in the comments, I’ll tell you :). Good luck!
Also on the site:
How can I set the BIOS to boot from a flash drive on an Asus laptop? Some tips for installing Windows 7 from a USB 3.0 flash drive updated: February 7, 2018 by: admin
Hello friends! Today I will talk about how to BIOS configure booting from a flash drive, and what to do if this same flash drive is not displayed in the BIOS settings. I already wrote an article about that, but today I want to write in more detail about that how to boot from a USB drive, having previously configured the BIOS.
What is this for? Well, if you are reading this, then I think you already know why you need it. Well, if not, then I’ll tell you a secret: you can create bootable flash drives and install operating systems from them or launch other bootable disk images, for example. This is very convenient; flash drives are more resistant to mechanical damage compared to disks, and they can have more memory.
Before you start writing the instructions, be sure to read the article, it says how to enter the BIOS.So, you have already created a bootable USB flash drive and are ready to boot from it. First of all, we need to configure the system so that our flash drive comes first, and the system starts from it first. There is one joke here, through which questions arise like the flash drive is not displayed in the BIOS settings.
Does BIOS not boot from a flash drive?
It's very simple, when the USB device is not connected to the computer, it will not appear in the boot options.
Setting boot from flash drive in BIOS
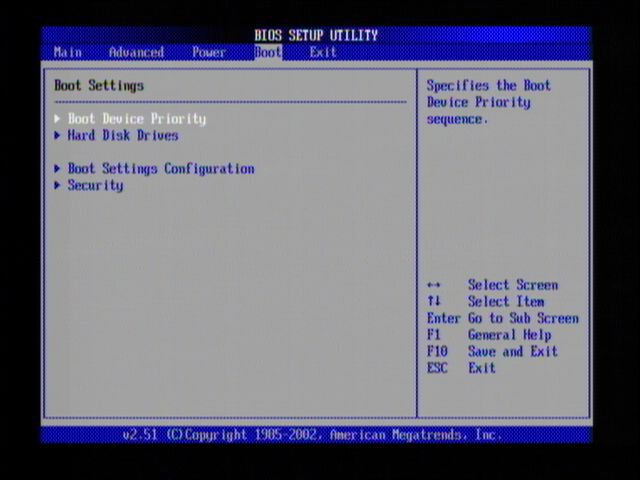
We do this: connect the flash drive, go to the BIOS (if you don’t know how, read the article above, usually these are the DELETE or F2 keys). And go to the page with setting the order of boot devices. I'll just show screenshots. Remember, everything may look different for you, and menu items may have different names. Look for the item with the word “Boot”.


If the flash drive is connected, we will see it in the list.

Now we need to install the flash drive in the first place in the boot list. To do this, press “Enter” and select “” .

We save all our changes by pressing F10 and restart the computer. If everything is done correctly and the USB drive is created correctly, the USB drive will begin loading. It may indeed be that USB is not displayed in the settings, most likely because you have an old computer and it does not support this function.
After a boring story about setting up the BIOS, I would like to advise you to think about the security of your home or office, and video surveillance, in my opinion, is the best means of protection. Moreover, with new technologies you can install IP video cameras, which will give you many new and modern opportunities. For example, creating a network from several cameras and even broadcasting the video to the Internet.
Also on the site:
Updated: January 12, 2015 by: admin
Friends, in this article we will find this very boot menu for laptops Acer, Sony, Samsung, MSI, Toshiba, HP, ASUS, Packard Bell and load the above devices from my Corsair Voyager flash drive, which contains the Windows 7 operating system. Don’t forget, if you want to install Windows 7 or Windows XP on a new laptop, then connect the flash drive to the USB 2.0 port (black), if you connect the flash drive to USB 3.0 port (blue), the system installation will fail, since there are no USB 3.0 drivers in the Windows 7 installer.

We will also analyze the BIOS of these devices in detail. Let's look at how to change the boot priority on these laptops, in case you and I are unable to enter the boot menu. There is no need to be afraid of the BIOS; if you configure something in it incorrectly, you can always reset the settings to default.
Very important note: This note will be useful to you if you have a new laptop from any manufacturer (2013, 2014 with UEFI BIOS). If you have such a laptop and you are reading these lines, then you want. To do this, of course, the laptop needs to be booted from .
Almost all laptops currently sold have a UEFI BIOS; such a laptop cannot simply be loaded from a flash drive, since the UEFI BIOS has special protection - the Secure Boot protocol based on special certified keys (available only in Windows 8). The Secure Boot protocol will not allow you to boot your laptop from any boot disk or flash drive other than the Windows 8 installation disk. In order to boot your laptop from a flash drive, the Secure Boot protocol must be disabled in the BIOS of your laptop, this is done very simply, read our article or .
Let's return to this article. I think the information will be useful to many owners of laptops and netbooks. This article will also help if you want to boot from a disk and don't know how to do it.
Let's start with an Acer laptop, first of all we connect our Corsair Voyager flash drive to the laptop, then press F12 when loading,

Then you need to select our flash drive in the boot menu that appears and click
If you are unable to enter the boot menu of your Acer laptop using the F12 key during boot, then the Boot Menu option is disabled in the BIOS and needs to be enabled.
When loading, press F2, the initial Information tab, go to the Main tab, see the F12 Boot Menu parameter, set it to Enabled,

Next, press F10 to save the settings, reboot, press F12 when loading and our boot menu appears, select our flash drive in it and press Enter, it boots from the flash drive.
If the boot menu of the Acer laptop still does not appear, then go to the BIOS again (when loading F2), Boot tab. We select our flash drive and put it in the first position using the F6 key, then press F10 to save the settings, reboot and boot from the flash drive.


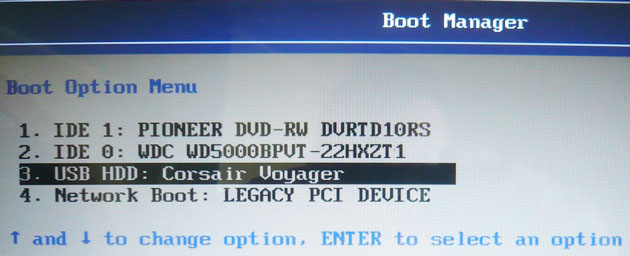
When loading the laptop, press F12 and get into the boot menu, select our flash drive here, if you connected a flash drive to the laptop, its name will be here. Press Enter and if your flash drive is bootable, it will boot from the flash drive.

If for some reason you cannot boot your laptop from a flash drive using the boot menu, then you can enter the BIOS and change the boot device priority there. We often press F2 when booting a Toshiba laptop and get into the BIOS of this laptop. The initial Main tab, go to the Boot tab (responsible for loading the laptop) and see our Corsair Voyager flash drive in sixth position. We select it using the keyboard and press F6, thus moving our flash drive to the first position, then press F10 to save the settings we changed, the reboot occurs and the laptop boots from the flash drive.
Friends, if you have a new Samsung laptop, for example 2012-2013, then read this article “”, for all others this instruction is also suitable.
When loading, press Esc or F10, get into the boot menu and select our flash drive. If the boot menu does not appear, then go to the BIOS, press F2 or DEL when loading. In the BIOS Boot tab, select the first parameter Boot Device Priority
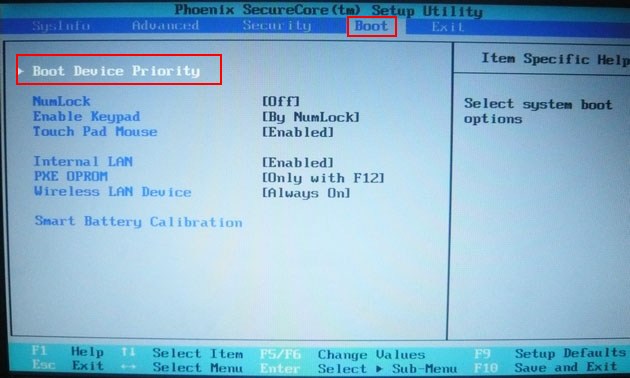
And we enter it, here we select our flash drive and using the F6 key we put it in the first position. Next, press F10 to save the settings and reboot, reboot, then boot from our flash drive.


and we get to the boot menu. The first device is now the disk drive, if your flash drive is connected to the laptop, then its name will also be present here, select our flash drive here and press Enter or F10, a reboot occurs and further loading from the flash drive.

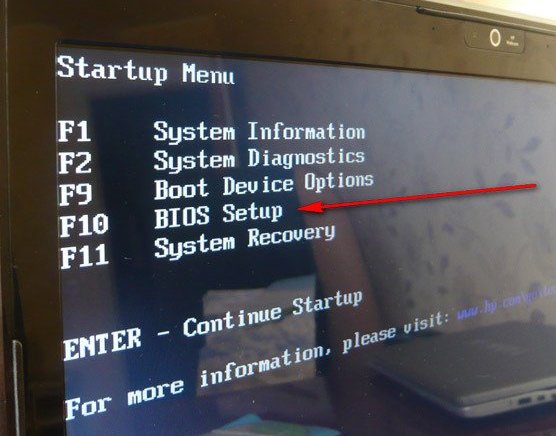
If you cannot enter the boot menu of an HP laptop, then go to the BIOS, press ESC when loading, then F-10, get into the BIOS,
Go to the System Configuration tab, then Boot Options, press Enter


As you can see, the first device is the Notebook Hard Drive. If your flash drive is connected to a laptop, then its name will be here, select our flash drive and use the F6 key to move it to the first position. Next, we save the settings we changed, press F10 to save the settings, the reboot occurs and the laptop boots from the flash drive.


If the boot menu is not available, press the DEL key during boot and enter the BIOS, then go to the Boot tab, select our flash drive and, without releasing Shift, press +, thereby moving our flash drive to the first position. Press F10 to save the settings, the settings are saved and the laptop boots from the flash drive.


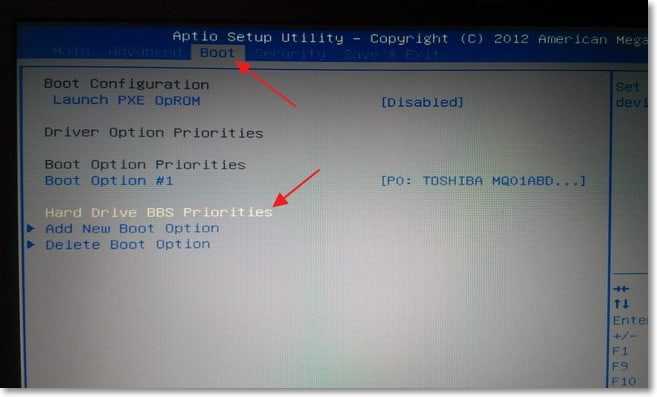
Then go to the Boot tab, and set the Fast Boot option to Disabled,


Once again we enter the BIOS and go to the Boot tab, set the Launch CSM (advanced boot) option to Enabled,

We go down to the Boot Option Priorities and Boot Option #1 option and enter it by pressing Enter, in the menu that appears, using the arrows on the keyboard, select the name of our flash drive and press Enter. Here we also put our Corsair Voyager flash drive in first place.


We press F10 to save the settings, reboot and our Asus laptop boots from the flash drive.
Also you can use boot menu Asus laptop, to do this, in the initial phase of booting the laptop, frequently press the key Esc, you will be taken to the boot menu, use the arrows on the keyboard to select your bootable USB flash drive and press Enter.

How to boot a Packard Bell laptop from a flash drive

Press the button when loading F12 and we get into the boot menu of the laptop, there we simply select our flash drive and boot the laptop from the flash drive.
If F12 does not work when loading, then click F2, less often F6 and get into the UEFI BIOS of the laptop,

here we go to the tab Boot.
If before turning on the laptop you connected a flash drive to it, then it may not decide immediately in this menu.
Set the Boot Mode option to Legacy BIOS.
And the option Secure Boot set to position Disabled.
Now the flash drive should determine. Place the flash drive in the first position, save the settings and reboot. If the bootable flash drive is made according to our articles, then the download will be successful.
There are many types of BIOS: Ami, Award, Phoenix Award, UEFI. Let's figure out which buttons to press when booting a computer or laptop so that go to BIOS and boot from a flash drive to install windows. I would like to note that the traditional key delete, F2 to enter the BIOS. Below are button combinations on how to enter the BIOS to boot from a flash drive.
Buttons for entering bios from laptop and computer manufacturers.
Buttons from BIOS manufacturers

How to set the BIOS to boot from a flash drive to install Windows
Let me start with the fact that you don’t always need to go into the BIOS to swap the bootloader to install windows. For this there is a so-called start menu. To go there, you need to turn on the computer, sometimes a key is written. In this case F12. Press the key that is written in the word Boot Menu.

How will we start the computer: USB flash drive or other devices. Next will be the installation of the Windows system.

How to install boot from a flash drive in Ami Bios
- Click Device Priority.
In line 1st Devise set priority from the flash drive. This is usually all, but many people have come across why I did everything correctly, but the computer does not start from the flash drive. Sometimes you just need to specify, in addition to the priority, forced loading in the line Hard Disk Drives.

- IN Hard Disk Drives set a forced launch from a flash drive.
- IN 1st drive select the media.
- Press F10 to save.
It turned out that in the settings of 1st Devise and Hard Disk Drives there is a bootloader with USB Flash i.e. We set the priority option, tried it and it didn’t work. Then we set a forced launch and everything worked out. And so on in all BIOS versions, if priority loading fails.

How to set Award Bios to boot from a flash drive
- Let's go to Advanced Features.

- Click First Device, in the context menu we set which bootloader we will start the computer with. We have chosen the primary device to launch.
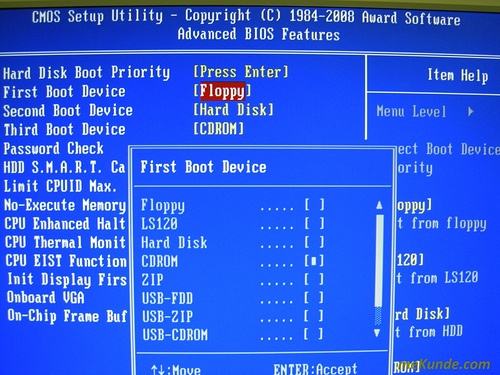
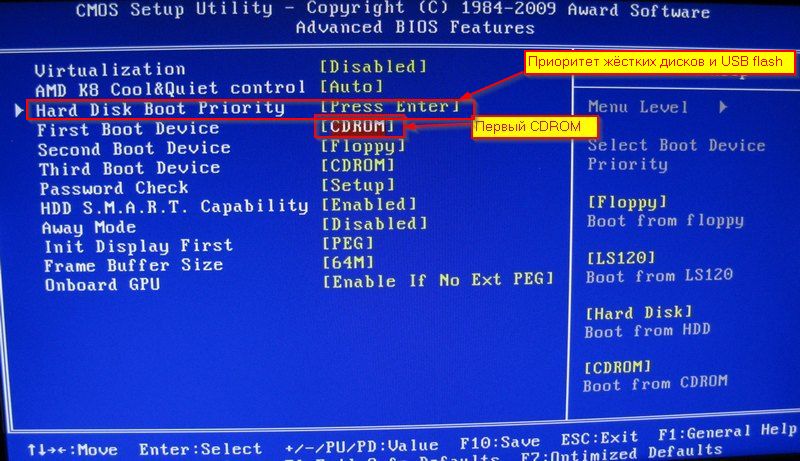
- Hard Disk Priority put the flash drive in 1st place. (If in First Device If you choose to start from a drive, then you need to install a flash drive in Hard Disk Priority).
- Award is ready, press F10 to save.
How to boot from a flash drive in Phoenix Award Bios
- Settings Advanced, in line First Boot Device install a flash drive or other device.
- Click F10 to save.

New UEFI BIOS in which you can control the mouse.
- Line Boot Priority, change places by dragging with the mouse. Can be done through advanced settings > Exit/Advanced mode and choose Advanced mode.

- Presses Boot and select in Boot Option #1 loader.

Going into the BIOS and booting from a flash drive to install Windows turned out to be quite simple, you just need to change the boot type. And remember about the priority and forced bootloader.


