Launch startup repair recommended what to do. Startup Repair Offline what is it and how to fix it
When starting up your computer, the user may experience loading errors. operating system. Windows 7 will attempt to repair the problem, but it may be unsuccessful, and you will see a message stating that it is impossible to resolve this problem, and that you need to send information about the problem to Microsoft. Clicking on the tab "Show details" The name of this error will be displayed - “ Startup Repair Offline". In this article we will look at how to neutralize this error.
Literally this malfunction means “restoring offline startup.” After restarting the computer, the system attempted to restore operation (without connecting to the network), but the attempt was unsuccessful.

The “Startup Repair Offline” malfunction often appears due to problems with hard drive, namely due to damage to the sector on which the system data responsible for the correct startup of Windows 7 is located. Problems with damaged system registry sections are also possible. Let's move on to ways to fix this problem.
Method 1: Reset BIOS Settings
Go to BIOS (using the keys F2 or Del when the computer boots). We load the default settings (item "Load optimized defaults"). Save the changes made (by pressing F10) and restart Windows.

Method 2: Connecting cables
It is necessary to check the integrity of the connectors and the tightness of the cable connections hard drive And motherboard. Make sure that all contacts are connected well and tightly. After checking, we restart the system and check for a malfunction.

Method 3: Startup Recovery
Because normal startup operating system is not possible, we recommend using a boot disk or flash drive with a system that is identical to the installed one.

Method 4: "Command Line"
If the above methods did not help resolve the problem, then restart the system from a flash drive or installation disk.
Press the keys Shift+F10 at the very beginning installation process. We get to the menu "Command line", where you need to type certain commands one by one (after entering each of them, press Enter).
bcdedit /export c:\bckp_bcd

attrib c:\boot\bcd -h -r –s

ren c:\boot\bcd bcd.old


bootrec /FixBoot

bootrec.exe /RebuildBcd

After entering all the commands, restart the PC. If Windows 7 does not start in operational mode, then the fault data may contain the name of the problematic file (for example, extension libraries .dll). If the file name was specified, then you need to try to search for this file on the Internet and place it on your hard drive in the required directory (in most cases, this is the windowds\system 32 folder).
Conclusion
So, what to do about the “Startup Repair Offline” problem? The simplest and effective way- This is the use of OS startup recovery using a boot disk or flash drive. If the system restore method did not fix the problem, then use the command line. Also check the integrity of all computer connections and BIOS settings. Using these methods will resolve the Windows 7 startup error.
Automatic startup recovery for windows 8/10 -detailed description.
Startup Repair or Automatic Repair is the same windows repair utility but named differently according to windows version. Thus, in Windows Vista and in windows 7 it is called "Startup Repair" and in windows 8 it is called "Automatic Repair" and in windows 10 it is called "Startup Repair" again.
This article is for windows 10 and windows 8, if you need windows 7 or vista startup repair, >> Click here
So now the questions we usually ask are:
- What is it: Windows 10 startup recovery?
Both functions are the same and it is very useful and effective tool to restore windows. The main job of this feature is to restore windows when something prevents the operating system from starting.
- What does "Startup Repair" or "Automatic Repair" actually do in windows?
Startup or Automatic Repair is the only repair tool you have, since windows that require immediate repair run it. This tool is designed to repair only certain glitches such as missing or corrupted system files, which were mainly used to boot the windows operating system.
- Why does Startup Repair or Automatic Repair say “cannot fix”?
Indeed, this function cannot show you what is causing the problem for windows to start. She won't help you recover personal files and documents. It also cannot detect or resolve hardware failures and does not help in combating virus attacks and their damage.
How to use Startup Repair and Automatic Repair?
When you turn on your computer and it displays your BIOS logo screen, quickly press the "Shift" key and press the F8 key several times.
This may not work the first time. Just restart your computer and try again. You will eventually be taken to recovery mode and you will see the next step below.
If you can't open it with the Shift and F8 keys, the only option is to use windows Disc or Windows USB Pendrive. This will also help if Windows 7 startup repair does not start.
To open startup or automatic repair from a windows disk:
Use only a boot disk that matches your current operating system. For example, use the windows 8 installation disc if you installed windows 8 on your computer. Use the windows 10 installation disc if you are using windows 10.
First, you will need to load your disk or windows flash drive, using boot sequence priority. If you don't know how to do this, follow the link below. restoring windows 7 startup via command line (win 8/10):
How to change Boot Sequence in BIOS?
- Immediately after the download has been completed, you will be able to see the first option in the setup menu and in this you need to click on “Next” after which click on “Repair your computer” to launch the startup repair feature.
- After this you will see three options. You will need to select the second one called “Troubleshoot” and then right below the troubleshooting menu select the third option “Advanced options”.

- Now select repair at starting windows 10 or “Automatic Repair” in Windows 8 to restore your computer.
comp4all.online
Resolving the “Startup Repair Offline” error when loading Windows 7
 When starting up your computer, the user may observe errors related to loading the operating system. Windows 7 will attempt to repair the problem, but it may be unsuccessful, and you will see a message stating that it is impossible to resolve this problem, and that you need to send information about the problem to Microsoft. By clicking on the “Show Details” tab, the name of this error will be displayed – “Startup Repair Offline”. In this article we will look at how to neutralize this error.
Fixing the “Startup Repair Offline” error
Literally, this malfunction means “recovery of offline startup.” After restarting the computer, the system attempted to restore operation (without connecting to the network), but the attempt was unsuccessful.
 The “Startup Repair Offline” malfunction often appears due to problems with the hard drive, namely due to damage to the sector on which the system data responsible for the correct startup of Windows 7 is located. Problems with damaged system registry sections are also possible. Let's move on to ways to fix this problem.
Method 1: Reset BIOS Settings
Go to the BIOS (using the F2 or Del keys when booting the computer). We load the default settings (item “Load optimized defaults”). Save the changes made (by pressing the F10 key) and restart Windows.
Read more: Resetting BIOS settings

Method 2: Connecting cables
It is necessary to check the integrity of the connectors and the tightness of the connections of the hard drive and motherboard cables. Make sure that all contacts are connected well and tightly. After checking, we restart the system and check for a malfunction.

Method 3: Startup Recovery
Since normal startup of the operating system is impossible, we recommend using a boot disk or flash drive with a system that is identical to the installed one.
Lesson: Creation Instructions bootable flash drive on windows

Method 4: "Command Line"
If the above methods did not help resolve the problem, then restart the system from a flash drive or installation disk.
Press the Shift+F10 keys at the very beginning of the installation process. We get to the “Command Line” menu, where you need to type certain commands one by one (after entering each of them, press Enter).
bcdedit /export c:\bckp_bcd

attrib c:\boot\bcd -h -r –s

ren c:\boot\bcd bcd.old


bootrec /FixBoot

bootrec.exe /RebuildBcd

After entering all the commands, restart the PC. If Windows 7 does not start in working mode, then the fault data may contain the name of the problematic file (for example, extension library.dll). If the file name was specified, then you need to try to search for this file on the Internet and place it on your hard drive in the required directory (in most cases, this is the windowds\system 32 folder).
Read more: How to install DLL to windows system
Conclusion
So, what to do about the “Startup Repair Offline” problem? The simplest and most effective way is to use OS startup recovery using a boot disk or flash drive. If the system restore method did not fix the problem, then use the command line. Also check the integrity of all computer connections and BIOS settings. Using these methods will resolve the Windows 7 startup error.
We are glad that we were able to help you solve the problem.
Poll: did this article help you?
Not reallylumpics.ru
The operating system does not appear in system recovery options.
 The operating system is not displayed in the system recovery options of windows 7/xp/8/10.
Fixing computer problems using system recovery options is one of the the best ways fix problems starting windows. But sometimes when we try to use these features, it may happen that your hard drive or windows are not listed (as shown in the screenshot above).
If windows is not listed in the recovery options, you will not be able to do anything other than start command line. And usually this problem only occurs when the hard drive fails (inactive) or, for example, “forgets” its boot volume. It needs to be like in the screenshot below ↓

So you need to use special team on the command line to fix this problem:
Solution 1 – Fixing an inactive hard drive partition.
Active section is a partition on your computer's hard drive called boot partition and contains your PC's operating system. Usually, only one partition can be active at a time, for example c: drive, where windows is usually installed.
Sometimes, for some reason, this partition becomes inactive and we will need to activate it in order to show it when restoring the system.
First, open CMD (Command Prompt) on your computer screen by clicking Shift key+F10 and then enter the command shown below:
Command #1 - diskpart
This command will run special utility. When diskpart starts, you will be able to see "DISKPART" on the left side of the command line.
Command #2 - list disk
The command will list all your connected drives on the computer.
Command #3 - select disk 0
In this step we select our “main” hard drive on which windows is installed. In my case, I choose drive 0 because it is the only drive shown in my cmd and it is also the one where my OS is installed.
Command #4 - list partition
This command will show you all the partitions created on the disk you selected.

Command #5 - select partition 2
Usually you should choose partition 2 because it usually has a windows partition, but that doesn't mean you should always choose the second one because sometimes partition 1 can also be a windows partition. So, select the partition where windows is installed.
Note. Never select partition sizes of 100 MB, 350 MB and 500 MB.
Command #6 - active
This will make your section active.

Command #7 - exit
Restart your computer and open System Recovery options again to see the changes.
Solution 2# - Fix windows Master Boot Recode
MBR or master boot recode is the most important data structure on a disk which is mainly created when we create a partition on our hard drive for Windows installations.
Your boot volume may be damaged by some recently installed software. Viruses or windows updates/Software. It's better to fix it as soon as possible. So now we use cmd to restore boot volume on your hard drive.
Command 1 # - Diskpart
Command 2 # - List volume
Command 3# - Exit

You will need to find your drive letter in this list, for example my drive is D: 29 GB.
Now you know what your drive letter is, so simply enter the drive letter in the command prompt and repeat the command below.
Command 4 # - D: (or your drive letter)
Command 5# - Bootrec/fixmbr
Command 6# - Bootrec/fixboot
Command 7# - Bootrec /rebuildbcd (Skip this command the first time and use it if all else fails, but be sure to use the chkdsk command below each time you try.)
Command 8# - Chkdsk /f (Try chkdsk /f /r If "Chkdsk /f" command won't work)
Team 9# - Y
Once the "chkdsk" command completes, simply restart your computer. Most likely, your problem will be solved.
IF NOTHING WORKS, JUST REINSTALL WINDOWS. DETAILED INSTRUCTIONS HERE:
How to install windows?
How to restore Windows system 7 on a laptop, a black screen appears when booting, the recovery environment does not work, I deleted all the hidden partitions, original disc with no. I spent a lot of time, tell me what to do now, or at least how to insure myself against such situations in the future, preferably without using paid programs backup data. Ilya.
How to restore Windows 7 system
Unfortunately, there are many reasons for this problem, ranging from incorrectly written drivers, harmful effects of a virus, errors file system and ending with our erroneous actions when working with a computer, there is no need to be afraid of such problems, you need to learn how to deal with them effectively.
Let's think how to restore windows 7 system, and also insure ourselves for the future from possible troubles using the backup and recovery tools built into the operating system. We will learn how to restore Windows 7 without using third party programs for backup even when the System Recovery Options are not loaded and the F-8 button will be useless.
- Friends, if our article does not help you, then check out others on this topic, for example: in it you will learn how to restore a non-bootable system using various command line utilities, the first is Bootrec.exe with the commands /FixMbr and /FixBoot or the utility bootsect /NT60 SYS, as well as Bootrec.exe with the /RebuildBcd parameter, these utilities can be launched from the recovery environment or from disk Windows recovery 7. Another article will teach you how to restore a damaged or deleted bootmgr bootloader itself. The article will show you how to restore your operating system when system recovery is disabled and much more.
- If Windows 7 freezes on boot or suddenly reboots, or may suddenly show blue screen with an error, then perhaps all these problems are due to numerous file system errors. How to fix the situation even when the operating system does not boot due to these errors is written in this article.
- Well, eight articles from the section will give you a detailed understanding of all the built-in recovery tools in Windows 7: restore points, previous versions of files, creating a system image and a recovery disk, and so on. So let's begin.
Windows 7 has quite a powerful and good tool in its arsenal -> Recovery environment, which is created automatically when installing Windows 7 in a hidden partition and contains five other tools that solve numerous problems and problems.
- Note: If you learn how to use Windows 7 recovery tools correctly, and this is not difficult, then you can do without additional and paid data backup programs.
You can launch the recovery tool by pressing the F-8 button on the keyboard immediately after starting the computer. After this, a menu will open in front of you Additional options download: Troubleshooting your computer, next Safe Mode, Safe Mode with Boot network drivers etc.
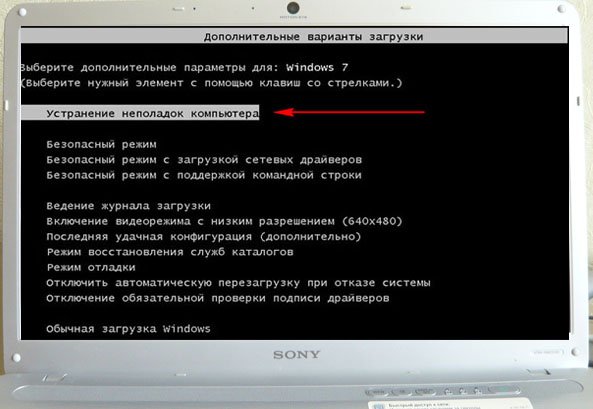
The first thing to do is apply Startup recovery(Automatically fix problems that prevent Windows from starting)

Required digression: After pressing the F-8 button when booting the computer, you may not have the > item, but only Safe Mode and so on, the question arises why.
When installing Windows 7, a recovery environment partition is created automatically and is located in the root of the drive (C:) in Recovery folder. You can also see in the Disk Management window - separate, hidden section hard drive, its volume is only 100 MB, it is used for storage boot files boot configuration (BCD) and system bootloader (bootmgr file).
You can see it under Computer->Management->Disk Management. Under no circumstances should you delete this partition (many people delete it out of ignorance), otherwise you will not be able to start the recovery environment, that is, the item Troubleshooting your computer you won’t, and in more severe cases you simply won’t boot the system.

In the lower screenshot you can see another hidden partition, with a capacity of 9.02 GB, this is a hidden recovery partition with factory settings on my laptop, yours may be larger or smaller. It’s also better not to delete it; if necessary, you can always restore Windows 7 from it.

What should you do if you do not have a partition with a recovery environment and when you press the F-8 button in the Additional boot options menu, the Troubleshooting computer option does not appear? How then to restore the Windows 7 system??
An installation disk with the Windows 7 operating system can help here. You can run the recovery tool by booting from the original installation Windows disk 7, selecting the item at the very beginning System Restore. If you don’t have an installation disk, then you can use it (you can make it in any running Windows 7) in five minutes, then you can also boot from it and do the same.


So we finally got to the System Recovery Options, either using the F-8 button and the Troubleshooting item, or the Windows 7 installation disk or the Windows 7 Recovery Disk.
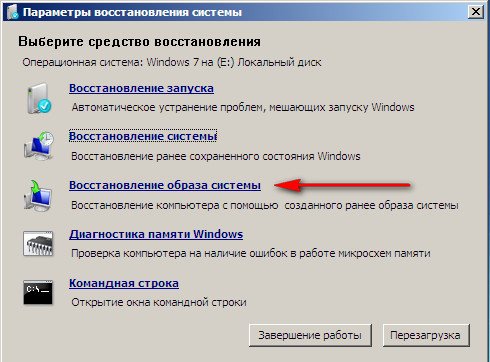
In the System Restore Tools Selection menu, select the first one:
Startup recovery-> there will be an analysis of faults that interfere with the normal loading of Windows 7 and their further correction for the normal loading and functioning of the operating system. During the process, we may be warned that problems have been detected in the boot parameters, click Fix and restart.


System Restore->using this function, we can, if we have it enabled, roll back to the time when our Windows 7 worked and loaded perfectly, everything is simple here.


->This is the tool I personally use; if used skillfully, it can be replaced paid programs on data backup, if interested, read on.

What's good about it? It will help when you don't have the original Windows 7 installation disc and you've deleted the hidden partition with your laptop's factory settings, but that's not all.
Sometimes there are situations when, due to various reasons or due to the actions of a virus, you will not be able to load the operating system at all, or many people ask How to restore Windows 7 system even if the menu with Additional boot options is also unavailable. Should I reinstall the operating system again?
Therefore, immediately after Windows installations 7 on your laptop or computer, we create it using this function-> Restoring a system image, archive image our Windows 7 on the hard drive, take care of it. It is imperative to create a Windows 7 Recovery Disk (read below), it will help you use the System Image if the Advanced Boot Options menu does not load.
Let's go to Start -> Control Panel->Archiving computer data.

Choose Creating a system image

Next, select Local disk on which we will store the system archive. In my case, Local disk (E:), if you have system unit some hard drives, then of course backup is better Place it on the hard drive where the operating system is not installed.


Note: You may notice that I have two operating systems installed on my laptop, so the archiving program selected two Local disks.

Click Archive and the process of creating an archive with our Windows 7 will begin.
Created, it will look like this.

Now, if necessary, you can deploy the archive with Windows 7 to your computer in 20-30 minutes. It would be better if you additionally copy the archive with the system onto a portable one hard drive, this way you will protect yourself doubly.
Let's imagine that we can't start Windows 7 and deploy the backup we created, let's do it together.
Let's launch Windows 7 Recovery Tool, by pressing the F-8 button on the keyboard immediately after starting the computer. The Advanced boot options menu opens, select Troubleshoot your computer.

Restoring a system image

Use the latest available system image


Of course, all our data is on Local disk, where the operating system is now being restored, will be deleted, so you can first boot from any Live CD and copy what you need.
How else can you restore your Windows 7 system? Of course, using the Windows 7 Recovery Disk. Let's create Recovery disk, which can be used to boot the computer, it will contain recovery tools that can be used to repair problems Windows boot 7, as well as restore the operating system from an archive copy that we created in advance.
Important: The bitness of the system is important for the recovery disk, you can use a 32-bit recovery disk for any 32-bit Windows 7, and a 64-bit recovery disk for any 64-bit Windows 7.
Let's go again Backing up computer data
Create a system repair disk, insert the DVD into the drive, press

Create disk


When Boot Disk Windows 7 recovery will be ready, put it in a safe place.
To restore Windows 7 from a Recovery Disk, you basically don’t need any working operating system at all. You will only need to change the boot priority to the drive in the BIOS of your computer, insert the recovery disk into it and restore your Windows 7 using the archive. Many here can draw an analogy with data backup programs and this is correct, they work on the same principle, only Of course, their functionality is more convenient.
- If you don’t know how to change the boot priority in the BIOS, read our articles and
Recovering Windows 7 from a Recovery Disk. I show you how to do it. Let's say we're in trouble, we can't start Windows 7, when we press F-8 on the keyboard immediately after starting the computer, nothing happens. We cannot get into the menu with Additional boot options and an error message is displayed. In this case, the system archive on the hard drive is not available to us. This is exactly the kind of trouble that happened to our reader Ilya, who wrote us a letter asking for help.
In this situation, many people reinstall Windows 7 from scratch, but not you and me, because we have System Recovery Disk.
We insert it into the drive and reboot, set it to BIOS loading from the drive, as I said, the boot disk starts the System Recovery Options program.
Press Enter until the prompt to boot from the disk disappears.
When turning on your computer, the user may encounter a failure to load the operating system. The latter will try to restore its operation, but to no avail, after which the system will report that it is impossible to solve this problem, as well as the need to send information about the problem to Microsoft. By clicking on “Show details” the user will be able to read the name of the existing event − "Startup Repair Offline". IN this material I'll tell you what Startup Repair Offline is and how to fix it this error on your PC.
Translated from English this text sounds like "Restore startup offline", usually denoting a situation in which some error (glitch) has led to instability in the computer. After rebooting the PC, the system tried to restore its normal work(without using network connection), but she failed.
Quite often after this the PC enters " cyclic reboot”, rebooting again and again in an attempt to correct the dysfunction that has arisen. I recommend interrupting this “bad infinity” by further acting on the advice that I will describe below.

Reasons for Startup Repair Offline
Most often, the appearance of Startup Repair Offline is associated with problems with the hard drive, in particular with damage system area hard drive, which is responsible for correctly loading the operating system of your PC.
In some cases, the cause of Startup Repair Offline dysfunction may be damage system registry, as well as malignant activity virus programs. We have studied what this Startup Repair Offline error is and analyzed the reasons for its occurrence, now we will learn how to fix this problem.
 Startup Repair Offline error
 How to fix Startup Repair Offline
To solve the Startup Repair Offline problem, I recommend doing the following:

bcdedit /export c:\bckp_bcd
attrib c:\boot\bcd -h -r -s
ren c:\boot\bcd bcd.old
bootrec /FixMbr
bootrec /FixBoot
bootrec.exe /RebuildBcd
Reboot our computer. If the system does not boot normally, then at least, the message that appears about the recorded problem may indicate problematic file(for example, some library with a .dll extension). Then you need to try to find this file on the network, or try to copy it from another stable computer with a similar OS, and then move it to the problematic hard drive in the appropriate directory (usually windows\system32).
Conclusion
What to do with Startup Repair Offline? I recommend, first of all, to use a disk (flash drive) with the appropriate version of the operating system, and restore the startup of your OS by selecting the appropriate recovery menu item (you can also use the “system recovery” item in the same menu). If this method did not help, launch the command line, and then enter the commands listed above in it, this will get rid of Startup Repair Offline on your PC.
“I explained that if it detects boot problems, Windows 7 automatically launches the Startup Repair Tool, which performs diagnostics with little or no user intervention and, in many situations, allows you to repair an unbootable system.
After this article was published, many users shared in the comments their less than satisfactory experiences using Startup Repair in . On the other hand, many wrote on the contrary that it helped them restore normal operation of the system. For those unlucky, I would like to remind you that Startup Repair only solves some problems, including missing and damaged system files.
As I mentioned in the previous article, if Startup Repair fails to fix the problem, it will bring up the System Recovery Options menu ( System Recovery Options) with a list of tools that can be used to diagnose and restore the system. In this article I will tell you how to call this menu yourself and describe each tool presented in it.
Calling the “System Recovery Options” menu
You can open the “System Recovery Options” menu in different ways depending on the specific situation.
If Windows still starts to boot, you can try to access the System Recovery Options menu manually from your hard drive.
. If Windows doesn't even start to boot, you can call up System Recovery Options by booting your computer from the installer. Windows DVD 7.
. If you have a system repair disk (System Repair Disc), boot the computer from it and call the “System Recovery Options” menu. I'll tell you about creating a system repair disk another time.
Let's say Windows starts loading, but doesn't finish. To access the System Recovery Options menu in this situation, turn off the computer and then turn it on again. After bootstrap When you hear a tone indicating that Windows is starting to boot, press and hold the key.
The Advance Boot Options screen appears (Figure A). Select the Repair Your Computer option. As the description at the bottom of the screen suggests, this option Displays a list of tools that you can use to diagnose, troubleshoot boot problems, and restore your system. To continue, click .
Figure A: Pressing the key when Windows starts to boot brings up the More Boot Options screen.
A loading message appears Windows files, and then the loading screen with green indicator progress. After a while, a dialog box will open asking you to select a keyboard input method (Figure B). Click Next.

Figure B. If you are using English language, just click "Next".
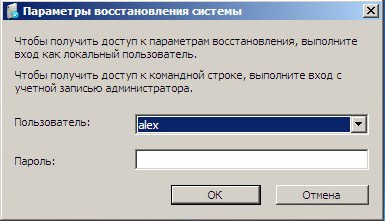
The login window shown in Figure will appear. C. To login use account with administrator rights.

Figure C: Use an account with administrator rights to log in.
After this, the “System Recovery Options” menu will appear, shown in Fig. D.

Figure D: The System Recovery Options menu lists tools you can use to diagnose, fix boot problems, and perform system recovery.
Options
As you can see, there are five options in the System Recovery Options menu. Let's take a closer look at them.
. “Startup Repair”. If this tool does not start automatically when the download fails, it should be used first. Please note that it only fixes some problems, such as missing or corrupt system files. This tool does not correct hardware malfunctions - for example, a hard drive.
. "System Restore" This tool allows you to restore the previous state of Windows system files without affecting the data files in any way – emails, documents, photographs. To provide this capability, the utility constantly monitors the state of the operating system for significant changes, which include the installation of applications, drivers and updates. If such a change is anticipated, the utility automatically creates a restore point - essentially a snapshot of the system state, including important system files and certain registry fragments. System Restore stores several different restore points at once, which allows you to roll back the system to any of the saved states. Therefore, “System Restore” can also be used in case of boot failures - just select the latest restore point.
. “System Image Recovery”. If for some reason System Restore doesn't work, and you have a relatively recent image of the operating system on your hard drive, you can restore Windows from it. The system image includes all system files and settings, programs and user files. Please note that the entire system is restored from the image, so everything current programs, settings and files will be replaced previous versions, saved at the time of creating the system image.
. "Diagnostics Windows memory» (Windows Memory Diagnostic). If, in addition to boot problems, you encounter application and operating system crashes or STOP errors, you can use the Windows Memory Diagnostic Tool to check the modules RAM for malfunctions. The diagnostic tool writes specific values to memory and then reads them back to ensure that the data has not changed.
. "Command Prompt" When you select this option, various command line utilities are available for diagnosing and restoring your system.
What do you think?
In future articles, I will talk about the tools from the System Recovery Options menu in more detail. Have you ever used them? Share your experience in the comments!


