Top tips: How to change your monitor screen resolution. How to change monitor screen resolution? Selecting the optimal resolution Resolution is not set
As a rule, the maximum resolution of modern monitors exceeds the standard 1920x1080, if they have a large screen diagonal (25" or more). Monitors with a small or medium screen diagonal of an older generation can support the standards 1600x1024, 1140x900, 1366x768, 1280x1024. The limits of their capabilities You need to know the monitor or laptop display in terms of its resolution in order to avoid problems with setting a value that is not supported. The maximum possible screen resolution is indicated in the instructions for monitors and laptops. Usually, after installing the video driver, the required screen resolution is adjusted automatically and is listed as recommended in the Windows system screen settings. .
But the video driver does not always automatically select the optimal screen resolution. In such cases, there is no way to do without manual intervention to set the desired resolution in the system settings or using the video driver manager - usually either Catalyst Control Center or Nvidia Control Panel.
1. Right and Wrong Ways to Adjust Screen Resolution
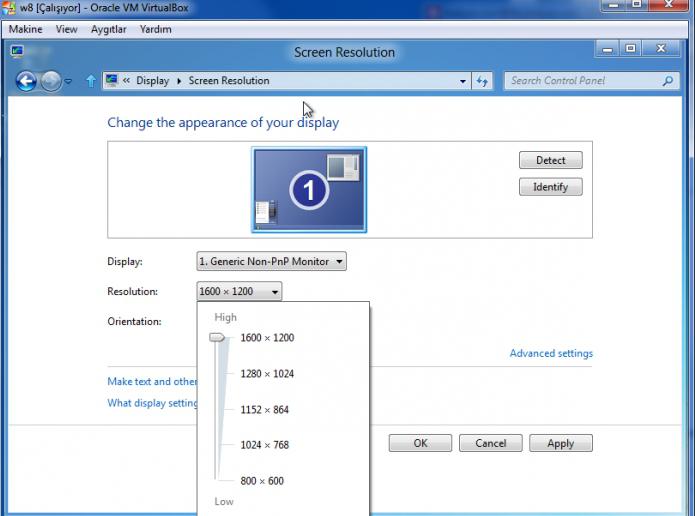
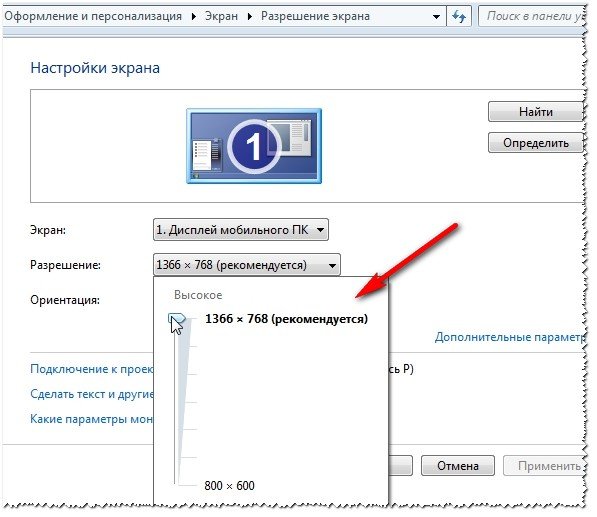
The screen resolution can be adjusted using the operating system by calling the context menu on the desktop and selecting “Screen resolution” in the case of Windows 7 and 8.1.

In the case of Windows 10, in the context menu you need to select “Display options”, then “Advanced display options”.


Here, in the context menu on the desktop, as a rule, there is also a command to launch the video driver manager. In its window you need to look for the settings tab to set the screen resolution.

It is advisable to change the screen resolution only in the system settings or inside the video driver manager. And not with the help of various third-party programs that provide such an opportunity. While Windows display settings and those in the video driver manager are protected from using a screen resolution that is not supported by the monitor (the new resolution is first tested for a few seconds with a preset option to return to the original value),

third-party programs and games can apply the new resolution immediately, without prior testing. And sometimes even without the user’s request. And if a resolution that is not supported by the monitor or laptop display is applied - too high or, conversely, too low, the result will be a dark screen with the words “Out of Range”, “Out Of Range”, “Input Not Supported” or with another message, but the same same essence. By experimenting with the screen resolution in the Windows settings or video driver manager, you can avoid this problem: if an unsupported resolution is mistakenly set and the screen turns off, after a few seconds it will return to the previous screen resolution and turn on again.

Setting an unsupported resolution may also be a result of viruses entering your computer.
So how to solve the problem if a screen resolution that is not supported by the monitor was applied?
2. Participation of the second display
Solving the problem in the simplest way is possible only if at least two monitors or a monitor and a TV are connected to the computer. The same applies to a monitor or TV that is periodically connected (accordingly, previously configured in the system) to the laptop. The problem is very easily solved even if the resolution of the main display is set to an unsupported one, not the secondary one. And even though the image on the second screen is not duplicated, but expanded. What needs to be done? On the empty desktop of the second screen, call up the context menu and select “Display Settings” for Windows 10 and “Screen Resolution” for system versions 7 and 8.1.

Most likely, the system screen settings window will open on the main monitor in pitch darkness. In this case, blindly press the +Shift+right/left arrow keys to move the window to another screen. And set the supported resolution for the main monitor.
If only one monitor is connected to the system unit, but there is another monitor or TV in the room, possibly supporting the set screen resolution, you can try to solve the problem using the latter. All you need to do is connect another, temporary display instead of the current monitor. And with its help you can already set the desired screen resolution. It is very possible that a modern TV will be able to cope with a resolution that turned out to be excessively high for the main monitor. And, conversely, there is a possibility that CRT TVs connected using an S-Video cable (for older video cards) or using a special adapter for a VGA cable (of course, if one is available) will be able to display an image with a low resolution of 640x480 or 800x600.
If there is no other savior display or one also does not support the problematic screen resolution, in order to cope with the task, alas, you will have to resort to “dancing with a tambourine.” Especially in the case of Windows 8.1 and 10 installed on the computer.
3. Removing the video driver in Windows safe mode
To change back the screen resolution supported by the monitor, you need to boot Windows in safe mode, where the system runs at the base screen resolution, without starting the video driver. In safe mode, the video card driver will have to be removed. Then, having started in the normal operating mode of the system, the video driver will need to be installed again.
3.1. Safe Mode for Windows 7
In the case of Windows 7, this process will be easier due to the ease of entering safe mode. You need to do a hard reboot using the Hard Reset button and press the F8 key when starting the computer. Once in the additional boot options menu, you need to select the “Safe Mode” option.

3.2. Safe Mode for Windows 8.1 and 10 using their installation media
For Windows 8.1 and 10, the F8 key does not work, just as in most cases its analogue, the Shift+F8 combination, does not work due to the reduced system startup time. You can get into safe mode in these versions of the system, without seeing anything in front of you, using the installation media of any of these versions - be it Windows 8.1 or Windows 10. Reboot the system using the Hard Reset button, go into the BIOS and set the boot priority from DVD -disk or flash drive. At the first stage of installing Windows, press the Shift+F10 keys to launch the command line. In its window we enter:
bcdedit /set (default) safeboot minimal
Press Enter. And we wait for notification of the successful completion of the operation.

Close the command line window. In the Windows installation start window, click “Next”.

Click “System Restore”.

Then select “Continue”.

After restarting the computer, Windows will boot into safe mode.
3.3. Safe Mode for Windows 8.1 and 10 with Recovery Disk
If you previously created a Windows recovery disk, you can use it in the same way as an installation disk or flash drive. After booting from the recovery disk and selecting your keyboard layout,

you need to select “Troubleshooting” (this menu option can also be called “Diagnostics”),

then – “Advanced options”,

and then launch the command line.

In its window, enter the above command and press Enter.


3.4. Safe mode for Windows 8.1 and 10 blindly
If there is neither installation media with Windows 8.1 or 10, nor a recovery disk, if there is no second computer with which any of them could be organized, or you are simply too lazy to bother with all this, you can try to enter safe mode from a working but invisible system blindly. But in this case, you need to carefully enter values, know exactly what language the keyboard layout was in before experimenting with screen resolution, and also be in the Windows environment, and not inside a 3D application (not all games can be minimized by pressing the +D keys ). So, what actions need to be taken blindly?
Step 1: If the layout was not in English, switch to it using the +space keys.
Step 2: launch the command line as administrator by successively pressing the keys +Q, cmd, Ctrl+Shift+Enter.
Step 3: if the speakers are working, we will hear the usual UAC system sound; Press the left arrow, then Enter.
Step 4: enter the command line command mentioned above
In the modern world, everything is changing rapidly. Cameras of all models, from the cheapest point-and-shoot cameras to professional DSLRs, can shoot HD quality videos. This video is also possible for expensive mobile phone models. DVD video standards are a thing of the past.
Film studios are making new spectacular films with previously unavailable effects. The requirements for video and television equipment standards are also growing. Viewers want films shot in higher quality images - they want to view them on wide screens, not just on a computer monitor.
What is screen resolution TV 1920x1080
Screen resolution is what affects the clarity of the image. This is the quality of pictures and text messages. Unit of measurement of resolution - responsible for the formation of the image on the screen. Today, when purchasing a TV with a plasma or LCD screen, you will probably come across the term Full HD - 1920x1080, which the seller will definitely tell you about.
These TVs are now available in every major store, they are affordable, and these are what customers are now looking for. If you answer that you don't know this term, the seller will add that this mark is the best recommendation for a TV, and the 1920x1080 resolution is an indicator of high picture quality.
How to choose a TV
When you are choosing a TV, pay attention to the measurements measured in inches. One inch is about two and a half centimeters. But large screen monitors are demanding on the video card. That is, if you bought a modern twenty-four-inch diagonal monitor, then expect that your iron horse will slow down slightly.
Budget 18-19 inch monitors are only good for their price. And for those who love battle scenes on the big screen, monitors with 27 inches diagonal are suitable.
Some people are now wondering why modern monitors are so narrow and elongated. There is an explanation for this. For modern films there are standards for the shooting format. They are filmed like this, with an elongated and narrow image. If you watch a new movie or play a modern game on an old square-shaped monitor, the picture will be small, and not everyone will like it.
FullHD or HD Ready
On the packaging boxes of TVs, in addition to the FullHD inscriptions, you often find other inscriptions - HD Ready.
What's the difference?

In 2005, the European Association of Telecommunications Technologies and Information Systems adopted standards for new TV models that will display video with high quality parameters. They are divided into two categories: HD Ready and FullHD.
HD Ready supports the minimum resolution for this class - 720 lines, and FullHD, where the screen resolution is 1920x1080, is capable of handling video with 1080 lines.
This name was picked up by the Japanese company Sony when, in 2007, it named a number of its products as the FullHD brand. Other companies in this market segment began to call their products the same way.

Therefore, most of the FullHD LCD and plasma television receivers sold nowadays (translated from English as “full screen resolution 1920x1080”) have a screen aspect ratio of 16 by 9 and support videos with 1080 lines of image. Such images compare favorably in quality with a simple DVD, they are clearer and of higher quality.
So what is screen resolution, how do screen settings affect the picture we see on the monitor?
The TV screen, whatever it may be, plasma or liquid crystal, is a matrix that consists of pixels located horizontally and vertically of the screen. Their number is called matrix resolution. Screen resolution comes in many types, but the most famous ones are 1024x768, 1366x768, and many others.
Types of television signals
The highest resolution now is Full HD - 1920x1080.
Television signals also have a resolution that has not yet reached a common standard throughout the world. In the USA, for example, the type is called NTSC (with a resolution of 640 by 480 pixels). In European countries, PAL signals and SECAM signals with a resolution of 720 by 576 pixels are used.

The signal may also differ in frame rate: fifty or sixty hertz.
Every modern TV has a processor that converts incoming signals to the standard that the TV matrix corresponds to. If the incoming signal and the matrix had the same standard pixel resolution, then the image would immediately be clear and of high quality. But, since signal standards are different in types, parameters and matrices, the TV must independently convert the signal in order to show a clear image.
Progressive and interlace scanning
The range in which TV channels broadcast is small. There is not enough space for everyone. The image transmitted by the channel can be formed in two ways. Progressive, which displays all frames completely (where the lines - even and odd - follow one another), and interlaced.
To save space on air, a scan was invented that reduces the frame rate by half. It was called interlaced. First, the first half of the frame is transmitted in odd lines, then the second half in even lines. Interlaced scanning would look blurry if there was no way to restore image quality.
In order to explain the method that forms the image, after the number of lines the initial English is written: “p” or “i”. For example: a resolution of 1920 x 1080p indicates that the picture was generated in a progressive way. And the 720i marking will mean that the video has 720 lines. And the letter i stands for the interlaced method. In order to indicate the format, the second-by-second frame size is indicated. When they say 1080p30, this means that there are thirty frames in this video, running per second. The higher the number of frames, the better and more detailed the picture looks.
Full HD requirements
The latest generations of televisions display images of both types of scanning. Thus, a screen resolution of 1920x1080 and a 16:9 aspect ratio must be present on a Full HD TV. These are the standard requirements for this type to display the incoming video signal.
Therefore, a resolution of 1920x1080 would mean that the TV has 1920 horizontal dots and 1080 vertical dots. Such TVs will catch high quality signals accepted in the world (HDTV standards).
Tricolor TV, a commercial TV operator, has been offering a package since 2012 that includes twenty-five HD quality channels. Someday, such channels may be free for everyone.
If you have problems with your monitor, font or image is not clear, you need to understand that this changes due to the resolution value. Let's say, when the resolution is set to a high value, say 1920x1080, then objects will be clear. And a larger number of them will fit on the monitor. And with a low resolution, say 800 by 600, fewer objects will fit on the monitor, but they will look larger.
But this does not mean that you can set the screen resolution you like to 1920x1080. It may not be supported by your monitor or TV model. CRT monitors support a resolution of 1024 by 768 pixels or 800 by 600 and are suitable for all types. LCD monitors and laptop screens support high resolution. And they work with the look that is suitable only for their model.
A large monitor equals an equally large resolution. It improves clarity and reduces image size.
How to adjust monitor resolution in Windows 7
To do this, you need to go to the "Start" menu, then go to the "Control Panel", and then go to "Appearance" and "Personalization". Then go to the “Resolution Settings” of the monitor. Now expand the list next to “Resolution”, use the slider to set the resolution you need, then click the “Apply screen settings” button.
Later models of monitors, based on liquid crystals, work with their own resolution. It does not need to be configured - it is already recommended for this type. Such monitors are divided into two types: with a ratio of 16:9 and 16:10 and standard with a ratio of 4:3. If you compare them, widescreen has a larger width and horizontal resolution.
If you don’t know the monitor resolution, you can find it out from the reference book, on the manufacturer’s website, or from the EDID.
What is EDID
There is a data standard that provides information about the monitor and its parameters, where it is made, its resolution, size, color quality characteristics, and so on.
If you can’t find out by EDID, then how to set the screen resolution
What should you do if, when you connect a TV receiver with a large screen, the image does not fit and looks cut off at the edges? To solve the problem, you need to update your computer's video card drivers. After this, specify your model in the computer settings as the base, or main monitor. Then you need to make sure that the TV is connected to the computer via a digital connection, and also that there are no restrictions on it.
Install the Moninfo EDID program (it is available on the Internet). After that, check the resolution of your TV in it. If it is supported, that's good. If not, then you will have to edit the EDID and set the resolution yourself.
If the image does not fit
To deal with this problem, you need to turn off the Overscan option on your television receiver.
If this is a computer, then after the mandatory video card, you need to right-click on the desktop. If you have a GeForce video card, then go to the NVIDIA program settings. If you have a Radeon video card, then go to the Catalyst Control Center program. Then adjust the parameters using the slider in the “desktop” settings to the required value.
How to adjust resolution

First you need to disable EDID.
Then set the resolution to 1920x1080 in the screen properties.
Reinstall the video card driver (remove the old driver).
If the previous measures did not help, try reinstalling Windows.

I would like to hope that after this information, questions about how to set the screen resolution to 1920x1080 will be easier to resolve.
Good day! Many users understand permission as anything, so before starting to talk about it, I want to write a few words of introduction...
Screen resolution- roughly speaking, this is the number of image pixels per certain area. The more dots, the clearer and better the image. So, each monitor has its own optimal resolution, in most cases, which needs to be set for a high-quality picture on the screen.
In this article I will consider the issue of changing resolution, and typical problems and their solutions to this action. So …
What resolution should I set?
This is perhaps one of the most popular questions when changing resolution. I’ll give you one piece of advice: when setting this parameter, I primarily focus on ease of use.
As a rule, this convenience is achieved by setting the optimal resolution for a specific monitor (each has its own). Usually, the optimal resolution is indicated in the documentation for the monitor (I won’t dwell on this :)).
How to find out the optimal resolution?
2. Next, right-click anywhere on the desktop and select screen settings (screen resolution) in the context menu. Actually, in the screen settings, you will see the option to select a resolution, one of which will be marked as recommended (screenshot below).

You can also use various instructions for selecting the optimal resolution (and tables from them). Here, for example, is a clipping from one such instruction:
- - for 15-inch: 1024x768;
- - for 17-inch: 1280×768;
- - for 21-inch: 1600x1200;
- - for 24-inch: 1920x1200;
- 15.6-inch laptops: 1366x768.
Important! By the way, for older CRT monitors, it is important to choose not only the correct resolution, but also sweep frequency(roughly speaking, how many times the monitor blinks per second). This parameter is measured in Hz; most often monitors support modes of: 60, 75, 85, 100 Hz. To prevent your eyes from getting tired, set it to at least 85 Hz!
Changing the resolution
1) In video drivers (for example Nvidia, Ati Radeon, IntelHD)
One of the easiest ways to change the screen resolution (and in general, adjust brightness, contrast, picture quality and other parameters) is to use the video driver settings. In principle, they are all configured in the same way (I will show a few examples below).
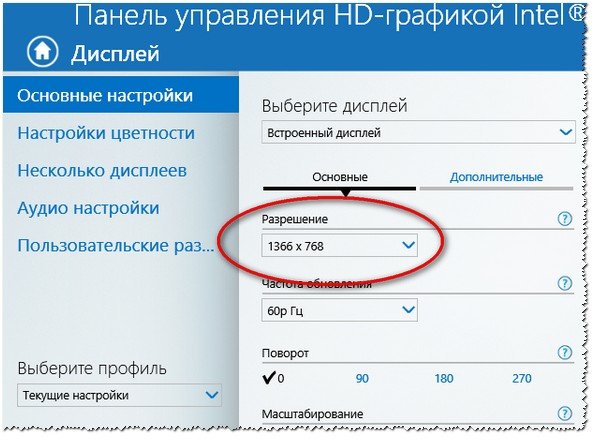
Intel HD
Extremely popular video cards, especially recently. In almost half of budget laptops you can find a similar card.
After installing the drivers for it, simply click on the tray icon (next to the clock) to open the IntelHD settings (see screenshot below).

Actually, in this section you can set the required resolution (see screenshot below).
AMD (Ati Radeon)
You can also use the tray icon (but not every driver version has it), or simply right-click anywhere on the desktop. Next, in the pop-up context menu, open the line “Catalyst Control Center" (note: see photo below. By the way, the name of the setup center may vary slightly, depending on the software version).


Nvidia
1. First, right-click anywhere on the desktop.
2. In the pop-up context menu, select “ Nvidia Control Panel"(screenshot below).


2) On Windows 8, 10
It happens that there is no video driver icon. This can happen for several reasons:
- reinstalled Windows, and you have a universal driver installed (which comes with the OS). Those. there is no driver from the manufacturer...;
- There are some versions of video drivers that do not automatically put the icon in the tray. In this case, you can find a link to the driver settings in the Windows Control Panel.
Well, to change the resolution, you can also use control panel. In the search bar, type “Screen” (without quotes) and select the coveted link (screen below).


3) On Windows 7
Right-click on the desktop and select " Screen resolution"(this item can also be found in the control panel).

Next you will see a menu that will display all the possible modes available for your monitor. By the way, the native resolution will be marked as recommended (as I already wrote, in most cases it provides the best picture).
For example, for a 19-inch screen the native resolution is 1280 x 1024 pixels, for a 20-inch: 1600 x 1200 pixels, for a 22-inch: 1680 x 1050 pixels.
Older CRT-based monitors allow you to set the resolution much higher than recommended for them. True, a very important quantity in them is frequency, measured in hertz. If it is below 85 Hz, your eyes begin to ripple, especially in light colors.
After changing the resolution, click "OK". You are given 10-15 seconds. time to confirm settings changes. If you do not confirm within this time, it will be restored to its previous value. This is done so that if your picture becomes distorted so that you cannot recognize anything, the computer will return to its working configuration.
4) On Windows XP
Almost no different from the settings in Windows 7. Right-click anywhere on the desktop and select “properties”.


Here you can select the screen resolution and color quality (16/32 bits).
By the way, the quality of color reproduction is typical for old CRT-based monitors. In modern ones the default is 16 bits. In general, this parameter is responsible for the number of colors displayed on the monitor screen. Only a person is practically unable to distinguish the difference between 32-bit color and 16-bit (perhaps experienced editors or gamers who work a lot and often with graphics). Whether it’s the butterfly’s business...
PS
Thank you in advance for any additions to the topic of the article. I have everything for this, the topic is fully covered (I think :)). Good luck!
The issue of changing the display resolution and selecting its optimal value is quite acute for novice Windows users. Today we will touch on its solution, considering several different options for getting out of the situation.
What is permission
Typically, screen resolution refers to the size of the image formed on the display in pixels. It implies a value relative to the physical dimensions of the matrix: the number of pixels is divided by the physical size of the display in inches. That is, the number of pixels does not increase in proportion to the physical size of the display, which immediately dispels the myth: the larger the screen, the higher its resolution.
Changing the resolution may be necessary after reinstalling Windows or drivers for the video card, if its value was not set automatically. It is also necessary to expand the screen when launching games - routines do not always correctly determine the resolution settings in Windows in order to apply them to the game.
Solving the problem in Windows 7
You can change the resolution value (the number of pixels vertically and horizontally) on your computer using several methods.
Feature integrated into Windows
To expand the screen in Windows 7, we perform a list of simple actions that any beginner who wants to choose the optimal value for the number of pixels used to display the image on the display can handle.
- Call the context menu of the desktop area free of icons and select “Screen resolution”.
The second method to open the same window is through the Control Panel item called Display. Click on its icon and select “Adjust screen resolution”.

- In the line of the same name, select the desired value from the list of suggested ones.
- Click “Apply” to evaluate the selected settings.

Follow the advice of the monitor developers and select the optimal setting value they recommend. There is always a “Recommended” sign next to it. If there are two or three items in the list, check whether the drivers are installed on your video card. Without them, you won't be able to change the resolution to a higher resolution than 1024x768.
Video card driver
If you have a video adapter driver installed, you can change the extension using the software that comes with the driver. Moreover, these programs will differ for different video chip manufacturers, but the principle will remain the same, and the algorithm for changing the extension value will be almost identical.
nVidia
When using more popular and, as a result, more expensive with the same performance, video cards from nVidia, the control panel for device operating modes will help you change the resolution.
- Call the context menu of free desktop space.
- Select the item highlighted in the screenshot to launch the window for setting up various video card parameters.

- Expand the “Display” menu item, where we click on the link shown below.

- When using multiple monitors, select the target for which we want to change the settings and determine the resolution value.
As already mentioned, you should choose your own resolution, assigned to the first position.
- Apply the new settings and close the window.
If you have a video card developed on an ATI graphics chip from Radeon, we perform the following steps in Windows 7.
- Call up the desktop context menu and click on the first item in the drop-down menu, or open the application through its icon in the tray.

- Click on the “Display” button, then click on “Advanced settings”.

- Select the desired parameter or enter it manually (which is also allowed) and save the changes made.
Third Party Applications
In addition to the proposed options, which are considered classic, it is possible to change the resolution using special programs. These are utilities for setting up the monitor, overclocking and configuring the video card.
Let's look at how to do this in a video adapter overclocking application called PowerStrip and a program designed to set display performance characteristics.
- Launch the PowerStrip program in Windows.
- Drag the slider located in the “Resolution” frame.
- Click “Save” to apply the parameters.


