Setting up a channel in a Wi-Fi router, how to choose a free one: or why frequent Wi-Fi cuts, low speed, poor quality of coverage. Wi-Fi: non-obvious nuances (for example, a home network)
So, most Wi-Fi routers operate at 2.4 GHz (more modern and expensive ones also support 5 GHz, in more detail in the article Wi-Fi 2.4 GHz vs 5 GHz ), this implies the use of the 2400MHz-2483.5MHz band with a step frequency of 5MHz. these bands form channels, for Russia there are 13. Pay attention - for Russia, since when setting up Wi-Fi, a choice of country will be provided, you must select the country of use of the router, for example, by choosing the USA, you will be able to access channels from 1 to 11. What is the threat? - If the wireless adapter installed on the computer / laptop / tablet / smartphone is intended for use in the USA, it will only be able to use channels 1 to 11. Therefore, if you set the channel number 12 or 13 on the router (or one of them will be selected automatically), the wireless client will not see the access point. In this case, you need to manually set the channel number from the range from 1 to 11.
Table of dependence of the frequency and number of the wireless channel.
| Channel | Lower frequency | Center frequency | Upper frequency |
| 1 | 2.401 | 2.412 | 2.423 |
| 2 | 2.406 | 2.417 | 2.428 |
| 3 | 2.411 | 2.422 | 2.433 |
| 4 | 2.416 | 2.427 | 2.438 |
| 5 | 2.421 | 2.432 | 2.443 |
| 6 | 2.426 | 2.437 | 2.448 |
| 7 | 2.431 | 2.442 | 2.453 |
| 8 | 2.436 | 2.447 | 2.458 |
| 9 | 2.441 | 2.452 | 2.463 |
| 10 | 2.446 | 2.457 | 2.468 |
| 11 | 2.451 | 2.462 | 2.473 |
| 12 | 2.456 | 2.467 | 2.478 |
| 13 | 2.461 | 2.472 | 2.483 |
It can be graphically depicted as follows:
As you can see, the 3 channels (highlighted in bold) do not intersect with each other 1, 6, 11.
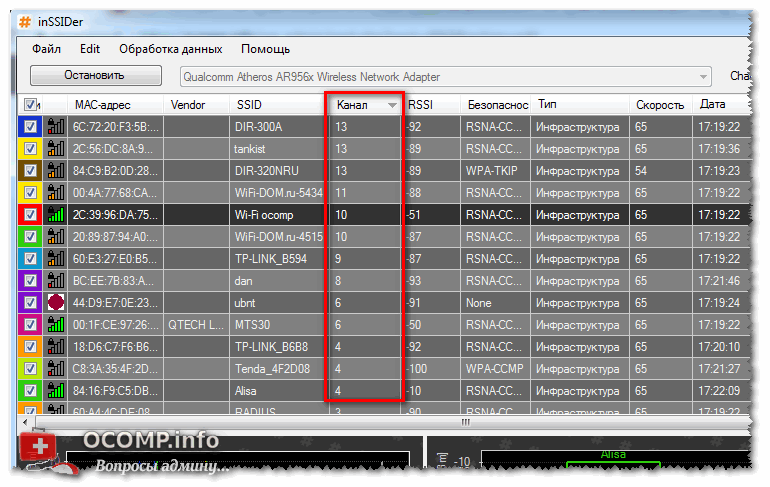
All routers operating at a frequency of 2.4 GHz use some one (or two at once) channels, but how to understand which channel is used by neighboring routers ?! To do this, you can use any of the many Wi-Fi programs, for example the free inSSIDer program. Everything is quite simple, download it to a laptop (or to a tablet / smartphone with Android / IOS OS), install, run and see all the available information about the access points operating nearby (routers / routers). For example, what picture I saw.

The program gives a lot of information about neighboring Wi-Fi networks and routers, we are interested in the Channel. Below you can see a graphical representation of the channel usage, on which it is more clear which channel is more busy and which is more free. In my case, there are more free channels from 8 to 13. The most attentive readers will notice that there is a 5 GHz field on the right and it is empty, this is due to the fact that this is a free version of the program and part of the functionality is cut in it, in particular, viewing Wi-Fi networks at a frequency of 5 GHz.
After you have selected a free channel, you need to specify it in the settings of your router. To do this, you need to go to the web interface, go to the Wi-Fi settings and specify a free channel.
How to change the wireless channel on Dlink routers.
http://192.168.0.1, login for access is admin, default password is admin. In the web interface, click the button "Advanced settings", then look for the section "Wi-Fi" - "Basic settings".

Change the channel and save the settings.
How to change the Wi-Fi channel on Tp-Link routers.
Open a browser (IE, Chrome, Opera, Firefox), enter the URL of the web interface in the address bar - http://192.168.1.1, login for access is admin, default password is admin. Then go "Wireless Mode" - "Wireless Mode Setting" specify a free channel and save the settings.

How to change the Wi-Fi channel on ASUS routers.
Launch any browser, enter the ASUS web interface URL in the address bar - http://192.168.1.1... Login for access is admin, default password is admin. In the web interface, in the left menu, click the " Wireless network", tab" General". Specify a free channel and save the settings.

How to change the Wi-Fi channel on Zyxel routers.
Open any browser (IE, Chrome, Opera, Firefox), enter the URL of the web interface in the address bar - http://192.168.1.1... The login for access is admin, the default password is 1234. In the web interface, click the " Wi-Fi network"and on the" Access point", change the Wi-Fi channel and save the settings.

How to change the Wi-Fi channel on Netgear routers.
Open any browser (IE, Chrome, Opera, Firefox) and enter the URL of the web interface in the address bar - http://192.168.1.1... Login for access is admin, default password is password. In the web interface, go to the " Wireless network"and change the channel in the right field, then save the settings.
Good time everyone!
I think that many of the users have encountered poor Wi-Fi network performance more than once: either the speed is low, the connection is cut off, the quality of the coverage is poor, or something else ... All these "troubles", by the way, can happen due to the fact that you have "incorrect" selected in the settings of the router channel.
Many people underestimate this option in the settings, and very rarely pay attention to it (how much in vain!). If you live in a large apartment building (where neighbors have their own Wi-Fi routers), then when the channels overlap, the connection quality can deteriorate significantly!
Actually, in this article I wanted to tell a little more about the channels: how you can find a free one, how to set it in the Wi-Fi router settings. I believe that checking this moment will not take so much of your time (but if the reason was this, you will significantly improve the quality of your Wi-Fi network!).
A brief educational program about channels and interference
Most routers today operate at 2.4 GHz. In our country, it is allowed to use from the 1st to the 13th channel - i.e. each Wi-Fi network operates in this range (note that in other countries other channels may be allowed and used. For example, in America, from 1 to 11 are allowed).
By the way, if your Wi-Fi network will use the 13th channel, then a device localized to work in the USA will simply not be able to work with this network ...
As I said above, the problem can arise when several routers (located not so far from each other) start working on the same channel. This is especially common in large apartment buildings. Because of this, there may be a decrease in speed, frequent breaks, and poor coverage.
In general, by default, most routers have auto-select channel option: i.e. when the device is turned on, other Wi-Fi networks must be "analyzed" and either a free channel or the least "loaded" one must be established. But I will note that this does not always happen: the "stuffing" of routers fails, and they do not reboot very often ...
In this case, the "manual" setting can help out. With the help of specials. utilities, you can find out what Wi-Fi networks are in the area and on what channels they work. After that, open the router settings, and set a specific channel (for example, the 5th).
Note! By the way, poor Wi-Fi coverage can be not only due to an incorrectly selected channel, but also due to an incorrectly chosen location for installing the router (see diagram below). In general, regarding how you can strengthen the Wi-Fi signal, I recommend this note:

On the question of the choice and location of the router in the apartment
How to find a free channel
There are special utilities for this. I'm impressed WifiInfoView ...
WifiInfoView
Official site (download page):
A very lightweight utility that does not need to be installed. All you need to do is download it and run it. Then it will automatically find all Wi-Fi networks in the area, show the MAC addresses, signal quality, frequency, channel, router manufacturer, etc. (see screen below).
After launching the utility, it will "think" for a second. 10 ÷ 15, then you will be presented with a list of networks. Pay attention to busy channels: does your channel overlap with some others? In general, ideally, you need to choose a channel that does not intersect with anyone, if there is none, take the one that is less common among others.

By the way, if suddenly the previous utility does not work for you, you can use its analogue. It works completely similar to the previous one, it even supports the Russian language. By the way, in my opinion it is more "sensitive", tk. often shows more networks.
How to change the channel in the router settings
Of course, a lot depends on the model of your router and its firmware. First you need to (also many call them a web interface). Further, as a rule, you need to find the section "Wireless settings" (if English firmware - see "Wireless Settings"). "Channel" is called that, in English. "Chanel".
For example, in TP-Link routers, it is enough to open the "Wireless Mode" section, the "Wireless Mode Settings" tab, and in the "Channel" line, instead of "Auto", specify the channel that you need.

If you have English. firmware version (TP-LINK) - see the "Wireless Settings" tab. See example below.

In D-Link routers, to change the channel, just open the main Wi-Fi settings tab (see screenshot below).

In Tenda routers, everything is, in principle, the same - the "Wireless Network Settings" tab, then at the very bottom, the "Wireless Network Settings" subsection.

After changing the channel, save the router settings and double-check the Wi-Fi network operation. In some cases, improvements are visible to the naked eye.
If it doesn't help, then pay attention!
If the quality of the Wi-Fi network has not improved, then pay attention to several more factors. I will give the most basic ones below.
1) Location of the router in the apartment.
If the router is located too far from the laptop (tablet, phone), and even behind two concrete walls, then it is not surprising that the signal may be weak. Also pay attention to the number of antennas on the router - when buying a new router, give preference to devices with 4 antennas.

By the way, antennas with signal amplification are now being sold for routers (see the screen above). Such antennas, for example, can be purchased in Chinese online stores.
Note! The best Chinese online stores are featured in this post:
2) Routers operating at 5 GHz.
Now, routers operating at a frequency of 5 GHz have begun to appear on the market. Their signal does not interfere with other routers and household appliances, which improves the quality of the network.
3) Special. enhanced Wi-Fi adapters
If you have a "weak" Wi-Fi adapter installed in your laptop (tablet), then it may make sense to purchase a special one. powerful external Wi-Fi adapter. Note the difference in reception in the example below.

4) If the neighbors got it ...
If you are tired of your neighbors with their Wi-Fi adapters, radios, and other devices that "clog" your space with waves, then you can go for radical methods: install a thin "lattice" on the walls (placed under the wallpaper on the walls), which will reliably isolate your the room from external waves and interference. Of course, this is rarely done in apartments, but nevertheless (by the way, some isolate children's rooms in such a way that it affects the health of the child) ...
Constructive comments are always welcome.
That's all for now.
I am often asked the question of how to change the Wi-Fi channel on the router. First you need to figure out what it is, what it is for and whether it needs to be changed at all. A router channel is a "pre-frequency" of the main frequency of operation of most router models - 2.4 GHz or 5 GHz. Within this frequency, the air is divided into 11 (in the USA) or 13-14 (Europe) gaps or channels. The channel is the path from our PC to the router.
Why it is necessary to change the channel
Using the router settings, we can set the automatic channel selection by the device itself, or manually set the maximum free interval with a confident and strong Wi-Fi network signal. It seems like nothing complicated, you must agree.
The question of how to change the channel on the router becomes an edge when there is an overlap of signals from neighboring devices using the same path. This is a very common situation in apartment buildings or offices, where dozens of routers can simultaneously "see" each other on the network. And since there are only 13 frequencies, there are frequent cases of simultaneous use of one channel by several devices, which often leads to a malfunction of the Wi-Fi network, expressed in connection instability, low network access speed, device freezing.
The solution to this problem is partially achieved by auto-installation, when the router automatically searches for the most unloaded path and works on it (TP-LINK, for example). And what about those owners of routers who have one channel set by default (in some D-Link models it is 7) and here it is no longer possible to avoid a conflict of devices when working together at the same frequency. Here, manual installation of a new channel for the router will help us.
Summarizing the above, we conclude that when a set of Wi-Fi networks and points and access is found in one place, conflicts in the operation of the equipment are possible:
- low access speed;
- frequent loss of connection with the router;
- problems connecting to your network from a remote part of the room with a strong signal.
For the most part, all these problems are solved by simply changing the path in the settings of the router, if it is not associated with technical problems in the form of equipment breakdown or violation of the integrity of the cables. So let's start with smartphones.
How to select a Wi-Fi channel on a router via a smartphone
For smartphones or tablets, there are several programs for analyzing the state of networks, the most common is Wi-Fi Analyzer.
- We go on our phone in Google Play, download this program and run it.
- The rating depends on the number of stars. The more of them, the higher the channel rating, the lower the level of interference, the higher the priority.
Selecting a Wi-Fi router channel using the Wi-FiInfoView program
On a computer or laptop, they usually use either the InSSIDER program or Wi-FiInfoView for the test. Let's take a look at the last program that does not require installation on disk. And even if it is not as functional as InSSIDER, it will give us all the information we are interested in.
- Download the program and run Wi-FiInfoView.exe. The Channel column shows the channel number for all found networks.
- We mark the busy channels for ourselves and select the free one, which we indicate in the router settings. At the end of the article, we will analyze how to change the Wi-Fi channel on the router.
Setting up a Wi-Fi router channel
There is nothing complicated in the process of setting up a router for a new channel. All we need is:
- The IP address of the router (usually found on a sticker on the bottom of the device);
- password for entering the router menu (on the same sticker).
On TP-LINK router
- We launch the browser and drive 192.168.1.1 into the search bar. If it doesn't work, then try tplinklogin.net
- When a menu appears that asks for a username and password, enter the name admin and the password admin (by default).
- In the settings menu that opens, click on Wireless and then Wireless Settings - wireless settings.
- Left-click on Channel and select any of the 13 static channels, while making sure that your country is selected correctly (Region tab) just above the page.
- We save the changes via “Save”, reboot and test the network.
In principle, all other router models have the same move for changing the channel with slight nuances. So, in D-LINK models:
- We register 192.168.0.1 in the browser window.
- We specify the username and password (admin and admin).
- In the "Settings" menu, open the Wi-Fi tab.
- We select the country of residence (Region) by clicking on the "Channel", we make its change.
- We save the changes with the "Apply" button.
We enter the settings menu as standard:
- We drive in the address 192.168.1.1, the same admin and admin as the name and password.
- Open on the left in the "Wireless network" menu.
- On the next page, set up a new channel.
- Apply button to save.
On Zyxel
We repeat the previous steps:
- Enter 192.168.1.1 in the browser.
- In the menu for entering the name and password, enter admin and 1234, respectively.
- In the next menu, click on "Wi-Fi network", check the correctness of the country selection and change the channel.
- We are saved.
On a Tenda router
- The settings will open at 192.168.0.1.
- The username is admin, we do not enter anything in the “password” field.
- Open "Wireless settings" in the menu.
- In "Channel" select the required value for the channel.
- We save through "Ok".
There are cases when all the methods of correcting the situation do not work - this happens in places where there are a huge number of wireless networks and devices, and no matter which channel you choose, the problem is not solved. Check if your router supports 5GHz - perhaps your model is already hopelessly outdated and you should think about purchasing a more modern version.
I dare to hope that now you have learned all about how to change the channel on the router.
How to change the channel on the router: Video
I work as a private computer foreman. I have been professionally engaged in computer repair for over 12 years, as an amateur since the 90s.
For two years he worked as the head of a service center specializing in connecting subscribers to the Internet and computer assistance.
Users often ask the question of how to change the channel on the router so that the Wi-Fi network works better. At first glance, everything looks simple: we find a free radio channel, set its number in the web interface, and save the settings. With this, the wireless network may cease to be visible at all, and we will consider why. And in principle, no one guarantees that at least one radio channel must be free. We will consider situations that can be called non-standard, and indicate how to act in them.
ASUS web interface,
Most routers have 11 channels and auto select available. The default, of course, is "auto". When setting up, it is recommended to do this: at first everything remains by default, then you see which of the channels is actually used by the network, and this "real number" is then set instead of "auto". But the interface of ASUS routers, for example, does not display the radio channel number if Auto Select is used. Therefore, to determine the channel number, you need to have a subscriber device (at least one).
Wi-Fi setup, step by step instructions
If we are setting up a mobile router, the value "auto" should remain in it. If the Wi-Fi network is organized in an apartment or in an office, then it is better to set the radio channel number "explicitly" once and for all.
In this case, there may be problems: when the web interface allows you to select from 13 channels, and not from 11, then in some cases this is a "plus", but not in all. Many subscriber Wi-Fi adapters "do not know how", that is, they cannot work on the 12th or 13th channel. And this is one more argument to choose the value of the number "explicitly", and not rely on automation.
Procedure for setting up
So, having entered the web-interface of the router, we select the "auto" parameter and save the settings:

"Wireless Network" -> "General", ASUS
If this option is not provided, then they act differently, and below we will consider how. And now, to make sure that there is a network, take any subscriber device and open the list of networks:

Wi-Fi connection, Android
If what you just configured is on the list, then read on in this chapter. If not, go to the next one. Alternatively, try using a different device, including a PC with a Wi-Fi adapter.
We will try to determine which radio channel our router chose. If you are using an Android device, download and install the “Wi-Fi Analyzer” application (available on Google Play). By launching this application, you will immediately see a graph that displays all networks, including ours:

Wi-Fi Analyzer application window
In this example, obviously, the automation did not work quite correctly: it was necessary to turn on the 10th channel, or even the 11th. So, we go to the web interface and fix the error (set the value to "11"). There is also an application for Windows that allows you to find a "free" radio channel, and it is called "inSSIDer". You need to use this program in the same way as the reviewed Android application.
If something didn't work out
Let's note right away: in order not to select the channel number "by typing", in any case, you will need a device with an application that analyzes the broadcast installed.
We talked about these applications above. But "Wi-Fi Analyzer", if you download it from "Google Play", does not work at all without a valid Internet connection. That is, the choice is simple: either you have to use the "Wi-Fi Analyzer" not quite legally, or you will just go through the radio channels. There is no such problem for Windows applications.
So, we take a device that analyzes the ether, that is, a PC or a smartphone with a suitable program. Let's see what range is free:

"InSSIDer" program window
Of course, you need to check the broadcast when the configured router is turned off. Then, turn it on to enter the interface and set a number from "1" to "13". And you need to choose this number according to the following rules:
- If a channel width of 40 MHz is used, then one Wi-Fi network occupies 8 bands, and not 4, as in the figure. Some routers know how to "split" a solid strip in two, but you should not rely on this. In our example, you need to select the number "10" regardless of the value of "Width" (which is set to "20" or "20/40").
- If possible, do not select the main channel number 12, 13, 14. If there are no other options, then make sure that each of the devices can actually be connected to such a network.
Those who do not have the "auto" setting in the web interface can use the same tips.
Let us explain once again how the Wi-Fi network is organized. It is clear from the figure that 4 lanes are always occupied, which, moreover, run in a row. The 5THCONFL network occupies the following interval: 4-5, 5-6 ... 7-8. This means that the main channel here is the sixth, and the bandwidth is 20 MHz. And the additional radio channel will be located next to the main one (close to). Together they will occupy a bandwidth of 40 MHz. That is, the "5THCONFL" network can take a 4-12 interval, if, of course, the "40 MHz" mode is activated.
Non-standard situations and solutions
Using a program that allows you to analyze the air, usually you will see the following values: -40 dB ... -50 dB. Here we are talking about the signal strength typical of a standard access point. Being at a distance of 5-6 m from the router, it is generally impossible to get a value better than "-45 dB". Note that "-6 dB" corresponds to a 4-fold decrease in power or a decrease in amplitude by half.

Analysis result, AP is off
Anything that is "below -65 dB" should not bother us at all. But for the example shown in the figure, it is better to exclude the band 1-7 from use. Depending on the capabilities of the router and on the requirements for the network, the following main channel number is selected:
- 9 - if the router “cannot” work on channel “number 14”, but you definitely need a network that uses the “40 MHz” mode.
- 10 - you need "40 MHz", and the router can use the 14th radio channel (in Russia it is officially prohibited).
- 11 - It is enough for you to use the "20 MHz" band.
It looks like we figured out how to configure wireless networks completely. If something is not clear, ask a question in the comments. Happy routing!
An example of using a spectrum analyzer
The fact is that routers (routers) with Wi-Fi began to be used very widely and your neighbors in the house also installed them.
Now the Internet is available in almost any apartment and it is very likely that Wi-Fi routers are installed in the apartments.
These Wi-Fi networks are located quite close, overlap each other and often operate on the frequency channels installed in the default routers by the manufacturer, creating excessive interference (congestion), creating interference with each other.
The entire band of frequencies used in household Wi-Fi in the 2.4 GHz region is divided into 11-14 overlapping channels, 22 MHz for each.
In the settings of the router, you need to select the channel (frequency range) with the least amount of interference.
But before that, you need to diagnose all the Wi-Fi networks around you.
The program is well suited for these purposes. inSSIDer.
You can download the program.
Installation of the program does not require any explanation, you just need to remember that it must be installed on a computer (laptop) with a wi-fi adapter.
Launch inSSIDer.
In the upper part of the window, you can immediately see which Wi-Fi points are working and on which channels.
At the bottom of the window, go to the "2,4 GHz Channels" tab (or "5 GHz Channels" if your router operates at this frequency) and look at the detailed channel map.

After analyzing the received data, we select the channel number and set it in the router settings.
Keep in mind that some devices only see channels 1 through 11, so if you want maximum compatibility with all devices, then limit your choice to channels 1 through 11.
Also, in the settings of the router, you can select a higher data transfer rate by setting the "Auto 20/40 MHz" option in the router, if it is there.


You can walk around the apartment with a laptop running the inSSIDer program and determine the points of maximum reception.
If something does not suit you, then try changing the installation location of the router, if possible, placing it in the center of the surrounding devices, as well as in an elevated place.
After such simple actions, you will restore normal Wi-Fi work.
It is also recommended to do the same for those who had no idea about Wi-Fi channels and use the factory settings in the router, perhaps you will improve the characteristics of your Wi-Fi network.


