Windows installer doesn't work. Windows Installer Troubleshooting
The installation of an application or program on a computer is not always successful.
When you try to install a software product on a computer running the Windows 7 operating system, a Windows Installer package error appears.
Reasons for the error
Read also: Everything about the NET Framework for Windows 10 Download methods, installation methods and common errors
Before you try to fix the problem, you need to find out the exact cause of its occurrence. The main reason for the error is the restriction of access rights.
In other words, when you run the installation file, the system cannot determine whether the user has sufficient rights to run it.
Often the message “Windows Installer package error” is accompanied by numbers and letters. This data indicates those folders to which the PC user does not have access.
The error may also be caused by the absence of several files in the installation program.
Some files can be destroyed by an antivirus program, mistaking them for malicious ones.
If the application was downloaded from a pirated resource, then it is quite possible that a number of files necessary for correct installation were initially missing.
When installing any application on your computer, you must disable or configure your antivirus program. It is recommended to perform these actions only when there is one hundred percent confidence that the file being installed will not harm the computer.
When installing which programs do you most often receive an error message?
Read also: How to change the Windows network type: Instructions for all versions (7/8/10)
A Windows Installer package error appears when installing files with the MSI extension, as well as programs such as iTunes, and Java emulators.
In the message containing the error text when installing Java, there is a numeric code - 1721. It reports that there was a failure during the installation of the program.

The reason may be hidden either in the lack of rights for installation or in the antivirus program. In order for the installation of files to become feasible, they must be added to the exclusion list in the antivirus settings.
If after this, the error remains the same, the problem lies precisely in the system’s permission to install the file.
Installing the iTunes application has its own characteristics, which will be discussed below.
Unable to install iTunes - Windows Installer package error
Read also: iMyFone TunesFix: solving all kinds of errors and problems when working with iTunes without losing data!
This error may occur when you try to install iTunes on a computer running the Windows 7 operating system.
To fix it, you can reinstall the operating system. Or, install iTunes correctly.
Correct installation of the program is carried out in the following sequence:
- On your computer keyboard, you need to hold down the “Windows” + “S” keys.
- In the program search window that appears, you need to enter the word “programs and components” and click on the result.

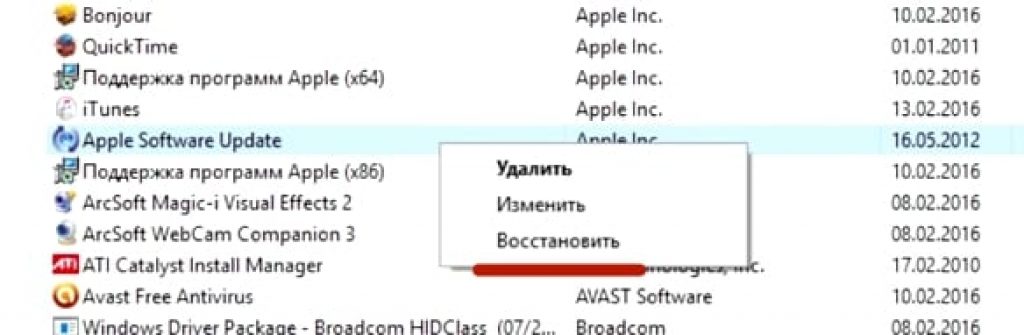
- In the list of programs, you need to find “Apple Software Update”.
- By right-clicking on the program, select the “Restore” sub-item of the context menu. If you click “delete”, then during uninstallation the message “Itunes Windows Installer package error” will appear. Then all you have to do is follow the on-screen prompts.

- After completing all steps to restore the program, it should be uninstalled. To do this, you need to return to the list of programs and click on the “delete” button.
- After uninstalling the program, the computer should be restarted.
- After rebooting, iTunes is installed again.
What to do if the problem persists?
Read also: TOP 3 Simple ways to clear RAM on a computer or laptop running Windows 7/10
However, the above actions do not always prevent a malfunction.
If after performing the above operations the error remains, then you should perform the following series of actions:
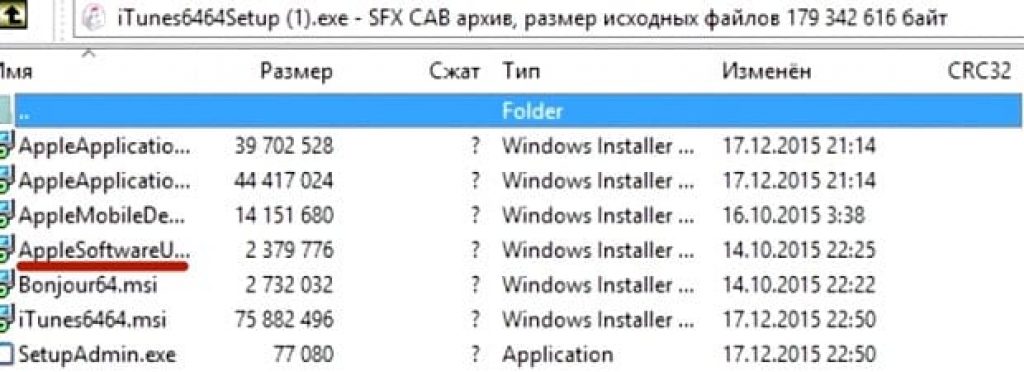
1 Right-click on the installation file and select the “open with” sub-item.
2 Select the archiver program from the list that appears.
3 In the window that opens, run the fourth file from the top.
4 Close the archive and try installing iTunes again.
5 The program can be easily installed on your computer.
The iTunes program must be downloaded from the official website.
When installing iTunes, the Windows Installer package error crashes. To resolve this issue, you should follow the steps above.
At the same time, you should not install system updates via the Internet. They must be downloaded from a flash drive or disk.
This will prevent Windows Installer package errors from appearing when installing iTunes on Windows 7.
Error when installing files with MSI extension
As mentioned above, the error can occur not only when installing iTunes, but also when trying to install any programs whose installation file has an MSI extension.
Files with the .exe extension are installed without any problems. This is because when working with MSI files, the download utility msiexec.exe is used.
Its failure to work may be the cause of the error.
If an error occurs during installation, then the reason lies in the installation file. The utility works as it should.
The error message can take two forms:


Before fixing the problem, it is necessary to diagnose the operation of the installation utility.
Diagnostics of the utility for installing files
Read also: [Instructions] How to enter Safe Mode in the Windows operating system (XP/7/8/10)
Diagnostics of the functioning of the installation utility is carried out as follows:
- Using the key combination “Win” + “R” you need to open a system window intended for executing commands;

- In the field you need to enter the command services.msc, and confirm with the OK button;
- In the service display window that opens, you need to find the Windows installation service (in this case, it is Windows 7);

- After double clicking on the service, the service configuration window should appear. All parameters must be set exactly as shown in the screenshot;

The above problems can be resolved by re-registering the installation utility in the Windows operating system. The re-registration process is carried out in the following way:
You need to open the command line, it can be opened in several ways: using the keyboard shortcut: “Windows” + “X”, or by launching the command line utility, which is located in the “standard programs” folder.
In addition to these methods, the command line can be launched using the cmd.exe command in the “Run” window.

The following commands fit into the 32-bit version of the operating system:

Commands for 32-bit version
In the 64-bit version of the system, you need to enter:

After finishing entering commands, they must be confirmed by pressing the Enter key. After confirmation, the computer should be restarted.
The command line is launched as an administrator. Command Prompt not only scans your computer for damaged files, but also replaces them with intact ones. To do this, the PC must be connected to the Internet.
After scanning the files and replacing them has been completed, you should restart your computer. After rebooting, you need to try running the installation file with the MSI extension.
In addition to the installer recovery utilities built into the system, Microsoft offers a third-party utility. It can be downloaded from the official website of the corporation.
It is worth noting that it works on Windows 7, XP, Vista.
Errors when installing applications from files with the .msi extension are one of the manifestations of problems with the Windows Installer service (in the Russian version, the Windows Installer). Users of all versions of this OS, with the exception of the earliest ones, encounter a similar phenomenon. Until now, the problem with the installer is one of the common reasons why users decide to reinstall the system. Let's try to figure out how to avoid this. The reason that Windows Installer does not work may be the following:
- viral infection, and removing the virus does not always solve the problem;
- incorrect installation of Windows updates;
- a malfunction of the security software when, instead of blocking one suspicious msi file, the installation service is blocked entirely;
- changes in computer security policies;
- Damage to system files or the registry for reasons not related to viruses (removal of installer components, unqualified editing of the registry, crooked software, hard drive failure, etc.).
Checking the integrity of the Windows Installer structure
The Windows Installer consists of the following components:- file C:\Windows\System32\Msiexec.exe - directly by the installer application itself;
- file C:\Windows\System32\msi.dll - Windows Installer library;
- Msiserver service, whose settings are stored in the registry key.
 If the files are missing, copy them from another system of the same version or from the installation disk. If the registry key is missing or damaged, also transfer it from the working system. To do this, on a working computer, run the registry editor (C:\Windows\Regedt.exe) and find the above section.
  Right-click the context menu of the msiserver folder and click "Export". Save the file in .reg format and transfer it to the problem machine.
  Double-click this file and agree to add data to the registry. Restart your computer.
  If the Msiserver service still does not start, check that the RPC (Remote Procedure Call) service on which it depends is running.
  You can re-register the installer files and restart the service using a set of special commands on the command line. For convenience, you can create a batch file: paste a set of actions into Notepad and save it as a .bat extension. To launch a file, simply double-click on it. For the changes to take effect, click on the desktop and press F5.
 Checking security settings and access rights
Windows Installer may not work because it is blocked by security software or the operating system does not have the necessary rights. First, let's look at the software. If you have an antivirus installed, temporarily disable it. Each product has its own methods of disabling, but most often this is done through the context menu of the antivirus icon in the system tray. Now let's take care of the rights. Open the context menu of Msiexec.exe and expand its properties. View the list of groups and users on the Security tab. Among them must be “System” and the “Trustedinstaller” service, and the latter must have full access to the file and be its owner. The system must have "read" and "read and execute" permissions.
  The Trustedinstaller service was first introduced in Windows Vista, so in Windows XP full access must be granted to the system. Everything written below applies to versions released later than XP. To check who owns Msiexec.exe, click the "Advanced" button on the same tab.
  In the next window, expand the "Owner" tab. Set the owner to the Trustedinstaller service if something else is specified as the owner. If it is not in the "Change owner to" list, click the "Change" button, and then click "Other users and groups."
  Enter Trustedinstaller in the "Enter names..." field, click "Check names" and OK. Return to the previous window. On the "Effective Permissions" tab, assign the necessary rights to Trustedinstaller and the system.
  The msi.dll library should have exactly the same security settings. Now let's check if there are any restrictions for the "System" user to access the following:
 - system drive (usually drive C);
- temporary folders (these are C:\Windows\Temp and C:\Users\Current_User\AppData\Temp);
- folder C:\Config.Msi;
- the folder where the msi file from which you are trying to install the program is located.
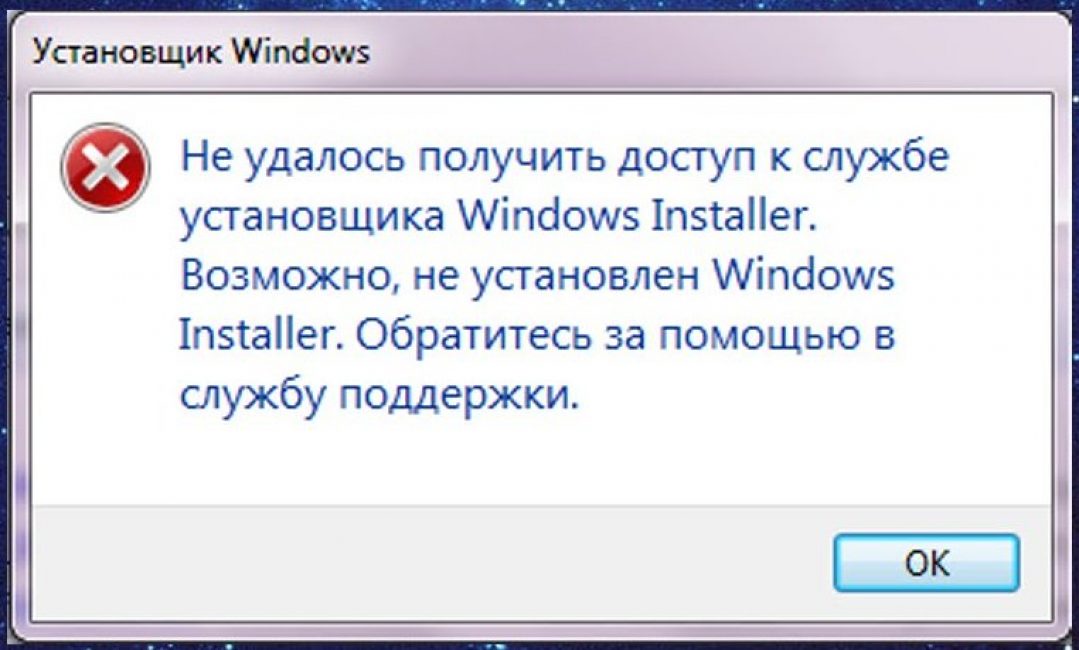
Sometimes it happens that when installing a program, you receive a Windows system message about the inability to access this service:
The Windows Installer service could not be accessed. The Windows Installer may not be installed. Contact support for assistance.
First, let's define what Windows Installer is. This is a system service that is responsible for installing, changing and uninstalling programs that have the .msi extension. There are several reasons why this problem occurs. Let's look at them below.
First reason The reason why this error may occur lies in the limitation of your user rights on this computer. In this case, you should try installing the program with administrator rights (this is done by right-clicking on the application icon).
Second reason may be hidden in system services settings, so check them. This is done like this: “Start” - “Control Panel” - “System and Security” - “Administration” - “Services”.

In the “Services (Local)” window that opens, at the very bottom of the list we find the “Windows Installer” section and double-click on this item with the left mouse button.

The installer service settings window will open, we need the “General” tab. The “Startup Type” line should be set to “Manual”. And make sure that the executable file is listed as:
C:\WINDOWS\system32\msiexec.exe /V
Instead of C, there may be, for example, the letter D - these are local drive letters.
Now go to the “Dependencies” tab. The large window This service depends on the following components should say “Remote Procedure Call (RPC)” as in the image below:

Third reason may be hidden in the program's association for files with the .msi extension. Open the "Start" menu - "Control Panel" - "Programs" - "Default Programs" - "Set Association". If your mapping is not set, or the Windows Installer is not specified there, you need to fix this, as shown in the picture below:

The installer program is called msiexec.exe and is located in the System32 system directory (it’s easier to find it by searching, as shown above).
I have had a couple of laptops damaged by “optimizers” and filled with programs installed together with them. Inexperienced users still believe in “optimizers” and don’t look at the checkboxes when installing, but that’s not the point. After cleaning, I started updating the software and unexpectedly (for the first time in my life) encountered the following error during installation:
The Windows Installer service could not be accessed. Windows Installer may not be installed. Contact support for assistance.
The error occurred during installation from msi (for which the service itself, among other things, is responsible). Maybe the service is turned off? We go to Control Panel - Administration - Services and do not find the one we need in the list. Did the optimizers optimize? We google for a long time, read a bunch of advice that doesn’t apply, study the question along the way and come to the following:
- Let's check whether Windows Installer actually exists on the system. Press Win+R, in the “Run” window that appears, write msiexec, click OK. If the Windows Installer Help window opens, the service is in place. But why is it not in the list of services?
- Let’s re-register the service in the system: open the “Run” window (Win+R) and write msiexec /unregister , then “Run” again and msiexec /regserver .
- Go to Services (Control Panel - Administrative Tools - Services), find “Windows Installer” (Windows Installer for the English version).
- Everything is ok. We check by installing from msi. If not, then my method did not help you, Google will help.
Safe Mode in Windows systems is one of the basic tools that allows you to restore system functionality. One of the significant disadvantages of safe mode is the inability to install/uninstall programs from msi packages. This limitation is due to the fact that the developers considered the service Windows Installer(Window Installer) is potentially unsafe, and decided to cancel the start of this service when the system boots in safe mode. Which in some cases is extremely inconvenient.
Most modern applications use the Windows Installer service for their correct installation/uninstallation, and if it is not available, their installation or uninstallation is impossible. Let's assume that in order to restore the system's functionality, it is necessary to remove in safe mode some application that interferes with the normal loading of the system (for example, an antivirus). When you try to run a standard uninstaller to remove an application, the system reports:
The Windows Installer Service could not be accessed. This can occur if the Windows Installer is not correctly installed. Contact your support personal for assistance

It is also not possible to manually start the Windows Installer service in Safe Mode (Services -> Windows Installer -> Start):
Windows could not start the Windows Installer service on Local Computer. Error 1084: This service cannot be started in Safe Mode

However, there is a small trick that allows you to start the Windows Installer service in safe mode and correctly uninstall the software.
To enable the Windows installer service in Safe Mode:

After starting the MSISServer service, it is possible to directly uninstall/install any application with an msi installer in safe mode.


