Installing Ubuntu in VirtualBox: Try Linux from Windows. Virtual Machines for Linux
The Linux operating system is of interest to many users, but few decide to switch to it - the habit of using Microsoft products affects. But any habit can be abandoned: Windows will gradually be forgotten if you first figure out how to install Linux in a virtual machine.
To solve this problem, you will need:
- Processor support for hardware virtualization.
- Oracle VM Virtual Box Program.
- A Linux distribution downloaded as an ISO image.
After a quick installation of the program, you can begin to perform the task.
Create a virtual machine
We have already discussed in detail how to install a virtual machine on Windows 7 in the article of the same name. There you will learn all the necessary information about checking for hardware virtualization and enabling this feature in the BIOS.
A huge number of distributions have been created on the Linux kernel, but for now we will focus on one of the most popular systems - Ubuntu. You can install Linux Fedora, Mageia, Gentoo, Puppy, etc. using the same instructions.
The virtual machine has been created, but it is currently in a powered off state.  To enable it, click the "Run" button located on the top line, or simply double-click on the machine itself with the left button.
Possible problems
Some users encounter an E_FAIL (0x80004005) error when starting a virtual machine, indicating that the session cannot be completed.  There are several solutions to this problem on the network, but the most popular are three methods:
- Changes in the extensions of the virtual machine configuration files from *.prev and *.tmp to *.xml.
- Removing Windows update KB3004394.
- Installing the stable version of VirtualBox.
The first two methods, most likely, will not help you. But installing a stable version in almost all cases allows you to solve the problem with the launch. So it's better to immediately install a verified version of VirtualBox (for example, 4.3.12) and do not suffer with configuration files.
Installing Linux
The Linux Ubuntu installation procedure is extremely simplified and does not require any special knowledge. After clicking the "Run" button, the installation wizard will turn on, in the window of which you need to specify the path to the pre-downloaded Ubuntu ISO image. 
After selecting the distribution, the installer's start window will appear. Specify the Russian language in the menu on the left in order to understand everything that will be written on the screen during installation. 
There are two options for further action:
- Try Ubuntu - the operating system will start directly from the distribution kit without installation on a virtual machine.
- Install Ubuntu - complete installation of the system with all components.
In principle, you can choose the first option, but for a full immersion in the Ubuntu environment, it is better to install the system after all. So click the "Install" button.

After successful installation, the virtual machine will automatically reboot. After restarting, you are taken to the Ubuntu desktop.
Talking about creating a virtual machine, we indicated the minimum system requirements under which Linux will work.
It would be better if you allocate a little more resources for the virtual operating system - at a minimum, it works slowly and is not always stable.

If the numbers you set seriously exceed the minimum system requirements, then you will immediately notice an increase in performance. In this case, your main operating system will not suffer - the main thing is not to run resource-intensive applications at the same time as the virtual machine.
05/16/2017 Romchik
Good day. In this article, we will look at how to create a virtual machine on VirtualBox for installing Linux. Let's configure VirtualBox in order to access the Internet on the guest system. And install Ubuntu 17.04.
What do we have? I have Windows 10 installed, 64-bit.

And installed VirtualBox version 5.1.22

You can download the latest version of VirtualBox on the official website absolutely free.
Now we can start creating a virtual machine for Linux. But first, let's define the terms:
- OS - operating system
- Host - OS on which VirtualBox is running
- The guest OS is the OS that runs on the virtual machine.
Creating a virtual machine in VirtualBox
Open VirtualBox and click "Create"

A window will open where we must enter:
- Name - the name of the virtual machine
- Type - type of OS (Windows, Linux, MacOS, etc.)
- Version - OS version
- Specify the amount allocated for the virtual machine
- HDD

In my case, I name my virtual machine Ubuntu 17.04, type is Linux, version is Ubuntu (64-bit). I allocate 2GB of memory (2048MB) and specify "Create a new virtual hard disk"
After specifying all the data, click "Create"
- Location of our disk
- The size
- Storage format

I left everything as default except for the size (I set it to 20GB). Click "Create"
All virtual machine is created. In the list of virtual machines, we have our newly created Ubuntu 17.04 machine. And in the right window we see all the details for our car. If you see something else, then go to the "Details" tab

All machine created. Now let's set up our virtual machine in such a way that the guest system has access to the Internet.
Select our car and click "Configure"

And go to the settings of our virtual machine. We can change the name of our virtual machine, location, amount of memory, number of processors, and more.

Now we are interested in the "General" section and the "Advanced" tab. Turn on the "Shared Clipboard" (set bidirectional)

Now let's set up a network for our virtual machine so that our guest system can access the internet. To do this, go to the "Network" section and in the "Adapter 1" tab, enable the network interface and select the NAT connection type. In general, VirtualBox has several types of connection, and each serves its own purpose. You can read about connection types on the official documentation website or on the Internet. NAT - serves for simple forwarding of an address to the Internet through an external address. In our case, the address of the virtual machine will be forwarded to the Internet through the address of our real machine. But there is one caveat. A machine that is behind NAT is not accessible from the outside.

Click "OK". We have made the basic settings of the virtual machine, now you can start installing the guest operating system.
Installing Ubuntu on VirtualBox
We will install Ubuntu 17.04. You can download Ubuntu on the official website. Download the iso image and mount it in a virtual machine. To do this, select a virtual machine and in the "Details" tab, click on [Optical drive]

We select only that the downloaded iso image.
Now we can start our machine. Click "Run"

Ubuntu installation starts. And the first thing we have to do is select the installation language and start the installation.


A warning will appear. Click "Continue"


- Username
- computer name
- login for user
- password
Click "Continue"

The installation went. We wait

Installation completed. Now you need to restart the virtual machine. Click "Reload"

Press "Enter"

All installation is complete.
Our system is restarting. Let's check Ubuntu's performance and Internet access. We pass authorization.
The system is working.

Let's start the terminal and ping some site.

The Internet is.
Conclusion.
We have created a virtual machine. Set it up to install Ubuntu. Enabled shared clipboard. Set up guest OS access to the Internet. Then installed Ubuntu.
And in the next article, we'll look at how to set up a virtual machine, then set up an Ubuntu guest to use shared folders.
In order not to miss the release of new articles, we subscribe.
Today, many people work with the Windows operating system. However, not many people know that there are other operating systems. For example, the Linux operating system. This is a very popular OS among programmers, because the possibilities of this system are almost limitless. And, of course, like Windows, Linux has its own versions. They are called distributions. In this article, I would like to pay attention to the Ubuntu distribution and its installation on a VirtualBox virtual machine.
Why Ubuntu?
Before installing, you should understand why this particular distribution was chosen. Its most important difference from the rest is simplicity and accessibility. If you decide to learn the Linux operating system, then you should start with Ubuntu. Before you start installing Ubuntu on a VirtualBox virtual machine, I would like to note a few advantages of this distribution:
- Popularity. Ubuntu is one of the most popular Linux distributions. In most places where knowledge of this operating system is required, attention is paid to the ability to work with Ubuntu.
- Easy to learn. Due to its popularity, there are many lessons to be learned. There is also quite a lot of documentation. And in itself, "Ubuntu" is more friendly to beginners. For example, when compared with Kali Linux, the difference is very noticeable. This can be easily compared. For example, "Ubuntu" says: "Wait, don't do this, it can lead to a bad outcome of events." And Kali Linux: "Do what you want, but then do not regret."
- Each distribution kit is created for some specific purposes. "Ubuntu" is ideal for learning, "Kali" is suitable for programmers who work with checking the network, because the necessary scripts are already preinstalled there.
- Design. "Ubuntu" has a graphical shell. In general, earlier "Linux" had just a console, and it was quite problematic to study it. Then there were distributions with a graphical shell, which greatly simplified work and learning.
- Easy to install drivers. The fact is that most device drivers are written only for the Windows operating system. If there is for Linux, then basically the installation takes a lot of time and is done through the console. In Ubuntu, this is all made easier, almost like in Windows.
Virtual machine or bootable flash drive?
So we considered all the main advantages of the Ubuntu distribution. Decided to start learning, but no desire to say goodbye to Windows? Then a virtual machine or a bootable flash drive comes to the rescue. Briefly about them.
bootable flash drive
In principle, the flash drive acts as a hard drive on which you put the operating system in order to start from it. It is enough to download the distribution kit, a special program, and in just an hour this operating system will be installed on your flash drive, and you will be able to start from it. However, the changes you make there will not be saved. Unless, of course, you allocate a special area on the drive. This is also done using a special program. In general, this is not very convenient, so people prefer installing Ubuntu on the VirtualBox extension pack.
Virtual machine
It is installed on the Windows operating system and allows you to install other operating systems there, including Ubuntu. Installing Ubuntu on VirtualBox is much easier than installing on a bootable flash drive, and it's more convenient to work with a virtual machine. After all, you can watch the lessons, open a virtual machine and immediately start trying. In this article, we'll walk you through a step-by-step guide to installing Ubuntu 16.04 on VirtualBox. Of course, you can use a newer version, for example 18.04 - there is not much difference.
Before you start installing Ubuntu on VirtualBox, you first need to download and install the virtual machine itself. In general, there are a lot of them, but it is VirtualBox that is popular. Even on the official Ubuntu website, examples are presented on it. You can download this program on the official website, it weighs little: 109 mb.
After VirtualBox is downloaded, open the installation file. It looks like this:
Click the Next button. After that we see the following:

It shows the set of applications to be installed and the location where the virtual machine will be installed. It is better not to change anything here, except for the installation location. You can choose any place, the main thing is that there is enough memory for the program itself and the operation of operating systems. Have you chosen? Press the Next button again.

Uncheck the boxes if you are against creating icons. Once again, click "Next", and the installation of VirtualBox begins.

During installation, the program will ask you for permission to install devices. It should be allowed so that there are no problems in the operation of the virtual machine. After successful installation, click on Finish. The program is installed! It looks like this:

Download Ubuntu distribution
For VirtualBox, you need to download the distribution itself, the so-called installation image. You can do this on the official Ubuntu website. You can download the latest version - 18.04. You may also notice that you can download two versions: Desktop and Server. They differ in that the Desktop version is usually put on a permanent basis on computers, and Server is a bit simplified and is ideal for virtual machines and boot disks. Therefore, you should download Ubuntu Server 18.04 to install on VirtualBox.
Installation start
Everything is ready to install Ubuntu on VirtualBox, let's get started. Open the virtual machine and click on the "Create" button.


You can write absolutely any text in the "Name" field. For convenience, you can write the name of the distribution, in our case - Ubuntu. In the "Type" field, select the type of operating system that we are installing. In the "Version" field, the distribution kit is selected. After filling, click "Next" and a new window will open:

Here you need to select the amount of RAM that will be allocated for the operation of our operating system. For stable operation, it is better to allocate from 2 GB. Although you can and 1 GB. In general, you should expect that when the virtual machine is running, the computer itself can work stably. Since we are installing Ubuntu only to get acquainted with the system, we will allocate 1 GB of RAM for it. After that, click "Next", and the following window appears in front of us.

Here you need to select the hard drive that your operating system will use to save data. You may not create it at all, but in this case, all your changes in the system will not be saved. You can also create a new virtual hard disk or use an existing one. We don't have one ready, so we'll create it. Select "Create a new virtual hard disk" and click "Create". Then we see:

Here you select the type of file that you want to use when creating a new virtual hard disk. It is better not to change anything, just click "Next".

Here you should choose whether your hard drive will be dynamic or fixed. If you choose a fixed one, then when the maximum volume is reached, it will no longer save, and if you use a dynamic one, then if necessary, it can expand. Who knows what you will have to face, so select "Dynamic" and move on.
We write the name of the virtual hard disk and designate its volume. Then click "Create". The setup is complete, it remains to proceed directly to the installation!

Choose an image
We press the "Run" button, thereby launching our future operating system. And we see the following:

Remember, we downloaded the Ubuntu install image to install on VirtualBox. So, now you need to provide the program with it in order for the installation to begin. Click on the folder icon and select the image that you downloaded. Then click "Continue".
Installing Ubuntu
After clicking the "Continue" button, we can notice that the installation of the distribution kit has begun.

We are waiting for some time. He will ask you to choose a language - choose Russian. Well, or any other with which it is most convenient for you to work. Installing Ubuntu on VirtualBox will continue after that. During the installation, there will be many windows where it is better to just click "Finish". It will also ask you to enter a username and password. They should be remembered in order to gain future access to the operating system.
Summing up
Installation takes 15-30 minutes, after which the operating system itself starts directly. As you can see, installing Ubuntu on a virtual machine is quite easy and takes little time. Good luck with your learning!
Linux OS is interesting to many users, but few decide to change Windows to it. However, if you delve into the essence of the work of this platform, it becomes clear that Windows is not the only possible option (especially given its high cost). First you need to understand how Linux is installed on a virtual machine.
What is needed to achieve this goal?
1.
Processor must support hardware rendering
2.
Installed VM VirtualBox application from Oracle (hereinafter referred to as VB)
3.
Downloaded ISO image of the Linux operating system
Once you've set up the virtual machine (which is a fairly quick process), you're ready to tackle the actual Linux OS itself.
Today you can find many variations of Linux developed on its kernel. Now we will look at the most common of them - Ubuntu OS.
1. Launch VB and click "Create".

Specify the name of the VM - ubuntu, as well as the type of OS - linux. The platform version must also be specified; it depends on whether the bit depth of the loaded OS is 32x or 64x.
2. Set the amount of RAM that should be allocated for the VM. In this case, the operating system will function normally with a volume of 1024 MB.

3. We create a new hard drive. Select the file type that is used when creating a new disk image. It's best to leave it active. VDI.


If we want the disk to be dynamic, then we mark the corresponding parameter. This will allow the disk space to grow as the VM fills up with files.


We have created a VM, but it is not currently active. To enable it, you need to launch it by clicking on the button corresponding to the name. Or you can double-click on the VM itself.
Linux installation
Installing Ubuntu is as simple as possible and does not require special skills. After starting the VM, the installer window will appear. It should specify the location of the downloaded Ubuntu image.

With this image selected, we will move on to the next step. In the new window, select the interface language - Russian, so that the installation process is completely understandable.

You can get an idea about the operating system in the first case, but a full installation will allow you to better immerse yourself in its environment. Let's choose "Install".
After that, the installation preparation window will appear. Let's check if the PC parameters are consistent with the requirements of the developers. If yes, move on to the next step.

During installation, we will select the item that offers to erase the disk and install Ubuntu.

During installation, you can set the time zone and specify the keyboard layout.

The installation procedure will take approximately 20 minutes.

After its completion, the PC will automatically reboot, after which the desktop of the installed Ubuntu will start.
Installation linux ubuntu completed, you can begin to get acquainted with the system.
Oracle VM VirtualBox is a program that allows you to create operating systems on virtual machines. This will allow you to use Windows programs in Linux in a 100% working way. If a Windows program does not run under then it will run in its native Windows environment. Using VirtualBox will be an easier and better alternative than installing Windows on a separate partition on a Linux machine as a .
First install VirtualBox
VirtualBox operates as a "single computer" on which operating systems can be installed.
I'm assuming you already have a Windows CD or DVD, or perhaps a virtual optical disc format file.
- Open the main window of VirtualBox, click the "Create" button.

Using the running wizard to create virtual machines, we enter the name of our future Windows 7 or Windows 8 machine, or maybe someone wants to install Windows XP. Depending on the input of the name of the operating system, VirtualBox automatically selects the pre-installation details for the future virtual Windows machine, which can be changed a little below for your purposes. For example, select the 64-bit version. In accordance with the choice, the wizard for preparing virtual machines, prepare the required amount, which can also always be corrected in the direction of increasing or decreasing system resources. - The next window allows you to allocate a certain amount of RAM from your computer's real RAM.

Do not allocate too much RAM, the more RAM you give to the guest system, in our case installed by Windows, the less RAM the host system will have, causing the entire system to crash. - Create a new hard drive. After clicking "Next" you get to the step "Select hard drive". This step will allow you to select a hard disk size, dynamically expanding or a fixed size for your virtual machine. Here I will draw attention to the fact that it is better to choose a dynamically expanding disk, as this will allow you to save space on the real hard disk of your computer.

To put it simply, stick to the already established choice of the virtual machine creation wizard. After clicking the "Create" button, the wizard completes its work. - Now it remains to select the disk image for the installed Windows by clicking on the "Configure" button. Select the "Media" section on the left side of the window. Click on "Empty" talking about an empty CD, DVD environment.
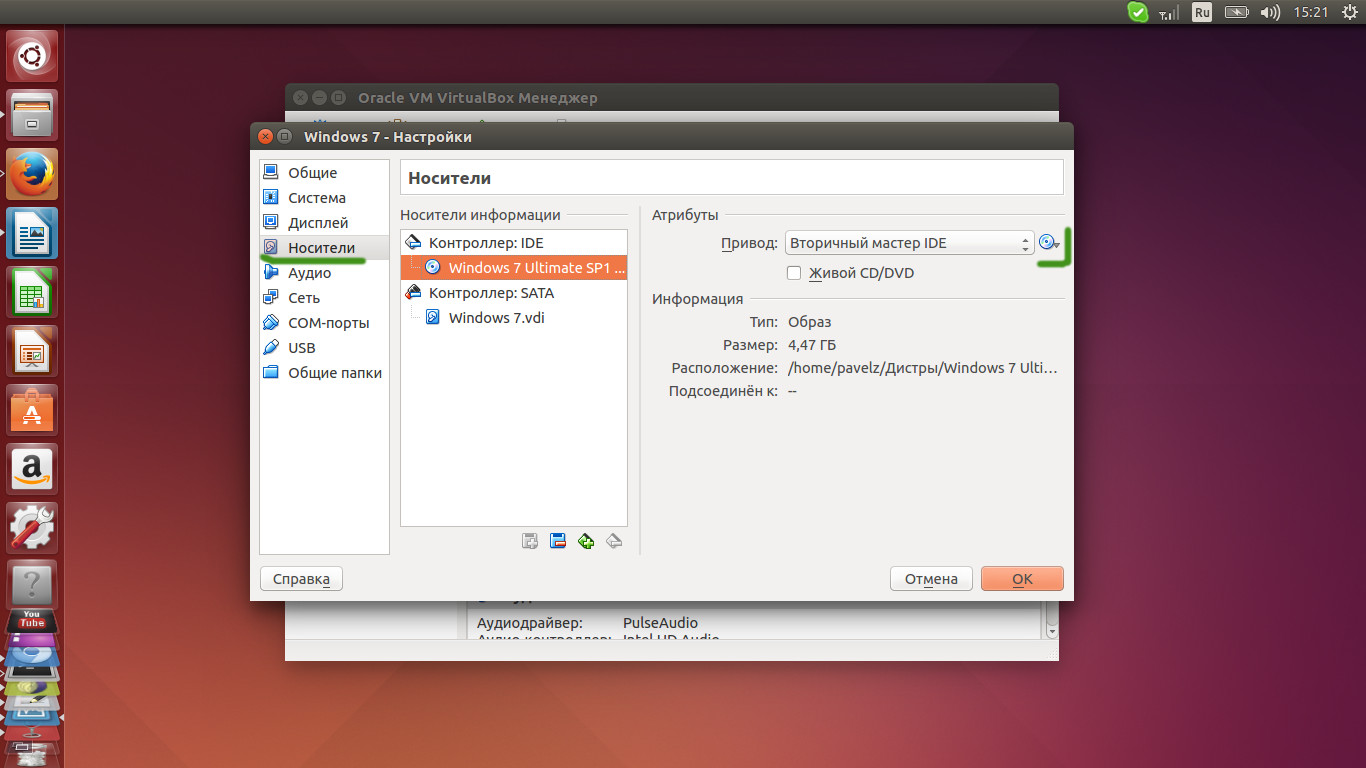
Opposite the word "Drive", click on the disk icon, which will allow you to select your computer's existing disk drive or a disk image that was previously saved to your computer. Click OK. - Now you're all set to install Windows! You can run a virtual machine and do a standard Windows installation.

After installing Windows in VirtualBox, we disconnect the installation media so that VirtalBox starts from a virtual hard disk. Also need


