Change default programs in windows 10. Select default programs in Windows settings. Restoring the Association of .exe and .lnk Files Using the Registry Editor
A file association in Windows is a system-defined correspondence between a file type and which program or image it opens. It often happens that by mistake the user sets incorrect associations for .lnk shortcut files or .exe programs, after which they all begin to “open” through any one program on the computer, and then file associations may need to be restored. However, this can happen with other file types as well.
In this instruction on how you can restore file associations in Windows 10 - for regular files, as well as for systemically significant ones, such as the mentioned shortcuts, programs, and more. By the way, if you had automatic creation system restore points, you can probably fix file associations much faster using . At the end of the article there is also a video instruction that shows everything described.
Restoring file associations in Windows 10 settings
AT Windows settings 10, an item appeared that allows you to reset all file associations to the default settings (which works with some restrictions, as discussed below).
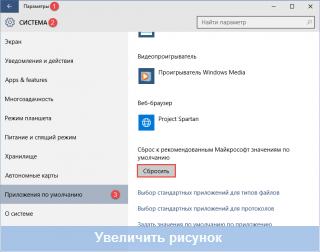
You can find it in "Settings" (Win + I keys) - System - Default applications. If in the specified section in the item "Reset to Microsoft-recommended default values" click "Reset", then all file associations will be brought to the state that was at the time of system installation, deleting the user-defined values \u200b\u200b(By the way, in the same window, below, there is a "Select standard applications for File Types" to set specific program associations for each file type.).
And now about the limitations of this function: the fact is that in the process of using it, user-defined file associations are deleted: in most cases, this works in order to correct typical violations of file associations.
But not always: for example, if associations were violated exe files and lnk, but not only by adding a program to open them, but also corrupting the registry entries (which also happens) about these types of files, then after resetting when you run such a file, you will be asked: "How do you want to open this file?", but the correct option will not be offered.
Restoring the Association of .exe and .lnk Files Using the Registry Editor
As well as in previous versions OS, in Windows 10 you can restore associations system files using the registry editor. Without entering the appropriate values in the registry manually, but using ready-made .reg files for import into the registry, returning correct entries for the respective file types, most often we are talking about lnk (shortcuts) and exe (programs) files.
Where to get such files? Since I do not post any files for download on this site, I recommend the following source that you can trust: tenforums.com
In the end specified page you will find a list of file types that have association fixes. Download the .reg file for the type of file you want to fix and "run" it (or right-click on the file and select "merge"). This requires administrator rights.
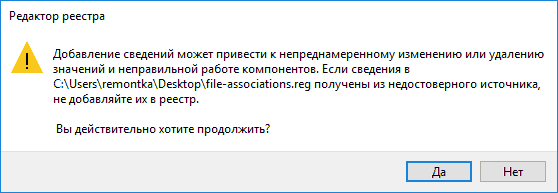
You will see a message from the registry editor stating that entering information may lead to unintentional change or deletion of values - agree and, after a message about the successful addition of data to the registry, close the registry editor and restart the computer, everything should work as before.
Repair Windows 10 File Association - video
In conclusion - a video instruction that shows ways to restore broken file associations in Windows 10 in various ways.
Additional Information

Windows 10 also includes a Default Programs control panel item that allows you to manually configure file type associations with programs, among other things.

To use it, you can choose given element or use Windows search 10, and then select the item "Association of file types or protocols with specific programs” and set the associations you need. If nothing helps, perhaps some methods from the manual will help solve the problems.
Instruction
Restore settings by default by starting in safe mode. To enable the system in safe mode, start the computer and press the F8 key. On a black screen, system commands will appear, among which select "Safe Mode". You can navigate through the commands using the arrow keys. As soon as the computer turns on safe mode, perform a system restore to initial settings. Reboot your computer by selecting Windows Normal Boot.
Restoring settings using the "System Restore" option. Select the "System Restore" option through the Control Panel. To do this, click the "Start" button. In the window that opens, select "Control Panel", then click on the "System and Security" tab (maybe just "System" in earlier versions). Windows versions). Select the "Find and fix problems" option. In the window that opens, at the bottom left there will be an inscription: "Recovery". Click on it. When the window opens, select the "Start System Restore" command. Before starting, you can go to the option " Advanced recovery methods". Two modes allow you to choose additional settings. Both modes before starting work offer to save data to external media, which will not be superfluous to save information.
Enter the "System Restore" option. It is possible through other items of the Start button. To do this, click "Start". Then step by step: "All Programs", "Standard", "Utilities", "System Restore". After you start System Restore, select the time of the initial computer settings. The system will be restored.
System failure It's not always a small problem. It becomes impossible to work at the computer, as it starts to slow down, does not open desired programs, hangs. Most often this is due to an infiltrated virus, but there may be other reasons.
You will need
- The affected computer, Internet access.
Instruction
In the dialog box, you need to find the function optimal settings BIOS: "Load Optimized Defaults". Activate it using the arrows on your keyboard and the "Enter" key.
Such a measure as creating an image will not hurt either. system disk(most often it is drive C). As a rule, this can be done immediately after installing the operating system. For creating backup follow this path: "Start" -> "All Programs" -> "Accessories" -> "Utilities" -> "Data archiving". The first time you run this function, you should uncheck the "Always run as a wizard" option, as you must complete all the steps yourself. Then again proceed to archiving, but without the wizard. To do this, in the window for selecting disks and folders that you want to copy, find "Documents and Settings", " Program Files' and 'Windows'. Be sure to check the "System State" item.
Related videos
note
Remember the name of the backup file and the path to it, so that you can easily find it if you need to restore it.
To find reliable antivirus today it is not difficult - there are quite a lot of sites on the network where advanced users share free and paid versions similar software. In addition, almost every provider can offer you, for a fee, the use of a stable and constantly updated antivirus.
Manufacturers Opera browser not provided for in available to the user settings simple option reset all settings to their initial value. But this does not mean that the opportunity to return settings on default without reinstalling the browser does not exist at all. This can be done manually using a simple procedure.
You will need
- Opera browser and Windows Explorer
Instruction
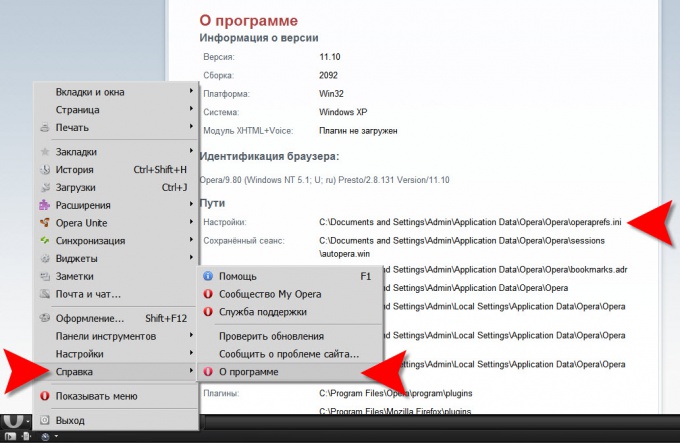
Open the browser menu and go to the "Help" section. You need to click the most bottom point("About the program"). The browser will open a page in which you need to find a section with the heading "Paths". The first line here contains the address of the settings file. It should look something like this: C:Documents and SettingsAdminApplication DataOperaOperaoperaprefs.ini You need to highlight this entire address, excluding the file name (operaprefs.ini). Copy the selection to RAM by pressing CTRL shortcuts+ C. You can also do this by right-clicking the selection and selecting the appropriate item in context menu. You won't need Opera anymore in this procedure, close your browser.
Paste the copied address of the folder containing the settings file into the address bar of File Explorer and press Enter. The file manager will open desired folder and you will need to find operaprefs.ini in it. The settings file should be deleted or renamed. That's all you need to do manually, Opera will do the rest for you the next time you start it. The browser will look for the settings file, and if it does not find it, it will create a new one, writing the settings to it. default which will be used in the future.
Related videos
Almost every person knows that technology tends to fail, and with computers - over time, they can break down or work unstably, causing constant freezes or crashes. Often the solution to this problem lies in resetting the settings you have set, you must go to the factory settings.

You will need
- Computer, knowledge of the basics of working with the motherboard.
Instruction
Often, computer failure occurs when you do not expect it. Reset to factory settings allows you to restore stable work computer. As a rule, more than 50% of failures occur due to a change system settings motherboard, the so-called acceleration of values. When setting extremely high values for the processor, it starts to heat up. When the temperature reaches the limit state, the user personal computer notices freezes and system crashes.
To avoid loss of motherboard performance after a malfunction occurs, you must return the BIOS to the default settings. This can be done without opening system block. To do this, you must turn on the computer or restart it if it was turned on. At BIOS boot click Delete key on keyboard.
In the opened BIOS menu find the menu line Load Bios Default, then press the F10 key (save and exit BIOS). In the dialog box that opens, you will see a request to perform the selected action, press the Y key. After rebooting computer BIOS will return to factory settings.
If for some reason this cannot be done, you can use other methods, for example, remove the battery from the motherboard - this will allow you to return to the default settings. To do this, you may need a "+" screwdriver.
Unplug the system unit and turn it back to you. Loosen a few screws with a screwdriver to remove the side cover.
Find the battery small size(it looks like a pill) and pick it up with any sharp object. After removing the battery, wait a few seconds (at least 5-7 seconds), then put it back in its place. It remains to put the side cover of the system unit in its place and screw in the screws.
Sources:
- reset laptop to factory state
Each user customizes frequently used programs to his taste, and is often faced with the need to return standard settings. If you have ever searched Opera's settings for the possibility of resetting them to their default values, you probably know that the developers of such a function popular browser did not provide. Do not rush to despair, because there is a way out.

Instruction
To restore Opera settings, some users give the advice to uninstall the program and then install it again. This option, in addition to being too complicated, also does not give a guaranteed result, since the program leaves the settings file on the computer, and during subsequent installing Opera brings it back to life, and you come to what you left.
To be sure to return the settings to original values, open Opera and go to "Menu" - "Help" - "About". A page will open in front of you, which will show all the paths where Opera saves data. You need the very first item "Settings".
Now open the destination folder specified in the settings path, find the Operaprefs.ini file in it and delete it. If you have disabled the display of file extensions in your system, then the file name will be Operaprefs. Restart Opera and the browser will open as it was just installed - all settings will be returned to the original initial state.
If you are not the only user on the computer, you may not find the settings folder path because some folders may be hidden. In order to open all folders, in any Windows Explorer window, click "Tools" - "Folder Options" - "View", and check the box "Display hidden files and folders.
Related videos
Unfortunately, in graphical interfaces current versions Opera browser does not have a button that you need to press to reset all settings in their the initial state. However, there are still a couple of ways to do this with a few relatively simple operations.

You will need
- Opera Browser
Instruction
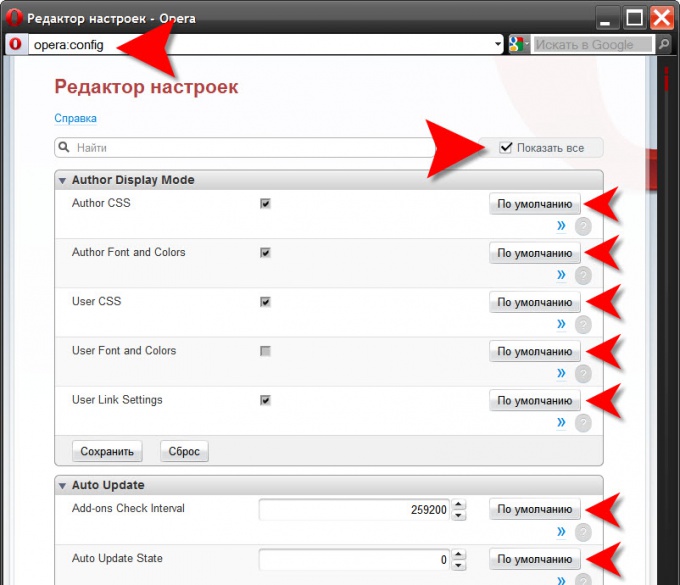
For the editor to expand all of its sections and show all settings, you need to put a label in the checkbox "Show all". Opposite each settings in each section there is a button that says "By default"- it must be pressed to reset the installation to its initial state. By clicking the buttons of all settings, you can return the browser to its original form. Although throwing absolutely everything settings there is no need, yet it is a rather tedious task for more than a dozen minutes. It is a pity that the manufacturer did not provide one common button for all settings, or at least for the settings of one section.
The other way is much simpler, though not "gentlemanly" to the browser. First run windows explorer double click on the shortcut " My computer"Or by pressing a combination CTRL keys+E.
Then, in the browser menu, expand the "Help" section and click on the item "About". In the information section under the heading "Paths", the first line indicates the location of the file where Opera stores its settings. You need to select it and copy (CTRL + C).

Then close your browser and address bar explorer, paste the copied path to the operaprefs.ini file (CTRL + V). Delete the file name from it and press Enter. Explorer will open the folder where the settings.
Find the operaprefs.ini file in the package and delete (or rename). On this, the procedure for resetting the settings to default is almost completed. The next time you start the browser, it will look for the file you deleted, and not finding the lost settings, it will create a new one in which it will place the settings for default.
There are situations when, as a result incorrect operation Bios, computer won't start. In such cases, to restore normal work computer that needs to be reset settings Bios by default. Return standard settings Bios is possible even in cases where the computer does not start at all and you do not have the opportunity to do it in a system way.

You will need
- Computer with Windows operating system installed
Instruction
Turn on the computer and immediately after that press the Del key several times. In this way you will get into the BIOS. In any version of Bios there is an item with which you can reset settings default. This item is called Load Optimal Defaults. Select it and press Enter. After that, a dialog box will appear asking you to save the settings. Select Save And Exit. After that, the computer will definitely restart and that's it. settings will be returned to standard.
AT operating system Windows 10, Edge set as default browser, Groove Music - music player by default, and Edge as the default viewer PDF files. If the user wants to set a different default app, they will need to go to Settings > System > Default Apps and change the settings according to their preference.
Although most users can change the web browser, the device PDF reader and other default apps in the Settings app, often Windows users 10 complain about the inability to change the default applications.
If you are unable to change your default web browser and cannot set VLC as your default video player, or are unable to set any other program or application as your default, you can use one of the two methods below to change the apps by default and set your favorite default programs/applications in Windows 10.
Method 1 of 2
Change the default application using the control panel.
In addition to the new settings, you can use the Classic Control Panel to change the default apps as well as classic programs in the operating Windows system 10.
Step 1: Open the control panel by typing Control Panel in the Start menu or taskbar search box, and then press the Enter key.

Step 2: Change the way the control panel is displayed using the menu View in the right corner, on small icons . Find and click the icon Default programs.


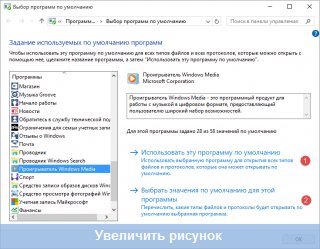
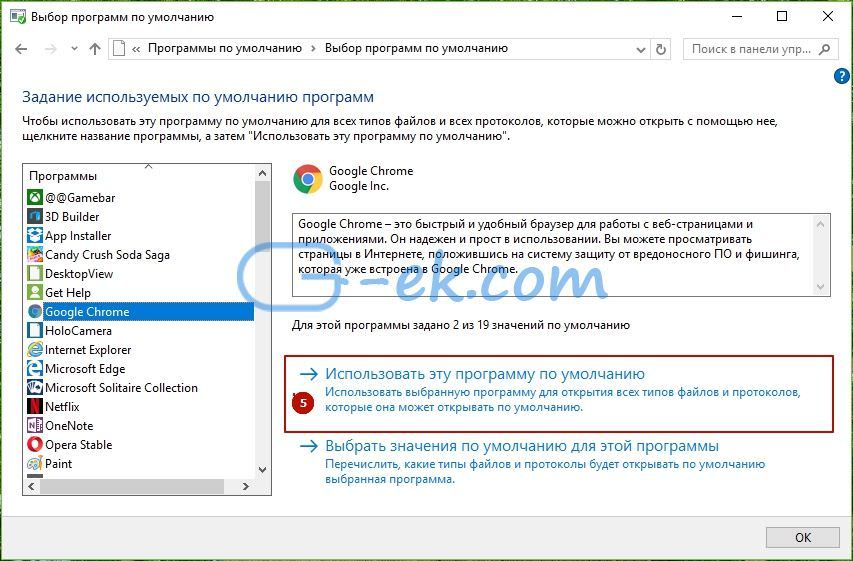
Step 3: In the opened window Select programs used by default Click on the first link Setting default programs.

Step 4: In the left pane, select your web browser or any other program that you want to set as the default program.

Step 5: Once you select a program or application, you will see that program and available options in the window with right side. Click Use this program as default , and click the button OK to set it as default.
It's simple!
Method 2 of 2
Using the Default Programs Editor
Exist great utility Default Program Editor which can easily change or set default programs in Windows 10. The only drawback of the utility is that it does not support modern applications installed from the store. Use this tool only if you want to install by default - classical programs for desktop.
Step 1: Visit this page, and download latest version Default Programs Editor (default program editor). You can run the program without the need for installation. Unzip the resulting archive and run the executable file.
Step 2: Start the editor. Click on the button Default Program Settings.

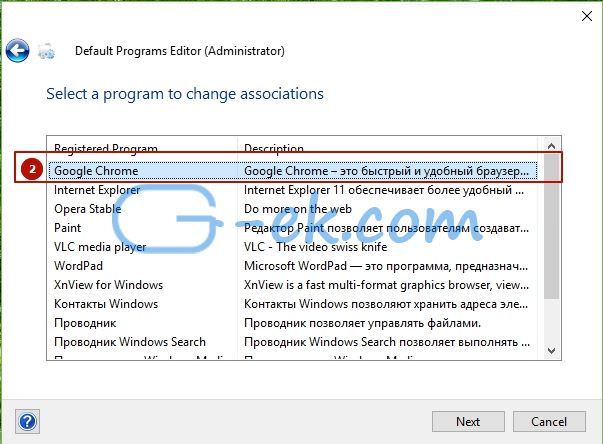
Step 3: Select the program you want to set as default. Click the button next.
Step 4: Choose which extensions you want to associate with the program. We suggest you choose all.
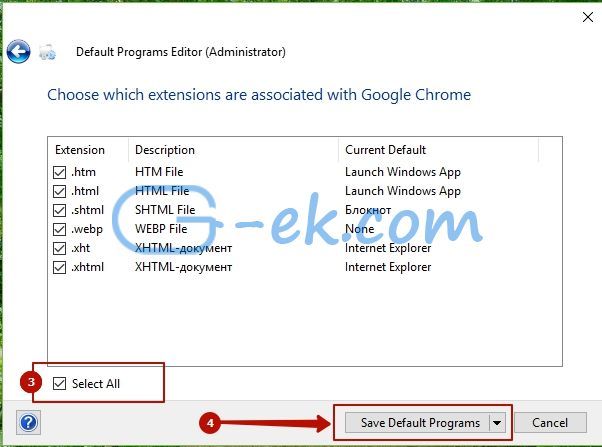
Step 5: Click the button Save Default Programs(keep default program). Ready!
Selecting a default program using the Open with menu
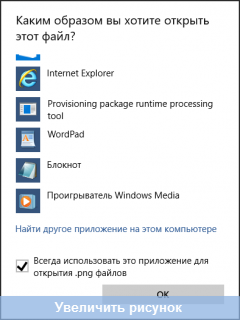
Click right button mouse on the file and select the item in the context menu To open with
To open a file once in a program other than the default one, simply select it from the list of available programs.
To change the default program for the selected file type, click Choose another application
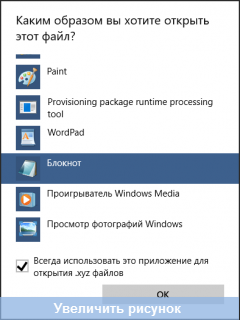
In the window that opens, you can select a program to open this type of file and check the option Always use this application to open .xyz files.
If the program list does not contain the one you want to select, press More apps ↓
If and in complete list you did not find the program you need, click Find another application on this computer. An explorer window will open, in which you can specify the path to executable file the application you need. Please note that in this way you can only select classic app.

If the file type is not associated with any application on the computer, then in a similar way you can select a program to open this file.


Selecting default programs in Windows Settings
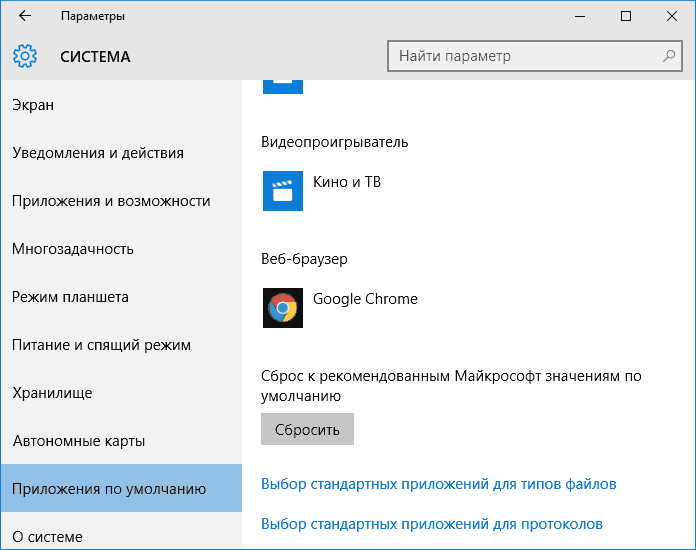
Click the button Start and open Options. Go to section System and choose Default apps.
If, due to a malfunctioning program or simply by mistake, incorrect file association settings were set, then here you can reset to default values by clicking the button Reset at the bottom of the window.
To change the default application for opening images, click on the name of the installed in this moment apps and select your preferred app from the menu.

If no application is associated with a specific file type and protocol, you can click Choosing a default value to match your preferred application. And if a suitable application is not installed on your computer, you will be prompted to go to the Store to search for and download a suitable application.

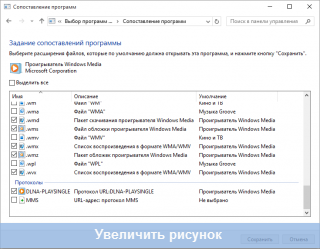
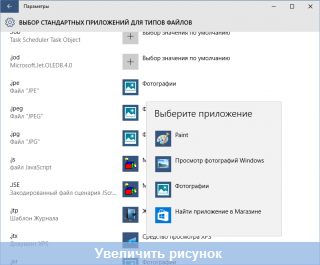
To associate an application with specific file extensions, click the link Selecting default applications for file types at the bottom of the window.

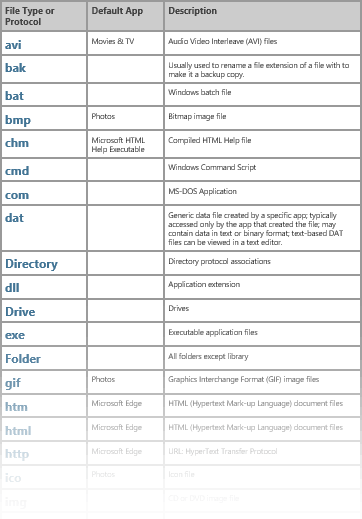
A window will open containing a list of all file extensions registered in the system. Here you can map a specific file extension to one of the applications from the list.
To map protocols to a specific application, use the link Selection of standard applications for protocols at the bottom of the Default Application Options window.

In the window that opens, you can change the default application for a specific protocol.

Classic Control Panel provides more app mapping options certain types files or protocols.
Click the right mouse button on the Start button or use a keyboard shortcut Windows + X, and select from the menu that opens Control Panel.
Unlike choosing default apps for file types in the system settings, here you can not only select an app from the list, but also add a desktop app, just like using the .

To select default values for specific application(file types or protocols) click the Set defaults by application link.
The Classic Control Panel window will open, in which you can either set the default program or select certain extensions files or protocols to match them to this program.