How to adjust hdmi image. What cable is needed for HDMI output? The process of connecting an HDMI cable to a TV
In this article you will learn how to connectHDMI to computer. First of all, you should determine what video adapter you have. If there is no HDMI output, a DVI channel with an adapter or DVI-HDMI connector is usually used. This channel is capable of transmitting sound of any quality.To set up HDMI, you need to understand the instructions that came with the TV. Next, you need to make sure that the sound signal is received by the TV. When you connect your TV and computer video card, you will need an HDMI to HDMI cable.
In order for the images on the TV screen and the computer display to be the same, you need to check the option for synchronous interaction of these devices. In this case, we will perform the following actions:
1) find Control Panel, first open Start
2) find the Screen icon and click on Screen Resolution Settings.
3) activate “Duplicate screen”.
If you want these two devices to function separately, then to do this you need to enable the “Expand screen” item. The monitor must be the main device.
The next action that needs to be performed is adjustment sound signal.
You need to do the following:
1) find Control Panel;
2) click on the equipment and sound icon;
3) click on control sound devices;
4) in the window that opens, open sound device management;
5) make it default. HDMI output;
6) click Apply.
To check the settings made and that the HDMI output is functioning as it should, open any video fragment.
We made sure that you should not, but perform all the settings yourself.
What cable is needed for HDMI output?
1) high resolution;2) with HDTV resolution.
There are cords from 1 to 10 m. The longer the cord, the higher the degree of sound signal loss. It is best to use active HDMI cables that are not afraid of distance. If you purchased such a cord, be careful and look at all its connectors. I answer all questions in detail.
Friends! Everything you do on the computer, watch movies, cartoons, chat on Skype, play, view photos, slides or Internet pages in a browser, all this will be shown on the screen of your TV if the TV is connected to the computer via hdmi cable. Nowadays, almost any TV has an HDMI input, and most of the video cards produced have HDMI output.
The HDMI interface was invented in order to connect two high-tech digital devices(they are undoubtedly your computer and TV) and transfer information from device to device without loss of quality. Such transmitted information may be an image and multi-channel high quality sound. If you have a movie or cartoon on your computer, in any HD, Blu-ray or AVI, MOV, MPG, MP4 format, then you can watch it all on your TV. There are slides or photos, please look. I’m not talking about games, because I’m not a supporter of them; they take up a lot of time from young people, which can be spent on studying. We connect the TV to the computer via HDMI with a second monitor To connect the computer to the TV we will use an HDMI cable, it looks like this and can be up to 20 meters long, choose the cable of the length you need.

For example, let's take a Samsung TV, not quite the new 4 series ( LED type), purchased several years ago, but it already has two connectors for connecting HDMI devices.

The computer that we will use to connect to the TV was also purchased about three years ago, it has an Nvidia video card installed and also has an HDMI connector.

As I already said, on our TV there are two HDMI connector. With the TV turned off, connect the HDMI cable to HDMI connector 2,
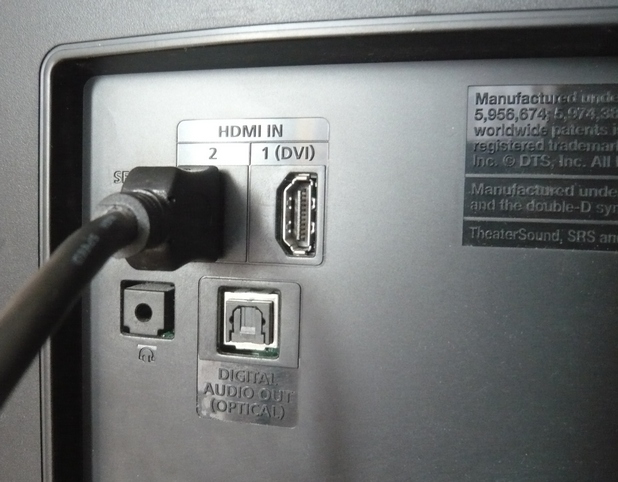
The reverse end of the cable is connected to the connector HDMI video cards desktop computer. The computer, in turn, is already connected to the monitor (also Samsung SyncMaster 971P) with a DVI cable.

We turn on the computer and TV. There may not be an image on the TV right away; instead, we see this message: “The cable is not connected” “Check the cable connections and the source parameter” or “ Weak signal or no signal"

On Samsung TVs, to display a list of all available video sources, you need to press the Source button on the remote control.

A menu appears on the TV, in this menu, using the remote control, select the HDMI 2 connector,


Now, on our TV, it should appear exact copy our computer desktop. But again there is nothing, the same error appears on a black screen. So we go to the “Screen Resolution” settings. Right-click on the desktop and select “Screen Resolution”.

As we can see in the window that appears, our main screen is set to the second (2) Samsung monitor SyncMaster 971P, and in the “Multiple Screens” parameter we have set “Display the desktop on only 2 monitors”, which is why the image is only present on the computer monitor screen, but not on the TV

We bring everything in this window to this state. Select a parameter
Multiple screens: "Duplicate these screens"
In the “Screen” parameter, “Multiple monitors” is automatically set, click Apply and OK.

The desktop of our computer appears on the TV.
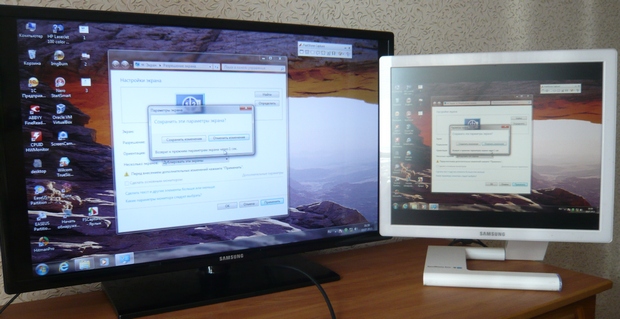
The resolution of our small Samsung TV is 1366 x 768. If your computer monitor supports this resolution, then it will automatically be set to the same resolution of 1366 x 768. If not, then either the TV or monitor will have the wrong resolution. For example, my Samsung SyncMaster 971P monitor has maximum resolution 1280x1024. At simultaneous use TV and computer monitor, the main thing for me is to set the resolution on the TV correctly, otherwise why did I connect it then. I put it on Samsung TV The resolution is 1366 x 768, the image is perfect.

And on computer monitor such a resolution of 1366 x 768 looks like this.

And nothing can be done here. If you need perfect image on a TV and a computer monitor, then they must support the same screen resolution, that is, have the same characteristics. There is no sound on the TV after connecting the TV to the computer via HDMI Friends! Don't forget that HDMI interface transmits video and sound over one cable and we can specify in the settings operating system Use the TV's built-in speakers to output sound.
Let's fix the problem by using a TV instead of a monitor. Go to Start->Control Panel->

Hardware and Sound->Sound

If you don't have anything in this field, click on empty space right-click and in the menu that appears, select the items “Show disabled devices”. "Show connected devices"
Now we look at the name of our TV, in my case it is Samsung, we need to turn it on and turn off the rest. Right-click on Realtek and select Disable.

We also turn off the speakers.
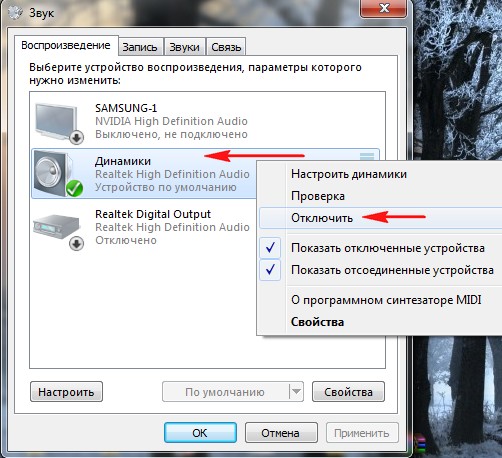
Samsung – Enable, Apply and OK.
Everything you do on a computer: watch videos, chat on Skype, play games, view photos or Internet pages in a browser, everything can be used on the TV screen if it is connected to the computer via an HDMI cable. Nowadays, almost any TV has such an input, and most produced video cards have an HDMI output. Let's consider the features of such a connection.
If earlier to connect CRT TV to the computer, all that was needed were RCA connectors, which, first of all, output standard images, then now we want to see higher quality images, for example HD video, but to transmit such image quality we will need HDMI connectors.
HDMI is a multimedia interface high resolution. It can be found quite often on new models of computers, laptops and TVs. This interface uses digital method transmission of information, which is why transmitted images maintain their quality. Through the HDMI connector it is possible to transmit digital data, both audio and video. HDMI is very popular now, because it is one of the most advanced and advanced interfaces.
HDMI Connector Types
Today there are three types of HDMI connectors:
- Type A– a standard connector, most often found in technology.
- Type C (micro HDMI), Type D (mini HDMI) – found on laptops, video cameras, laptop computers. These are smaller versions that have all the features of the prototype.
- Type B– this connector has an extended video channel that allows you to transmit images with a resolution of over 1080p. But this type of connector is not as popular as the first three.
Each type of HDMI connector requires a special wire. There are 5 main options:
- Standard. Supports video resolution up to 1080p.
- High speed. Supports almost all video formats, including even 3D and Deep Color.
- Standard with Ethernet. As you can see, among other things, it can provide Internet access.
- High-speed Ethernet. Also supports internet.
- Automotive. A special type designed for connecting car HDMI devices.
Connecting a computer to TV
To do this, we need an HDMI cable type A, which can be purchased at any computer store. All that remains is to find HDMI connectors on your TV and computer. As a rule, they are located on their back side. On a computer, this connector is located next to the monitor connector. If the computer has a built-in video card, then the socket, in most cases, is located near the USB ports.
If the TV is placed on the wall, it may be difficult to connect the HDMI cable. You can get out of this difficulty by using an HDMI angle or by purchasing a cable where one of the plugs is located at an angle of 90 degrees.

There are video cards where the additional connector is not HDMI, but DVI. In such a situation, you will need to purchase additional DVI-HDMI adapter. If the video card does not have HDMI and DVI ports, then you will not be able to connect the TV to the computer using this method.

At HDMI connection It is important to remember that if only a TV is connected to the computer via the HDMI connector, and additional monitor not connected, when starting the OS, your desktop will automatically appear on the TV screen. But there are exceptions in which the screen will remain black. Therefore, it is best to first configure the video card to specific resolution TV. This can be done if you additionally use a VGA or DVI output to system unit connect a computer monitor. Then it will accurately show the image, and you can configure it in the video card driver required resolution for TV. If you have a FullHD TV (that is, HD Ready 1080p), your computer must provide a resolution of 1080p, and if the TV is HD Ready, then a resolution of 720p is sufficient.

Settings
The very first time you connect your computer to the TV, you will need to adjust the image. To do this you need to click right click mouse on the desktop, then it all depends on your operating system, but one thing is for sure, that you need to find the video card settings. Call the context menu on the desktop by clicking the right mouse button.
If Windows 7 is installed on your computer, then select “Screen Resolution”, then find the line “Screen” and select suitable option. If the connected TV is not automatically detected, then in the same window click the “Find” button and wait until the search for the TV is completed.

Your computer's desktop will appear on the TV screen. If necessary, in the properties of the video card you can adjust the resolution, desktop size, color correction and make other image settings.
If you often use your TV as a second monitor, then many video cards have modes such as “Clone” or “Mirror”, where both displays are configured exactly the same. You can also make both monitors work independently of each other, all of which is available in the Extended Desktop mode.
When connecting HDMI-HDMI, the sound is most often without additional cables And special problems transmitted to the TV audio channel from the computer. The main thing is to configure the computer’s audio parameters by using the “sound output via HDMI” option. It should be noted that if the TV is equipped with an HDMI version 1 port, then audio will not be transmitted. Also, sound will not be transmitted when connected via VGA, DVI, and some video cards do not have a sound chip for HDMI.
Many owners of laptops and computers lack the diagonal size of their “native monitor”. If for permanent job conventional 15-24 inches is more than enough, then for good games or there won't be enough films. To enjoy gameplay or watching a movie in full, you can use a TV instead of a standard screen. With the above information, establishing a connection between two devices will no longer be a problem for you.
Today, almost everyone has large LCD TVs, which have successfully replaced the anachronism in the form of old CRT models. Their huge advantage is not only highest quality images, but also the ability to connect to a computer. Using regular laptop, you can make an excellent media center by spending very little money on it.
It’s just that, in principle, there is nothing complicated about this, but sometimes there are minor problems that require a little time to resolve. No need to worry, as almost all problems can be solved relatively easily, and the reward for your efforts will be a movie in excellent quality that you can enjoy on your home TV screen!
General information
So, to connect you need a TV itself that supports this mode, as well as a computer or laptop, which can also be connected via an HDMI connector. Of course, you also need the cable itself. So how do you set up your TV via HDMI? To answer this question, you will have to conduct a small educational program on the most basic concepts.
Types of HDMI connectors and cables
By the way, what is this? It's comparative new interface for transmitting high definition video and audio. Its peculiarity is that it uses exclusively digital transmission of encoded data, which ensures excellent picture and sound quality. No wonder that this interface Today it is one of the most popular all over the world.
There are three types at once standard connectors HDMI:
- Type A. Standard, found in any modern technology.
- Type C (micro HDMI), as well as Type D (mini HDMI). These connectors are familiar to all owners of modern cameras, smartphones and tablets. Being smaller, these modifications have all the advantages of their predecessors.
- Type B. It differs in that it is capable of transmitting video with a resolution higher than 1080p, but is still rare.
Of course, among such a colorful “hotbed” of connectors themselves, no less varieties of cables have appeared that can connect them:
- Standard. It is most common and can be used to transmit video with a resolution of up to 1080p.
- High speed. You can watch 3D and other ultra-high definition formats.
- Standard/Ethernet. Not only supports audio and video transmission, but can also be used to connect to local network. Rare, however, as are devices that support this feature. In any case, connecting a computer via HDMI to a network is almost impossible to see in our country.
- High Speed/Ethernet. Everything is the same as was said regarding the modification described above, only it is even less common and supports all high-definition video formats.
- Automotive. As the name suggests, it is used to connect devices that support this interface in cars.
Choosing a cable
Beginners usually have difficulties not only with how to connect a computer to a TV via HDMI, but also with the question the right choice cable. What you don't hear in stores! And about oxygen-free copper and gold-plated contacts! Some of these stories are relatively true, but you definitely shouldn’t believe everything.
So, remember one simple rule: if you are not going to watch 3D movies on TV, and the cable length in your case does not exceed 1.5-2 meters, you can take any model, even a Chinese one. In this segment, there is no difference between a cable that costs six thousand and one that costs 200 rubles. If you need 3D, then you should choose a cable with a specification of at least HDMI 1.4. In the case where there is none, you will not be able to watch a three-dimensional movie via HDMI, since the cable simply cannot cope with such a volume of transmitted information.

However, even then you shouldn’t run to the store to buy a cable, paying 500 or more (!) dollars for it. Any cord of the required specification will be sufficient. Forget about the myths that talk about “better signal transmission” and other nonsense. The specificity of digital transmission is that it either exists or it doesn’t exist at all. Simply put, if the cable is capable of transmitting a signal, then it will transmit it in any case, and the quality of the image and sound will not suffer in any way. But when the computer stubbornly does not see the TV via HDMI, it still makes sense to replace the cable. It may happen that it was manufactured in violation of technology.
And now a few words about where the connectors are.
If we talk about a TV, then most often they can be found on its back panel. However, in latest models HDMI connectors are often located on the side wall. It's easier with computers. All necessary inputs are on the video card. If we're talking about about the laptop, then in standard case the desired entrance is located close to USB connector 3.0. Before connecting your laptop via HDMI, it won’t hurt to look at the instructions for it again. It will also not be superfluous to visit the manufacturer’s website, where you can familiarize yourself in detail with all the specifications that this device uses.
Connection
So how to connect your computer to your TV via HDMI? Everything is very simple here. Connect the plug to the connector on the TV, and then insert its other end into a similar port on the computer’s video card. Attention! Both devices must be turned off at this moment, otherwise they are likely to break!
Here's how to connect your computer to your TV via HDMI. If only one TV is connected to the computer, then everything should work immediately after they are turned on. But if you need it paired with a monitor, then numerous and varied problems are possible, the occurrence of which is associated with several factors at once.
Connection problems
So, at first you may find that all the icons and controls on your TV screen appear stretched or warped. This is due to wrong resolution. As a rule, modern operating systems set the appropriate value automatically, but this is not always the case.
To adjust the resolution, you need to right-click on any free space on the desktop, then select context menu"Screen resolution" item. Keep in mind: it is better to set the recommended values, since otherwise no one can guarantee good quality images. This applies to both maximum and minimum values.
In addition, it doesn’t hurt to click on the “ Additional options", then go to the "Monitor" tab. There you should click on the “Screen refresh rate” drop-down list. You need to make sure that under this item there is a checkbox “Hide values that may harm your equipment.”
Important! All of the above especially applies to laptops, in which damage to the screen will lead to the replacement of the entire laptop assembly. Only after you make sure that all parameters fully comply, you can connect the laptop to the TV via HDMI.
The minimum suitable value is 60 Hz. However, the more, the better. Of course, the color rendering quality must be set to 32 bits. If after clicking the “OK” button the system does not work normal mode, just wait 15 seconds and then everything will return to default settings.
Setting up the connection of multiple displays
If not only a TV, but also a monitor is connected to the system unit, the system will consider all devices to be displays. The specific type of equipment in this case is completely unimportant. Windows 7/8 has two main modes for this case: duplication and cloning. You can choose between them in the same dialog box in which you set the required display resolution.
Screen mirroring
As you can guess from the name alone, your two desktops will be displayed in front of you on all connected displays. Important! Alas, but standard Windows tools(and Windows 8 is no exception) do not allow you to set for each monitor eigenvalue. Imagine what the image will look like big TV and an old 4:3 monitor!

Simply put, for comfortable use this mode you will have to use devices with the same resolution, otherwise some display may be turned off altogether. Since we are talking about connecting a TV, this option is still unlikely. However, you can simply pair a widescreen monitor with your TV. In this case, it will be possible to experimentally find the most suitable resolution, and there will be no annoying black bars on the sides of the desktop on the computer.
Here's how to connect your computer via HDMI using this mode.
Expanding the screen
This method is much more interesting. In this case, the TV can be made into one desktop, and the laptop or computer monitor can be made into a second one. Simply put, with the mouse you can select the active one on at the moment The monitor on which the application will run.
The OS will automatically number the displays, and familiarize yourself with them serial numbers you can in the same “Screen Resolution” section. If you have gone too far with the number of TVs and monitors, and therefore no longer understand which one is which, just click on the “Detect” button, after which the devices will be sorted in order, and the currently active monitor (or TV) will be highlighted.
Manual distribution
In the event that you do not like the order of automatic distribution of display numbers, you can simply grab them with the mouse and place them on right place. So, it is preferable to place the TV in the front rows, since in this case it will be much more convenient to display content on it. After all this, you can click on “Apply”, after which the desktop will be expanded to multiple monitors. Using the “Make Primary” button you can set the priority.
Roughly speaking, the monitor you select will have a Start button, and all other connected displays will be considered slaves by default. As practice shows, setting the TV as the main monitor is not very wise. Of course, except for those cases when it will “officially” replace your work computer monitor.
Other options

If you have installed control programs for your video card (NVidia, AMD), then connecting via HDMI can be done using the methods suggested by their developers. For example, in the first case, you need to right-click on a free space on the desktop, and then select “Panel” from the context menu that appears. NVidia control" Go to the “Display” section and make the settings you are interested in. AMD programs are managed in a similar way. In general, all setup steps are similar to what we described above, so it won’t be difficult to figure them out.
How to output sound to TV via HDMI
What about sound via HDMI? Don't forget that an HDMI cable is a very functional thing. Not only images are transmitted through it, but also sound. Many novice users completely forget about this, and therefore spend a lot of time trying to fix “problems” that actually don’t exist. For sound to be transmitted correctly, you must have the most installed current versions drivers for the video card. Of course, the same applies to drivers for audio output devices (integrated into motherboard Realtek core or discrete audio card).
Let's learn how to set up sound via HDMI. To understand whether you have a sound output module installed through it, you need to open “Device Manager”. It's easy to open. Right-click on “My Computer”, select “Properties” in the context menu, and in the dialog box that opens, in the far left part of it, click on to the desired point. A new one will open working window, in which you need to find the “Sound, gaming and video devices” section. It should contain a line like High Definition Audio, which indicates support for digital quality audio playback.

Next, go to the “Control Panel” (search through the “Start” button), select the “Sound” item there. It should also have something similar to " HDMI device" If everything is in order, turn off the computer, connect the TV, and boot the system again. The device should change its status to “Ready”. You need to right-click on it, and then select the “Use as default” option in the context menu that opens.
Pay attention!
Alas, not all models can transmit sound to a TV via HDMI in principle, as this is due to the characteristics of the connectors. As a rule, the first connector, which is specifically designed for connecting computers, laptops and other reproducing equipment, should in any case have such capabilities. In addition, it doesn’t hurt to dig deep into the TV settings. There you can often find a lot of useful things - setting up sound output, for example. However, connecting a TV via HDMI largely depends on the manufacturer and model of the device. Remember this. Therefore, it won’t hurt to read the instructions again.
That's it, after this the audio must go via HDMI. To be sure, reboot the entire system again, and then start enjoying high-definition movies streamed from your computer or laptop. Here's how audio is transmitted over HDMI.
Don't forget about the remote control!
It happens that you have already tried all the methods, but the image stubbornly refuses to appear on the TV screen. Why is there no signal via HDMI? In this case, it won’t hurt to take a closer look at the remote control for your TV. There is probably a small Source button there, with which you can select the signal source.
Click on it, then activate the one in the selection menu that appears HDMI port, to which you already have a computer connected. Most likely, after such a simple action, everything will work perfectly. Here's how to connect your TV via HDMI.
And again about the problems
Alas, Windows would not be itself if everything was so simple. As a rule, many users encounter problems associated with duplicating images from a PC monitor to a TV screen. So, very often people complain that they are unable to display an image on a TV unless they make it their main monitor. As you can understand, this is not advisable in all cases.
As a rule, a TV is used as a media player, and a regular monitor is used for work. If it is not active, you will not be able to work fully or watch movies normally. Unfortunately, the creators of Windows are once again “behind the times”, and therefore regular funds there is simply no way to properly manage a multi-monitor configuration. We have to look for third-party alternatives.

The most powerful and flexible program this type is great app Actual Multiple Monitors, which we will talk about now. The program is paid, which is important for our region, but its capabilities are worth the stated price. Of course, there are some absolutely free utilities, but not always their capabilities can be compared with those of the program described below.
Actual Multiple Monitors - assistant in connecting a TV
Of course, when creating this utility, the developers were unlikely to focus exclusively on connecting a TV via HDMI, but the program really simplifies its use when connecting to an existing computer/monitor pair.
Unlike standard utilities this application can make the desktop on a computer monitor and TV absolutely identical, but at the same time on each of them you can easily set different resolution! This perfect solution for those users who are quite happy with the old 4:3 monitor, but who would like to use a TV as a second display.
But that's not all! You can easily determine which application windows will be displayed where. Simply put, you can only display the window of the player you are using on the TV screen. Agree that this option is extremely convenient and useful! And one more pleasant circumstance. The application allows you to use a separate desktop image for each monitor, which will certainly be appreciated by all aesthetes. The program is paid, it costs around 40 dollars, but it works out its cost in full.
How to connect two TVs if the video card only has one HDMI connector?
If you have the opportunity to connect two TVs to the system at once, one of which will be used for its intended purpose, and the second you will work on, then this is great... But for most modern video cards only one HDMI connector. What to do in this case?
This problem can be solved in two ways. In the first case, you will need to find a DVI/HDMI adapter. Connect it to analog output video card, and then use a cable to connect the system unit to the TV. However, if you use old monitor, which connects to the system unit only via an analog connector, you will not have such problems at all. Important! Through such an adapter, sound is not transmitted to the TV via HDMI, and therefore the issue with acoustics will have to be resolved separately.
The problem is that the quality of the signal that is output to it is not very high. What to do if you have quality monitor and TV that you would like to connect via a normal interface? In this case, you will need to buy a so-called HDMI splitter, which allows you to connect several devices to one output at once.
Important! As with cables, don't try to buy the most expensive products of their kind. In stores you can see models costing $500, but practice clearly shows that they do not have any significant advantages over the “Chinese” ones for 300 rubles. An exception should be made only for cases when you plan to view “heavy” 3D video. If this is really the case, you will have to buy a more expensive model, since cheap modifications rarely support such signal density.
In conclusion

Here's how to connect your computer to your TV via HDMI. There is nothing complicated about this, you just need to be a little more careful. We warn you once again - all devices must be turned off at the time of connection! It is not uncommon for ports to burn out if this instruction is ignored!
This unfortunate circumstance is due to the fact that this cable is actually under quite high voltage. Surely everyone knows stories about flash drives that caused fires USB ports. And this despite the fact that the voltage on the ports is negligible (compared to HDMI)!
But in that article we looked at everything possible ways connections from the most ancient interfaces (VGA, tulips) to the most modern HDMI. But times are changing and today HDMI is the most advanced interface that is present in all modern TVs and which is used most often. Therefore, today we will dwell on this in more detail. Let's figure out the connection, as well as possible problems.
So, how to connect your TV to your computer via HDMI?
The first thing we need is to make sure that this interface exists on both devices - TV and computer (or laptop), it looks like this:

Prices for them vary greatly, both from the length of the cable itself and from the quality of workmanship (the material from which it is made, etc.). I took the most cheap cable 3.3 meters (price about $4) shows everything perfectly, even high-resolution files - 1080p shows without any jambs. Now decide for yourself which cable to take. And of course, don’t forget about the length so that it’s not too short.
We connect this cable to the computer (laptop) and to the TV. Typically in LCD TVs some HDMI inputs— connect to anyone, there’s not much difference. And on the TV we select HDMI source. Samsung has something for this separate button HDMI or click SOURCE (other manufacturers should have something similar):

and choose the right source depending on which socket number you inserted into, select that one:

Next, we'll look at setting up the computer.
If you connect your TV to your computer as the main monitor, then it should be automatically detected. If you connect a TV as an additional monitor, then most likely you will have to configure something. As a rule, there are no problems, everything is quite simple and quick to set up, the system is still more modern, but it doesn’t always work out so smoothly. But now let's try to figure it out for different versions operating systems.
So, setup for Windows 7
Right-click on the desktop and select “Screen Resolution”:

The following window will appear:

And here, in the “Multiple Screens” field, select the mode you need. You can either duplicate the image on both the main and additional monitor (TV) or Expand, that is, in other words, enlarge right side screen or leave only one of the screens active. Here, choose all the modes one by one and see what’s what. And after you select desired mode, click “Apply” for the changes to take effect, and then confirm your action again by clicking “Save Changes” in the pop-up window:

For laptops Windows control 7 is still easier. To select the appropriate display mode, you just need to press the key combination Fn+F4 (perhaps in some models it will not be F4, but another button, the main thing is to make sure that something like a monitor is shown, as in the screenshot below, there may also be other symbols or slightly different picture):
After pressing these key combinations you will see the following window:

And alternately pressing F4, while holding Fn, select the desired mode.
This seems to have been sorted out. Here, in principle, no problems should arise, but with Windows XP, as I already said, everything is not so simple. Firstly, in the case of a laptop, XP simply does not understand the Fn+F4 key combination, I don’t know why, but I couldn’t make friends with these “hot” keys in Windows. Secondly, in the case of a computer, it is also not always possible to configure through the screen settings additional screen(in our case, TV) so we have to climb into even greater depths. But there are no hopeless situations, so now we’ll look at how to solve the problem of connecting a TV to a computer running Windows XP.
Setting up a connection for Windows XP
First, we try to configure the connection through the screen settings. Right-click on the desktop and select “Properties”, and then go to the “Options” tab:

And in this window, you can select your TV as the main screen by selecting screen 2 and checking the box next to “Use this device as the main” or you can Extend the desktop by selecting the appropriate option below. Then click “Apply”. And close this window. But, unfortunately, it is not always possible to configure the connection between the TV and the computer this way. And if nothing works out for you, move on.
If everything is higher listed methods are not suitable for you, then the only option left is to configure the connection through the utility of your video card. And here, unfortunately, I won’t tell you a single recipe, since everyone has their own hardware, some have Intel, some have Nvidia, some have Radeon, some have more new video card, someone has an older one, and accordingly these utilities will be different, but the principle is very similar, the only difference will be exact name, A general meaning naturally it will be the same. I will show using Nvidia as an example, but I will repeat for others - all the steps are similar.
So, right-click on the desktop and select “NVIDIA Control Panel”:

And in the window that opens, click on the plus next to the “Display” item to expand the entire contents of the section and go to the “Installing multiple displays” item:

and in the right part of the window, select the desired mode and click “Apply”. If one of them does not work, choose another. As a rule, the "Clone" mode works without problems.
Well, that's all. I told everything I could. If you still can’t connect your TV to your computer via HDMI, then ask in the comments, I’ll try to give you some practical advice.


