How to move files to SD. Learn how to quickly transfer photos to the memory card of your Android device
The green robot's "stomach" is smaller than a thimble. Especially on devices with little memory. I fed him a dozen or two super-mega-necessary programs - and the place ran out. But... many of us have the opportunity to install a second “stomach” in the gadget and continue feeding.
Today we’ll talk about transferring applications from internal memory to an SD card in Android smartphones and tablets.
Which apps can be transferred and which ones can't?
Among mobile applications, there are those that can be transferred between drives and those that cannot. When you transfer a program to external media, some components remain in the same place - in the permanent memory of the device.
If the program is relatively autonomous and not too fussy in terms of the location of files and data, it will remain functional. And if it is deeply rooted in the operating system, when the work of other structures depends on it, the transfer can end disastrously - not only this program will stop working, but also everything that interacts with it. For this reason, you should absolutely not try to move system applications.
The ability to transfer third-party products to microSD varies. It depends on whether the program author has provided for this possibility. They don’t write about this in the characteristics - everything is learned experimentally, but such experiments do not threaten serious consequences. If after transferring the program does not work, it is enough to return it to its place or reinstall it into the device’s memory.
Moving by system means
Modern versions of Android, starting from 6.0, support transferring software to cards without additional funds. They use a micro SD card as an extension of the internal storage, and the movement function is built into the firmware.
To transfer a program from the memory of a smartphone or tablet to a card in Android 6.0 and higher, do the following:
- Open system settings and go to the " Device» – « Applications».
- Open the menu (properties section) of the desired program with a short touch.
- Tap " Storage", then " Change».

- In the window " Changing storage location» select « Memory card».

The instructions are applicable to devices of many brands and models, but adjusted for individual characteristics. Some manufacturers, for example, Samsung, instead of " Storage"You need to go to the section " Memory" Others have a button Move toSD" is located in the menu of applications that support this function. Well, others... simply didn’t bother and refused to implement the transfer function into the firmware of their devices.
The ability to transfer applications to SD cards “without intermediaries” also exists in very old versions of Android - 2.2 and lower, and everything that appeared later - up to the sixth version - requires third-party tools, which will be discussed further.
Mobile software for moving applications to SD
AppMgr III

A phone memory card is the best expansion option for installing and storing files. There are several ways to transfer utilities, music, games and photos to the SD card of Samsung devices and more.
Below I will show you a few methods that I personally use. You can take them into service!
File Manager
Use File Explorer or similar from Google Play to gain access to information stored on the Android device.
- Find the files you want to move;
- Mark the desired objects, go to the menu, select Move;
- Specify the future location of the files on the SD card;
You can move the files to an existing folder or create a new one.
Transferring applications to an SD card
Photos and music are copied easily, with applications on Android devices everything is much simpler than it seems:
- Open “Settings”, “Applications” section, “Management” item;
- Find the software you need (game or program);
- See if it's possible to move it to SD;
Samsung and other Android devices allow you to move some applications - if this is allowed, the “To memory card” button will be active. All you have to do is press it, the bulk of the data will be transferred to the SD card, a smaller part will remain in the device’s memory, freeing up space.

Wait until the end, the reverse operation may be performed!
How to transfer cache to memory card on Android?
The cache takes up a lot of space; in some cases it is easier to move its files to a memory card. Download the FolderMount program (does not work without root rights).

Having root will make it possible to use the program:
- Click the "+" icon;
- Enter the name of the file, in the “Source” field - the location of the cache folder;
- Fill out the “Destination” field by entering the address of the SD folder;
- Click the checkmark at the top and the pin symbol next to the name;
The pin will turn green once the cache transfer is complete!
Protected Applications
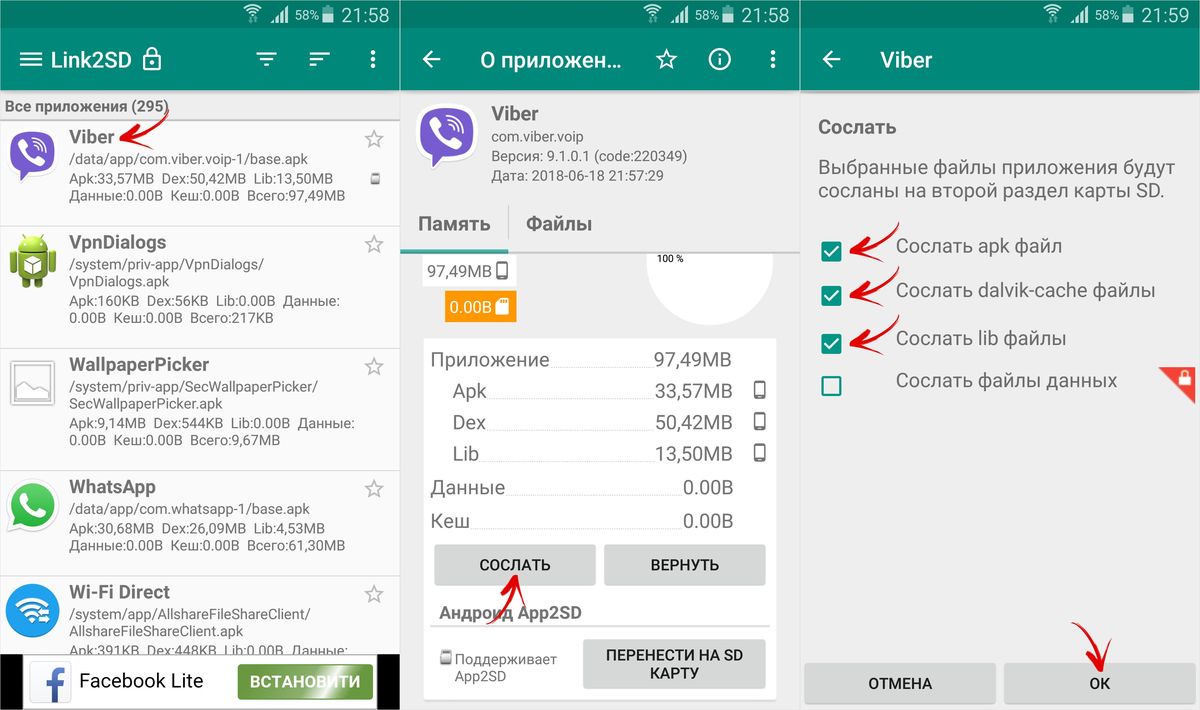
Some applications are protected from being copied to a memory card; it is impossible to transfer them without root rights. You will need to download the free program Link2SD, install, launch and find the necessary software.
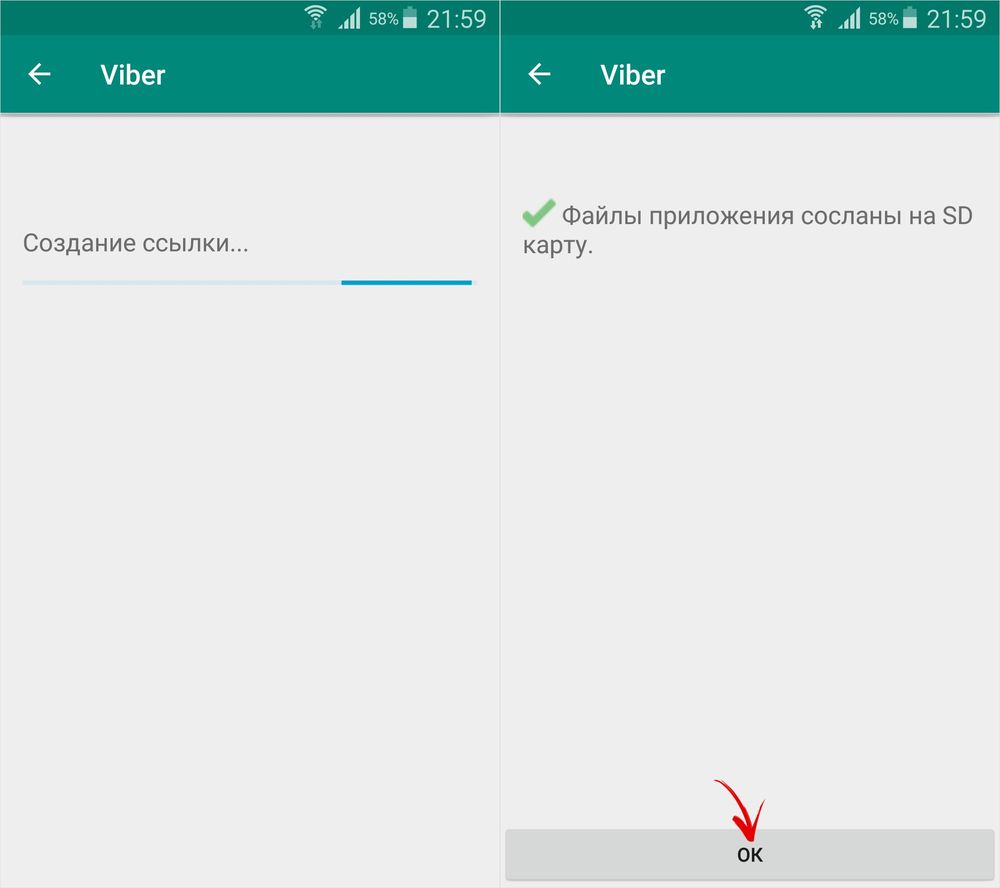
Two buttons will appear in front of you: “Actions” and “Transfer to SD card”. Click the second one, confirm the action by clicking “OK”. Confirmation of superuser rights will be required: select “Allow” and wait until the transfer is completed.

In addition to the above-mentioned programs and standard tools for devices running Android, there is a large amount of software that allows you to transfer files to a memory card.
Carefully read the description of such software to find out in more detail the possibility of working without root rights, the range of functions and other features. Store files on a flash drive, freeing up space on the Samsung device itself for optimal performance!
As a rule, you need to transfer data from one memory card to another after purchasing a new larger SD card. The matter seems to be not complicated, but there are some nuances, for example, when you need to keep all previously installed programs and applications working.
Before you transfer files to a new memory card, you need to prepare it. The first thing you need to do is format the memory card. This will allow you to get rid of some problems at an early stage. To do this, you need to go to the “Menu” of the phone, then to “Settings”, select “Memory” and “Empty SD card”. Or you can connect the device to your computer and format it like a regular removable drive (format in FAT32).
After successful formatting, you need to assign a name to the memory card. It is better to set the name the same as the old SD card. Then you need to enable the visibility of hidden folders and files on your computer. This can be done through the menu bar of any folder – “Tools” - “Folder Options” - “View” (if the menu bar is not displayed, you need to hold down the “Alt” key). Displaying hidden files is necessary in order to copy absolutely all data from the phone’s memory card (some files may be hidden).
Transferring files
The easiest way to copy data to another memory card is using a card reader. To do this, you just need to insert the old SD card into the device, copy all the data to the computer, and then insert a new memory card into the card reader and write this data to it. Typically, card readers support very high data transfer rates, so this process will take a little time.
If you don’t have a card reader, you can simply copy the files via your computer. To do this, you need to insert the old memory card into the smartphone, enable the appropriate operating mode for data transfer in the settings and connect the device to the computer via a USB cable. Then you need to copy all the data from the SD card to your desktop or any other folder. Depending on the total amount of information, this procedure may take a long time.
After this, you need to disconnect the phone from the computer, turn it off and insert a new memory card. Then you need to connect the device to the computer again and move the files to the new SD card. If everything was done correctly, then all files and applications will be displayed correctly.
Do you want to download another application, but there is not enough internal memory? There is a solution: just move the already installed applications to the SD card. Our instructions are suitable for version 6 and higher. The names of some menu items may vary slightly depending on the smartphone model and system version.
Transfer applications to the SD card through Android settings

- Go to the gadget settings and select the “Applications” section.
- Open Application Manager to see all installed programs.
- Select the application you want to move to the memory card. In our example, this is Instagram.

- Open the "Memory" tab and in the "Used" section, click "Change".
- Select a memory card as the storage area and click Move.
- The location changes will take some time. Typically, this procedure is completed in a minute.
Important: Not all applications can be moved to an SD card. To move some programs you need to have root rights and the Link2SD application.
Transferring applications to a memory card using App 2 SD Pro
If you want to move multiple apps at once, download App 2 SD Pro to make the transfer process much easier.
After installing App 2 SD Pro, a window will open with information about all installed programs. Here you can check the boxes next to the applications you want to move to the card. Just click OK and App 2 SD Pro will complete the transfer process.
Almost all phones and tablets released in 2018 have a large amount of built-in memory, which is expandable using a microSD card of 32 GB or more (in mid-range and flagship models). But among owners of old and inexpensive devices with internal storage of 4 GB or less, the issue of lack of free space on a smartphone is especially acute. In this article, we will look in detail at all the ways to transfer applications to an SD memory card in Android.
The instructions are intended for both beginners and experienced users, so it talks about transferring applications not only using standard means, but also using special programs that require root rights.
You can also free up space in the internal memory by deleting system applications.
How to transfer applications to a memory card using accessible means
Since the earliest versions of Android, the system has had the ability to transfer most installed applications to an SD card. Instead, in Android 6.0 Marshmallow it became possible to use a memory card as an internal drive (this method is also described in the article).
Let's look at the function using the example of a Samsung phone running Android 5.0:
Go to Settings and select Apps. Depending on the manufacturer and firmware, the item may be called “Application Manager”, “All Applications”.

Select the downloaded game or program. If the application can be moved, the “Move to SD card” button will be active. Click on it.

If the button does not work, the developer has prohibited installation of the application on the memory card and you will not be able to move it using standard means.
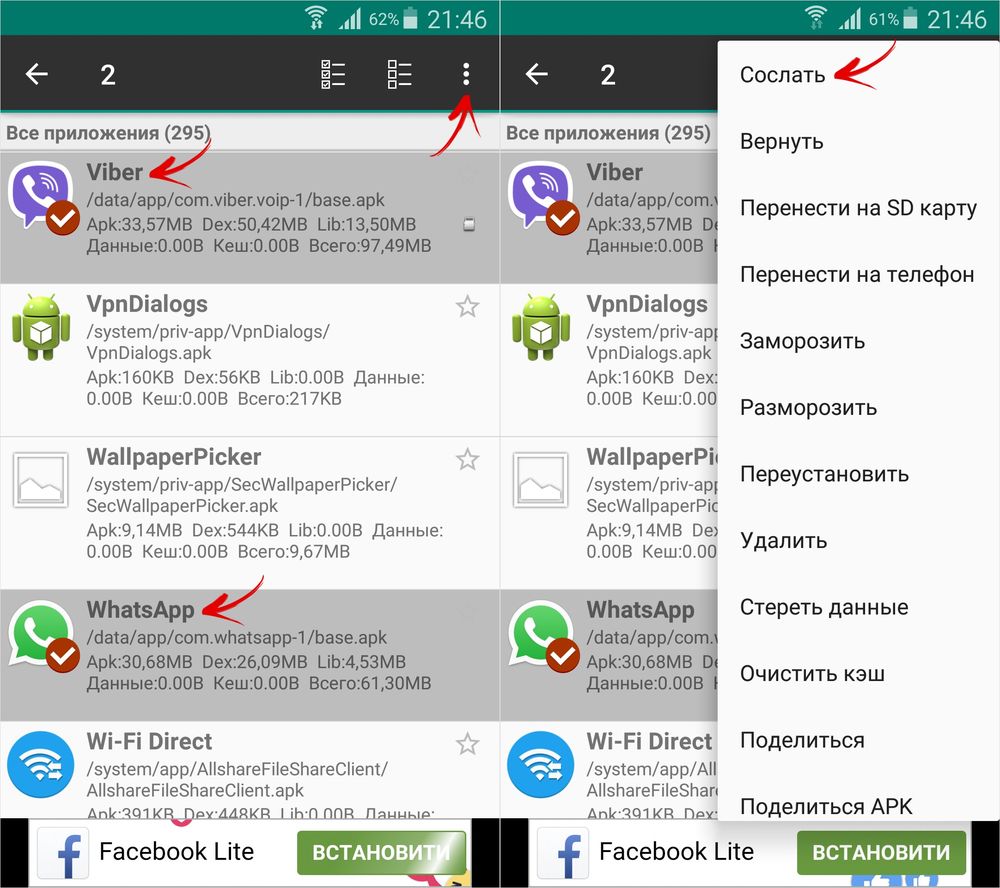
AppMgr III (App 2 SD) for transferring applications
In order not to open the settings of each game or program and not see whether they can be transferred or not, use the AppMgr III (App 2 SD) utility - in it, the moved applications are collected in a separate tab.

Hold your finger on app cards to mark them. Select the ones you need and click on the folder icon at the top. In the new window, click on the red arrow, which will take you to the application details page. To go to the settings of the next selected program or game, press the Back button.

AppMgr III will also tell you which applications should not be installed in external memory so that all their functions work correctly.
Using an SD card as internal memory
This feature was introduced in Android 6.0 and works in Android 7 Nougat, Android 8 Oreo and Android 9 Pie. It allows you to use a memory card as a built-in storage device. Since SD replaces internal storage, it makes sense for the flash card to be larger than the internal memory. And for applications to work quickly, the SD card must have a high write speed.
Data from a memory card formatted as an internal drive will not be read if you install the SD card in another smartphone or tablet. To use the card in a new device, you will have to format it as portable storage.
After connecting, a message will appear in the notification shade that a new memory card has been detected. Just click “Configure”, select “Internal memory” in the window that opens and follow further instructions. Don't forget to transfer files from the SD card to another storage device, as they will be deleted during the formatting process.

Detailed instructions for setting up the card:
1. Go to “Settings” → “Storage” (may be called “Storage and USB drives” or “Memory”).
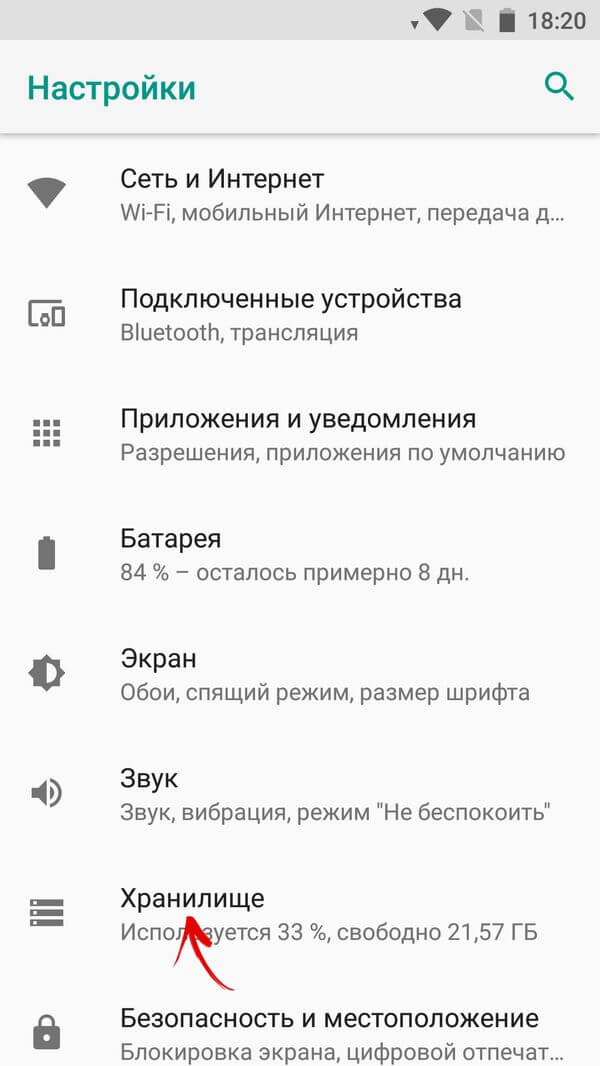
2. Click on "SD Card".

3. In the upper right corner, open the menu, select “Settings” (in some firmware “Memory”).

4. Click Internal Storage.

5. A warning will appear on the screen that all data saved on the SD card will be deleted during the formatting process. Therefore, copy them first, and then click “Clean and Format”.

6. If your smartphone uses low-class SD (for example, microSD Class 6), a message will appear on the screen that the memory card is slow.

7. Before completing the formatting process, you will be prompted to transfer some files and applications to the SD card. Select the option you want, click Next and then Transfer.

8. Finally, click “Done” and manually restart your phone.

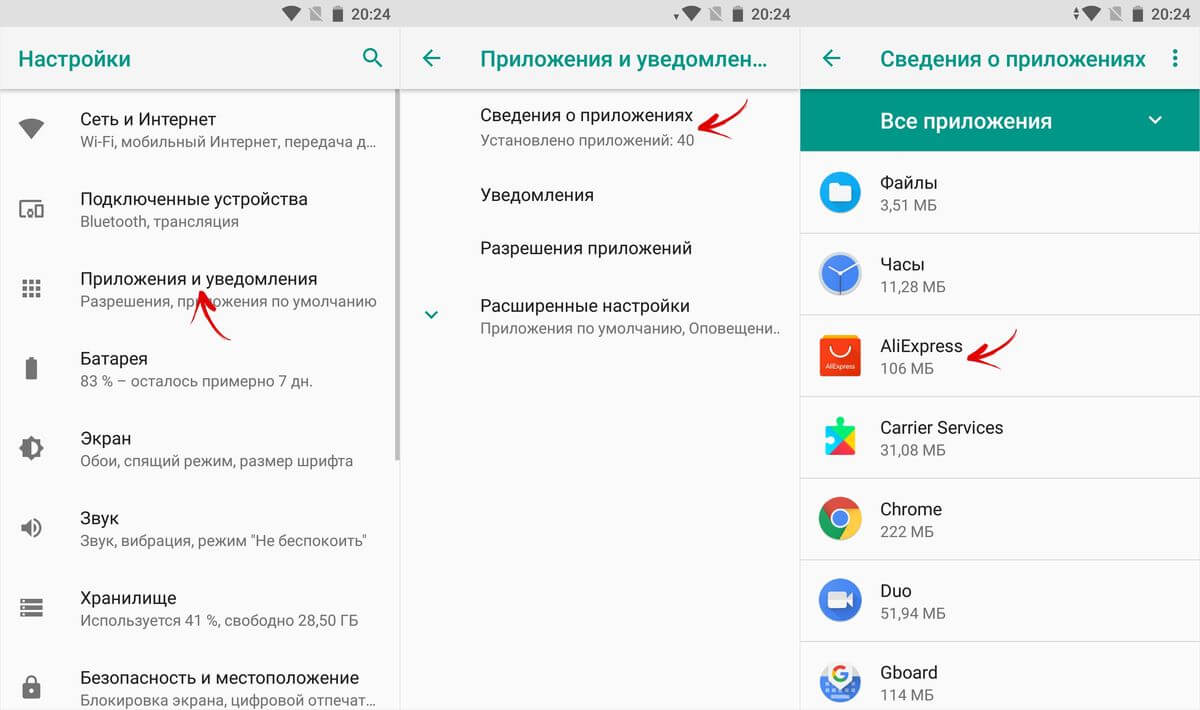
Now open “Settings” → “Applications” → “Application details” (if this item is not there, proceed to the next step) and select the installed program or game.
Click “Storage” (may be called “Memory”), then click the “Change” button and select the SD card.

In the window that appears, click “Move” and wait for the transfer to complete.

Formatting a memory card as an internal drive using ADB
If your smartphone has Android 6, 7, 8 or 9 installed, and there is no option to format the SD card as internal storage in the settings menu, the manufacturer has not added such an option to the firmware. But users can format the memory card themselves using the utility.
To do this, activate on Android, connect your mobile device to your PC and run ADB from the command line or from Windows PowerShell if one of the latest builds of Windows 10 is installed on your computer. Enter the following command and press Enter (in Windows PowerShell, add ./ before the command).

The console will launch and the “$” sign will appear in it. Type the command and click Enter:

The line below will display the view's SD card ID disk:NNN,NN. Replace NNN,NN to the value of the received identifier and run the command:

Wait for the command to complete. Then go to Settings → Storage and select SD card. Expand the list of options by clicking on the three dots at the top and click “Transfer Data.”

Select "Transfer" and wait for the process to complete. Finally, click “Done.”

How to move multiple apps to SD card in Android 8 Oreo and 9 Pie
To avoid performing the same steps to transfer applications separately, use the AppMgr III (App 2 SD) program, which was described at the beginning of the article. Only on Android 8 Oreo and Android 9 Pie you will have to give AppMgr III a couple of permissions.
Launch the application. A notification will appear that the program needs access to your usage history. Click Allow, select AppMgr III from the list of applications, activate the switch and return to the program. You can also configure access to your usage history by going to “Settings” → “Applications and notifications” → “Advanced settings” → “Special access” → “Access to usage history”.

Select the games and programs that you want to move to the flash card and click on the image of the folder with the arrow inside. In the "Move to Map" window, click on the red button below.

A message will pop up saying that AppMgr III needs permission to change system settings. Click on the switch and you will be taken to settings. Activate the toggle switch and return to the application. The options for this permission are located under Settings → Apps & notifications → Advanced settings → Special access → Change system settings.

You will then be prompted to allow AppMgr III to automatically perform actions without manual confirmation for each application. Click "YES", go to the "Accessibility" section, select "AppMgr III", switch the toggle switch to the "ON" position and confirm by clicking "OK". Then return to the program.


Application transfer will begin immediately. Just wait for it to complete.

At the end it will show that the applications have been moved to the memory card.
Transfer games to SD card in Android
Most of the user memory is occupied by the cache of installed games. To move it, we will use the FolderMount program, which can mount directories from internal memory to external memory. It requires .
Download FolderMount from Google Play, launch it and provide Superuser rights.

In the “List of Pairs” tab at the top, click on “+”.

Come up with and enter the name of the folder pair in the first line.

Click on the second one, after which the built-in file manager will open. The game cache is located in the “Android/obb” directory, and the application cache in “Android/data”. Go to the folder you want to mount and click on the checkmark.

The screen will ask if you want to create the destination folder automatically. Click "YES" if you agree. In this case, FolderMount will copy the path from the internal storage and create the same on the external drive. Click "NO" if you want to manually set the mount end point and select the folder where to move the files.

To start copying, click on the checkmark and confirm the transfer by selecting “YES” in the next window.

The process will be displayed in the notification panel.

Once copying is complete, switch the toggle switch in the “List of Pairs” tab to mount.

At the bottom there is a button with a pin image, clicking on which will mount all directories at once.

To move files back from the destination folder to the source folder, first unmount the pairs: to do this, turn off the toggle switch or click on the crossed out pin, then hold your finger on the pair and click on the trash can icon.
How to move apps using Link2SD
Link2SD is a program that can mount application data onto a memory card. In order for it to work, it is necessary to create an additional partition on the SD in the ext3/ext4 file system on the mobile device. Partitioning a memory card into sections is done in one of the following ways.
(!) Before creating a new partition, copy all the files located on the SD, as they will be deleted after partitioning the memory card.
Memory card partitioning on Android via TWRP
If installed on your smartphone, partition the SD card through it. To do this, click “Advanced”.

Select "Partition SD card".

Check "Micro SD card" and click "OK".
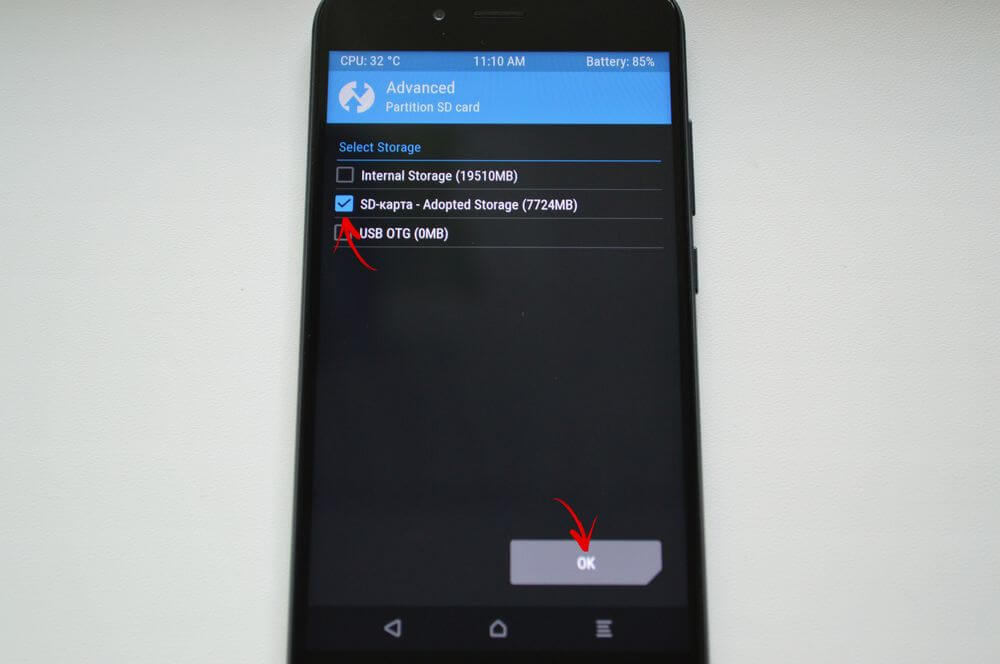
Select the file system of the ext-partition to be created and specify its size. For example, 2048 MB - this memory will become available for transferring applications and the volume of the SD card will be reduced by that amount. Leave the Swap partition size (paging file) equal to 0.
Drag the slider to begin SD marking.

At the end, click “Reboot System” and “Do Not Install” if you do not want to download the official TWRP application.
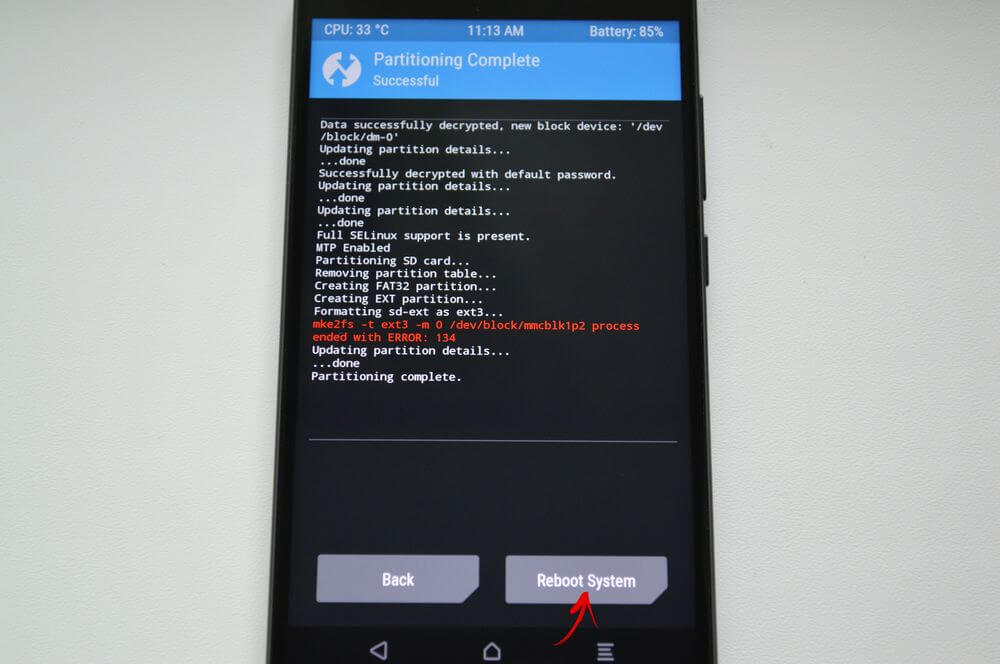

The device will reboot. If you go to “Settings” → “Memory” (or “Storage” in the latest versions of Android), you will see that the SD size has decreased. The second section “sees” only Link2SD, App 2 SD and similar applications.
Create a hidden partition on SD using AParted
The second way to split a memory card into 2 partitions if you have Superuser rights, but no TWRP:
Go to “Settings” → “Memory”, click “Disable memory card” and confirm the action.

Launch AParted and grant root access.

There are 2 bars in the Create tab: the top one will display the new partition, and the bottom one shows the current SD size and its file system.
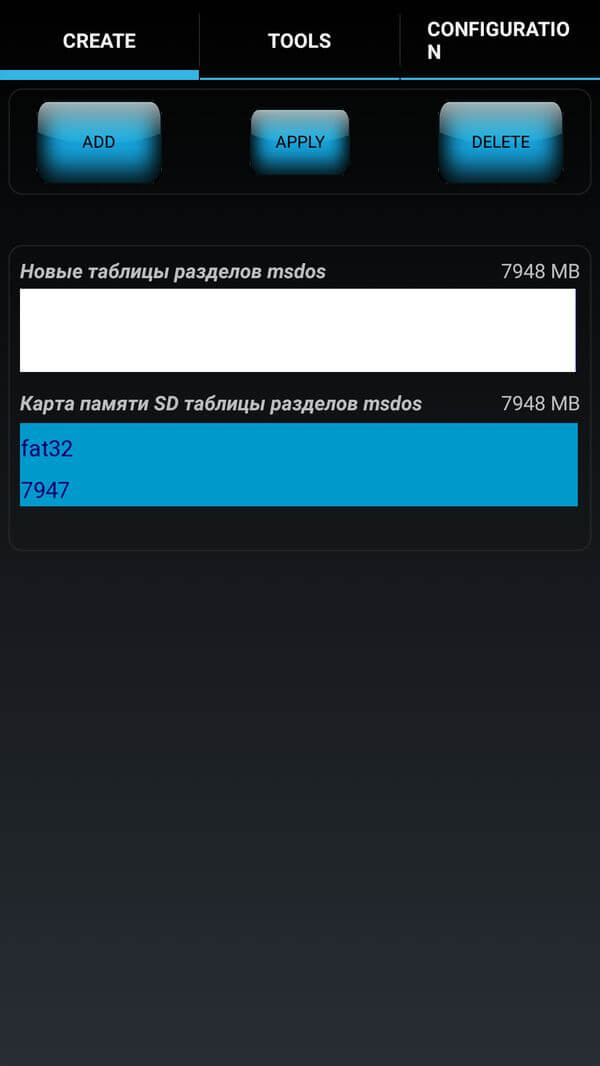
Click "ADD" to create the first partition. This will be the new size of the memory card where you can save photos, music, videos and other files. Leave the checkbox next to “Format”, the fat32 file system and select the size with the slider. To set it more precisely, click on the number next to MB, enter the desired value and click OK.


Click “ADD” again and create a second hidden partition to which games and applications will be transferred. Pull the slider all the way, leave “Format” checked and select the ext file system.

Click “APPLY” and select “OK” in the warning window that appears.
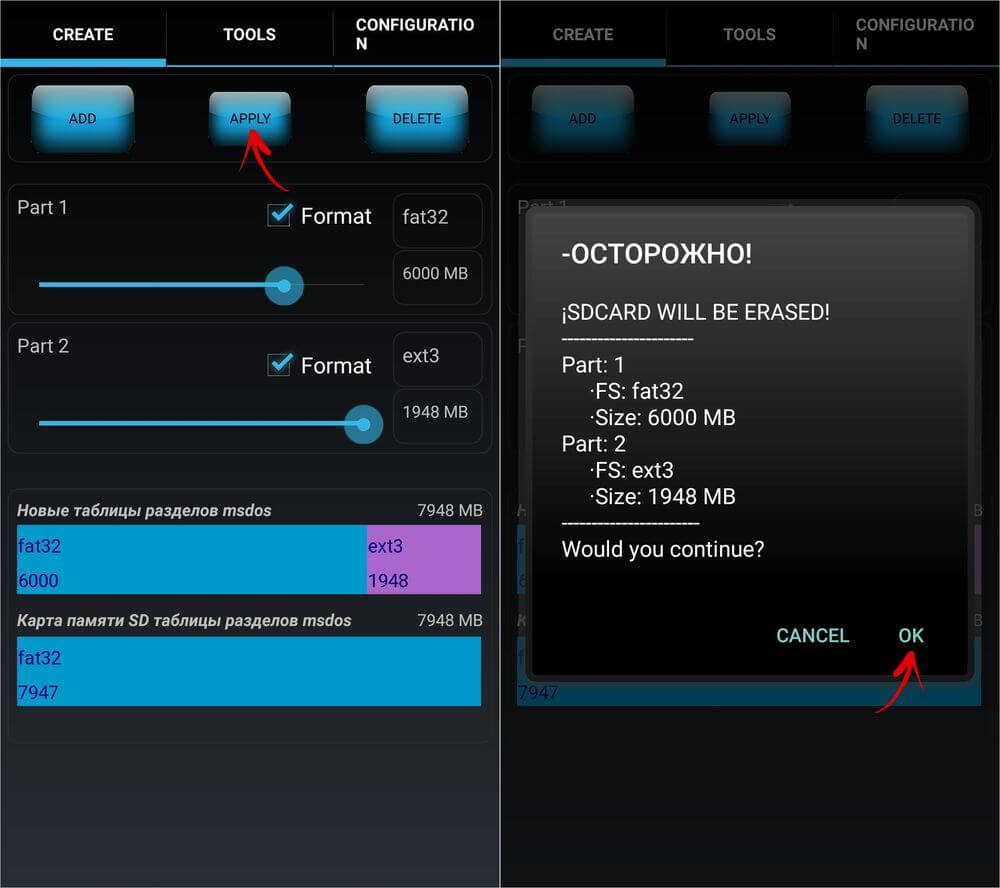
The SD partitioning process will start.

When completed, the second line will display 2 sections.

Now connect the memory card through “Settings” if this does not happen automatically. The new SD size should be displayed there.
Working with Link2SD
Open Link2SD and grant the program Superuser rights.

A window will immediately appear asking you to select the file system of the hidden partition of the SD card. Check the appropriate ext version and click OK. If the window does not appear, expand the menu on the left and click “Recreate mount script.”


Then click "Restart device" to mount the second partition of the memory card. The device will reboot.

Once Android is launched, go to Link2SD, click on the 3 dots in the top right corner and select "Multiple".

Select the applications you want and open the menu again. Click "Send".

There is also a "Move to SD Card" feature that moves apps using the standard Android method that is not available to users without a Link2SD.

If you need to move one game or program, find it in the list, click on it and select “Send” or “Move to SD card”.