The computer does not see the camera, what should I do? Canon Camera Connect app.
Greetings to blog readers!
Today I would like to consider one interesting question, which blog subscribers and readers have already asked about several times. So, can it be used camera as a webcam?
How to use a camera as a webcam?
The question is relevant for those who do not have a webcam on their computer, but want, for example, to chat with friends on Skype. The answer is ambiguous - maybe, but there are a number of conditions for this. Firstly, many modern models already equipped with a similar operating mode. In order to activate it, you just need to install the drivers, connect the camera with a USB cable to the computer and activate the camera mode.
But in most cases, everything is much more complicated. First of all, you need to check whether your camera has the ability to stream video. To do this, take from the kit that came with your model a cable with tulips for connecting to a TV - on one end it usually has 3 tulips, and on the other is the connector that is intended for audio-video output on the camera - this can be USB, miniJack or some other one.

As a rule, the yellow tulip is responsible for the video - we connect it to the video input on the TV and select AV input as the image source in the TV menu - the camera, of course, must be turned on. If there is no picture, then you will not be able to use this camera as a web camera, since it cannot transmit streaming video.
If a picture from the camera appears on the screen, then you can proceed to the next step and connect it to the computer.
But first you need to make sure that it has a video capture device with a video input that will transfer video to the program. This could be a video card or TV tuner. If there is no tuner, and the video card is not equipped with the necessary video input, then you can purchase separate device video capture - in Chinese online stores there are a lot of all kinds of inexpensive models.

We connect this device to Computer USB, and insert the tulip connector from the cable that came with the camera, which is inserted into the turned on camera.
For Canon cameras there is a separate similar special proprietary utility, which is called PSRemote.
As you can see from the screenshot, you can also select a video file, picture, or broadcast your desktop for playback on the Internet. In addition, the program allows you to apply various cool effects to your video.
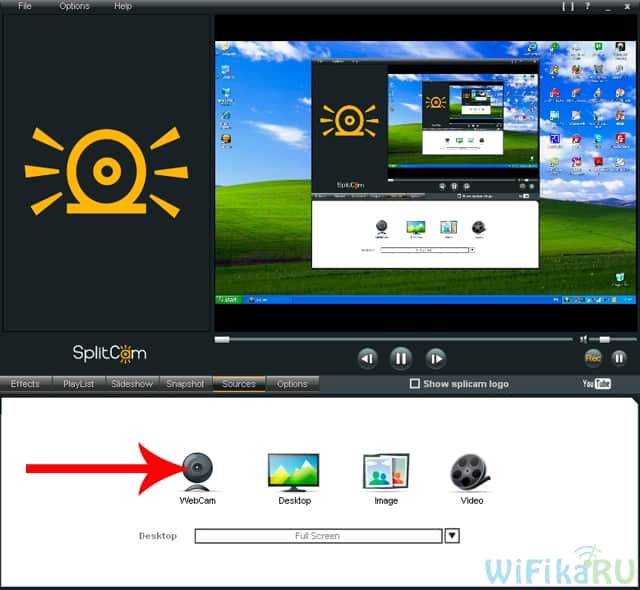
After that, in Skype or another video communication application, for example ooVoo, select our application as the outgoing video (“Tools > Settings > Video settings > Select webcam > SplitCam Capture”)

The MoneyCam program works similarly, in which there are even more various effects for overlaying for online video and detailed settings display video images. To launch an image from the camera, go to the “Sources” tab and select our camera.

In Skype, as in the case of SplitCamer, go to the source selection section and activate the ManyCam application as its source.

Or, for example, you can use the program on Facebook:

That's all for today - I hope the question of how to use a camera as a webcam has become not so insoluble for you - go for it!
No matter how large the amount of physical memory of your camera, sooner or later it will each be filled with video and photo images. There will be a need to clean it up and transfer everything you removed to a rough computer disk. We will need a special cable and software. All this is included in the kit camera. How to connect the camera to computer?
Instructions
1. Insert the cable supplied with the camera into the camera. If the camera has a PC connection mode, activate it.
2. Find the included cord with a USB connector and connect it to any free USB port your computer. This port located on the front or back panel of any modern personal desktop computer, occasionally even on both panels. On laptops USB ports can be located on the side or on the rear panel.
3. After connecting the cable to the computer, operating system will begin recognizing the new connected device and launch the Found New Hardware Wizard. If the system asks installation disk, then insert the disc included with your camera, on which it is written " USB Driver" The installation will take less than a minute, confirm its completion by clicking the “Finish” button in the final window of the installation wizard.
4. Later, a new window will appear on the screen, which will offer options for actions with your camera. At the same time, it will be identified as the newest " removable disk" We recommend immediately copying the images, saving them in a new or existing folder on your PC’s hard drive.
CD-ROM is optical disk with information placed on it that cannot be overwritten. This is how the abbreviation CD-ROM stands for Compact Disc Read-Only Memory. Connecting it involves placing the disc in a CD reader installed in the computer. However, the name CD-ROM often refers to the reading device itself. Connecting it to a computer is a somewhat more difficult process.

Instructions
1. Buy a special IDE/ATAPI-USB converter if from time to time you need to quickly connect a CD-ROM drive to a desktop or laptop computer. Structurally, it is designed like an ordinary connecting cord, at one end of which there is a USB connector, and at the other there is a very wide special connector. You need to insert this connector into the slots on the back of the CD-ROM drive housing. It is designed in such a way that it covers two slots at once - the one that serves to connect the power bus, and the one that provides data exchange via the IDE/ATAPI interface.
2. Connect the 2nd connector of the device to the USB port of the computer, and the system will recognize the CD-ROM drive. The indicator on the wide connector will light up, and you will be able to work with external drive optical disks.
3. If you need a continuous connection of the CD-ROM drive and install it in system unit, then start the procedure by turning off the computer and disconnecting it from the network. Position the body in such a way that you have free access to both side surfaces.
4. Remove the left and right panels of the system unit by unscrewing the two screws connecting them to the rear surface of the case. The standard tower system unit has upper compartments for installing devices in five-inch cases - prepare one of them for installation. You need to remove the plastic plug on the front panel opposite this compartment.
5. Place the CD-ROM in the prepared bay, adjust its position relative to the front panel of the system unit and secure it with four screws - two on the left and right sides system unit chassis.
6. Insert one of the available power cable connectors into the corresponding slot on the back of the optical drive. After that, with the support of the IDE cable, connect the CD-ROM to the connector on the motherboard.
7. Close the system unit, replace the disconnected wires on the back panel and turn on the computer. After the system boots, it should recognize the new device and install a driver for it from own base. If this does not happen, install it manually using the software included with the CD-ROM drive, or by downloading it from the manufacturer's website on the Internet.
Video on the topic
There are situations when you need to transfer information stored on your hard drive. disk laptop to a non-movable computer. Certain difficulties may arise due to incompatible connectors. But they can be easily eliminated with the support of special adapters.

Instructions
1. Use an adapter to connect a rough drive laptop to PC. What is this for? If your laptop is over 3 years old, then there is a risk that the rough drive may fail. In order to avoid complete loss of necessary information, it is necessary to make it backup copy, which will be contained on the hard disk your PC.
2. Buy an adapter at any computer store. After this, in order to connect the rough disk laptop connect the adapter with the wide side to the computer to the IDE cable motherboard desktop computer. Connect the connector to the tight part of the adapter hard drive laptop. Before performing these manipulations, do not forget to turn off the power from the computer.
3. Power up your desktop computer after connecting the hard drive laptop to the computer. The new device will be found during boot. Please note that you will only be able to transfer all the necessary data to the rough disk of your PC after rebooting it again. It does not matter what version of the Service Pack the operating system you are using is in. It will not be possible to avoid re-downloading.
4. Use a special HDD container if you don’t want to bother with adapters and if the process of transferring data from a hard drive laptop on PC will be repeated quite often. This container connects to a computer using a USB cable. This imposes certain restrictions on the data transfer speed, but at the same time makes the process more comfortable. You can buy a HDD container at any computer store. There are several versions, among which there is a container, which itself is an adapter with IDE motherboard desktop computer boards. Those. when using it, the data exchange speed does not suffer, as is the case with a USB container.
Since ancient times, man has strived to capture what is happening around him. Rock paintings, frescoes, paintings, photographs - each is just a means to preserve the moment. IN modern world photography is an art form where the creative process is manifested in the search for the necessary frame, selection of composition and lighting. The final result of photography is the gift and skill of the photographer.

How the camera works
Any camera works on the principle of acquiring an image with the help of light. The ancestor of the camera is the camera obscura (from Latin - dark room). A camera obscura is a light-proof box with a hole in one wall and frosted glass on the other. An upside-down image appears on the screen when a beam of light passes through an opening up to 5 mm in diameter. The camera obscura did not provide the required image sharpness. In the future, the camera obscura was improved with optical devices installed in place of the hole. This was the impetus for the creation of the camera.
Who invented the camera
The camera obscura was widely used for astronomical observations. Artists also used a camera obscura to simplify their work. A particularly famous artist was the one who used the camera obscura - Leonardo Da Vinci. Due to its massive size, the camera was difficult to use. In 1665, the English scientist Robert Boyle created a super-compact camera obscura. In 1770, the Swiss scientist Karl Scheele confirmed that the image obtained with silver salts and fixed with ammonia is not destroyed. It became possible to save photographs on paper. The original camera was invented in 1839 by Louis Jacques Mande Daguerre. Daguerre's first experiments were unsuccessful. In 1827, Daguerre met Joseph Niepce, who was working on the same problem. In 1829, Daguerre and Niepce entered into a partnership agreement. Niepce died in 1833. Daguerre, using their joint achievements with Niepce, by 1837 invented a new system for acquiring photographs. This system is called daguerreotype. The images on the daguerreotype turned out to be of high quality, but it was unthinkable to make several images. Daguerre's invention caused a real boom; the method of daguerreotype spread widely throughout every world. Prerequisites were made for Daguerre's invention: the creation of a camera obscura, the development of chemical processes for fixing the image.
Video on the topic
Returning a discovered camera to its owner is a decent and necessary thing. But how to find the owner and make sure that this is the true legitimate owner of the device? This is not as difficult to do as it might seem at first glance.

The camera is the soul and heart of the photographer, a working tool and faithful assistant. Anything happens in life, including the loss of expensive electronic devices due to haste or carelessness. Returning a discovered camera to its owner is a sign of excellent tone and ambition, not to mention the significance of this step for the true owner. It's not so much about the cost of the device itself, but about the unique photographs taken, which can be of significantly greater value. In addition, for aspiring photographers, their tool is an exceptional means of earning money. Often people are ready to offer a significant ransom for a discovered camera.
You need to learn as much as you can about the camera
Owners expensive devices often they leave several images on the memory card, which contain information about the owner, contact numbers or other methods to get in touch. If there is no such information, it is necessary to study the table of contents of the photographs in detail and determine the shooting locations. It is absolutely possible that you will be able to meet your own acquaintances in the photographs, and by contacting them you will be able to establish the identity of the photographer.
Visiting forums and communities of photographers
You need to leave a message about your find on special forums for photographers. They have appropriate sections dedicated to communication about buying and selling photographic equipment. There, from time to time, there are announcements of finds or losses. You should choose both according to the territorial thesis and the traffic of the Internet source. IN public networks There are also a ton of communities dedicated to the art of photography.
Other methods of reporting a find
If, from the photographs, it was possible to determine the approximate area of residence of the owner, you need to go there to post notices about the find. The same can be done in the place where the camera was found. There is another genuine method of searching for the owner of a camera: especially old ones are selected from the photos on the memory card, which are used to search in Google or Yandex images. By going to the original source of photos on the Internet, you can establish the identity of their creator.
Authentication of the owner
When the owner is discovered, it is imperative to verify its authenticity. Should be requested serial number devices or lenses, which are indicated on the camera nameplate, frame or electronic mount of the optics. You can ask for copies or photographs of the purchase receipt and warranty card.
Video on the topic
Skype is an application used for making telephone calls on the Internet, as well as for organizing conferences and video calls. In addition to a webcam, in order to make a video broadcast on Skype, you can also use a camera with a video recording function.

You will need
- - computer;
- - camera;
- – video capture device.
Instructions
1. Make sure your digital camera can work in webcam mode. To do this, connect it to your TV and set it to video recording mode. Make sure the camera is capable of producing satisfactory video quality. If it can also stream video, you will be able to connect camera to Skype.
2. Perform the transfer operation streaming video With camera and on a PC with capture support. For this, use a video capture device (video card or tuner with a video input) and a composite input (tulip). Connect the cable from the camera to the device to use camera like a webcam.
3. Install the driver for the video capture device, the one that allows you to record the signal to the hard drive. It cannot broadcast video signal to the Internet. To do this, it is necessary to intercept and redirect the signal. Use for this free application SplitCam.
4. Download the program from the link http://splitcam.biz/. Install it on your computer. Connect an adapter or tuner to the computer, i.e. video capture device. Connect the cable to the composite input and connect it to the digital camera output. Set to camera Auto-shutdown timer for the highest time.
5. Use the program that comes with the video capture device to make sure that the image from the camera is transferred to it. After that, launch the SplitCam application. Go to the “File” menu, then “Video Source” and select your device by checking the box next to it. After that, go to the “Options” menu, select Advertisements and check the Exchange ad and video windows box to move the video image to a larger window.
6. Launch Skype. If the program does not offer to check the video quality, select the signal source manually. To do this, go to the “Tools” menu, select “Settings” - “Video Settings”, then “Prefer webcam”, from the drop-down menu you need to select SplitCam Capture.
Digital cameras, like any technology, tend to break down. In some cases, you can try to improve the situation without resorting to the help of experts.

Instructions
1. First, figure out what kind of malfunction is in your camera: - it does not turn on; - it turns on, but does not take photographs; - it takes photographs, but the pictures are not clear or with unclear blockages; Next, contact your superiors about the operation of the unit in the section “Elimination of permissible malfunctions” or something similar. See if your task is described there. If described, follow the instructions there.
2. If the camera does not turn on, check the battery. Open the battery slot cover. Make sure the battery is installed correctly. If everything is in order, but the camera still does not turn on, check visually whether the battery is working properly and whether there are any signs of deformation or oxidation. It's possible that it needs to be charged. If charging the battery does not help, try replacing the battery with the same one.
3. If your camera turns on but takes pictures, then the reason may be in the memory card. First of all, make sure that there is enough free space. If there is no space, then connect the camera to the computer via a USB port (or a memory card via a card reader), move all the photos to the computer (if they have not been moved before), format the memory card. If this does not help, it is possible that your card was accidentally blocked and your camera simply does not see it. On MicroSD cards There is a lock switch, one that can involuntarily turn on when a memory card is abruptly removed or inserted into the slot. Check that the switch is in the ON position. It is also possible that the contacts of the camera and memory card are clogged. Clean the contacts with a rubber eraser.
4. If the unit takes photographs, but the pictures are not clear, check whether your lens is dirty with dust, sand, or fingerprints. In this case, wipe the lens with a specially prepared cloth. Before wiping, make sure you remove sand and other large particles from the lens. On the contrary, you risk scratching it. And don’t get carried away with wiping the lens too often, because the risk of damage to it also increases. If this doesn’t help and the photos of your ex are unclear, it’s possible that your settings have gone wrong. In this case, you need to refer to the instructions
5. If these tips did not help you fix the problem, you need to contact an expert in photographic equipment repair. And remember that the camera must be protected from any damage, sudden temperature changes and other adverse influences. This will extend the life of your unit.
Video on the topic
Today even schoolchildren have learned that a pocket computer can be connected to an ordinary PC via a USB interface. But the set of PDA interfaces allows you to use peripherals for a wide variety of purposes. All of the interfaces have their own characteristics, although some are not used as often as USB or BlueTooth.

You will need
- – PDA;
- – camera;
- – extension slot;
- – USB cable;
- – infrared port.
Instructions
1. Please note that for the operation of any equipment, drivers corresponding to the system installed on the PDA are responsible. The summary of information on the PDA screen is carried out through programs responsible for certain functions. Any external equipment is connected due to the same thesis. But some types of equipment that can be easily connected to a huge PC may not be supported by a pocket computer.
2. Adjust the performance of certain PDA functions yourself. Realize your needs with stretch slots. These are devices that are installed on the PDA case, different modules connect more closely to them. Most handheld computers use Compact Flash or Multimedia Card expansion slots. IN selected models PDAs can be used by Smart Media or Memory Stik by SONY. The likelihood of using one or another expansion slot is to be determined by the user's management.
3. Connect to PDA digital camera via USB cable. Make sure that the drivers of both devices match. Occasionally drivers for different types devices are supplied by the PDA manufacturers themselves. A digital camera is not a common type of device that users try to connect to a PDA.
4. Send pictures to your PDA via Ir if you have a digital camera that supports infrared. The only drawback is the low data transfer speed.
5. Use cameras operating in CF format to connect to your PDA. Transfer quickly captured material via PDA. View photos on your PDA from a digital camera connected to it. When choosing devices, pay attention to the compatibility of the extension slots of both devices.
6. Often, users try to connect not a digital camera to their PDA, but a web camera. Check out the Webcamera Plus app and transform your PDA. This will be acceptable if your pocket computer has Windows Mobile installed.
Video on the topic
Pay attention!
Digital cameras are poorly suited for the metamorphosis of photographs. They cope with this better graphic editors on the PDA.
Useful advice
The screen of most PDAs is inferior in parameters to the screen of the camera itself. By working with images on camera, you'll become much faster at reviewing frames.
By purchasing computer equipment, users are burdened to use all its probabilities. It's no secret that laptops, like computers, are compatible with digital video devices, such as cameras, camcorders, etc.

Instructions
1. Video cameras can be external or built-in. Integrated video cameras are usually placed in top panel laptop. You can find out this visually by looking at the laptop.
2. Turn on your laptop and click on the My Computer icon. You will see a window with local disks and external connected devices. If you find the item “Video devices” or simply “Video” at the bottom, click on it with the mouse and you will see yourself on the screen. Your laptop has an integrated, built-in video camera. Occasionally she may not work due to lack of installed drivers, which need to be downloaded to a laptop via a USB cable from the Internet from the manufacturer’s website.
3. If your laptop does not have a built-in video camera, you should connect an external video device to it. This is quite primitive to do. Webcams are sold in stores computer equipment with software, necessary USB cables. Read the instructions. Take a USB cable and connect your laptop to the camcorder via the USB port. After a few minutes, the laptop operating system will detect the external connected device. Go to the “My Computer” folder and find the “USB video device” item there. Click on it with your mouse. If the drivers for the camera were downloaded mechanically, then the equipment is installed and the camera will work. But occasionally you need to install the software yourself. Insert the disc included with the webcam into the receiving device, open it, find installation file with "exe" stretch, run following the commands on the screen. After some time, the installation will finish. Restart your computer, the camcorder is ready to use.
4. To connect a traditional video camera (one that is allowed to shoot video) to a laptop, a special 1394 port is used. This gives best quality images of digital material downloaded from a video camera, and also increases the download speed. Also used for connection connecting cable with plugs for the FireWire 1394 port. If the laptop does not have such a port, purchase an IEEE 1394 controller and insert it into the side port for connecting controllers with its thin part. After this, insert the plug of the above cable into the controller, connecting the laptop to the video camera. Connecting and disconnecting the controller occurs like a flash drive. Check the connection of the video camera through the operating system using the method described above in step 2.
Photos from digital memory camera sooner or later you will need to load it into your computer, because the reserves of any storage medium are limited. Upload photo from camera into a computer is allowed using different methods.

Instructions
1. The most common method of transferring photos from camera to a computer is copying or moving when connecting devices to each other using a cable. Connection cable camera To suits the computer included in delivery. In order to connect the camera to a computer, you need to install the appropriate driver on the final one, the one that also comes with the camera. Some manufacturers record proprietary photo processing software on disk along with drivers. After installing the drivers, connect the camera to the computer via USB interface. It can be recognized by the operating system as a removable disk or as a device. In the first case, data transfer will be carried out using standard file administrators, and in the second - with the help of proprietary software installed from disk.
2. Upload photo from camera it is also possible to connect to a computer using special devices - card readers (which can be built into a laptop or system unit, or connected to the computer when USB help). This method differs significantly more high speed data transfer. To download photos from camera into the computer, remove the flash card from camera and insert it into a card reader connected to the computer (or built into it). If the camera uses a micro version of a flash card (say microSD), then use a special adapter to insert it into the card reader. This method of data transfer is no different from copying data from a regular flash drive.
3. Some modern cameras support special technologies wireless transmission data. If the computer is also equipped with modules wireless communication(say Bluetooth), then downloading photos from camera can be carried out using this method. To do this, activate Bluetooth on both devices, on your computer select bluetooth icon in the tray and click on the “Add device” button. After adding the device, start browsing and copying the desired photos.
Useful advice
If your computer is not very new and does not have a USB port, then make sure in advance that the free PCI slot available, purchase a USB controller and install it in the PCI slot of the motherboard. Such a controller costs about a couple of hundred rubles.
When you connect the camera to the computer, the automatic installation connected device and the contents of the camera's memory are displayed. If this does not happen, then here are some tips that will help you answer your question.
Faulty USB port
You need to connect the device to the computer through the front connectors. Nothing worked out? Try using the rear ports. If attempts are unsuccessful, then use a flash drive. If it doesn't happen here either feedback, then the problem is in the cord. It should be replaced. If everything works, then the problem is in faulty USB ports.
IN modern devices can be seen USB type connection, which is called MTP. If the PC has an old operating system, but the device has MTP, then this is the problem. We advise you to connect your cameras with your family USB cables, directly into the USB port of a PC, the cord length is no more than a meter.
Camera is turned off
The computer does not see the camera if it is turned off after you connect it to the PC. Then the computer will not see the connection USB cord working.
Windows does not see the camera - the drivers are not installed correctly
Check how you installed the drivers. To do this, you need to connect USB to your computer. In the section - device manager (My computer - call the context menu right click mouse - Properties - Device Manager tab). You need to see if a new storage device has been added to the partition - USB controllers. If you saw yellow exclamation mark near one of the points, this means that the drivers are installed incorrectly and the computer does not see the camera.
System failure
If the problem persists and your PC still does not see the camera, then it may be a computer system failure. Programs that block may recognize the device as a threat that contains viruses. Accordingly, she blocks it.
Solution
- go to Start – Control Panel – System and Security – Windows Firewall;
- click on Enable and Disable Windows Firewall;
- mark with a dot opposite – Disable “Windows Firewall” (not recommended);
- Click OK to save your changes.
Restart your PC. Try turning your camera on again.
IN recent years WiFi is gaining more and more popularity among users, so it is not surprising that more and more different digital gadgets are acquiring support of this standard wireless communication. This trend has not escaped our good old device - it has long become a reality. Today we will turn our attention to it and see what’s what and why it’s even needed.
Actually, the WiFi camera is designed to perform three tasks:
- Directly send files to the Internet
- Transferring a photo to a computer or smartphone
- Remote camera control from your phone
If we are talking about amateur photography, then this opportunity is still rather pleasant, but not very required bonus to the camera. But professional photographers, when minutes matter and need to urgently send some sensational shot to the editor, will be very happy to be able to send their materials directly. If the camera with wifi also has Android OS, then you can even edit the photo before sending it.
Well backup, which saves not only space on the memory card, but also protects your photos from loss due to the breakdown of this card or failure of the entire camera, will be very useful not only for professionals, but also for amateurs - it’s a shame to lose beautiful shots due to a minor mistake or broken equipment.
The second is a more convenient wireless connection with the computer or TV itself - these wires always get lost, and if your camera also has some kind of non-standard connector and you don’t have a cable at hand, then you have to pull out the card and look for where to insert it to display your photos . To communicate with a PC or smartphone, you will need to first install some programs, which are abundant in free access- there will be no problems with this.
It is also sometimes possible to establish a direct connection and exchange frames between several compatible wifi models cameras.
And if you have at home wireless printer- then you can quickly and easily print your photos.
And the most interesting thing is the opportunity remote control camera from your phone - there’s even that! It can be very convenient to place the device at a distance and take pictures from a remote control cell phone.
In short, there are a lot of advantages - let's figure out how it all works.
How to connect a camera to a computer via wifi?
In addition to models that already have a built-in WiFi module, it is possible for a simple camera to connect to the network. For this purpose, it implements a support function external adapters with corresponding connectors for different models.

Another option is to use it on supported devices special cards Eye-Fi. IN the latter case, however, the camera cannot work as an access point - that is, you cannot connect to it from other devices, but only download video from it to your computer.
I think I should just list everything possible ways does not make sense to use - let's look at real example— Canon EOS 70D will be connected to the tablet. There is a very wide built-in functionality of the wifi camera, there is almost everything that I have already listed - transfer of images between several cameras with wifi, connection with a smartphone, remote control from a computer, printing to a printer, uploading to the Internet and viewing images using the DLNA standard.
So, let's first configure the camera itself to work with WiFi to connect to a computer. First, let's enable in the settings wireless module

Go to the menu WiFi functions and come up with a name for our camera that will be displayed online.

After saving the settings, go to the type selection menu wifi connections and click on the “Smartphone” icon.

The next step is to decide how the connection will be made - directly or through an existing local network.
Direct connection of the camera to the phone via WiFi
Direct connection camera and smartphone via WiFi is characterized by low connection quality and a short range. To activate this mode, you need to select “Camera access point mode” in the menu

After that, select “Connect manually” and set the network name (SSID).

After this, you can manually set the data transmission channel and encryption type, but this is not necessary. That's it - the access point has been created and you can go to your smartphone. To work with Canon cameras, you will need to install the EOS Remote Utility program on your smartphone or tablet - it is available for both Android and Apple.
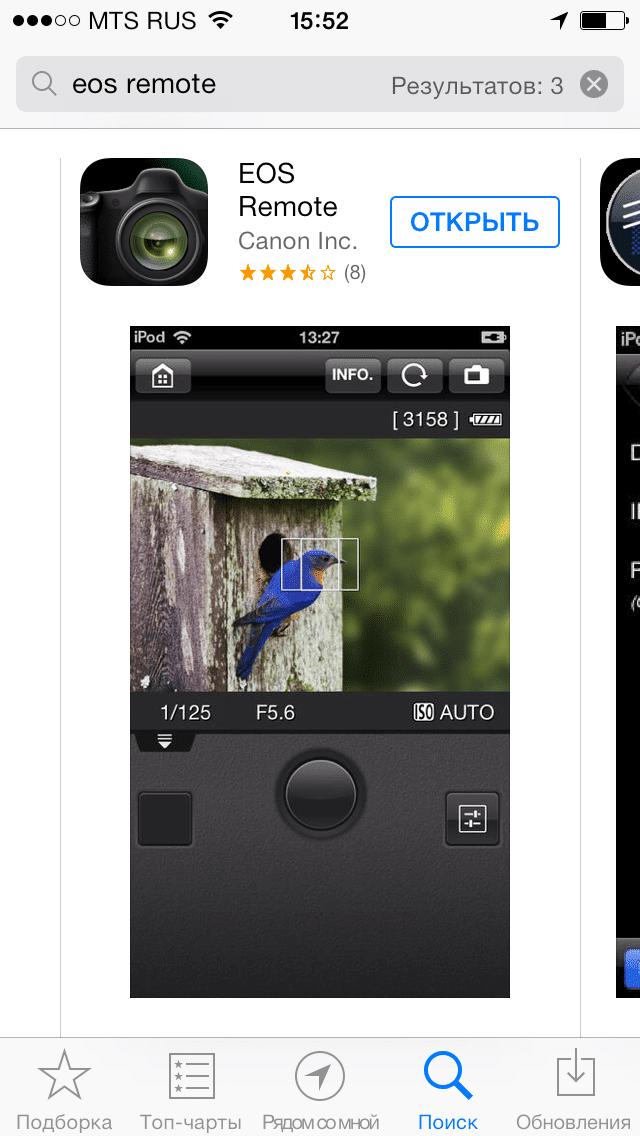
We install it, launch it and select the type of work - viewing pictures or remote control. WiFi must be turned on on the phone.

After this, a search will be made for suitable cameras within the operating range - we will find ours and connect to it using the specified password.

After this, we again look at the camera, on the screen of which a request will appear to confirm the connection to it from your phone.

We approve and receive on your mobile phone or tablet either a list of photos from the camera or a panel for its remote control, depending on what we chose at the beginning.

Connecting the camera to a computer via wifi
It is even more practical to use the local network that has already been set up in the house for a long time thanks to the articles on this site, so we will take the first step from the previous section and select “Infrastructure Mode” for the wifi connection type. After which you will be asked to find and connect to the one that suits us wifi networks.


After this, just as in the previous case, open the EOS program, connect to the camera from your phone and work. For example, this is what the camera control panel looks like on your phone screen.

That's all, I think you understand why you need a camera with wifi.
Can I use digital camera How to use a web camera for working in video communication programs over the Internet? It depends on the capabilities of the camera itself.
In some models the manufacturer The function of working in web camera mode is included(Webcam), and this should be written in the user manual. If the camera supports web cameras According to the instructions, you need to connect it to your computer via USB.
You may also need to install the driver that came with the camera.
Other cameras, which according to the instructions do not provide for this mode of operation, can be divided into two groups:
- The first group includes cameras that can be used as a web camera, but for this you need to install special programs.
- And the other group includes cameras that cannot work as a webcam.
To understand which devices belong to the first group, you need to connect the video output of the camera (see instructions) to the TV. Typically, a cord with tulips and a USB connector at one end is used for this, and at the other end there should be a connector for connecting to the camera. So, having connected the camera with this cord to the TV, using a yellow tulip, on the TV screen you should see an image that at the moment The camera shoots through the lens in real time. On the television receiver you need to select the appropriate input. To do this, you do not need to enable viewing of photos or video files on the camera.
If such a connection is possible, and you actually see the image in real time from the camera on the TV screen, then you can use such a device as a web camera. Just need to install necessary programs to the computer.
Connecting the camera
To organize the operation of the camera as a web camera You must have a video capture device on your computer ( Capture Video) . This device will transmit the video signal to the necessary programs.
Such a video capture device can be a TV tuner, video card or adapter. But at the input of such devices there must be a video input in the form of a “tulip” connector. We will connect the yellow tulip from the camera to it.

1) INSTALL DRIVERS AND PROGRAMS
Having installed necessary drivers, you will also need to install utility for redirecting video signal to the Internet(ManyCam, Active WebCam, SplitCam). After all, programs for ensuring the operation of video capture devices can save video recorded by the camera on hard drive, but they cannot broadcast this signal to the network. This is where you need a special utility to redirect the video stream.
2) CAMERA SETUP
For normal operation The camera needs to disable the shutdown function in the settings. Also, to save battery power, it is advisable to connect the camera to a power supply. Especially if you use constant focusing.
3) SWITCHING
After that, connect the camera to the computer using the yellow tulip A/V cable. Before this, you need to connect the tuner or adapter to the computer if they are external and located outside. All connections must be made with the equipment turned off.
In the window of the program that came with the video capture device, you should see video from the camera (you may have to set the input to composite).

4) SETTING UP THE UTILITY
After that open the utility window to redirect video recording and select the desired device as the signal source:
File > Video Source > Your video capture device.
Here you can also configure the video signal parameters, which can be useful if the Internet is slow and the image slows down.
5) SKYPE SETUP
After this you can open Skype or another video communication program and in the settings specify our utility as the video source:
Tools > Settings > Video Settings > Select Webcam.
Possible difficulties
When installing all drivers and programs, it is advisable to create a restore point on your computer. When working software When processing video, various difficulties and errors are possible. To protect your system, you should use the recovery capabilities in the OS.
If at Skype work the system freezes, then restart the computer. If this happens often, then it is advisable to reinstall all programs and drivers (used in this guide). If this does not help, then you can use another utility program to redirect the video signal. If there are only minor interferences, you can try turning off all programs and turning them on again.
The order in which programs are turned on does not need to be changed (first the utility that directs the video stream, and then Skype).
Advantages of using a camera as a webcam
- The sensitivity of the camera is greater than that of a conventional web camera, which allows you to transmit normal video in poor lighting conditions;
- You can adjust the white balance;
- The dynamic range is wider;
- There is a zoom.


