Setting up a local network connection in windows xp. Setting up a local network in Windows XP
Creating a local network at home is not a whim, but a necessity if you use two or more computers. The main task of such a network is to connect PCs and create the opportunity for the user to conveniently use the resources of each of them, rather than switch between computers. In this article we will look at how to set up a local network connection between computers.
For example, two devices will be used: a desktop computer based on Windows 7 and a laptop based on Windows 10. The list of instructions that will be in the article can also be used on other Windows operating systems (8, 8.1).
Methods for connecting computers over a local network
Today, you can connect via a local network through a router or directly. The first method is gaining popularity, and the second is already a relic of the past, although the time period has not passed that long. Let's look schematically at how the connection occurs.
First, let's look at the first scheme “directly”. It only works when the computers are connected to each other. Data transfer occurs only in one direction, i.e. either from the first PC to the second, or vice versa. At the same time, if one computer is connected to the Internet, then the second one can be configured to provide it, but this is already inconvenient, because routers appeared.
Desktop computers connect to the router, and mobile devices can receive data from the router or transmit it to it using a wireless network. Thus, you can, using a router (usually they come with a Wi-Fi access point), connect all the devices in the house into one network and use the Internet from one access point, without interfering with each other at all.
We will now configure the local network according to the “via router” principle, because it is more convenient, practical and modern, and also not very difficult even for a novice user. How to configure your router? Use the instructions from the manufacturer’s website; now they are written very clearly and accessible. Once you have configured the router, proceed to setting up the local network.
Please note that if you have been using the Internet via a modem for a long time, your desktop computer is connected to it, and the router is connected to the modem, you do not need to make any additional settings. It is only important that a laptop or other PC is connected to the router using a Wi-Fi wireless network. Let's start setting up the network.
Setting up a local network on a desktop computer (No. 1)
To start using the local network, you must follow the following instructions:
- Let's go "Start" - Control Panel - Network and Sharing Center";
- Next, on the left side of the screen select “Change advanced settings...”;

- In this window you need to check the boxes next to the following:
"Enable network discovery"
"Enable file and printer sharing"
"Enable sharing so network users can..."
"Use 128-bit encryption..."
"Enable password protected sharing"
"Allow Windows to manage homegroup connections"

- Click "Save changes"(it is important that you are logged in with “Administrator” rights);
- At this step, you need to join a home group, but we will create it on a laptop, so scroll through the article to the point, and then return here;
- When the password is received, you need to enter it in the required window. To do this, go to "Conductor" and then "Home Group";
- Click "Join", check the boxes next to all components for which shared access is provided and enter the password that was generated earlier (you should have written it down on a piece of paper);

- The password will be checked and the connection will begin. Here you need to wait until everything is configured as needed;

- When the joining is completed, you will receive a message as in the window below, and also, if you repeat step 6, you will see the message “This computer has joined a homegroup.”


Setting up a local network on a laptop (No. 2)
First of all, you need to do the same steps as on computer No. 1, namely steps 1-4. Since we have Windows 10, in order to enter the “Control Panel”, you need to enter “Search” and enter this request. After this, everything is done in the same way as with the first PC.
Now let’s move on to creating a “Home Group” and further setting up the network:
Now, to make sure that everything works as it should, we need to check the functionality of the local network we created, which we will now do in the next part of the article.
Network health check
The main task of a local network, as we have already said, is the sharing of resources. Most often, such resources are faxes, scanners, printers, etc., as well as the files themselves on different PCs. We will not check the operation of the printer from different PCs, but this function should definitely become available after the above conditions are met.
Let's check the health of the network using file transfer. To do this, let's create a shared folder on the laptop. Let's go to "Conductor", and then in "Net":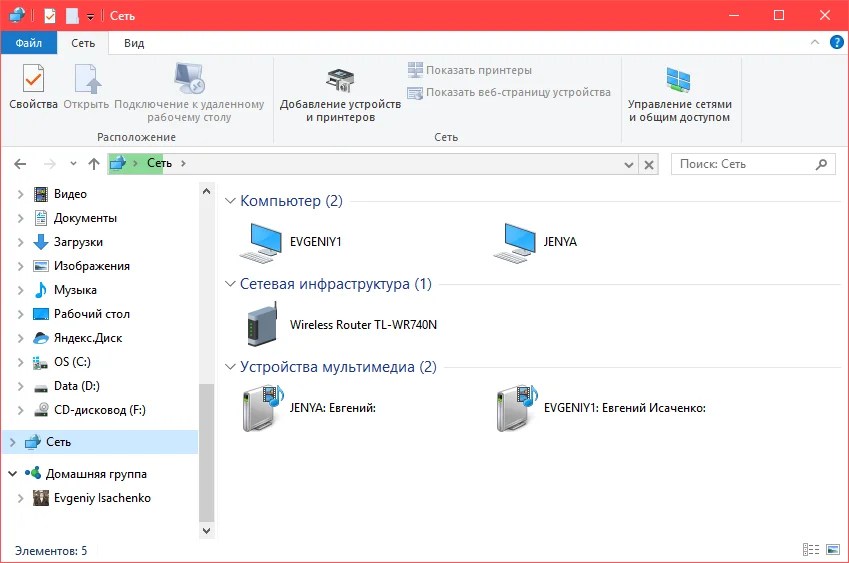
The computer named “Jenya” is our laptop, and the second computer “Evgeniy1” is a desktop computer. This verified that the computers are indeed on the same network. Now go to Local Drive D and select a folder for sharing, let it be, for example, “Notes”. Select it, press RMB, and then "Properties":
Therefore, you need to click "Access", and then "Sharing". In the list of users, select the one who logs into the system on computer No. 1 using such and such a login. After this, you will receive a message that the folder is open for public access: 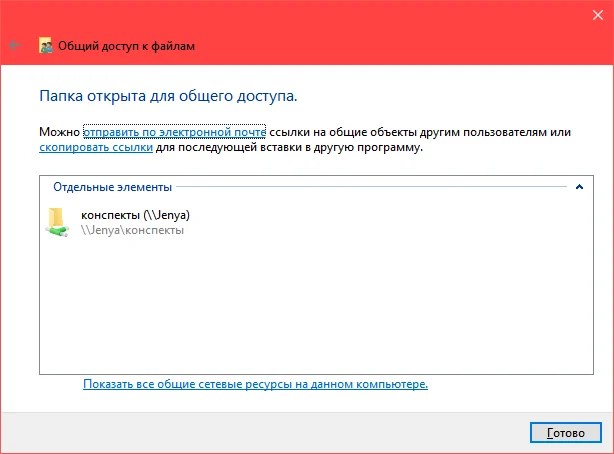
Now press again "Ready". On computer No. 1 we enter “My Computer” - “Network”, and then select our computer “Jenya”. Now our “Notes” folder has become available in the list of folders. It is important not to immediately go into this folder and check if everything has been transferred - you need to wait about a minute after you close the Properties window for the changes to take effect.
Windows 10 users sometimes experience error 651 and similar errors when connecting. These are called "Internet connection errors". This occurs due to a software or hardware network failure...
After concluding an agreement with an Internet provider and installing cables, we often have to figure out on our own how to connect to the network from Windows. To an inexperienced user this seems somewhat complicated. In fact, no special knowledge is required. Below we will talk in detail about how to connect a computer running Windows XP to the Internet.
If you find yourself in the situation described above, then most likely the connection parameters are not configured in the operating system. Many providers provide their own DNS servers, IP addresses and VPN tunnels, the details of which (address, username and password) must be specified in the settings. In addition, connections are not always created automatically; sometimes they have to be created manually.
Step 1: New Connection Wizard
- Opening "Control Panel" and switch the view to classic.

- Next we go to the section "Network Connections".

- Click on the menu item "File" and choose "New connection".

- In the New Connection Wizard start window, click "Next".

- Here we leave the item selected "Connect to the Internet".

- Then select manual connection. It is this method that allows you to enter data provided by the provider, such as username and password.

- Next, we again make a choice in favor of the connection that requests security data.

- Enter the name of the provider. You can write whatever you want here, there will be no mistakes. If you have several connections, then it is better to enter something meaningful.

- Next, we enter the data provided by the service provider.

- Create a shortcut for connecting on the desktop for ease of use and click "Ready".

Step 2: DNS Setup
By default, the OS is configured to automatically obtain IP and DNS addresses. If your Internet provider provides access to the World Wide Web through its servers, then you need to enter their data in the network settings. This information (addresses) can be found in the contract or found out by calling the support service.

Creating a VPN tunnel
VPN is a virtual private network that operates on the network-on-network principle. Data in a VPN is transmitted over an encrypted tunnel. As mentioned above, some providers provide Internet access through their VPN servers. Creating such a connection is a little different from the usual one.
- In the Wizard, instead of connecting to the Internet, select a network connection on the desktop.

- Next, switch to the parameter "Connect to a virtual private network".

- Then enter the name of the new connection.

- Since we connect directly to the provider's server, there is no need to dial the number. Select the option shown in the figure.

- In the next window, enter the data received from the provider. This can be either an IP address or a site name like “site.com”.

- As in the case of connecting to the Internet, check the box to create a shortcut and click "Ready".

- We enter the username and password, which will also be provided by the provider. You can configure the saving of data and disable the request for it.

- The final setting is to disable mandatory encryption. Let's go to properties.

- On the tab "Safety" uncheck the corresponding box.

Most often, you don’t need to configure anything else, but sometimes you still need to register the DNS server address for a given connection. We have already discussed how to do this earlier.
Conclusion
As you can see, there is nothing supernatural about setting up an Internet connection on Windows XP. The main thing here is to follow the instructions exactly and not make mistakes when entering data received from the provider. Of course, you first need to figure out how the connection occurs. If this is direct access, then you need IP and DNS addresses, and if it is a virtual private network, then the host address (VPN server) and, of course, in both cases, a username and password.
Setting up the Internet in Windows XP is not particularly difficult. This applies to both wired and wireless connections. In the first case, the parameters are set in the section "Network Connections", which is located in the Control Panel. In the second, everything is done with loading drivers if they are not initially in the system.
Connection setup
If the setup is for a wired connection, then you need to know certain network parameters. But this does not apply to the case when the computer is connected to a Wi-Fi router via a cable. Regarding the wireless network, things are different.
If the laptop has pre-installed Wi-Fi, then you just need to download the necessary drivers and connect to your home network. The procedure for a discrete adapter is similar. It's even easier for owners of 3G/4G modems: just download the necessary software, enter the SIM card PIN code, if required, and activate the connection.
Method 1: Direct Wired Connection
Open menu "Start" and click on "Control Panel". There, switch to the classic display view, if such an option is available. Expand the element "Network Connections".
Several devices can be displayed in the window. Find the one whose status is signed "Connected", and double-click on it. There select the item with the name "Internet Protocol"TCP/IP" and open its properties.  Check the checkboxes for manual input mode, and then specify your network settings. Button "OK" will be confirmation of your actions.
Note: the Internet may not work even with the correct parameters. This is because your connection is configured to a network device with a differentMAC address. In this case, you need to call the provider and describe the problem, technical support will fix everything within a few minutes.
Method 2: Wired connection via Wi-Fi router
Now let’s figure out how to connect the Internet with a cable via a router on Windows XP. In this case, no detailed configuration is required, since the device parameters are already set as required. All that remains is to connect it to your computer or laptop using an Ethernet cable.
Important: initially two cables are suitable for the router: one for power, the second for the Internet. There is no need to touch them. Connect the third one to one of the free numbered sockets, and then insert it into the network adapter on the computer.
When the physical connection is completed, all that remains is to configure the computer for correct operation. Most likely, even this will not be required; the Internet will start working immediately. If this does not happen, then follow these steps:

Close the settings window and go to any program that works with the Internet, for example, a browser. There you can check the connection status. If the instructions did not give any results, then there is a problem with the router settings.
Method 3: Wireless Network
Setting up Wi-Fi in Windows 7, as well as an external modem, differs from a wired connection. First you need to find and install drivers for the device. They are usually included in the package and are also available for download from the official website. The shortcut to enable 3G/4G is located on the desktop. Open it and then press the connect button.
The connected Wi-Fi will be displayed in the tray. Click on its icon, select your home network and enter the access code for it.
(.doc, 593 Kb)
As a rule, our engineers configure your computer accordingly when connecting. If for some reason this was not done (no computer at the time of connection, power outage in the apartment, etc.), then to access the Internet you will need to make a number of operating system settings, which are described in detail below.
To create a new connection to the Internet, you need to open the network connections management window (Start menu -> Control Panel or Start menu -> Settings -> Control Panel, then select Network connections in the Control Panel - Fig. 1 and Fig. 2).
Rice. 1. Start menu.

Rice. 2. Control panel.
In the window that opens, select File -> New connection... from the menu bar (Fig. 3). After this, the New Connection Wizard will launch.

Rice. 3. Create a new connection from the File menu.
If you use additional equipment (router) to connect to the Internet, then information about setting it up should be found in the documentation supplied with the device.
The procedure for further actions is indicated in the following figures.

Rice. 4. Create a new connection, step 1.

Rice. 5. Create a new connection, step 2.

Rice. 6. Create a new connection, step 3.

Rice. 7. Create a new connection, step 4.

Rice. 8. Create a new connection, step 5.
Enter the name of the connection in the “Service Provider Name” field (the name does not matter, for example, “Sunlink” or “Internet”)

Rice. 9. Create a new connection, step 6.
In the “Username” field, enter your login for connecting to the network (1, specified in the connection act), in the “Password” and “Confirmation” fields, enter your password for connection (2 and 3, respectively, the password is also indicated in the connection act ), then click the “Next” button (4).

Rice. 10. Creating a new connection, step 7.
Check the box next to “Add a connection shortcut to the desktop” (1), and then click the “Finish” button (2).
After closing the “New Connection Wizard”, the network connection window will open, shown in Fig. 12.
Clicking on the “Connection” button will lead to a connection to the Internet. If this is not required at the moment, you can click on the “Cancel” button or the window close button. How to activate the network connection in the future is described below.
2. Using an Internet connection.
Once a PPPoE connection has been configured on your computer, you can connect to the Internet at any time. If you checked the “Add a connection shortcut to the desktop” checkbox in the “New Connection Wizard” (Fig. 10), then to connect to the Internet just double-click on the connection shortcut on the desktop (Fig. 11) and in the window that opens, click on “Connect” button (Fig. 12).

Rice. 12. Connection window.
If the connection shortcut has not been added to the desktop, it can be found in the network connection management window (Fig. 13). How to open the connection management window itself was shown earlier in Fig. 1 and Fig. 2.

Rice. 13. Starting a connection from the Control Panel
If an Internet connection is not required, you can disconnect from the network at any time. To do this, right-click on the connection icon in the Windows taskbar (in the lower right corner of the screen, to the left of the clock, Fig. 14), and select “Disconnect” in the menu that appears (Fig. 15).

Rice. 14. Connection icon in the taskbar.

Rice. 15. Disabling the connection.
Despite the growing popularity of Windows 8 and Windows 10 optimized for mobile devices, the good old “xp” still enjoys the trust of users. Accordingly, the question “how to create a local network connection on Windows XP” is still relevant for lovers of simple and understandable “classics”. Therefore, here we will look at how to set up a local network between windows xp and windows xp when connecting computers via cable.
How to connect a local network on windows xp?
To set up a local network on Windows XP, you first need to connect the computers using a network cable.

connecting a network cable to a PC network card
A direct local network connection in Windows XP is created in the settings of each network computer.
The cornerstone of most self-created local networks is the incorrect connection of computers via twisted pair cable. Check that the cable is not “crushed” by the sofa or broken by the interior door, otherwise, or may occur.
How to set up a network connection in windows xp?
To create a local network connection:
1. On your Windows XP, go to the “Network Neighborhood” section;

2. On the left side of the menu, from the list of possible tasks, select the “Display network connections” sub-item.
 This will allow you to determine which networks are currently active or simply disabled.
3. Select the local network connection shortcut here, right-click on it and select the “Properties” menu item.

4. In the “General” tab at the end of the list there is a column “Internet Protocol TCP/IP” - double-click on this line to go to the menu for adjusting the IP address parameters.
Here enter the following parameters: 
If the local network connection shortcut is inactive, right-click on it and enable the network connection.
This completes the setup of the windows xp windows xp local network on the first computer.
5. On the second and subsequent computers (when creating a network connection via a switch), the network card is configured in the same way.

Please note that the IP address of each network computer must be unique. So, if you installed 192.168.1.1 on the first PC, then on the second you can enter, for example, 192.168.1.2.
The correctness of the Windows xp network connection settings can be checked using the Ping utility launched on the command line, as we described in the article: “”

This parameter is adjusted through the “Control Panel” in the “System” tab. Next, go to the “Computer name” column and set the desired value. Each computer must have a serial name: for example, comp 1, comp 2, comp 3, etc. Do not forget to title the name of the entire functioning working group - this will be required for the smooth exchange of information between functional units.


