Simple tips on how to make a folder invisible. Opening hidden folders and files
There may be a need to open hidden files and folders of the operating system, mainly to edit some important system documents.
To do this you need to know how to make visible hidden folders.
The fact is that in all modern versions of the OS Windows settings by default they assume the so-called “fool protection”.
This means that inexperienced user it simply does not see most of the important system partitions and cannot make potentially dangerous changes to them.
But on the other hand, some fine settings operating system may require editing these hidden files.
This article will provide detailed guide, which allows you to implement this procedure in Windows 7, Windows 8 and Windows 10, which are on at the moment occupy the lion's share of operating systems used in the commercial and private sector.
Secrets of the Windows 7 system partition
This version of the operating system from Microsoft has taken the palm of popularity from the legendary XP, support for which ended several years ago.
This success is primarily dictated user-friendly interface, which is easy to find necessary settings.
This also applies to the option to show hidden folders and files, which is most easily activated through the taskbar.
- First you need in a standard way get to the taskbar: open Start and select “Control Panel”.
- Then click on the link “Design and personalization”.
Advice! For convenience, you need to select a display method by category.

- In the variety that opens, we need the “Folder Options” category, or, more precisely, its “Show hidden files and folders” option, which speaks for itself.

- In the window that opens called “Folder Options”, expand the “View” tab and at the very bottom of the list of additional options we see the show/hide function special files. All that remains is to set the checkbox to the desired position.

You can get to the “Folder Options” window in Windows 7 in a simpler way: to do this, just open any directory and select “Folder and Search Options” from the “Arrange” drop-down menu.

Advice! If you decide to use this method, by default only hidden files in the current directory will be displayed. To apply this rule to all drives, you must activate the “Apply to folders” option.

Having dealt with the classics, you can move on to more modern systems.
We delve into the intricacies of Windows 8
This version of the operating system is significantly different from Windows 7, which at one time caused many complaints from users.
The changes also affected hidden directories: in Windows 8 there are two types of files and folders, not visible to the user.
The first is the actual hidden sections. This status is enjoyed not only system files and folders, but also components of various third party applications.
Moreover, the user himself can assign this type to any object on the disk.
However, this opportunity is often used by malware, which, for example, results in problems with files on a flash drive.
For these two types, the algorithm of actions will be different.
To open regular hidden files and folders you need to run next steps:
- First you need to open “Explorer”, for which you can use standard label in the "Taskbar".

- In the opened folder in top panel settings, click on the “View” menu and select the “Show and Hide” function. In the list that opens, you must activate the “Hidden elements” checkbox.
In the same way, you can assign hidden status to any selected file or folder.

In order to see particularly important system files, you need to make the following settings:
- In the same “View” menu, go to “Options” - “Change folder and search options.”

- As a result, the “Folder Options” settings window will appear, similar to that in Windows 7. Here you should go to the “View” tab and uncheck the “Hide” protected system files checkbox (recommended).

There is another way to get to this window:
- In Start, which in the eight has an unusual Metro interface, click on the gear icon (Computer Settings).

- In the menu that opens, you need to click on the lowest link to open the Control Panel, which is familiar to most users.

- In the “Taskbar”, first select the function display method Large (or small) icons, and then click on the “Folder Options” link, which will ultimately give access to the settings window of the same name.

It is also worth considering separately the algorithm for enabling the display of hidden and system elements for Windows 10, since, despite its similarity with eight, the settings of this OS have their own nuances.
How to make a hidden folder or file on your computer? Surely, many users have encountered the need to make a hidden folder or hide some file on their computer.
Sometimes you need to hide a folder or file by various reasons. To avoid accidentally deleting important folder or file, especially if other users have access to the computer. Also, a file or folder may be hidden due to sensitive data that is not intended for public viewing.
A situation may just happen when a folder or file needs to be urgently and quickly hidden from strangers, and run special programs you won't have time.
You can make a hidden folder using the operating system itself. You can also use programs specially designed for this; in addition, you can put a password on a folder or file, for example, using an archiver or.
Using operating room facilities Windows systems you can hide a folder or hide a file, and you can also create an invisible folder. Both methods work equally well in the operating systems Windows 10, Windows 8.1, Windows 8, Windows 7, Windows Vista, Windows XP.
How to hide a folder on your computer in Windows
In order to make a hidden folder, you first need to click right click mouse over a folder or file, and then to context menu select “Properties”. In the “Properties: folder name” window, in the “General” tab, in the “Attributes” section, you will need to check the box next to the “Hidden” item, and then click on the “OK” button.
In order to hide a file, you need to do the same.

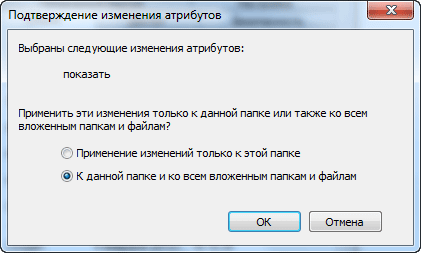
Next, the “Confirm attribute changes” window opens. In this window, you will need to select one of the options: “Apply changes only to this folder”, or “To this folder and all subfolders and files”, and then click on the “OK” button.
- “Confirm changes to this folder only” - only this folder will be hidden.
- “To this folder and to all subfolders and files” - not only this folder will be hidden, but its subfolders and files will also be hidden.
By default, the item “To this folder and to all subfolders and files” is activated. In any case, this folder will be hidden and the folders and files in it will not be visible.
After this, the folder or file will become hidden and disappear from view.
How to see hidden folders in Windows
In order to show hidden folders or files in Windows, you need to enable operating system display hidden folders and files. This can be done from the Control Panel or from any folder. In the folder, you will need to click on the menu button “Arrange” => “Folder and Search Options”.
After this, the “Folder Options” window will open, in which you will need to open the “View” tab, and in the “ Additional options» activate the item “Show hidden files, folders and drives”. Then click on the “OK” or “Apply” => “OK” button.

After this, you can see the hidden folders again.
How to make hidden folders visible
After showing hidden folders and files has been enabled on your computer, you can open hidden folders and files to make them visible again.
In order to display hidden folders, you will need to right-click on the hidden file or hidden folder. Such hidden folders or hidden files will appear semi-transparent.
In the “Properties” window, in the “General” tab, you will need to uncheck the box next to “Hidden”, and then click on the “OK” button.

If it was a hidden folder, then in the next window you will need to click on the “OK” button.
Attention! After you finish operations with hidden folders or files, do not forget to re-enable the “Do not show hidden folders, files and drives” option.
How to create an invisible folder
First you will need to create new folder, or use an existing one. Move the folder that you will make invisible from the center to the edge of the monitor screen so that it is not in the working part of the monitor.
In order to make a folder invisible, you need to right-click on it, and then click on the “Rename” context menu item. On your keyboard, press and hold the Alt key, and number pad Enter the numbers “255” one by one. After this, on the “Desktop” you will see a folder without a name. This folder is not hidden yet.
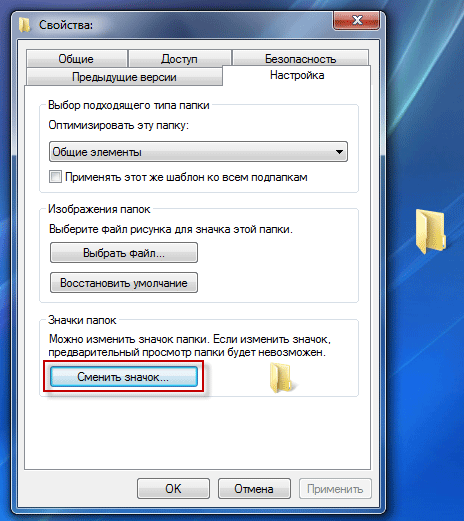
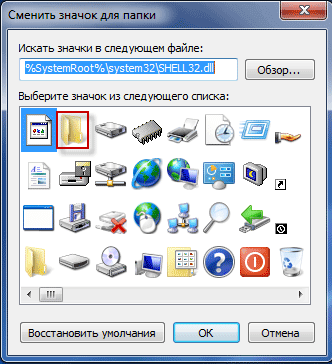
Then the Properties window opens. In this window, in the “Settings” tab, you need to click on the “Change icon...” button.
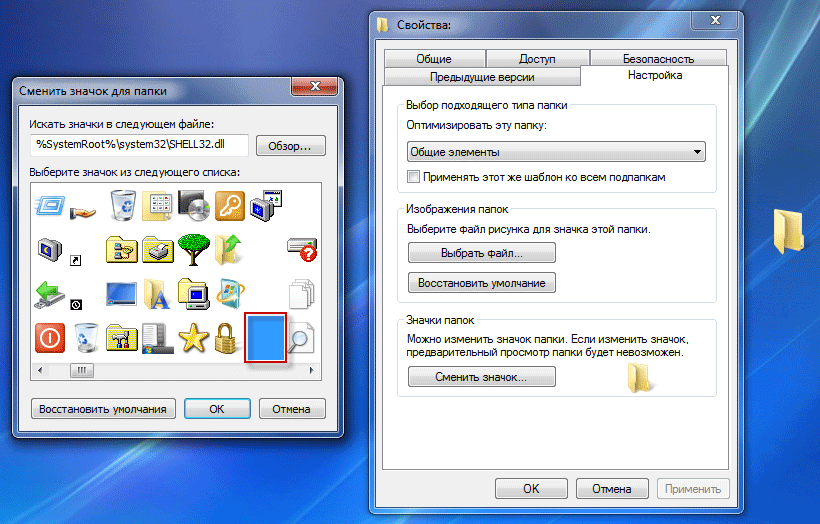
In the “Change folder icon” window that opens, in the “Select an icon from the following list” field you will need to find free space with transparent icons, and then click on such a transparent icon. After that, click on the “OK” button in both windows.
The folder disappears from the “Desktop”, this folder has become invisible.
This method has disadvantages. Such an invisible folder will be noticeable when you drag another folder or file over this location, or when highlighting this part of the monitor screen.

The invisible folder can also be seen using Explorer. Open the Desktop folder in Explorer. In this folder you will see a folder with transparent icon, which you can open to view the contents of an invisible folder.

How to make an invisible folder a hidden folder
To ensure that an invisible folder is not visible when you hover the mouse over an area of the screen, or in a folder in Explorer, an invisible folder can be made hidden. As a result, the hidden folder will have additional protection from detection.
- Move your mouse cursor to the location of the invisible folder and right-click.
- Select "Properties" from the context menu.
- In the “Properties: folder name” window, in the “General” tab, in the “Attributes” section, check the box next to “Hidden”, and then click on the “OK” button.
An invisible folder will become hidden and will not be highlighted when you hover your mouse over the folder's location on the Desktop.
How to make an invisible folder visible
In the place where the invisible folder is located, right-click on the invisible folder. After this, a context menu will open. In the context menu, click on the “Properties” item.
In the "Properties" window, open the "Settings" tab, and then click on the "Change icon..." button. In the “Change Folder Icon” window, select the folder icon, and then click the “OK” button in both windows.
After this, the invisible folder becomes visible, only it does not yet have a name.
To give a name to a folder, right-click on the folder and select “Rename” from the context menu. Then give this folder a new name.
Conclusions of the article
In the Windows operating system, you can quickly make a hidden folder, as well as create an invisible folder that will disappear from view. Using a hidden or invisible folder, the user can hide data that is not intended for public viewing.
How to make a hidden folder in Windows (video)
Sometimes you need to hide important or confidential information from prying eyes. Moreover, you need to not just set a password for a folder or file, but make them completely invisible. This need also arises if the user wants to hide system files. So, let's figure out how to make a file or folder non-displayable.
All methods of hiding files and folders on a PC can be divided into two groups, depending on what will be used: third-party software or internal capabilities of the operating system. It should also be noted that before using many of these methods, you should check that the ability to use the hide attribute is configured in the OS itself. If the application of invisibility is disabled, then you should change the settings in the folder options at the global level. How to do this? is covered in a separate article. We'll talk about how to make a specific directory or file invisible.

Method 1: Total Commander
First of all, let's consider the option of using a third-party program, namely the popular file manager.

If showing hidden elements in Total Commander is disabled, then objects will become invisible even through the interface of this file manager.
But, in any case, through Windows Explorer Objects hidden in this way should not be visible if the settings in the folder parameters are set correctly.
Method 2: Object Properties
Now let's see how to hide an element through the properties window using the built-in operating system tools. First, let's look at hiding a folder.


Now let's see how to make it hidden separate file through the properties window, applying for the specified purposes standard tools OS. In general, the algorithm of actions is very similar to the one that was used to hide folders, but with some nuances.


Method 3: Free Hide Folder
But, as you might guess, by changing attributes it is not difficult to make an object hidden, but it is just as easy to display it again if desired. Moreover, they can do this freely even outside users who know the basics of working on a PC. If you need to not only hide objects from prying eyes, but also make sure that even a targeted search for an intruder does not produce results, then in this case a free specialized Free app Hide Folder. This program can not only make selected objects invisible, but also protect the hidden attribute from changes with a password.
- After launching the installation file, a welcome window opens. Click "Next".
- In the next window you need to specify which directory hard drive the application will be installed. By default this is a directory "Programs" on disk C. It’s better not to change unless absolutely necessary specified location. So click "Next".
- In the program group selection window that opens, click again "Next".
- In the next window, the Free Hide Folder installation procedure starts directly. Click "Next".
- The application installation process is in progress. After completion, a window appears indicating the successful completion of the procedure. If you want the program to be launched immediately, make sure that next to the parameter "Launch Free Hide Folder" there was a flag. Click "Finish".
- A window opens « Set Password» , where needed in both fields ( "New Password" And "Confirm Password") specify the same password twice, which in the future will serve to activate the application, and therefore to access hidden elements. The password can be arbitrary, but preferably as strong as possible. To do this, when compiling it, you should use letters in different registers and numbers. Under no circumstances use your name, the names of close relatives, or dates of birth as a password. At the same time, you need to make sure that you don't forget the code expression. After entering the password twice, press "OK".
- A window opens "Registration". You can enter here registration code. Don't let this scare you. Specified condition not necessary. So just click "Skip".
- Only after this does the main Free Hide Folder window open. To hide an object on your hard drive, click "Add".
- A window opens "Browse folders". Move to the directory where the element you want to hide is located, select this object and press "OK".
- After this it opens information window, which informs you about the desirability of creating a backup copy of the protected directory. This is a matter for each user individually, although, of course, it is better to be on the safe side. Click "OK".
- The address of the selected object will be displayed in the program window. Now it's hidden. This is evidenced by the status "Hide". At the same time, it is also hidden for search engine Windows. That is, if an attacker tries to find the directory through a search, he will not succeed. In the same way, you can add links to other elements that need to be made invisible to the program window.
- To produce backup, which has already been discussed above, you need to mark the object and click on "Backup".

A window will open "Export Hide Folder Data". It requires you to specify the directory in which it will be located. backup as an element with the FNF extension. In the field "File name" enter the name you want to assign to it, and then press "Save".
- To make an object visible again, select it and click "Unhide" on the toolbar.
- As we can see, after this action the object attribute was changed to "Show". This means that it has now become visible again.
- It can be hidden again at any time. To do this, mark the element's address and click active button "Hide".
- The object can be completely removed from the application window. To do this, mark it and click on "Remove".
- A window will open asking if you really want to remove the item from the list. If you are confident in your actions, then click "Yes". After deleting an element, no matter what status the object has, it will automatically become visible. At the same time, in order to hide it again if necessary Help Free Hide Folder, you will have to add the path again using the button "Add".
- If you want to change the password to access the application, then click on the button "Password". After that, in the windows that open, enter the current password sequentially, and then twice the code expression to which you want to change it.


Of course, using Free Hide Folder is a more reliable way to hide folders than using standard options or Total Commander, since changing the invisibility attributes requires knowing the password, user installed. When trying to make an element visible in the standard way through the properties window, the attribute "Hidden" will simply be inactive, which means that changing it will be impossible.

Method 4: Using the Command Line
You can also hide elements in Windows 7 using command line (cmd). Specified method, like the previous one, does not make it possible to make an object visible in the properties window, but, unlike it, it is performed exclusively by built-in Windows tools.

But, as we remember, if you need to make the directory visible again, in the usual way This cannot be done through the properties window. Visibility can be restored using the command line. To do this, you just need to enter almost the same expression as for making invisibility, but only in front of the attributes instead of the sign «+» put «-» . In our case we get the following expression:
attrib -h -s "D:\New folder (2)\New folder"

After entering the expression, do not forget to click Enter, after which the directory will become visible again.
Method 5: Changing the Icon
Another option to make a directory invisible involves achieving this goal by creating a transparent icon for it.


This method is good because when using it you don’t need to bother with attributes. And, besides, most users, if they try to find on your computer hidden elements, they are unlikely to think that exactly this method was used to make them invisible.
As you can see, in Windows 7 there are many options for making objects invisible. They are feasible both by using internal OS tools and by using third party programs. Most methods offer to hide objects by changing their attributes. But there is also a less common option that simply makes the directory transparent without changing the attributes. The choice of a specific method depends on the convenience of the user, as well as on whether he simply wants to hide materials from casual eyes, or wants to protect them from the targeted actions of intruders.
How to make a hidden folder on your computer?
In this article we will look at how to make a hidden folder (directory).
There is a need for this for reasons of confidentiality, that is, we do not want, for example, colleagues to see the catalog we need or separate document(we also recommend that you read the article keylogger. This way you will know how attackers can steal from you important information, including passwords).
We will hide it without any software. We will do this in the Windows 7 operating system.
By making a hidden folder, we create the simplest method of protection, which, in general, does not protect against, for example, someone spying on where it is located.
In this case, an outside observer can find it, although it is hidden, the path to it is already known. Therefore, if you decide to make a hidden directory, make sure that there is no one else in the room.

If you still need reliable protection, then in this article you can read how to put a password on a folder. So, let's get started. First, we need to come up with a name for our directory, in our case it will be trash1.
That is, we try not to give away its important content in the title. Important tip, move the folder we need to several others, so we will make it even more inaccessible. For example, you can place it in a catalog with various sundries or videos.
Now let's hide it. This is quite simple to do, you need to right-click on the directory we need (the one that needs to be made invisible) and select “Properties” there:

In the window that opens, at the bottom we see the “hidden” item we need and an empty square for placing a bird next to it.

The hidden directory is ready, it should disappear. Next you should find out how hidden documents make visible when we need.
Let's do it here, right away in Explorer. At the top left we find the “Arrange” item, click on it. In the menu that appears, go to “Folder and Search Options”. This takes us to the directory settings menu.
Go to the “View” tab. Here we skip to the very end. There we see the line “Show hidden files...”. Here we select it, then “Apply”, “OK”.
That's it, that's it now invisible folders made visible on the computer.
That's basically it. Although, if you use the “Total Commander” program, then this process is generally simplified to one click on special badge“Open/hide elements.”
This button is not available in all versions of Total Commander.
Although, of course, this program both simplifies the process of hiding/opening a directory or file for you, and simplifies it for strangers.
Therefore, it may still be worthwhile to deal with the first, main method. So, there is a possibility that not all curious people know how to make hidden documents visible.
If you don’t quite understand the first method, then here’s another one on how to make invisible folders visible.
To do this, we need to follow this path: Start - Control Panel - Appearance and Personalization - Folder Options. Next, “View” and scroll down until you see the item “Show hidden files...”.
In this way, we got there, only in a different, more standard way, which can also make hidden folders visible in Windows XP.
With these simple operations we can make the files or entire directories we need, both hidden and visible.
To do this, you just need to follow a few easy steps.
More can be said. Knowing how to make folders hidden well and quickly, you can use this and find such hidden directories of other users. Of course, you should not commit illegal actions.
It is best to use the acquired knowledge only to protect your files.
We also recommend that you read the article on how to put a password on a folder. After all, knowing how to properly protect information, you can be more confident about your important files. Also, protecting information will help save time and money on these services from special specialists.
That's all, we looked at the question of how to make a hidden folder, thanks for your attention. You can ask your questions in the comments below.
What is a hidden file? It is different from simple file because its display is not visible on the computer. All data is saved in its original form, only the file icons no longer appear. In the computer settings, you can change the display parameters, and hidden objects will differ from ordinary objects in greater transparency. IN Windows can also create a hidden folder.
How to create a hidden folder in Windows operating system
- You need to create a new folder or take one of the existing files;
- Right-click to open a dialog box and select the line “Properties”;
- In the folder settings that open, check the box next to the “Hidden” option.
That's it, now regular Windows folder turned into a hidden. If you need to get reverse effect, that is, make the hidden folder visible again, then all instructions should be repeated in reverse order. If, after turning a simple folder into a hidden folder, it does not disappear, then this means that the special settings, allowing you to see both visible and invisible files.
For change display settings hidden objects Windows you need to perform a number of actions:
- Through the "Start" menu, go to " Control Panel» Windows;
- In the window that opens, find the tab “ Design and personalization", double-click on it;
- In the dialog box, find an item where you can see whether a particular folder is hidden or not. Then select the desired option: “ Show hidden files and folders" or " Don't show hidden files and folders».
All that remains is to accept the changes made using the “OK” or “Apply” buttons.
Why do users need to resort to hiding any data?
Oddly enough, the function hiding files is not intended to prevent others from accessing them. Store important information (documents, projects, photos and videos, etc.) in hidden Winodws folders almost meaningless, because invisible files can always be found through search and thus discovered. As a rule, they are used to protect information from unknowing users so that they cannot inadvertently delete any important information. Inexperienced people will find it difficult to find hidden files without knowing where the file is stored and its parameters. Moreover, not everyone knows how to properly configure settings for hidden files and folders. If the user wants to protect his data from strangers, then he should resort to other methods of protection, for example, archiving.


